This article will cover building a markdown editor application written in Django and running it in the much talked about and discussed Docker. Docker takes all the great aspects of a traditional virtual machine, e.g. a self-contained system isolated from your development machine and removes many of the drawbacks such as system resource drain, setup time, and maintenance.
When building web applications, you have probably reached a point where you want to run your application in a fashion that is closer to your production environment. Docker allows you to set up your application runtime in such a way that it runs in exactly the same manner as it will in production, on the same operating system, with the same environment variables, and any other configuration and setup you require.
By the end of the article you’ll be able to:
- Understand what Docker is and how it is used,
- Build a simple Python Django application, and
- Create a simple
Dockerfileto build a container running a Django web application server. - Setup a Continuous Integration and Delivery (CI/CD) pipelines to build and test the Docker image automatically
What is Docker, Anyway?
Docker’s homepage describes Docker as follows:
“Docker is an open platform for building, shipping and running distributed applications. It gives programmers, development teams, and operations engineers the common toolbox they need to take advantage of the distributed and networked nature of modern applications.”
Put simply, Docker gives you the ability to run your applications within a controlled environment, known as a container, built according to the instructions you define. A container leverages your machine’s resources much like a traditional virtual machine (VM). However, containers differ greatly from traditional virtual machines in terms of system resources. Traditional virtual machines operate using Hypervisors, which manage the virtualization of the underlying hardware to the VM. This means they are large in terms of system requirements.
- Docker doesn’t require the often time-consuming process of installing an entire OS to a virtual machine such as VirtualBox or VMWare.
- You create a container with a few commands and then execute your applications on it via the Dockerfile.
- Docker manages the majority of the operating system virtualization for you, so you can get on with writing applications and shipping them as you require in the container you have built.
- Dockerfiles can be shared for others to build containers and extend the instructions within them by basing their container image on top of an existing one.
- The containers are also highly portable and will run in the same manner regardless of the host OS they are executed on. Portability is a massive plus side of Docker.
Prerequisites
Before you begin this tutorial, ensure the following is installed to your system:
Setting Up a Django web application
Let’s jump directly to the application that we’ll dockerize. We’ll start from the Martor project, which implements a live markdown editor for Django:
- Go to the django-martor-editor repository. And Fork it.
- Clone the repository to your local machine.
Let’s take a look at the project structure, I’ve omitted some files and folders we won’t be visiting today:
.
├── requirements.txt    # < Python module list
└── martor_demo         # < Django Project root
    ├── app             # < App code
    │   ├── admin.py
    │   ├── apps.py
    │   ├── forms.py
    │   ├── migrations
    │   ├── models.py
    │   ├── templates
    │   ├── urls.py
    │   └── views.py
    ├── manage.py      # < Django management tool
    └── martor_demo    # < Django main settings
        ├── settings.py
        ├── urls.py
        └── wsgi.py
You can read more about the structure of Django on the official website. You control the application for development purposes using the manage.py script.
Before we can run it though, we’ll need to download and all the dependencies.
First, create a Python virtual environment:
$ python -m venv venv
$ echo venv/ >> .gitignore
$ source venv/bin/activate
Next, add some of the Python modules we’ll need:
- Gunicorn: gunicorn is an HTTP server. We’ll use it to serve the application inside the Docker container.
- Martor: Martor is Markdown plugin for Django
$ echo martor >> requirements.txt
$ echo gunicorn >> requirements.txt
Install all the modules using:
$ pip install -r requirements.txtPush the change to GitHub:
$ git add .gitignore requirements.txt
$ git commit -m "added martor and gunicorn"
$ git push origin master
And start the development server, you can visit your application at http://127.0.0.1:8000:
$ cd martor_demo
$ python manage.py runserver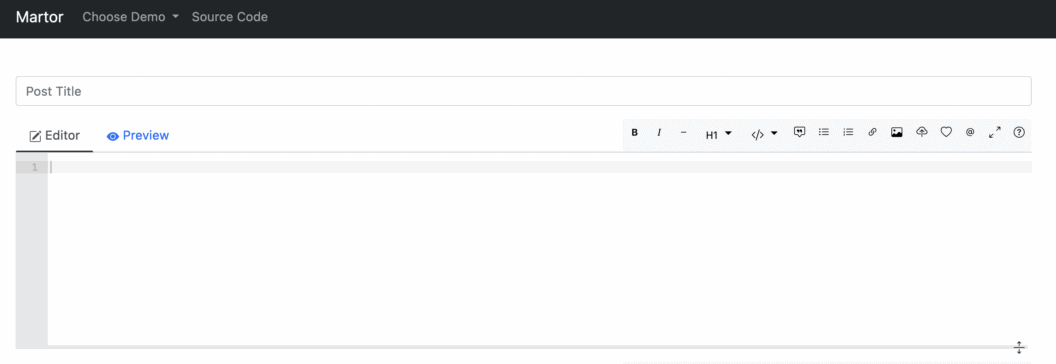
If you check the output of the previous command, you’ll see this message:
You have 18 unapplied migration(s). Your project may not work properly until you apply the migrations for app(s): admin, auth, contenttypes, sessions.
Run 'python manage.py migrate' to apply them.
Django prints this warning because it has detected that the database has not been initialized.
To initialize a local test database and get rid of the message run:
$ python manage.py makemigrations
$ python manage.py migrate
Testing in Django
In this section, let’s add some tests to the application. Tests are our first line of defense against bugs.
Django uses the standard Unittest library, so we can get on writing tests right away.
Create a file called app/testPosts.py:
# app/testPosts.py

from django.test import TestCase
from app.models import Post


class PostTestCase(TestCase):
    def testPost(self):
        post = Post(title="My Title", description="Blurb", wiki="Post Body")
        self.assertEqual(post.title, "My Title")
        self.assertEqual(post.description, "Blurb")
        self.assertEqual(post.wiki, "Post Body")
The code is illustrative of a normal unit test:
- Import the
Postmodel from the application. - Create a
postobject with some initial values. - Check that the values match expectations.
To run the test case:
$ python manage.py test
Creating test database for alias 'default'...
System check identified no issues (0 silenced).
.
----------------------------------------------------------------------
Ran 1 test in 0.001s

OK
Destroying test database for alias 'default'...
Another tests that Django supplies are the deployment checklists. These are scripts that check for potentially dangerous security settings.
To run the checklist:
$ python manage.py check --deployYou’ll likely see some warnings. For demo-ing, we can live with the warnings. Once you go to production, you might want to take a closer look at the messages and what they mean.
Static vs Dynamic Files
We just need to make one modification before we can continue. Django has the concept of static files. These are files without any Python code, they are usually images, CSS stylesheets, or JavaScript.
The distinction between static and dynamic is important once we release to production. Dynamic files have code that must be evaluated on each request, so they are expensive to run. Static files don’t need any execution, they don’t need a lot of resources to be served and can be cached with proxies and CDNs.
Django collects all static files in one directory with this command:
$ python manage.py collectstaticStyle checker
The final test we’ll do is a style check. Python has strict forms that can be validated using Flake8, a static analysis tool.
Install and run the tool to check there are no style errors in the project:
$ pip install flake8
$ flake8 . --max-line-length=127
Continuous Integration
Before proceeding, push all modifications to GitHub:
$ git add martor_demo/settings.py app/testPosts.py
$ git add static
$ git commit -m "add unit test and static files"
$ git push origin master
With an initial application and some tests in place, it’s time to focus on using Continuous Integration (CI) to build and test the code in a clean, reproducible environment.
Setting up a CI/CD pipeline in Semaphore takes only a few minutes, once it’s in place it, Semaphore will run the tests for you on every update and, if there are no bugs, build the Docker image automatically.
- Visit Semaphore and sign up for a free account using the Sign up with GitHub button.
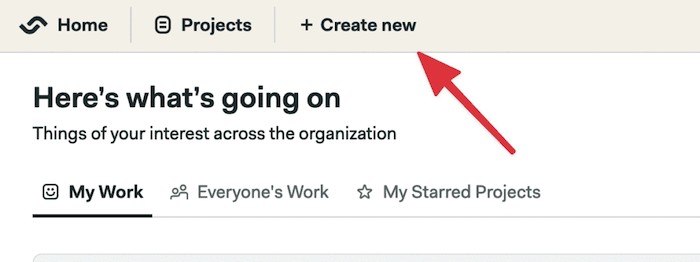
- Click on + Create new to add your Git repository to Semaphore:
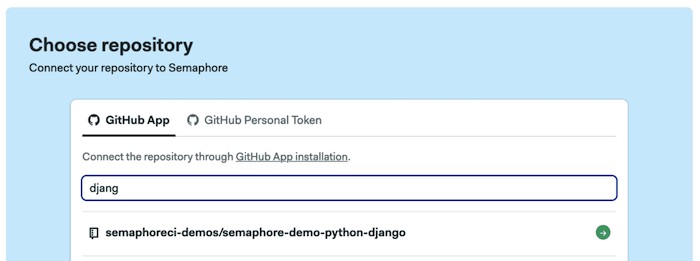
- Click on Choose next to your repository:
- Click on Continue to workflow setup.
- Select the single job templante and click on Customize it first
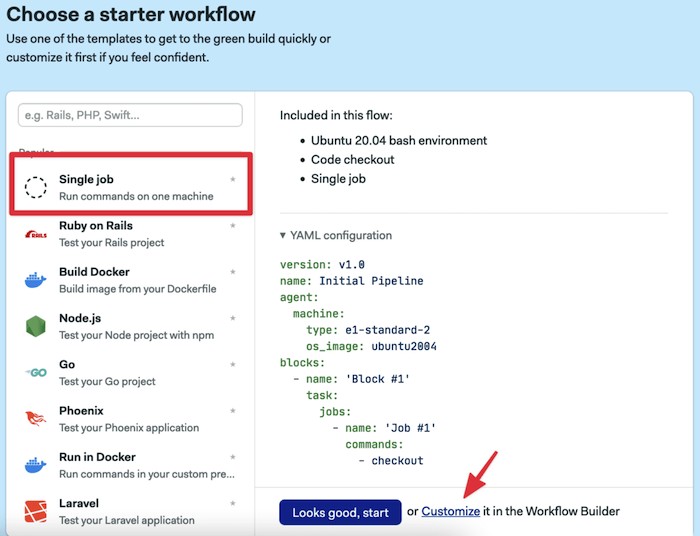
This will open the Workflow Builder:
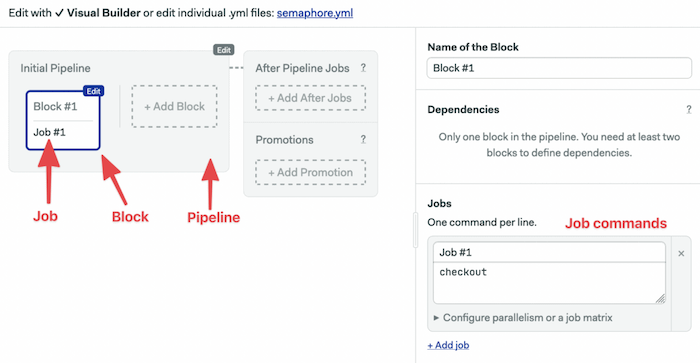
The main elements of the builder are:
- Pipeline: a pipeline is made of blocks that are executed from left to right. Pipelines usually have a specific goal such as building and testing code.
- Block: blocks group jobs that can be executed in parallel. Jobs in a block usually have similar commands and configurations. Once all job in a block complete, the next block begins.
- Job: jobs define the commands that do the work. They inherit their configuration from the parent block.
- Promotions: We can define multiple pipelines and connect them with promotions to get complex multi-stage workflows.
The first block has to download the Python modules and build the project:
- Click on the first block and set its name to “Build”
- On the job commands block type the following:
sem-version python 3.11
checkout
mkdir .pip_cache
cache restore
pip install --cache-dir .pip_cache -r requirements.txt
cache store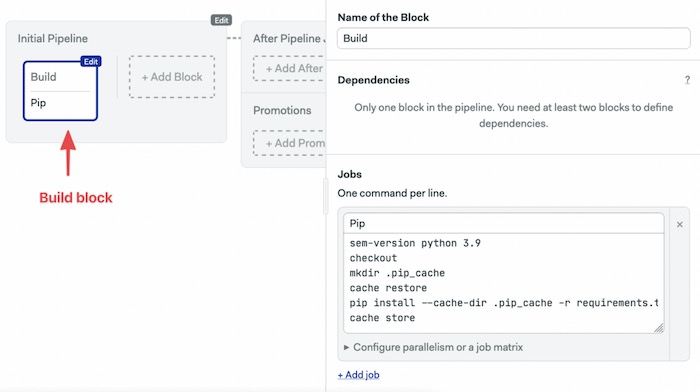
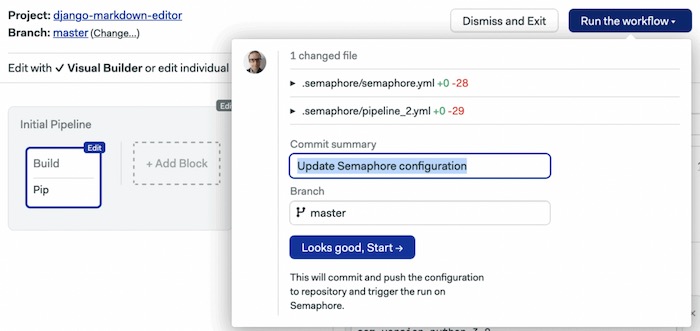
- Click on Run the Workflow.
- Set the branch to master.
- Click on Start.
We have three commands in Semaphore’s built-in toolbox:
- sem-version activates a specific version of one of the supported languages. In the case of Python, it also setups a virtual environment.
- checkout uses git to clone correct code revision.
- cache stores and restores files in the project-wide cache. Cache can figure out which files and directories it needs to keep. We can use it to avoid having to download Python packages each time.
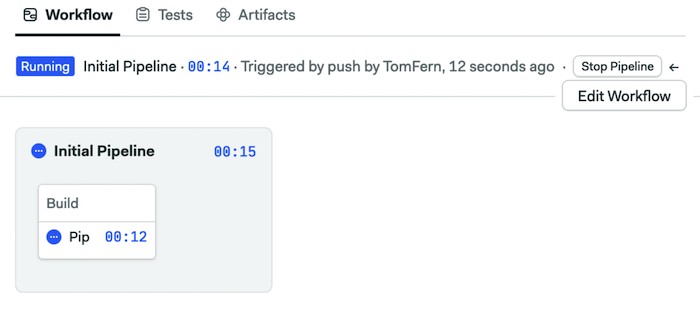
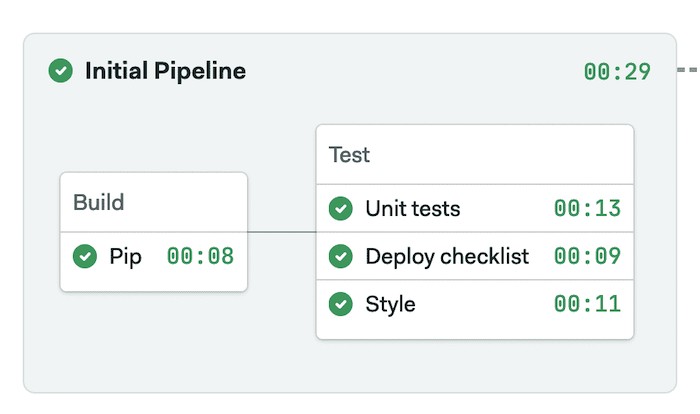
The initial CI pipeline will start immediately, a few seconds later it should complete without error:
Add a second block to run the tests:
- Click on Edit Workflow.
- Click on + Add Block.
- Set the name of the block to “Test”.
- Open the Prologue section, type the following commands. The prologue is executed before each job in the block:
sem-version python 3.11
checkout
cache restore
pip install --cache-dir .pip_cache -r requirements.txt
cd martor_demo
python manage.py makemigrations
python manage.py migrate
python manage.py test- Add a second job called “Checklist” and add the following commands:
cd martor_demo
python manage.py check --deploy- This is a good place to add some style checking. Add a third job called “Style check” with the following commands. We’re using flake8 to check the style of the code:
pip install flake8
flake8 martor_demo/ --max-line-length=127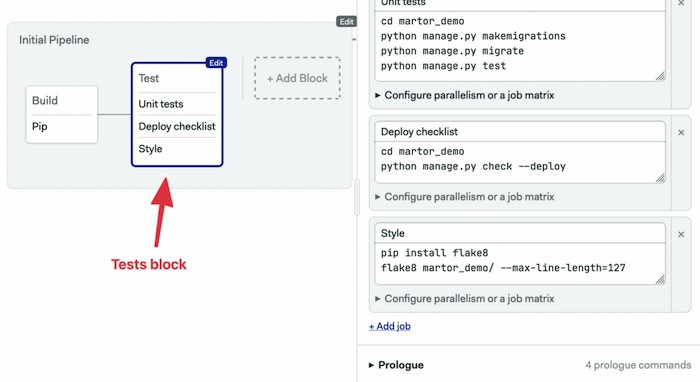
- Click on Run the Workflow and Start:
Dockerizing the Application
You now have a simple web application that is ready to be deployed. So far, you have been using the built-in development web server that Django ships with.
It’s time to set up the project to run the application in Docker using a more robust web server that is built to handle production levels of traffic:
- Gunicorn: Gunicorn is an HTTP server for Python. This web server is robust and built to handle production levels of traffic, whereas the included development server of Django is more for testing purposes on your local machine only. It will handle all dynamic files.
- Ngnix: is a general-purpose HTTP server, we’ll use it as a reverse proxy to serve static files.
On a regular server, setting the application would be hard work; we would need to install and configure Python and Ngnix, then open the appropriate ports in the firewall. Docker saves us all this work by creating a single image with all the files and services configured and ready to use. The image we’ll create can run on any system running Docker.
Installing Docker
One of the key goals of Docker is portability, and as such is able to be installed on a wide variety of operating systems.
On Windows and OSX install Docker Desktop.
For Linux, Docker is almost universally found in all major distributions.
Building and Running the Container
Building the container is very straight forward once you have Docker on your system. The following command will look for your Dockerfile and download all the necessary layers required to get your container image running. Afterward, it will run the instructions in the Dockerfile and leave you with a container that is ready to start.
The project already comes with a functional Dockerfile. To build your container, you will use the docker build command and provide a tag or a name for the container, so you can reference it later when you want to run it. The final part of the command tells Docker which directory to build from.
$ docker build -t django-markdown-editor .In the output, you can see Docker processing each one of your commands before outputting that the build of the container is complete. It will give you a unique ID for the container, which can also be used in commands alongside the tag.
The final step is to run the container you have just built using Docker:
$ docker run -it -p 8000:8000 \
     -e DJANGO_SUPERUSER_USERNAME=admin \
     -e DJANGO_SUPERUSER_PASSWORD=sekret1 \
     -e DJANGO_SUPERUSER_EMAIL=admin@example.com \
     django-markdown-editor

Superuser created successfully.
[2022-05-04 17:49:43 +0000] [11] [INFO] Starting gunicorn 20.1.0
[2022-05-04 17:49:43 +0000] [11] [INFO] Listening at: http://0.0.0.0:8010 (11)
[2022-05-04 17:49:43 +0000] [11] [INFO] Using worker: sync
[2022-05-04 17:49:43 +0000] [16] [INFO] Booting worker with pid: 16
[2022-05-04 17:49:43 +0000] [17] [INFO] Booting worker with pid: 17
[2022-05-04 17:49:43 +0000] [18] [INFO] Booting worker with pid: 18
The command tells Docker to run the container and forward the exposed port 8020 to port 8020 on your local machine. With -e we set environment variables that automatically create an admin user.
After you run this command, you should be able to visit http://localhost:8020 and http://localhost:8020/admin in your browser to access the application.
Continuous Deployment
After manually verifying that the application is behaving as expected in Docker, the next step is the deployment.
We’ll extend our CI Pipeline with a new one that runs the build commands and uploads the image to Docker Hub.
You’ll need a Docker Hub login to continue:
- Head to Docker Hub.
- Use the Get Started button to register.
- Go back to your Semaphore account.
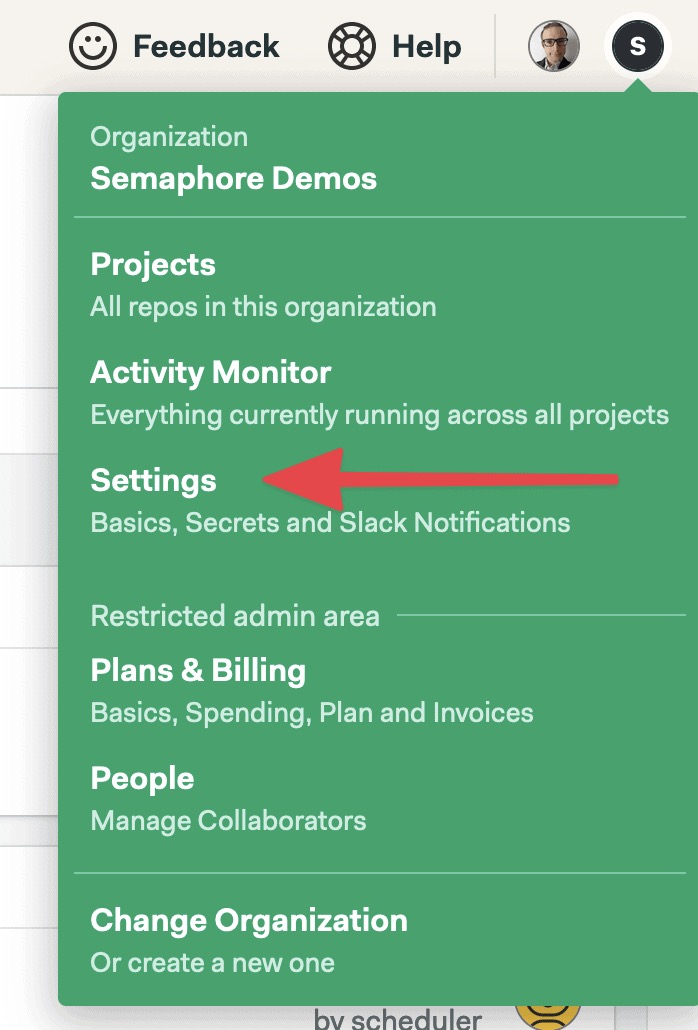
- On the left navigation menu, click on Secrets under Configuration:
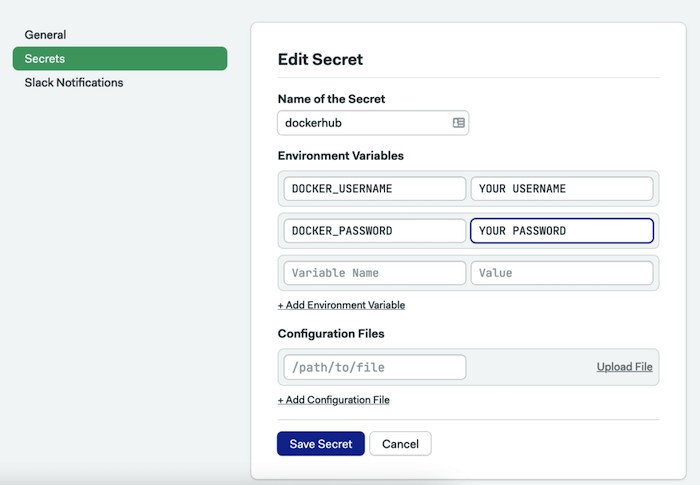
- Click on Create New Secret.
- Create a secret called “dockerhub” with the username and password of your Docker Hub account:
- Click on Save Secret.
Semaphore secrets store your credentials and other sensitive data outside your GitHub repository and makes them available as environment variables in your jobs when activated.
Dockerize Pipeline
- Open the CI pipeline on Semaphore and click on Edit Workflow again.
- Use the + Add First Promotion dotted button to create a new pipeline connected to the main one.
- Call the new pipeline: “Dockerize”
- Ensure the option Enable automatic promotion is checked so the new pipeline can start automatically.
- Click on the first block on the new pipeline. Set its name to “Docker build”.
- Open the Prologue and type the following commands. The prologue restores the packages from the cache and prepares the database:
sem-version python 3.11
checkout
cache restore
mkdir -p .pip_cache
pip install --cache-dir .pip_cache -r requirements.txt
cd martor_demo
python manage.py makemigrations
python manage.py migrate
cd ..- In the job command box type the following commands. The job pulls the latest image (if exists), builds a newer version, and pushes it to Docker Hub. The
--cache-fromoption tells Docker to try to reuse an older image to speed up the process:
echo "${DOCKER_PASSWORD}" | docker login -u "${DOCKER_USERNAME}" --password-stdin
docker pull $DOCKER_USERNAME/django-markdown-editor:latest || true
docker build --cache-from=$DOCKER_USERNAME/django-markdown-editor:latest -t $DOCKER_USERNAME/django-markdown-editor:latest .
docker push $DOCKER_USERNAME/django-markdown-editor:latest- In the Secrets section, check the dockerhub secret
- Click on Run the workflow and Start.
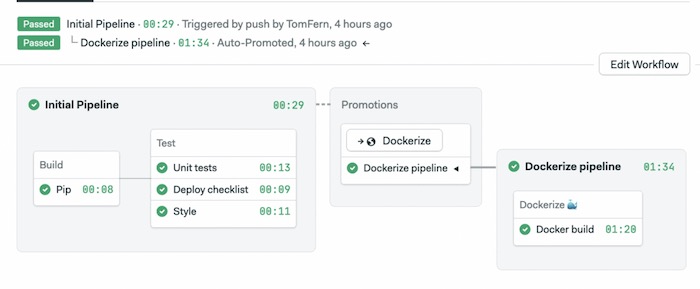
The CI/CD pipelines start automatically. Once all tests pass, the Dockerize pipeline will create a new Docker image and push it to Docker Hub.
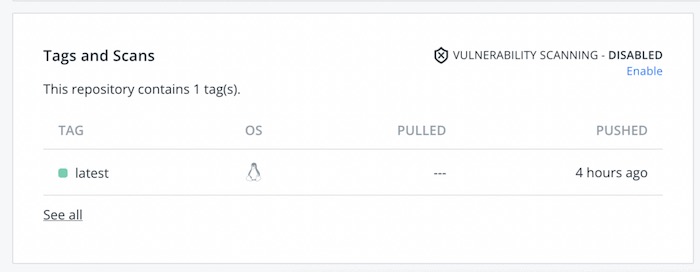
You can pull the image to your machine and run it as usual:
$ docker pull YOUR_DOCKER_USERNAME/django-markdown-editorNext Steps
We’ve prepared a Docker image with everything needed to try out the application. You can run this image on any machine or cloud service that offers Docker workloads (they all do).
The next step is to choose a persistent database. Our Docker image uses a local SQLite file, as a result, each time the container is restarted all data is lost.
The are many options:
- Use a managed database service from a cloud provider.
- Run the database inside a VM.
- Create a second container with the database and use volumes to persist the data.
Regardless of the option you choose, you will have to:
- Configure Django to connect to the database.
- Create a new secret on Semaphore with the database connection password.
- Pass the database connection parameters as environment variables when starting the Docker container.
Conclusion
In this tutorial, you have learned how to build a simple Python Django web application, wrap it in a production-grade web server, and created a Docker container to execute your webserver process.
If you enjoyed working through this article, feel free to share it and if you have any questions or comments leave them in the section below. We will do our best to answer them, or point you in the right direction.
Having your application running is the first step in the way of Kubernetes. With Kubernetes, you can run your applications at scale and provide no-downtime updates:
- Download the ebook: CI/CD for Docker & Kubernetes
- A Step-by-Step Guide to Continuous Deployment on Kubernetes
- Learn how Docker & Kubernetes works in Semaphore
- Continuous Deployment with Google Container Engine and Kubernetes
Next reads:
- Python Continuous Integration and Deployment From Scratch
- Continuous Deployment of a Python Flask Application with Docker and Semaphore
- Lightweight Docker Images in 5 Steps
- Creating a Heroku-like Deployment Solution with Docker

I’m trying to follow this guide using my own Django sample project (very basic) and I’m getting an error when running the container:
from django.core.management import execute_from_command_line 00:00
132ModuleNotFoundError: No module named ‘django’ 00:00
Ok
Thanks very much for taking me through this tutorial step by step. My Unit Test and Deploy Checklist CI/CD failed but am still grateful for the nice work. the error log says ‘ModuleNotFoundError: No module named ‘martor” , everything seems fine on my local though. I will try and figure that out or create an issue on our repo for your help. thanks, guys
There’s already a Dockerfile on the project directory. Should I overwrite it? Sorry, am new to this.
Extremely clear tutorial all the way through!
There definitely is a need to use common sense in some of the steps to make your way through.
In addition, if you have 2FA enabled on your docker account, you must replace your password secret in sSemaphore with the generated access token string from Docker.
Can’t wait to go deeper! Thanks a bunch
Great tutorial.
There is a typo in this sentence: “You then pass two flags to the command, bind to attach the running server to port 8020, which you will use to communicate with the running web server via HTTP.”
Port 8010 is used to communicate between nginx and gunicorn.
You’re first step defeats the whole purpose of using Docker to begin with. If you have to install dependencies directly on the host machine then why use docker at all?