Jupyter notebooks are great for learning and running experiments on Machine Learning. They, however, fall short when it comes to scalability and robustness required for application deployment. In that way, notebooks are like Excel — they work great on their own, but a spreadsheet is not an application. To cover the gap, we need DevOps and MLOps.
How do we take code from a notebook and build an application everyone can use? We need to combine DevOps and Machine Learning. In this video and blog post, we’ll automate the deployment of an AI application to HuggingFace using Continuous Integration and Delivery.
But first, let’s recap some of the theory. You can check the full explanation in my previous article: ML for the Rest of Us
Convolutional Neural Networks (CNN)
In my previous article, we developed a small CNN to distinguish pictures of cats and dogs. We took a pre-trained model and fine-tuned it with 7000 labeled pictures of cats and dogs.
The first step to convert the Kaggle Notebook into a running application is to bring the code into an IDE (changing the paths accordingly).
# src/train.py

from os.path import join
from fastai.vision.all import *
from utils import is_cat
import yaml

with open("params.yaml", "r") as stream:
    params = yaml.safe_load(stream)

# Paths
data_path = join('data', 'images')
metrics_path = 'metrics'
models_path = 'models'

# Instantiate dataloader
dls = ImageDataLoaders.from_name_func(
        os.getcwd(),
        get_image_files(data_path),
        valid_pct=params['train']['valid_pct'],
        seed=params['train']['seed'],
        label_func=is_cat,
        item_tfms=Resize(params['train']['resize_img'])
)
print(f"Image count for dataset")
print(f"- Training: {len(dls.train_ds)}")
print(f"- Validation: {len(dls.valid_ds)}")

# Fine-tune model
learn = vision_learner(dls, resnet34, metrics=error_rate)
learn.fine_tune(0)
By the way, you can find the whole code in this repo:
Feel free to fork the repository and checkout the “initial” branch, which only includes the Python code:
$ git clone -b initial https://github.com/<USERNAME>/semaphore-demo-mlops.gitWe’ll also need a “prepare data” script:
# src/prepare.py

import tarfile
import os

dataset = os.path.join('data','images.tar.gz')
destination = 'data'

print(f'Decompressing {dataset}...')
with tarfile.open(dataset, 'r:*') as tar:
    tar.extractall(path=destination)a
And a test script:
# src/test.py

import numpy as np
from fastai.vision.all import *
from fastai.learner import load_learner
import urllib.request
import os
import sys
from utils import is_cat
import tempfile

def predict(model, url):
    """ Predict API:
        (pred,pred_idx,probs) = model.predict(img)
    """
    with tempfile.TemporaryDirectory() as temp_dir:
        test_fn = os.path.join(temp_dir, 'test.jpg')
        urllib.request.urlretrieve(url, test_fn)
        f = open(test_fn, mode="rb")
        data = f.read()
        img = PILImage.create(data)
        is_cat,_,probs = model.predict(img)
        return is_cat, probs[1].item()

# Load model
learn = load_learner('models/model.pkl')

# Should be False
url = "https://upload.wikimedia.org/wikipedia/commons/thumb/c/c8/Black_Labrador_Retriever_-_Male_IMG_3323.jpg/2880px-Black_Labrador_Retriever_-_Male_IMG_3323.jpg"
is_cat, probs = predict(learn, url)
if is_cat is True or probs > 0.1:
    print(f'Image "{url}" incorrectly labeled as cat')
    sys.exit(1)

# Should be True
url = "https://upload.wikimedia.org/wikipedia/commons/thumb/1/15/Cat_August_2010-4.jpg/2880px-Cat_August_2010-4.jpg"
is_cat, probs = predict(learn, url)
if is_cat is False or probs < 0.9:
    print(f'Image "{url}" incorrectly labeled as dog')
    sys.exit(1)
Data Version Control
Models are equal part the result of the training data and code. The code is already tracked in Git. But what about the data? Using Git for data is cumbersome and sometimes impossible, so we need another solution.
DVC is a AI/ML tool to track large files such as datasets and models. Its workflow is inspired in Git, so each time we run dvc add path/to/files this happens:
- The files are hashed and moved into
.dvc/cache(the DVC cache), which is not commited to Git. - A
.dvc(e.g.images.tar.gz.dvc) file is added next to the original file. It contains the hash, the size, and the name of the tracked file. These files work like pointers to the original data. - The tracked files are relinked to their original paths.
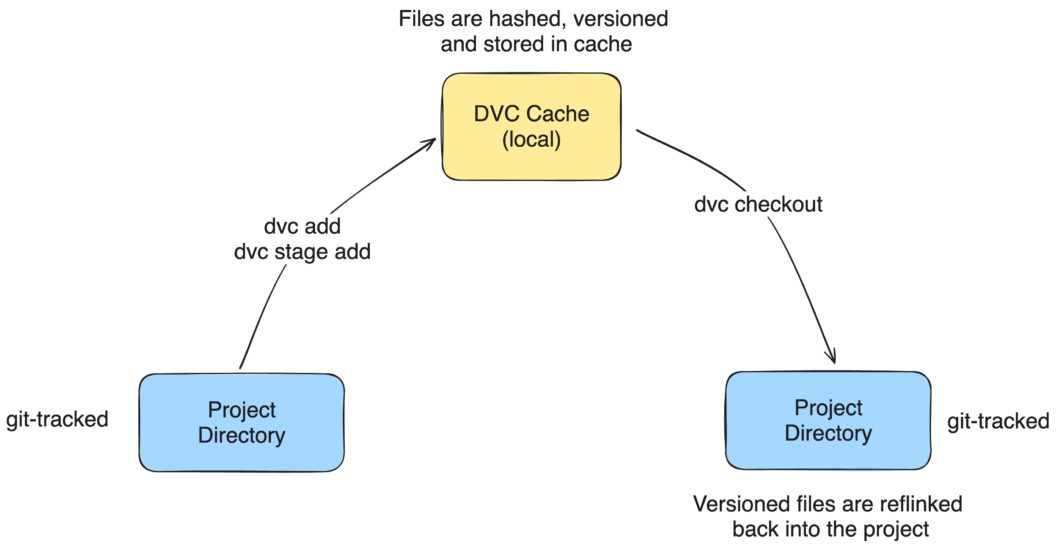
When we do dvc checkout, DVC looks for file.dvc files in the project and links the matching files from the cache back to their original location. Since .dvc files are tracked by Git, we get a complete history of what files were present at any point in the project’s history.
Back to our example, we need to download the training dataset:
$ wget https://huggingface.co/datasets/tomfern/oxford-pets-subset/resolve/main/images.tar.gz -O data/images.tar.gzOnce downloaded, we can add it to DVC with:
$ dvc add data/images.tar.gzML Pipelines
Another powerful feature of DVC are ML pipelines, effectively this is our first step with MLOps. DVC allows us to describe steps or stages in terms of inputs and outputs, and, like make, DVC can figure out which files have changed and which stages can be skipped.
To add a stage, the syntax is:
$ dvc stage add -n "stage name" \
  -d "input file1" -d "input file2" \
  -o "output file1" -o "output file2" \
  command
In our example, we use three stages: “prepare”, “train”, and “test”. Let’s add them now.
# prepare stage
$ dvc stage add -n prepare \
    -d src/prepare.py \
    -o data/images \
    python src/prepare.py

# train stage
$ dvc stage add -n train \
    -d src/train.py -d data/images \
    -o models/model.pkl -o models/model.pth \
    -m metrics/classification.md \
    --plots metrics/confusion_matrix.png \
    --plots metrics/top_losses.png \
    --plots metrics/finetune_results.png \
    python src/train.py

# test stage
$ dvc stage add -n test \
    -d src/test.py -d models/model.pkl -d models/model.pth \
    python src/test.py
Some commands may output metrics or plots; we should mark them as such with --plot and -m. This allows us to diff these files across runs.
To run the complete pipeline, we use:
$ dvc repro

Running stage 'prepare':
> python src/prepare.py
Decompressing data/images.tar.gz...

Running stage 'train':
> python src/train.py
Image count for dataset
- Training: 1293
- Validation: 554
epoch     train_loss  valid_loss  error_rate  time
0         0.448924    0.028780    0.005415    00:28
epoch     train_loss  valid_loss  error_rate  time
Updating lock file 'dvc.lock'

Running stage 'test':
> python src/test.py
Updating lock file 'dvc.lock'

To track the changes with git, run:

    git add dvc.lock
The dvc.lock file keeps track of the ML pipeline status, i.e., what steps have already been run and the outputs’ hashes. As a result, we should always commit this file when changed.
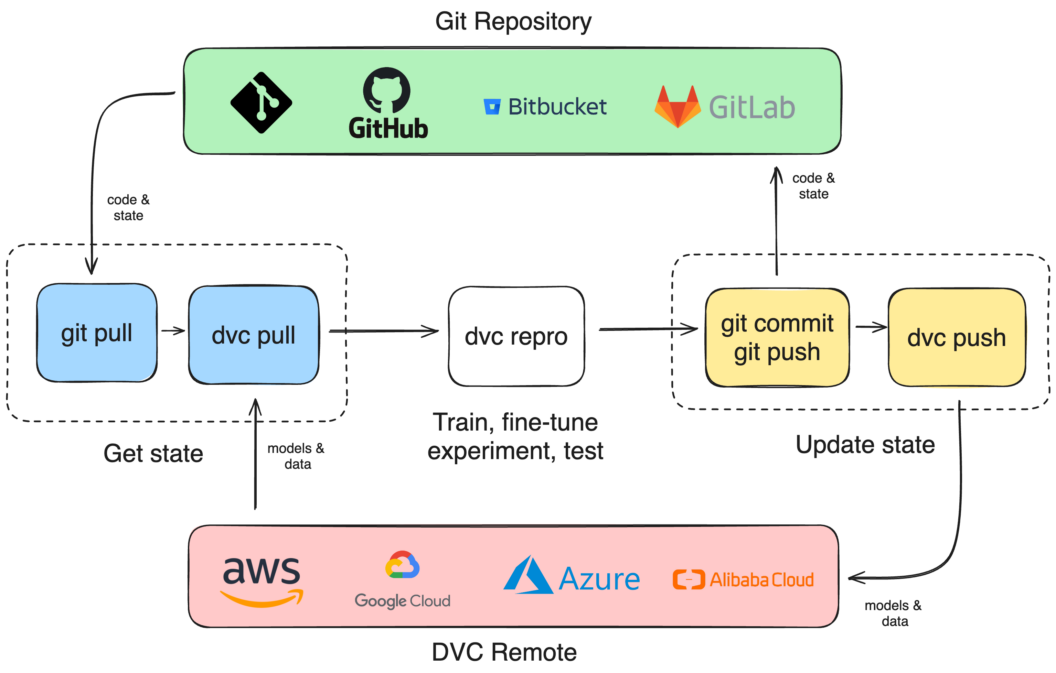
DVC Remote Storage
We can save our code on the cloud with git push but what about the data and models? For that we need remote storage. DVC supports cloud storage solutions like AWS S3, Google Cloud or Azure Storage.
To add remote storage, we need to configure some sort of bucket:
$ aws s3 ls
2024-01-09 12:43:23 mybucket
And add it as a remote:
$ dvc remote add myremote s3://mybucket
$ dvc remote default myremote
Once added, we should run dvc pull before each run (dvc repro), commit the changes, and run dvc push to upload the new changes.
Continuous Integration and Deployment
Having our data in remote storage makes it easier to use Continuous Integration to automate training and deployment of new ML/AI models.
The workflow for CI training is as follows:
- Install DVC in the CI machine
- Clone the repo
- Pull the DVC data from the remote
- Run the training and testing scripts
- Push the changes into the remote
You can find a sample CI/CD workflow in the main and noremote branches of the demo:
We can follow up the CI process with Continuous Delivery to deploy the application using HuggingFace or as a Docker container

Conclusion
From Jupyter to production, adopting DevOps tools like Continuous Integration and Data Version Control lets us automate traditional manual processes like training and testing AI models.
I believe that learning how to automate AI training is an essential skill for the coming ML-enabled times. So, I hope this tutorial and video has helped a bit.
As always, thanks for reading!
