Building beautiful and functional apps in Flutter is easy, but how do we make sure that we deliver a great user experience at scale? We can do it by integrating and running automated tests for every new change pushed to our codebase.
Our goal for this article is to:
- Write tests for our Flutter2 app.
- Run the tests locally.
- Automate the tests in our Continuous Integration (CI) workflow on the cloud using Semaphore.
Flutter Testing
Flutter comes with rich support for testing, from unit and widget tests up to integration tests. The different testing approaches involve varying levels of complexity and trade-offs.
| Testing | Unit | Widget | Integration |
| Confidence | Low | High | Highest |
| Maintenance cost | Low | High | Highest |
| Dependencies | Few | More | Most |
| Execution speed | Quick | Quick | Slow |
Prerequisites
We will be using Semaphore, and I recommend reading the following articles if you’re not familiar with how it works:
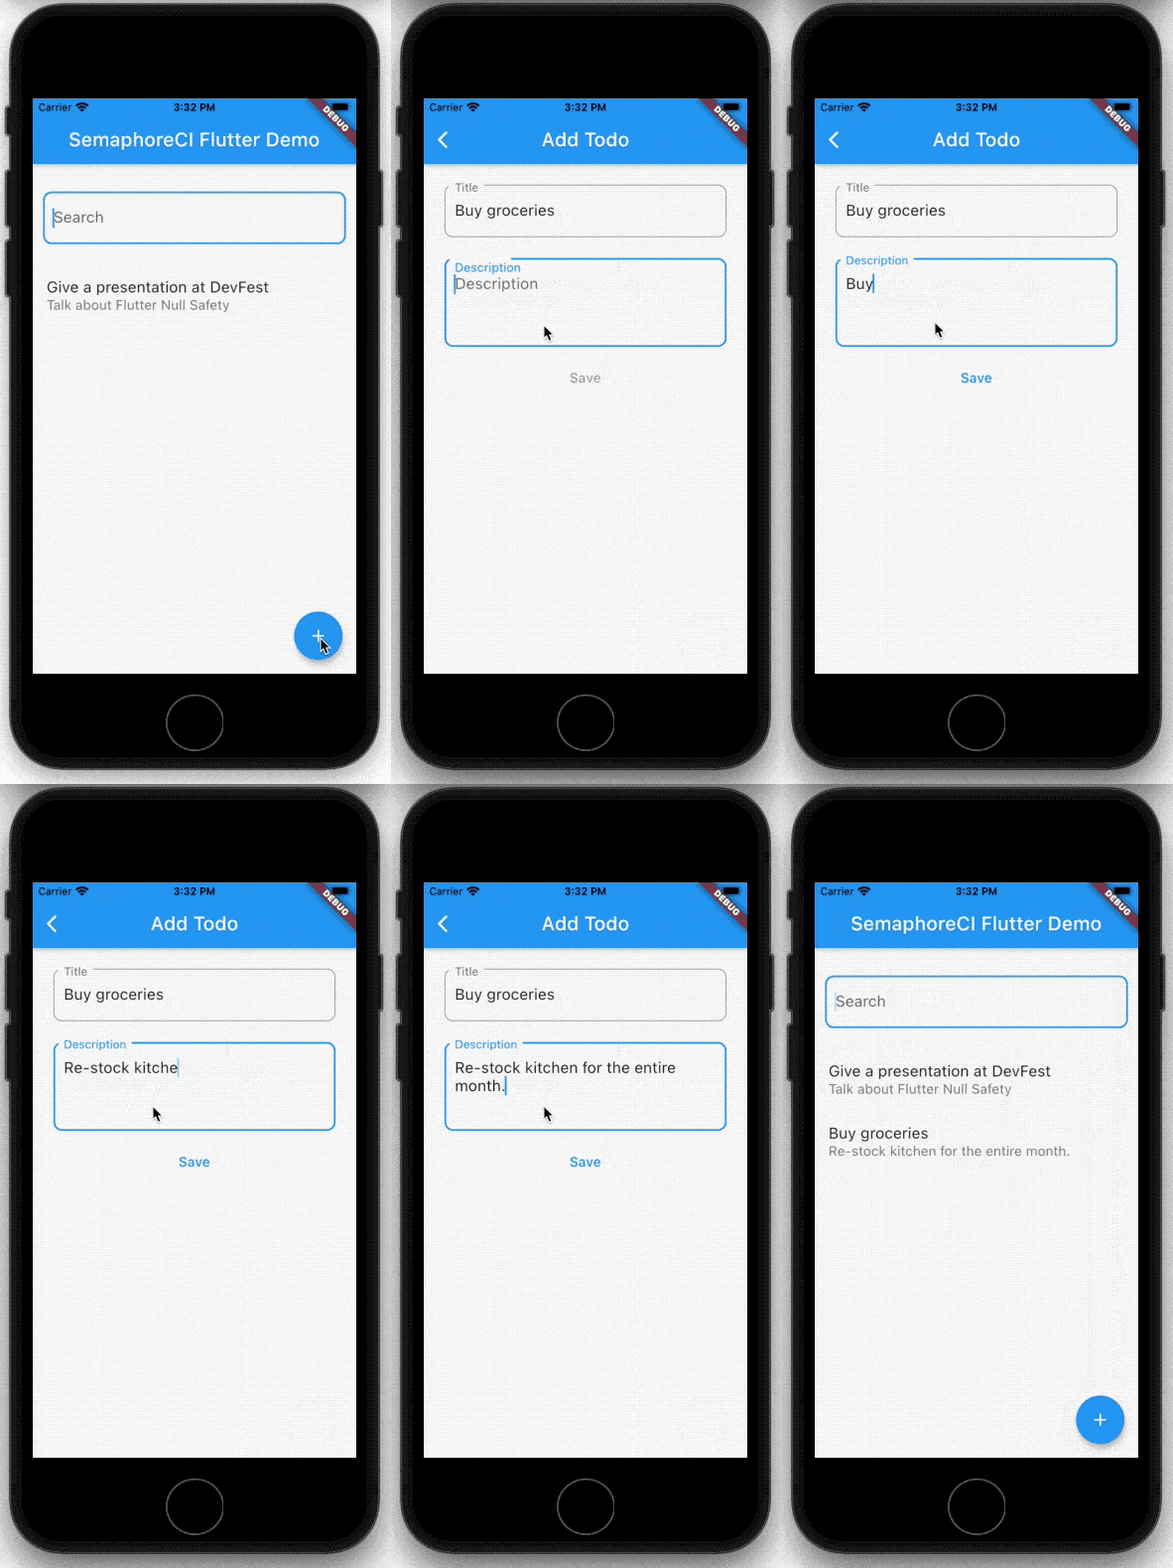
Our Todo app was written in Flutter 2.0 with support for null safety. The null safety feature eliminates bugs caused by null pointers, helping developers speed up development time and making code maintenance easier.
Before going on, ensure you have installed in your machine:
- Flutter SDK 2.0 and up
- Dart SDK 2.12 and up
Next, head over to our demo repository, fork it and clone it to your machine.
Then, download the dependencies with:
$ flutter packages getFinally, connect an emulator/simulator or a real device and run the app:
$ flutter runUnit Testing
A unit represents a method, function, or class in your code. It is a small part of your app that can be tested in isolation.
Test-Driven Development, also known as TDD, is considered a good approach for writing clean and maintainable code. Our demo project already includes the application’s core functionality, so we’re going to practice writing the tests for it.
Adding test dependencies
We’re going to use the flutter_test package from the Flutter SDK. flutter_test is built on top of the test package, with additional utilities for testing widgets.
To use the package, add the following in your pubspec.yaml:
dev_dependencies:
  flutter_test:
    sdk: flutter
Writing unit tests
As an example, we are going to write tests for the TodoViewModel class, shown below. This class includes the todos list and the methods for creating a Todo app. For reference, the relevant code we’re going to test is:
# lib/viewmodels/todo_viewmodel.dart
import 'package:flutter/material.dart';
import 'package:semaphoreci_flutter_demo/models/todo_item.dart';

class TodoViewModel extends ChangeNotifier {
  List < TodoItem > todos = [];

  void addItemToList(TodoItem item) {
    todos.add(item);
    notifyListeners();
  }

  void updateItem(TodoItem item) {
    final i = todos.indexWhere((t) => t.id == item.id);
    if (i != -1) todos[i] = item;
    notifyListeners();
  }

  void deleteItemById(int id) {
    todos.removeWhere((t) => t.id == id);
    notifyListeners();
  }

  void deleteAllItems() {
    todos.clear();
    notifyListeners();
  }
}
Start by creating a file named todo_viewmodel_test.dart in the test folder. The suffix *_test.dart is required per convention when searching for tests in your app. Type the following lines in the new file:
import 'package:flutter_test/flutter_test.dart';
import 'package:semaphoreci_flutter_demo/features/home/home_viewmodel.dart';
import 'package:semaphoreci_flutter_demo/models/todo_item.dart';
import 'package:semaphoreci_flutter_demo/viewmodels/todo_viewmodel.dart';

void main() {
  test('Should show default empty todos array', () {
    // Arrange
    // Act
    // Assert
  });
}
💡 Optionally, you can also group tests based on their functionality. In this case, the new file should be created in features/viewmodels/todo_viewmodel_test.dart. This helps keep your tests organized, and is of great help when you are working on large projects.
The test structure we’re going to use is the Arrange-Act-Assert pattern for writing good tests. This is an optional, but a good practice to follow — especially if you’re just starting out with writing tests.
Next, add the tests to check if the items have been successfully added to the list:
test('Should get all items added to the list', () {
  // Arrange
  final todoViewModel = TodoViewModel();
  final item = TodoItem(
    id: 1,
    title: 'Buy groceries',
    description: 'Go to the mall and shop for next month’s stock.',
    createdAt: 1,
    updatedAt: 1,
  );

  // Act
  todoViewModel.addItemToList(item);
  todoViewModel.addItemToList(item);
  todoViewModel.addItemToList(item);

  // Assert
  expect(todoViewModel.todos.length, 3);
});
Let’s digest the use of the Arrange-Act-Assert pattern in this test case:
- Arrange: This step creates the instance of the
TodoViewModel, which is aChangeNotifiersubclass, and theTodoItemobject - Act: The step acts upon the
TodoViewModelby calling the methodaddItemToList, which adds the same instance of theTodoItemobject - Assert: This step verifies that the
todoshave three items based on calling the methodaddItemToListthree times
Finally, add the remaining test cases for CRUD (create, read, update, delete) operations:
test('Should update one item in the list', () {
  // Arrange
  final todoViewModel = TodoViewModel();
  final item = TodoItem(
    id: 1,
    title: 'Buy groceries',
    description: 'Go to the mall and shop for next month’s stock.',
    createdAt: 1,
    updatedAt: 1,
  );
  final item2Old = TodoItem(
    id: 2,
    title: 'Buy groceries old',
    description: 'Go to the mall and shop for next month’s stock old.',
    createdAt: 1,
    updatedAt: 1,
  );
  final item2New = TodoItem(
    id: 2,
    title: 'Buy groceries new',
    description: 'Go to the mall and shop for next month’s stock new.',
    createdAt: 1,
    updatedAt: 1,
  );

  // Act
  todoViewModel.addItemToList(item);
  todoViewModel.addItemToList(item);
  todoViewModel.addItemToList(item2Old);
  todoViewModel.updateItem(item2New);

  // Assert
  expect(todoViewModel.todos[2].title, 'Buy groceries new');
  expect(todoViewModel.todos[2].description, 'Go to the mall and shop for next month’s stock new.');
});

test('Should delete one item by id from the list', () {
  // Arrange
  final todoViewModel = TodoViewModel();
  final item = TodoItem(
    id: 1,
    title: 'Buy groceries',
    description: 'Go to the mall and shop for next month’s stock.',
    createdAt: 1,
    updatedAt: 1,
  );
  final itemToDelete = TodoItem(
    id: 2,
    title: 'Buy groceries deleted',
    description: 'Go to the mall and shop for next month’s stock deleted.',
    createdAt: 1,
    updatedAt: 1,
  );

  // Act
  todoViewModel.addItemToList(item);
  todoViewModel.addItemToList(item);
  todoViewModel.addItemToList(itemToDelete);
  todoViewModel.deleteItemById(itemToDelete.id);

  // Assert
  expect(todoViewModel.todos.length, 2);
});

test('Should delete all items from the list', () {
  // Arrange
  final todoViewModel = TodoViewModel();
  final item = TodoItem(
    id: 1,
    title: 'Buy groceries',
    description: 'Go to the mall and shop for next month’s stock.',
    createdAt: 1,
    updatedAt: 1,
  );

  // Act
  todoViewModel.addItemToList(item);
  todoViewModel.addItemToList(item);
  todoViewModel.addItemToList(item);
  todoViewModel.deleteAllItems();

  // Assert
  expect(todoViewModel.todos.length, 0);
});
To verify if the tests are correct, run one of the following commands. All tests should pass.
$ flutter test test

$ flutter test test/todo_viewmodel_test.dart

$ flutter test test/features
🎯 Challenge: Write unit tests for the HomeViewModel class.
Widget Testing
Widget testing, as its name implies, is used to check whether a widget is true to form. This type of testing is more comprehensive than unit testing. By using the flutter_test package, we are able to use different tools for testing the widgets of our app: like for building and interacting with widgets, and using widget-specific constants to help locate one or more widgets in the test environment.
In this section, we’re going to add widget tests for HomePage, which is located at lib/features/home/home_page.dart.
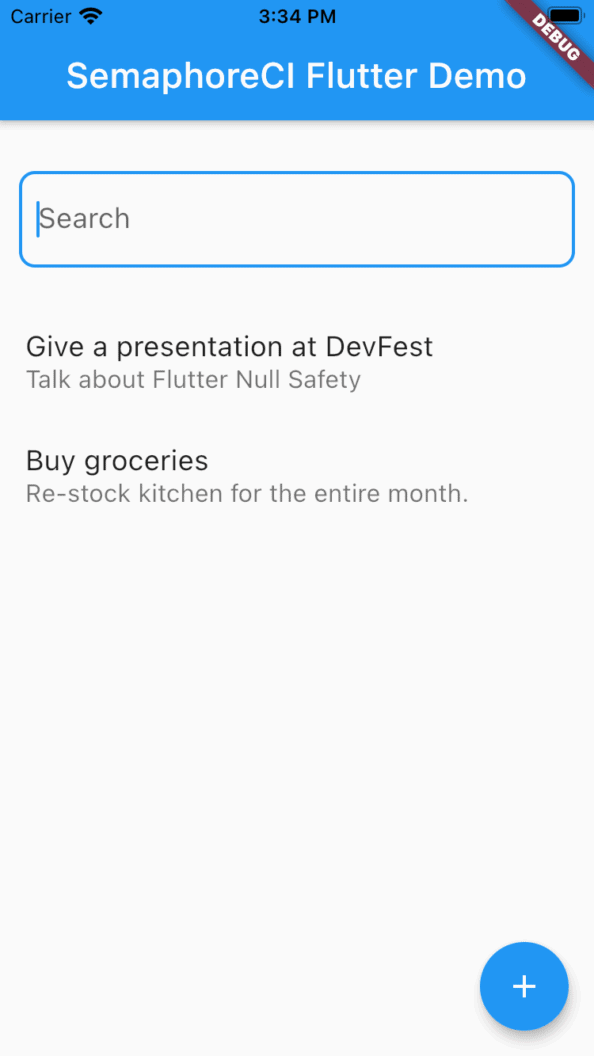
For reference, here is the HomePage code:
# lib/features/home/home_page.dart
@override
Widget build(BuildContext context) {
    return Scaffold(
      appBar: AppBar(
        title: const Text(
          'SemaphoreCI Flutter Demo',
        ),
      ),
      floatingActionButton: FloatingActionButton(
        key: const ValueKey('button.add'),
          onPressed: () {
            Navigator.push(
              context,
              CupertinoPageRoute(
                builder: (_) =>
                const DetailPage(
                  type: DetailPageType.add,
                ),
              ),
            );
          },
          child: const Icon(Icons.add),
      ),
      body: SafeArea(
        child: Column(
          children: [
            Container(
              margin: const EdgeInsets.only(
                  left: 12,
                  right: 12,
                  top: 32,
                  bottom: 24,
                ),
                child: const TextField(
                  decoration: InputDecoration(
                    hintText: 'Search',
                    border: OutlineInputBorder(
                      borderRadius: BorderRadius.all(
                        Radius.circular(10.0),
                      ),
                    ),
                  ),
                ),
            ),
            Expanded(
              child: Consumer < HomeViewModel > (
                builder: (_, data, __) => ListView.builder(
                  itemCount: data.todos.length,
                  itemBuilder: (_, i) => ListTile(
                    title: Text(data.todos[i].title),
                    subtitle: Text(data.todos[i].description),
                    onTap: () {
                      Navigator.push(
                        context,
                        CupertinoPageRoute(
                          builder: (_) => DetailPage(
                            type: DetailPageType.edit,
                            item: data.todos[i],
                          ),
                        ),
                      );
                    },
                  ),
                ),
              ),
            ),
          ],
        ),
      ),
    );
}
First, create a file named home_widget_test.dart in the test folder and add the following lines:
import 'package:flutter/material.dart';
import 'package:flutter_test/flutter_test.dart';
import 'package:provider/provider.dart';
import 'package:semaphoreci_flutter_demo/features/home/home_page.dart';
import 'package:semaphoreci_flutter_demo/features/home/home_viewmodel.dart';
import 'package:semaphoreci_flutter_demo/models/todo_item.dart';
import 'package:semaphoreci_flutter_demo/viewmodels/todo_viewmodel.dart';

void main() {
  testWidgets(
    'Should display the items in the list',
    (WidgetTester tester) async {
      // Arrange
      // Act
      // Assert
    },
  );
}
In widget testing, we are using testWidgets(), which creates a new instance of the WidgetTester in place of the test() method. The tester is used for building and interacting with widgets in a test environment.
The next step is to set up the items needed for the test.
testWidgets(
  'Should display the items in the list',
  (WidgetTester tester) async {
    // Arrange
    final todoViewModel = TodoViewModel();
    final item = TodoItem(
      id: 1,
      title: 'Buy groceries',
      description: 'Go to the mall and shop for next month’s stock.',
      createdAt: 1609462800,
      updatedAt: 1609462800,
    );
    final titleFinder = find.text('Buy groceries');
    final typeFinder = find.byType(ListTile);

    ...
  },
);
In this test case, we are going to check whether the item with the title “Buy groceries” is visible on the list found on the homepage.
Now, render the UI of the widget by using the pumpWidget method.
testWidgets(
  'Should display the items in the list',
  (WidgetTester tester) async {
    ...

    // Act
    await tester.pumpWidget(
      MaterialApp(
        home: MultiProvider(
          providers: [
            ChangeNotifierProvider(
              create: (_) => todoViewModel,
            ),
            ChangeNotifierProxyProvider<TodoViewModel, HomeViewModel>(
              create: (_) => HomeViewModel(
                todoViewModel: todoViewModel,
              ),
              update: (_, todo, __) => HomeViewModel(todoViewModel: todo),
            ),
          ],
          child: HomePage(),
        ),
      ),
    );
  },
);
Next, add method calls to invoke addItemToList three times.
testWidgets(
  'Should display the items in the list',
  (WidgetTester tester) async {
    ...

    // Act
    ...

    todoViewModel.addItemToList(item);
    todoViewModel.addItemToList(item);
    todoViewModel.addItemToList(item);

    await tester.pump();
  },
);
In most cases, .pump() should be enough, especially when there is no widget rebuild scheduled, for instance, due to side effect redraws or animations, after requesting a widget rebuild. But if you need to wait for any frames to finish rebuilding, you can also check out .pumpAndSettle().
Lastly, verify if the items are added to the list using Matcher.
testWidgets(
  'Should display the items in the list',
  (WidgetTester tester) async {
    // Arrange
    ...
    final titleFinder = find.text('Buy groceries');
    final typeFinder = find.byType(ListTile);

    // Act
    ...

    // Assert
    expect(titleFinder, findsNWidgets(3));
    expect(typeFinder, findsNWidgets(3));
  },
);
With Matcher, you can conveniently verify that the items are rendered properly in the widget: in this case, on the HomePage widget.
There are also additional matchers on top of the `findNWidgets`:
findsOneWidgetverifies that there is exactly one widget foundfindsNothingverifies that there are no widgets foundfindsWidgetsverifies that one or more widgets are foundmatchesGoldenFileverifies that a widget’s rendering matches a particular bitmap image (“golden file” testing)
Before moving on, run the test locally with fluter test test and check that all tests have passed.
🎯 Challenge: Write unit tests for the DetailPage class.
Integration Testing
Unlike unit and widget testing, integration testing allows you to test how the individual pieces of your app work together. Writing integration tests is expensive, but, when done right, gives you the most confidence.
To use the integration_test package, add the following in your pubspec.yaml:
dev_dependencies:
  ...
  integration_test:
    sdk: flutter
💡As of Flutter 2.0, integration_test was moved into the Flutter SDK.
We’re going to write an integration test for our first test case, which is adding a new item to the Todo list. To begin, create a folder called integration_test and, inside, create a file named add_new_todo_item_test.dart with these lines:
import 'package:flutter/material.dart';
import 'package:flutter_test/flutter_test.dart';
import 'package:integration_test/integration_test.dart';
import 'package:semaphoreci_flutter_demo/main.dart' as app;

void main() {
  IntegrationTestWidgetsFlutterBinding.ensureInitialized();

  testWidgets(
    'Should display the newly added item in the list',
    (WidgetTester tester) async {
      // Arrange
      ...

      // Act
      ...

      // Assert
      ...
    },
  );
}
In the setup code above:
IntegrationTestWidgetsFlutterBinding.ensureInitialized()is similar toWidgetsFlutterBinding.ensureInitialized()in a running app. This is called if you need to initialize the binding instance prior to running the app; for instance, when making a native plugin or database initialization.- Integration tests can still make use of
flutter_testAPIs, e.g.testWidgetsfor interacting with widgets using taps and searching widgets using matchers.
Now you can setup the integration test code:
testWidgets(
  'Should display the newly added item in the list',
  (WidgetTester tester) async {
    // Arrange
    app.main();
    await tester.pumpAndSettle();
    final addFinder = find.byKey(const ValueKey('button.add'));
    final titleFinder = find.byKey(const ValueKey('input.title'));
    final descriptionFinder = find.byKey(const ValueKey('input.description'));
    final saveFinder = find.byKey(const ValueKey('button.save'));
  },
);
We are using ValueKey to look up our widgets. For example, the FloatingActionButton has a value key of button.add, therefore it matches the addFinder. byKey is one of the common ways to find one or more widgets in the test environment.
floatingActionButton: FloatingActionButton(
  key: const ValueKey('button.add'),
  onPressed: () {
    Navigator.push(
      context,
      CupertinoPageRoute(
        builder: (_) => const DetailPage(
          type: DetailPageType.add,
        ),
      ),
    );
  },
  child: const Icon(Icons.add),
),
Moving on, interact with the widgets and add a new item to the list:
testWidgets(
  'Should display the newly added item in the list',
  (WidgetTester tester) async {
    // Arrange
    ...

    // Act
    await tester.tap(addFinder);
    await tester.pumpAndSettle();

    await tester.enterText(titleFinder, 'Buy groceries');
    await tester.pumpAndSettle();

    await tester.enterText(descriptionFinder, 'Go to the mall and shop for next month’s stock.');
    await tester.pumpAndSettle();

    await tester.tap(saveFinder);
    await tester.pumpAndSettle();
  },
);
We are interacting with the widgets by:
- Tapping
addFinderopens theDetailPageinDetailPageType.addmode. - Entering text
titleFinderto accept the input “Buy groceries”. - Tapping
saveFinderto save the item in the todo list.
Finally, verify if the item was saved on the list:
testWidgets(
  'Should display the newly added item in the list',
  (WidgetTester tester) async {
    // Arrange
    ...

    // Act
    ...

    // Assert
    expect(find.text('Buy groceries'), findsOneWidget);
    expect(find.text('Go to the mall and shop for next month’s stock.'), findsOneWidget);
  },
);
Since we make use of flutter_test APIs, we can call the same methods for checking if the item was added to the list, for example, if it is rendered in the Home Page UI.
Time to run the tests. Make sure a device is connected to your computer, whether an iOS simulator (iOS) or a real device. To run the integration test for this test case, enter the following command:
$ flutter test integration_test/add_new_todo_item_test.dart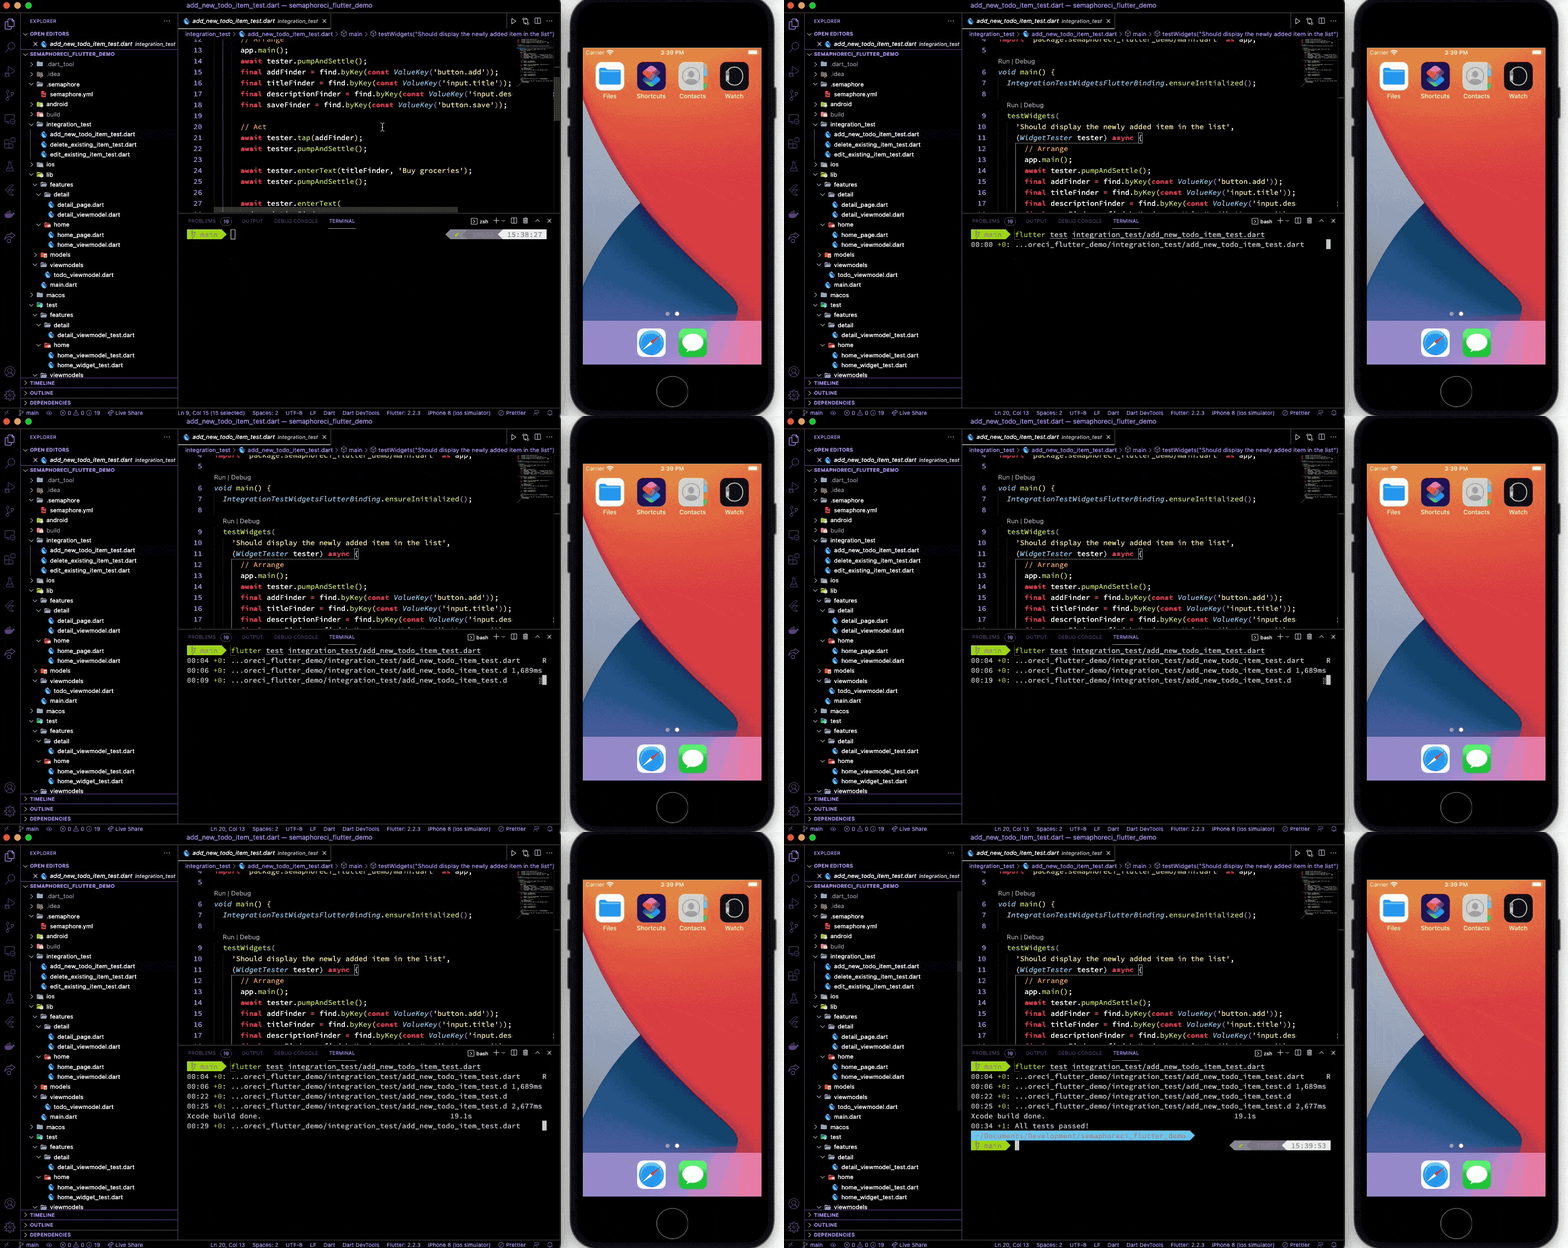
🎯 Challenge: Write integration tests for editing and deleting an item.
Automating Flutter tests
There are several ways on how you can start automating your tests and builds. The most common ones are a dedicated server or cloud-based CI/CD platforms.
Setting up a dedicated CI/CD server may seem a good choice for small apps, but there are also hidden costs to maintenance, security, and long-term performance. With cloud-based CI/CD platforms like Semaphore, you are more focused on building the product rather than worrying about maintaining yet another server.
Add your project to Semaphore
Log in with your account Semaphore account and click on the + Create New button in the navigation bar.

Link your Github account and select your project fork.
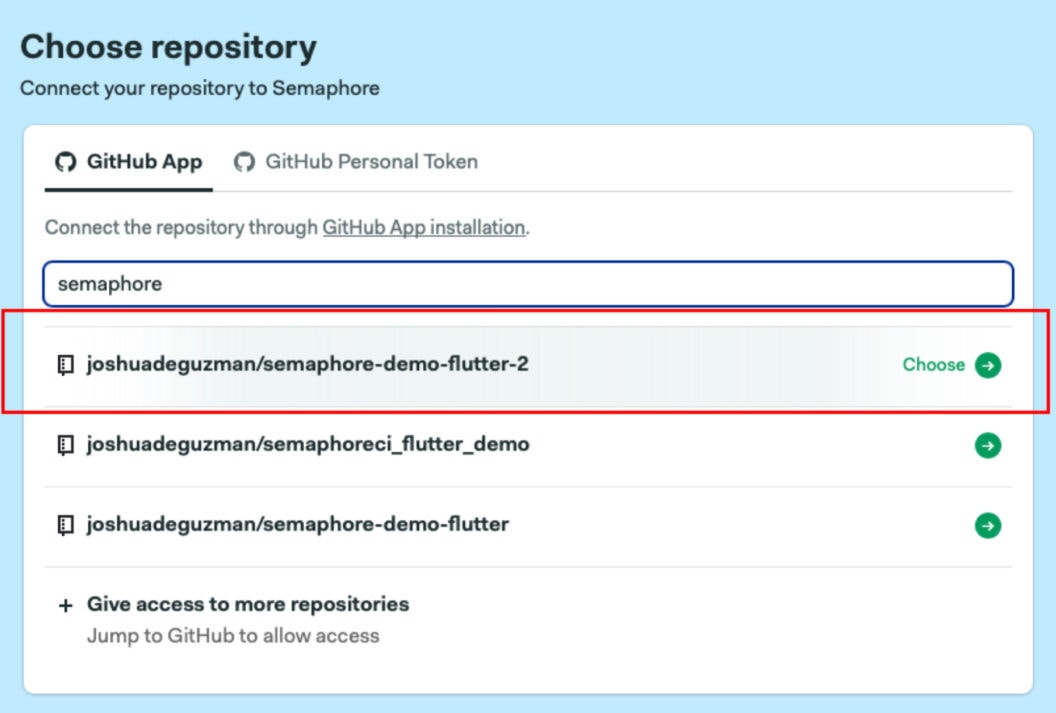
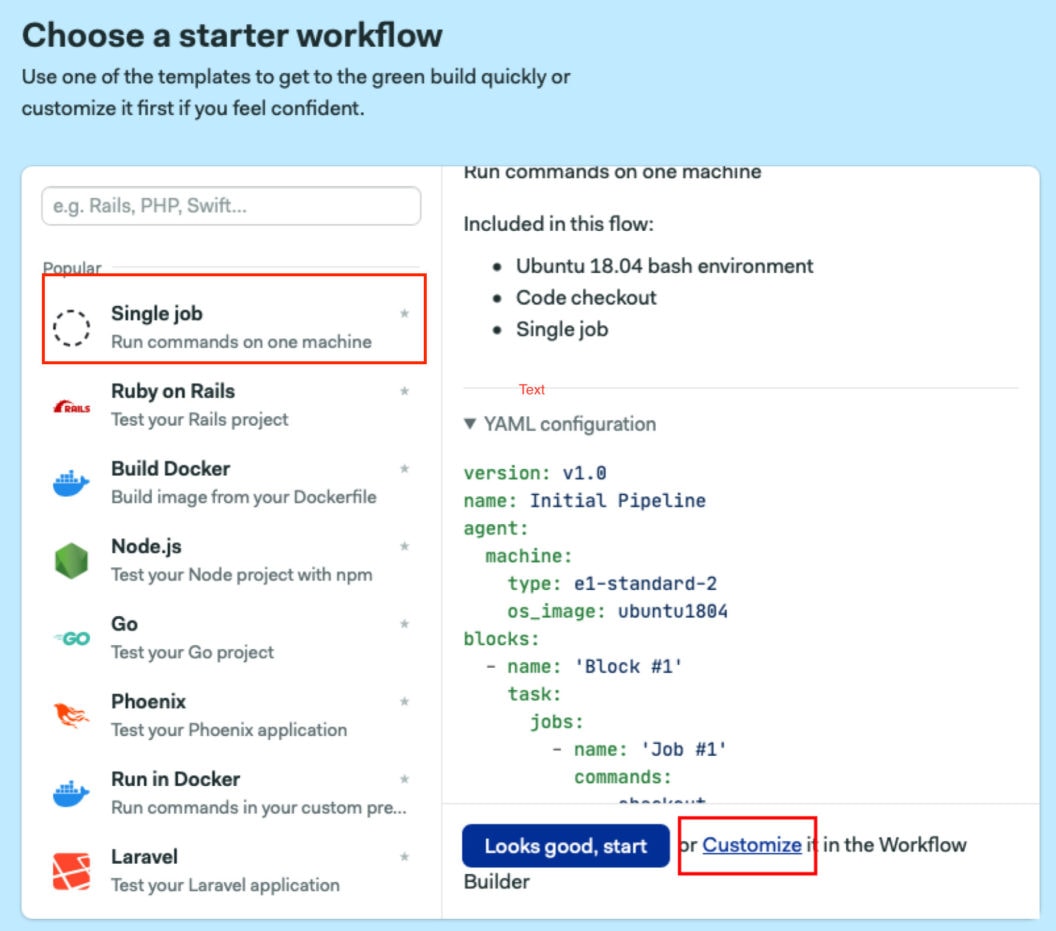
Click Continue to workflow setup and select the Single Job starter workflow. Click on Customize to open the workflow editor.
Understanding the workflow builder
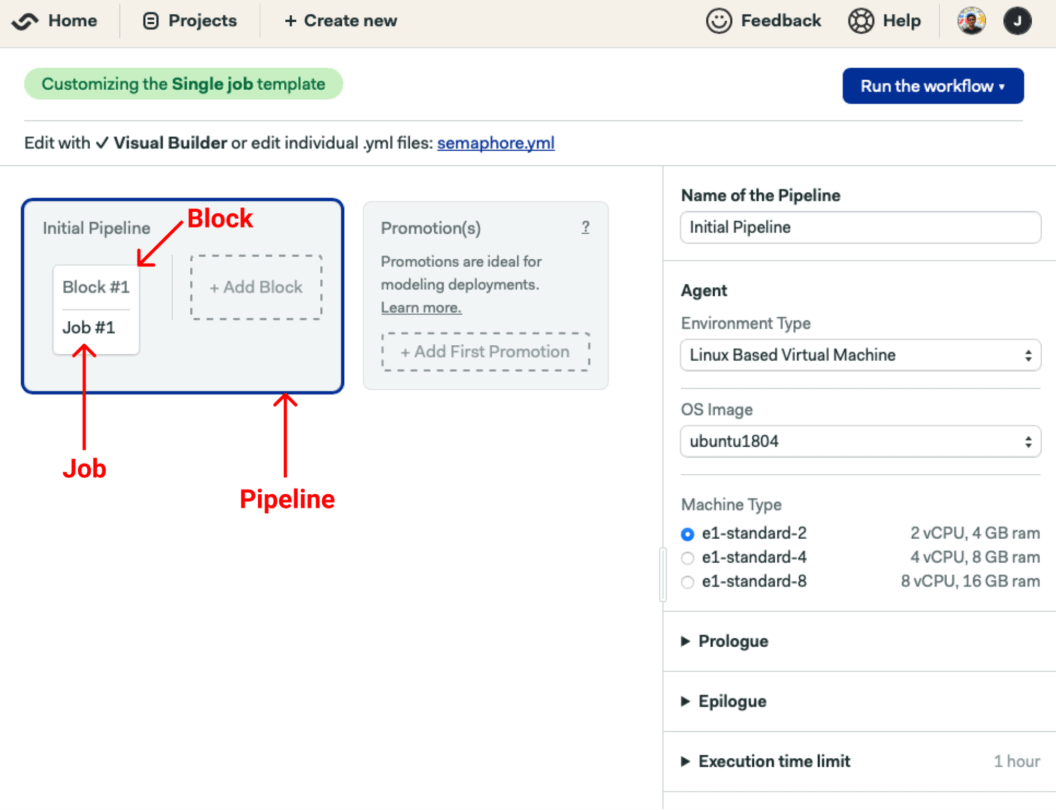
- A workflow may contain one or more pipelines, for example, running tests, creating and deploying builds.
- Each pipeline has one or more blocks, which are executed from left to right.
- Each block has one or more jobs, and it defines what set of tasks is needed to be accomplished in a pipeline. By default, Semaphore executes blocks sequentially.
- Jobs are executed in parallel in a single block. A job contains a set of commands, and if any of these fail, the pipeline will stop and be marked as failed.
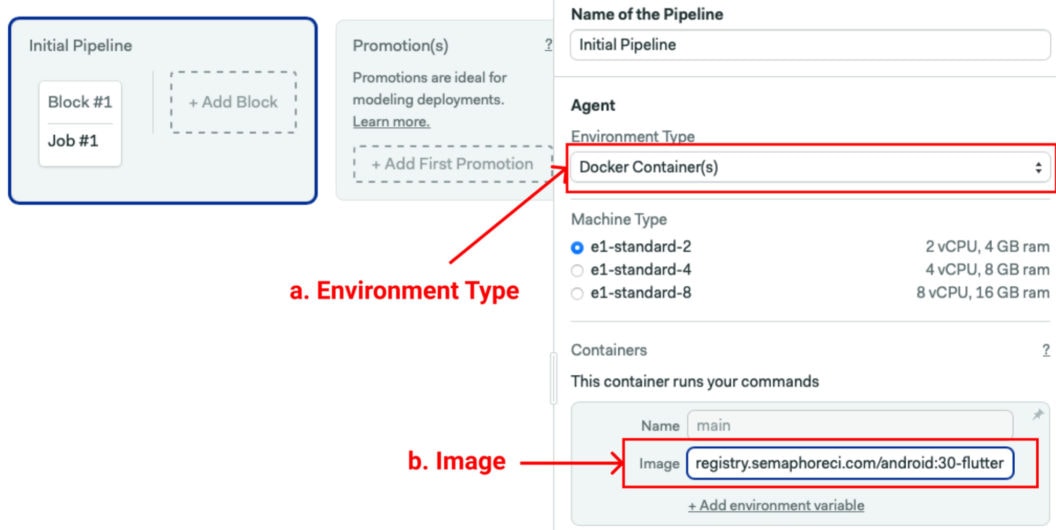
In the Agent section, change the environment type to Docker and type “registry.semaphoreci.com/android:30-flutter” in the Image field. This is one of the many CI-optimized Docker images supplied by Semaphore.
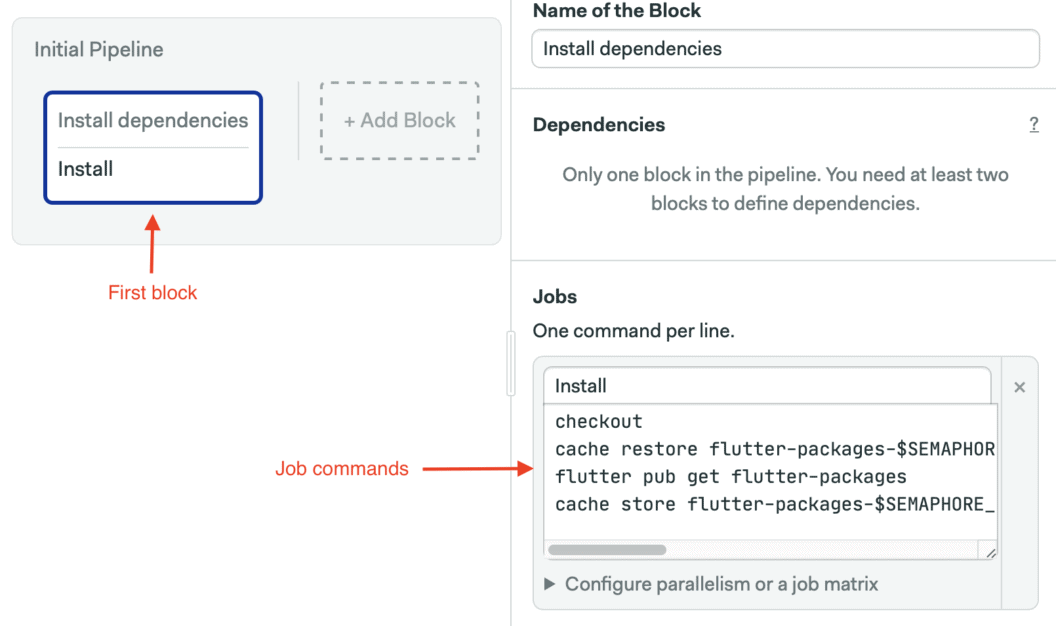
Having set up the environment, create your first block to install Flutter and its dependencies. The job commands should be:
checkout
cache restore flutter-packages-$SEMAPHORE_GIT_BRANCH-$(checksum pubspec.yaml),flutter-packages-$(checksum pubspec.yaml),flutter-packages
flutter pub get
cache store flutter-packages-$SEMAPHORE_GIT_BRANCH-$(checksum pubspec.yaml),flutter-packages-$(checksum pubspec.yaml),flutter-packages /root/.pub-cache
Here, we use checkout to clone the repository into the CI machine and cache to store Flutter dependencies between runs.
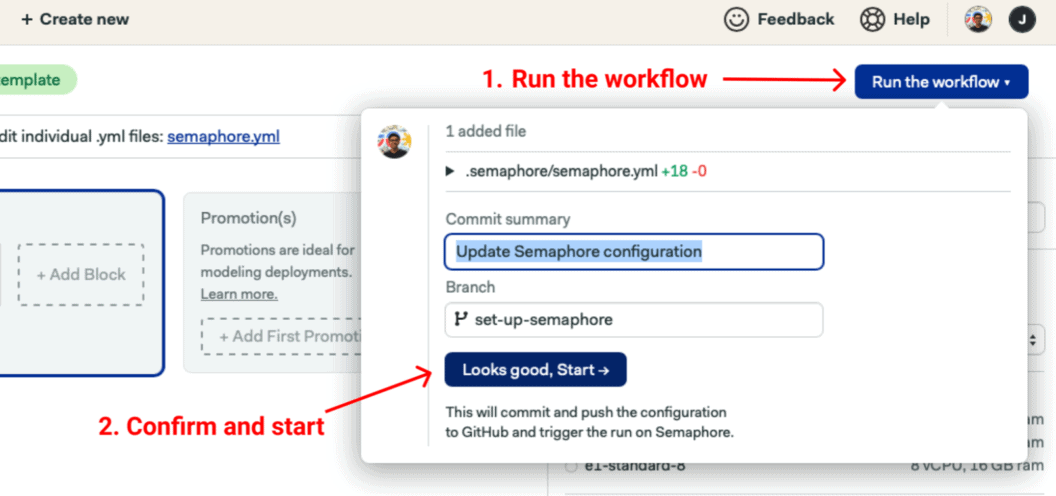
Finally, run the workflow to check the job works.
Adding the test jobs
This is where we are going to run two jobs in parallel and check whether the code quality passes based on the code formatting and linting. With parallel testing, we can execute both jobs at the same time in order to get results quicker.
Create a block for static code analysis. Use the Edit Workflow button to open the editor once more. First, add the following command in the Jobs initial command section:
flutter format --set-exit-if-changed .Click on Add another job and type the linting command. Our project uses the standards set by the very_good_analysis package.
flutter analyze .Finally, add the following commands to clone the repository and restore dependencies in the Prologue section, which is executed before all jobs in the block.
checkout
cache restore flutter-packages-$SEMAPHORE_GIT_BRANCH-$(checksum pubspec.yaml),flutter-packages-$(checksum pubspec.yaml),flutter-packages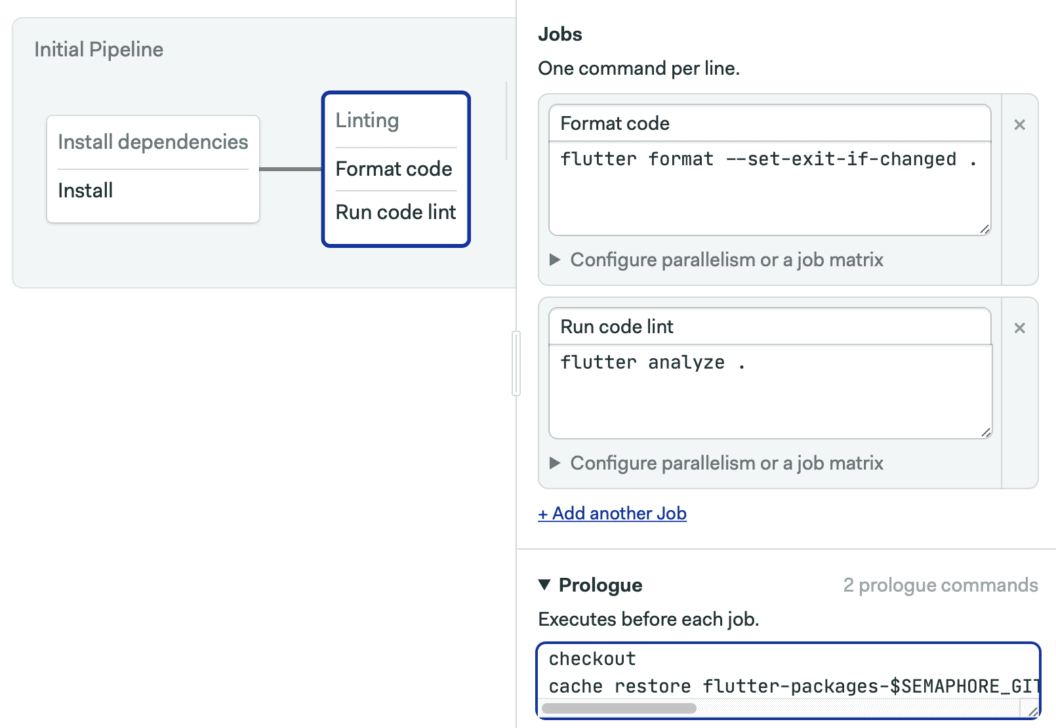
Create a new block for unit and widget tests. Add the following command In the Jobs section to run the Flutter tests:
checkout
cache restore flutter-packages-$SEMAPHORE_GIT_BRANCH-$(checksum pubspec.yaml),flutter-packages-$(checksum pubspec.yaml),flutter-packages
flutter test test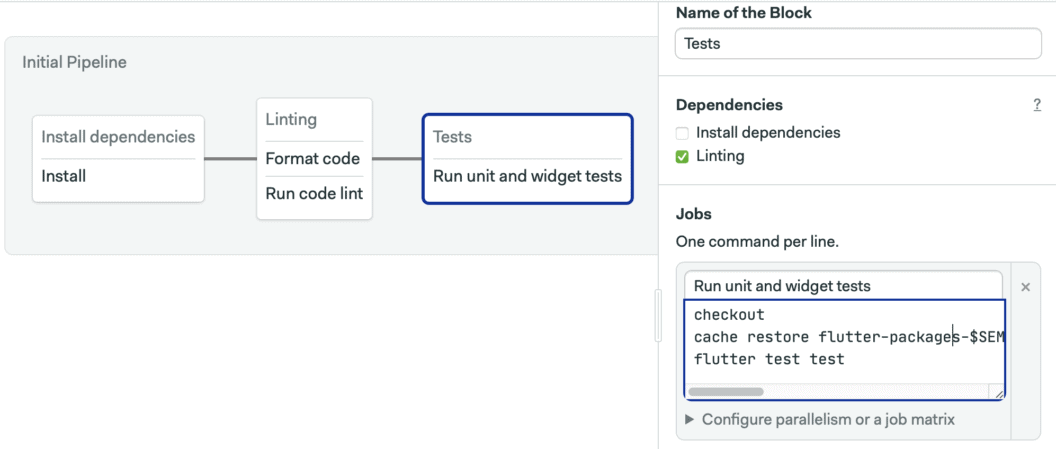
Create a new block for integration tests. For these, we’re going to use an AVD emulator for Android. To start, add the following commands in the Jobs section.
In the Prologue, use these commands to initialize the emulator:
checkout
cache restore flutter-packages-$SEMAPHORE_GIT_BRANCH-$(checksum pubspec.yaml),flutter-packages-$(checksum pubspec.yaml),flutter-packages
sdkmanager "platform-tools" "platforms;android-29" "build-tools;30.0.0" "emulator"
sdkmanager "system-images;android-29;google_apis;x86"
echo no | avdmanager create avd -n test-emulator -k "system-images;android-29;google_apis;x86"
emulator -avd test-emulator -noaudio -no-boot-anim -gpu off -no-window &
adb wait-for-device shell 'while [[ -z $(getprop sys.boot_completed) ]]; do sleep 1; done;'
adb shell wm dismiss-keyguard
sleep 1
adb shell settings put global window_animation_scale 0
adb shell settings put global transition_animation_scale 0
adb shell settings put global animator_duration_scale 0
Create three test jobs, one for each integration test:
flutter test integration_test/add_new_todo_item_test.dartflutter test integration_test/edit_existing_item_test.dartAnd:
flutter test integration_test/delete_existing_item_test.dart💡The command executes the Flutter integration tests directly using flutter test <path/to/file>. If you plan to add more tests, you can also create a script that loops through all the files included in the integration_test directory instead of having individual flutter test commands.
That’s it! Now let’s check out our workflow in action. Merge the set-up-semaphore branch to your default branch.

💡 If your Semaphore plan allows it and the performance of the basic machine is not enough for your needs, consider selecting a VM with more CPUs and memory for the integration test block. You can set per-block CI machine settings by scrolling down the block settings until you reach the Agent section and clicking Override global agent definition. You’ll need to repeat the Docker setup and image steps you did at the beginning of the pipeline.
NB: Semaphore has the Test Reports feature that allows you to see which tests have failed, find the slowest tests in your test suite, and find skipped tests. Read more about Test Reports.
Final words
Investments made in writing quality and automated tests will pay off in the long run as the app scales. Manual testing simply isn’t going to cut it. Focusing on building features with tests is way better than testing trivial parts of the app manually. If you combine automated tests with CI/CD, you’ll have the confidence that nothing breaks in the app as it grows.
Are you a mobile developer? Then, read these great articles next:
