The need for efficient, reliable, and continuous deployment methods has never been more pressing. But how is this important and why? Kubernetes by itself is a robust orchestration platform that was built to manage and scale containerized applications. When it comes to Kubernetes, its true strength lies in its flexibility and while it excels in managing complex container operations, the real challenge emerges in the deployment phase; that is, the ability to update and maintain applications without disruption.
Kubernetes addresses this with various deployment strategies, each designed to suit different operational needs and minimize potential disruptions to ensure that applications remain resilient and available, even during updates.
What is the Rolling Update Deployment Strategy
Traditionally, when deploying applications to Kubernetes, you have the option to use various high-level resources, such as a Deployment (for web apps, etc.), a StatefulSet (for databases, message queues, etc.), or any other suitable resource, utilizing a pre-deployed image hosted in a registry accessible to Kubernetes.
When unexpected issues arise with the image, causing the application to become non-functional, a conventional solution is to revise the application code and update the image. Subsequently, the deployment configuration is updated with a corrected and functional image. During this process, the existing deployment is reconfigured; and due to the nature of Kubernetes deployments, the pods within that deployment are automatically recreated one by one with the new, updated image. In case you are not aware, this process is driven by the rollingUpdate deployment strategy working under the hood.
The primary goal of the rolling update deployment strategy is to minimize downtime and ensure that applications remain accessible and operational, even during updates. This strategy is the default for deployments, and it is the one you are using, perhaps without even knowing, if you have not explicitly specified it in your deployment configuration.
With the help of this strategy, Kubernetes is smart enough to prevent downtime for your deployments as you update them, to ensure user experience and service continuity. However, that’s not all, here is what the rolling update deployment strategy provides out of the box:
- Incremental Updates: The deployment updates are applied gradually, replacing a few pods at a time instead of reconfiguring the entire deployment all at once. This method ensures that a portion of your application remains operational and accessible, allowing for the new version’s stability to be assessed before it is fully rolled out, thereby reducing the impact of any potential issue.
- Configurable Update Speed: With the rolling update strategy, you can configure and control the number of pods that can be updated simultaneously and the number of pods that can be unavailable during an update process. This flexibility helps you configure the whole deployment process to match your operational needs and maintain the balance between deployment speed and service availability.
- Failed Update Halts: With the
rollingUpdatestrategy in place, you get to give Kubernetes the ability and right to halt any update to your deployment if the update fails or deploys incorrectly. As Kubernetes monitors the health of new pods as they are deployed, it will halt any unsuccessful update process; thereby minimizing the impact of failed updates. - Continuous Availability: With The
rollingUpdatedeployment strategy, you are rest assured that there are always pods available to handle requests. This minimizes potential revenue loss or decreased productivity that could result from downtime. - Efficient Resource Utilization: Since the update happens in place and gradually, the rolling update strategy enhances resource management by avoiding the necessity to double resource allocation typically seen with blue-green deployments. This method ensures only a minimal number of additional pods are created at any time. Leading to an efficient and optimized use of the cluster’s resources.
Preparing for a Rolling Update
Rolling updates in Kubernetes are about more than just pushing new code or swapping out container images. To nail a robust rolling update deployment strategy pipeline, there are a few key elements you’ll want to get right. Ensuring your application remains stable and available throughout the update process hinges on thoughtful preparation in the following areas:
- Health Checks: Health checks, also known as probes, are your first line of defense against deploying unstable versions of your application. They ensure that newly deployed versions of your application are ready and capable of serving traffic before they are fully integrated into your service pool.
When you implement health checks in your deployments, you are ensuring that any version of your application that becomes unresponsive or encounters critical issues is promptly replaced during a rolling update. This mechanism ensures that the rolling update is cautious, proceeding only when it’s safe to do so, thereby minimizing downtime and potential disruptions to your service.
In addition to health checks, using minReadySeconds, which is an optional specification in deployment configurations, adds a buffer or an extra layer of caution after a pod becomes ready before it is marked as available. This is particularly useful if you want to give your application ample time to fully warm up or complete initialization tasks before it can handle traffic.
Together, they enhance the robustness of your rolling update deployment strategy pipeline. Of course, it’s entirely up to you whether you employ one or both in your setup. However, It is highly recommended to lean towards prioritizing probes if you’re considering just one. But, for a truly comprehensive health-checking mechanism that leaves no stone unturned, embracing both probes and minReadySeconds is the way to go.
- Versioning: Proper versioning of your container images is essential for rollback and clarity. It plays an important role in managing your deployments over time, especially when you need to quickly address issues. Using specific version tags or semantic versioning for your images instead of mutable tags like
latestis highly recommended. This disciplined approach guarantees that every deployment is tied to a specific, unchangeable version of the image. Such precision in version referencing facilitates flawless rollbacks and fosters predictable behavior across not just your Kubernetes cluster, but also in different environments. - Deployment Strategy Configuration: The deployment strategy you choose dictates how updates are rolled out. Kubernetes offers a
RollingUpdatestrategy as a default, but understanding and fine-tuning its parameters can greatly enhance your deployment process. TheRollingUpdatestrategy’s effectiveness, however, is significantly enhanced by fine-tuning two critical parameters –maxSurgeandmaxUnavailable.
The first parameter maxSurge controls the maximum number of pods that can be created above the desired number of pods during an update. Adjusting this can help you balance speed against the extra load on your cluster resources. The second parameter maxUnavailable sets the maximum number of pods that can be unavailable during the update process. Lower values increase availability but can slow down the update process. Finding the right balance is key to a smooth deployment, and tailoring the RollingUpdate deployment strategy to your specific needs.
This balance ensures that your deployment strategy aligns with both your performance standards and your operational capabilities.
Configuring a Rolling Update
We will use a well-understood application like a web server to see how the rolling update strategy works. Create a file called nginx-server.yaml (arbitrary) and paste in the following configuration settings:
This tutorial assumes you have a Kubernetes cluster up and running. Otherwise, you can opt-in for a local or cloud-based Kubernetes cluster to proceed.
apiVersion: apps/v1
kind: Deployment
metadata:
  name: nginx-deployment
spec:
  replicas: 3
  revisionHistoryLimit: 5
  selector:
    matchLabels:
      app: nginx
  strategy:
    rollingUpdate:
      maxSurge: 1 # as an absolute number of replicas
      maxUnavailable: 33% # as % of replicas
    type: RollingUpdate
  minReadySeconds: 5 # Using minReadySeconds to add a readiness buffer.
  template:
    metadata:
      labels:
        app: nginx
    spec:
      containers:
      - name: nginx
        image: nginx:1.25.3 # Versioning: Using a specific version tag.
        ports:
        - containerPort: 80
        readinessProbe: # Incorporating probes.
          httpGet:
            path: /
            port: 80
          initialDelaySeconds: 10
          periodSeconds: 30
          failureThreshold: 2
        # NOTE: The default Nginx container does not include a "/health" endpoint.
        # Adjust the path below to point to a valid health check endpoint in your application.
        livenessProbe:
          httpGet:
            path: / # Default path; adjust as necessary for your application's health check.
            port: 80
          initialDelaySeconds: 15
          failureThreshold: 2
          periodSeconds: 45
Here we are configuring a deployment with three replicas of an Nginx image. The RollingUpdate strategy is configured with maxSurge: 1 and maxUnavailable: 33%, allowing one extra pod to be created above the desired count during the update, and one pod can be taken down, ensuring a balance between speed of deployment and service availability.
The
maxSurgeandmaxUnavailablefields within the rolling update strategy for deployments can be specified as either absolute numbers or percentages. This flexibility allows you to tailor the update process to the size and requirements of your deployment more precisely. It makes your rolling updates more adaptive based on your deployment size.
Each pod in the deployment will run a Nginx container based on the image version nginx:1.25.3. This specific versioning is important for consistency across deployments and facilitates easy rollbacks if needed.
Additionally, we are incorporating both readiness and liveness probes in the deployment to make HTTP GET requests to the root path (/) on port 80 of the Nginx server. The readiness probe starts checking 10 seconds after the container launches and repeats every 30 seconds, ensuring that traffic is only routed to the pod once it’s ready to handle requests.
The liveness probe begins 15 seconds after the container starts, with checks every 45 seconds to monitor the ongoing health of the Nginx server, restarting it automatically if it becomes unresponsive.
Furthermore, a minReadySeconds value of 5 seconds adds an extra layer of stability by ensuring the Nginx container remains in a ready state for at least this duration before it is considered available, helping to smooth out the transition of traffic to new pods during updates.
Finally, the revisionHistoryLimit is set to 5, limiting the number of old replicasets that Kubernetes keeps for rollback purposes. This helps to manage cluster resources by preventing an accumulation of unused resources.
Create this deployment using the following command – kubectl apply -f nginx-server.yaml. Once executed, the following output is expected:
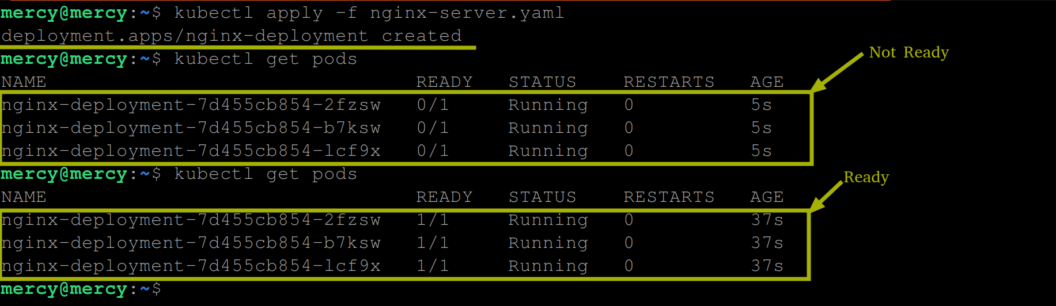
The output above shows that the deployment is created and after the readiness check has been completed, the pods created by the deployment are now ready to receive traffic.
Performing a Rolling Update
With our application setup, let’s proceed to see the rolling update deployment strategy in action by updating our Nginx deployment image version. Execute the below command to make this update:
kubectl set image deployment/nginx-deployment nginx=nginx:1.25-alpine

#View the update process
kubectl get pods
This will update our deployment to use a version 1.25-alpine other than the one we already specified 1.25.3.
After executing the following command the following output is expected:
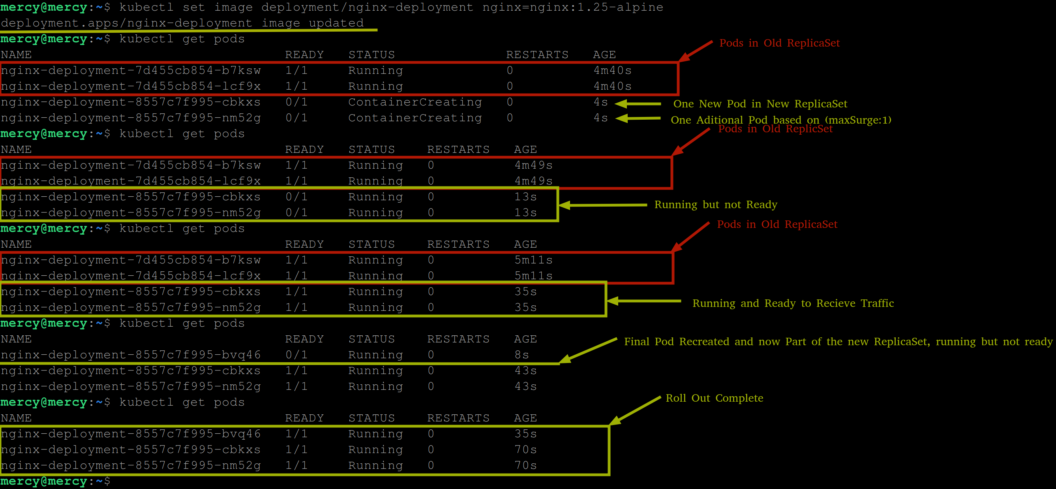
First, we get a message indicating that the deployment image update is applied, signaling the initiation of a rolling update process for the nginx-deployment. Here Kubernetes starts to replace the old pods (old replicaSets) with new ones (new replicaSets), leveraging the specified maxSurge and maxUnavailable settings to manage this transition.
The initial kubectl get pods from the above output reveals the beginning of this process where two existing pods from the old ReplicaSet are running, and simultaneously, two new pods from the new ReplicaSet are in the ContainerCreating phase. This situation indicates that Kubernetes is starting to roll out the new version alongside the old version, adhering to the maxSurge setting by temporarily creating an additional pod above the desired replica count, and the maxUnavailable setting by not making more than one pod unavailable at any moment.
This demonstrates Kubernetes’ effort to start rolling out the update without immediately impacting the existing service.
As the update progresses, the new pods transition to the Running state, demonstrating that the new version is being deployed and is coming online, with the minReadySeconds parameter ensuring these pods are fully operational before they start serving traffic. This adds an extra layer of assurance that the new pods can handle requests effectively.
Meanwhile, the pods from the old replicaSet are still running, ensuring service availability during the update. As the new replicaSet pods go into a Running state alongside the old replicaSet pods, this overlap becomes a critical phase. During this time, Kubernetes uses the minReadySeconds parameter to provide a buffer, ensuring the new version is fully operational and ready to take over from the old version, thereby maintaining continuous availability.
Then the appearance of another new pod entering the Running state while the old pods are no longer listed indicates the rolling update is proceeding to replace all old pods with new ones.
Finally, all pods from the initial deployment are been replaced with pods from the new replicaSet, all running and ready to receive traffic. You can confirm this using the following command:
kubectl get replicasets

This confirms the completion of the rolling update, with the entire set of desired replicas now running the updated application version.
Execute the following command to see the status of the rolling update:
kubectl rollout status deployment/nginx-deploymentThis will display the real-time progress of the update, indicating when the rollout is complete or if there are any errors. However, right now, you should have the following output:

If you are interested in knowing the history of rollouts for the specified deployment, in this case, the nginx-deployment, execute the following command:
kubectl rollout history deployment/nginx-deploymentThis will list the revisions of the deployment, including details such as the revision number, the change cause (if specified during the update), and the time when each rollout occurred:

This information is valuable for tracking changes to your deployment over time and identifying specific versions to which you might want to roll back or further investigate. Use
kubectl describe <resource>to view the revision you are currently in.
The CHANGE-CAUSE field indicates the reason for a particular rollout or update to a deployment. To add a CHANGE-CAUSE to your deployment history execute the following command:
kubectl annotate deployment nginx-deployment kubernetes.io/change-cause="Update to Nginx version 1.25-alpine"
When it comes to the CHANGE-CAUSE field, you have two more options. You can use the --record flag to document the command that triggered a rollout in the resource’s annotations – As in kubectl set image deployment/nginx-deployment nginx=nginx:<image-version> --record or directly include it in the metadata section of your configuration file like so:
metadata:
  annotations:
    kubernetes.io/change-cause: <CHANGE-CAUSE-MESSAGE>
And just in case you need detailed information on what exactly was changed in any revision – revision 2 for instance, execute the following command:
kubectl rollout history deployment/nginx-deployment --revision 2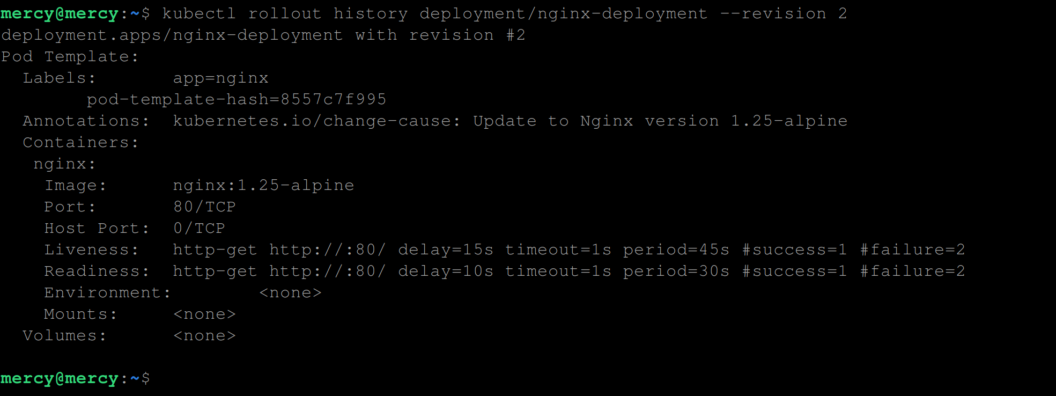
Here parameters with values represent parameters that were not explicitly set or modified in that particular revision.
Rolling Back an Update
To roll back an update we would typically use the kubectl rollout undo deployment <deployment-name> command, which reverts the deployment to its previous state or reverts to the previous revision (revision 1 in this case).
However, we will use the following command instead:
kubectl rollout undo deployment nginx-deployment --to-revision=1This will explicitly roll back the deployment to a specific revision, in this case, revision 1. This command is useful when you want to revert to a particular known good state identified by its revision number, rather than simply undoing the last update.

To view the roll back process in real-time, use the kubectl rollback status like so:
kubectl rollout status deployment/nginx-deployment
Handling Image Pull Errors
When you initiate an update and the image you’re attempting to deploy is incorrectly tagged or simply unavailable in the container registry, Kubernetes halts the update process. To see this in action, execute the following command to update the nginx-deployment to use an nginx image with a non-existent version:
kubectl set image deployment/nginx-deployment nginx=nginx:0.0.0.0

Execute the command – kubectl get pods to view the pods:

From the output above, we can observe the effects of attempting a rolling update with a misconfigured image. Since we specified maxSurge to 1 and maxUnavailable to 1 , Kubernetes tries to update our deployment by adding one new pod beyond the desired count and making one of the existing pods unavailable. However, since the new pods encounter an ImagePullBackOfferror due to the invalid image, and cannot start; Kubernetes does not proceed to update any further pods until the issue is resolved.
At this point when you execute the kubernetes rollout status command like so:
kubectl rollout status deployment/nginx-deploymentYou get the following output:

This means since the rollout is not successful, Kubernetes gives it 10 minutes, which is the default value for the progressDeadlineSeconds parameter, to make progress. Once this time elapses without successful progress, the rollout process is completely halted, resulting in the message deployment has exceeded its progress deadline .
Conclusion
The rolling update deployment strategy is a powerful method for updating and maintaining applications without disruption in Kubernetes. It allows for incremental updates, configurable update speed, and the ability to halt failed updates. With this strategy, your applications remain continuously available, and resource utilization is optimized.
In scenarios where you might want to temporarily halt the rollout of a new version to perform checks, apply fixes, or conduct further testing without completely stopping the deployment, you can pause your deployment and resume when you like using the kubectl rollout pause and kubectl rollout resume commands respectively on your deployment.
With what you have learned so far, you are on your way to effectively manage and optimize your deployments in Kubernetes environments. You are now equipped with the skills necessary to ensure smooth, uninterrupted services for your users while embracing best practices for continuous deployment and delivery.
