Working with enterprise software applications is a sophisticated task, especially when resolving a production bug that only happens in a production environment. Trying to reproduce a bug like this can take hours or days, bringing an enormous risk to your project.
With Event Sourcing, you can reproduce the bug quickly by rebuilding your application state at any specific time through events replaying. Moreover, Event Sourcing also makes your auditing task more straightforward because you get all the changes to the application state in the order of time.
In this article, you will learn what Event Sourcing is, how to build an application with Event Sourcing, and a strategy to reproduce a production bug quickly.
What Is Event Sourcing
Traditionally, to create new data or update existing data, your application directly makes a transaction to the database. For critical applications that require frequent auditing of the databases to see if there are any illegal or problematic transactions, it would be a nightmare to audit just by looking at the application logs.
Event sourcing is an event-based software development pattern. Instead of directly making write requests to the databases, with Event Sourcing, you create the event with information about the change you want to make to your database first. Then you apply that event to your database to make the data update.
Benefits of Event Sourcing
Event Sourcing provides many benefits regarding audibility, scalability, and flexibility. Below are the three notable benefits that Event Sourcing offers:
- Reproducibility: you store all the immutable events in the order they occur. By having all the orderly immutable events, you can understand the current state of your application and have an easier time auditing the changes in your application data if needed.
- Scalability: Event Sourcing enables scalability in your app. Instead of directly updating your primary database, which might make your primary database a performance bottleneck, the events can be processed asynchronously in a distributed manner. As a result, you can apply the data changes to the primary database gradually.
- Replayability: Event sourcing also allows you to rebuild the application state at any desired moment by replaying the events from event logs. This lets you easily debug a production issue by restoring production events in your local machine. You can even rebuild your production database from the event logs in case of a catastrophic event.
Real World Applications Using Event Sourcing
Many real-world applications were built using event-sourcing design patterns like Grab, The Mill Adventure, and Netflix.
Grab
Grab is a global technology company that provides transportation, food delivery, and digital payment services. As they grow, many features are added, along with millions of bookings created daily; they need to find a solution for a more scalable and stable booking service.
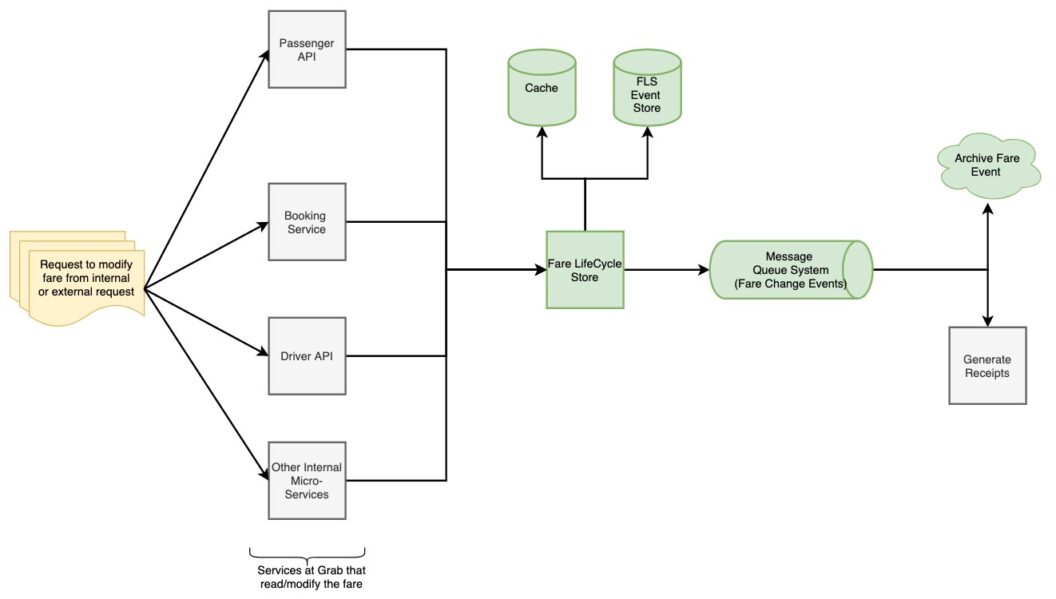
By applying Event Sourcing to build Fare Storage, a single source of truth fare data store, they got a platform to store and retrieve fare with loosely coupling services, making the booking service more scalable and stable. To learn more about how Event Sourcing helps Grab build a more robust booking service, check out the Democratising Fare Storage at Scale Using Event Sourcing article.
The Mill Adventure
The Mill Adventure is a complete gaming platform that enables rapid development in iGaming. For them to audit trail, time travel, and boost the performance and scalability of their services, they applied Event Sourcing to build their services through Amazon DynamoDB with Serverless technologies.
Have a look at how the Mill Adventure implemented event sourcing at scale article to learn more about how the Mill Adventure adopted the Event Sourcing design pattern for building their platform.
Netflix
Netflix applied Event Sourcing for their downloads project so that they can quickly test their system variations thanks to the ability to replay events that Event Sourcing offers.

The flexibility of Event Sourcing has enabled their downloads project to rapidly innovate and react to changing requirements, as well as allowing them to debug issues with change data states over time.
Demo Time
You now understand what Event Sourcing is, the benefits of Event Sourcing, as well as the real-world applications that are using it. Let’s build a demo application to understand better how Event Sourcing works.
About the Demo App
The demo application is a user service. With the user service, you can:
- Create a new user with their
usernameandfullName - Get the user information by their
username
Normal approach
For a normal approach without applying Event Sourcing, the user service works as below:
- The API create a new user creates a new row directly into the
usertable in the database - The API for getting user information queries user data from the
usertable
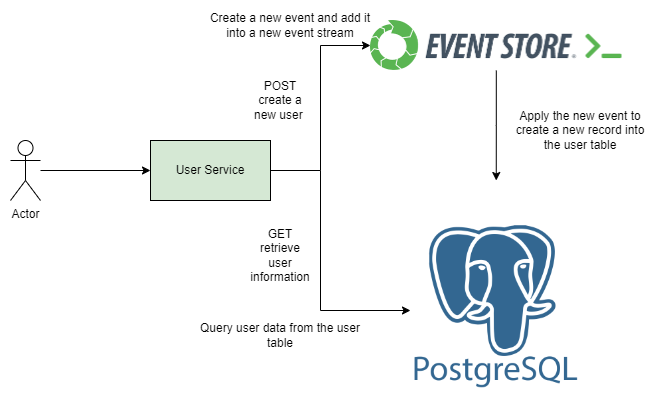
Event Sourcing approach
Using Event Sourcing approach, the user service works as below instead:
- The API for creating a new user creates a new event stream into the Event Store database. Inside the event stream, you have the event which has the event type (
user-created), along with information about the updated data such as the user’susername,fullName, and theopenedAttimestamp. - There’s a separate process which continuously checks if there’s a new event created at the EventStoreDB. With every new event, this process creates a new record into the
usertable with data matching with the user information stated in the event. - The API for getting user information queries the user data from the
usertable
The User Service Components
The user service consists of the following components:
- A PostgreSQL database to store the user data
- An EventStoreDB to store all the user events before applying them to the PostgreSQL database
- The user service itself which is built using Node.js platform, Express server with Typescript programming language
What is EventStoreDB
EventStoreDB is an open-source state transitionel database, that is specfically designed for applying Event Sourcing into your apps. EventStoreDB provides support for concurrency models, granular streams and guaranteed writes which make it an ideal choice for applications that require strong performance and high availabilty.
EventStoreDB has a built-in subsystem called Projections which allows you to append new events into a Event Stream. Each event has a version associated with it, which represents the position of the event in the stream. As a result, you get the ability to correctly handle concurrent modifications to the same stream.
The database supports a subscription model allowing you to receive real-time updates as new events are appended to the stream. You can then define your action to be triggered whenever a new event is received, such as creating a new record into the usertable.
Below is the diagram demonstrating how EventStoreDB works in general:

Prerequisites
To follow along with the step-by-step guide in this demo section, you need to prepare the following prerequisites:
- Docker and Docker Compose are installed in your local machine so that you can bring up the PostgreSQL and EventStoreDB containers
- Node.js, preferably version v18.15.0 or above.
- Git
- curl
- The pgAdmin 4 GUI tool for interacting with the PostgreSQL database.
Build the application
To understand how Event Sourcing works, you will build the user service in the two phases.
With the first phase, you will build the API for creating a new user. This API creates a new stream into the EventStoreDB database. For a real world service, you could have the events for creating new user, updating the user information, or deleting the user. All these events should be placed in the user event stream. To keep the demo application simple, there’s only one event with event type is user-created in each event stream for now. The event also contains the user information with the below format:
{
      username: string;
      fullName: string;
      openedAt: string;
    }
With the second phase, you will build:
- A process to sync the events from the EventStoreDB database to the PostgreSQL database. As a result , new rows are added into the
usertable with the user information. - The API for retrieving user information from the
usertable based on the user’susername.
For the complete code of the user service, please check out the Event Source Demo App GitHub repository.
With that said, let’s build the first phase of the application.
First phase of the application
In this phase, you will need to execute the following steps:
- Step 1: Initialize a new Node.js project
- Step 2: Create the event data format
- Step 3: Create the projection file
- Step 4: Create the functions to interact with EventStoreDB
- Step 5: Create the function to implement the API for creating new user
- Step 6: Create a Docker Compose file to bring up the EventStoreDB
- Step 7: Create the config file for storing the EventStoreDB connection string
- Step 8: Bring up the EventStoreDB database
- Step 9: Bring up the cart service
Step 1: Initialize a new Node.js project
Open up a new terminal and create a new directory called event-source-demo-app-semaphore in your home directory using the following commands:
mkdir ~/event-source-demo-app-semaphore
cd ~/event-source-demo-app-semaphore
Then run the following commands to initialize a new Node.js project with all default configurations:
npm init -yA new package.json file should be created with the following contents:
{
  "name": "event-source-demo-app-semaphore",
  "version": "1.0.0",
  "description": "",
  "main": "index.js",
  "scripts": {
    "test": "echo \"Error: no test specified\" && exit 1"
  },
  "keywords": [],
  "author": "",
  "license": "ISC"
}
Replace the content from "scripts" to "license": "ISC" with the following contents:
...

  "scripts": {

    "eventsourced:start": "ts-node -r tsconfig-paths/register ./src/eventsourced/index.ts"
  },
  "dependencies": {
    "@eventstore/db-client": "4.0.0",
    "convict": "6.2.3",
    "express": "4.18.2"
  },
  "devDependencies": {
    "@types/convict": "6.1.1",
    "@types/express": "4.17.14",
    "@types/node": "18.11.9",
    "ts-node": "10.9.1",
    "tsconfig-paths": "4.1.0",
    "typescript": "4.8.4"
  },

  ...
The dependencies block code lists the dependencies required to run the user service as followed:
- The
@eventstore/db-clientdependency is for interacting with the EventStore database. - The
convictlibrary is for defining the configuration for the user service. In this case, it is for working with the EventStoreDB connection string. - The
expresslibrary is for creating the API server.
The scripts block code lists has the eventsourced:start script which is for bringing up the user service.
The devDependencies block code lists the dependencies that are used for developing and debugging purposes.
To install the dependencies, run the following command:
npm installStep 2: Create the event data format
In this step, let’s define the event data format for the user event.
Create a new directory named src/eventsourced/users in the root project directory.
mkdir -p src/eventsourced/usersCreate a new file named events.ts in the src/eventsourced/users directory and copy the following content to it:
import {
    JSONEventType,
  } from '@eventstore/db-client';

  export type UserEvent = JSONEventType<
    'user-created',
    {
      username: string;
      fullName: string;
      openedAt: string;
    }
  >;
The UserEvent object uses JSONEventType type, which is a built-in type from the @eventstore/db-client library. Inside the UserEvent object, you have:
- The type of the event, which is
user-created - The data of the user which are their
username,fullName, and theopenedAttime, which is the time the event is created.
Step 3: Create the projection file
To store the events in the EventStoreDB database, you need to create event streams in it. Each created user will have a seprate event stream. In the event stream, there’s one event which has the user-created type and information about the created user.
To do that, create a new directory named src/eventsourced/core with the following command:
mkdir -p src/eventsourced/coreCreate a new file named projection.ts inside the src/eventsourced/core directory with the following content:
import {
    EventStoreDBClient,
    jsonEvent,
    JSONEventType,
  } from '@eventstore/db-client';

  export const create =(
      eventStore: EventStoreDBClient,
      streamName: string,
      event: JSONEventType
    ) : void => {
      eventStore.appendToStream(streamName, jsonEvent(event), {
      });
    };
The create function requires three inputs:
eventStore– an instance of theEventStoreDBClientclass to connect with the EventStoreDB databasestreamName– astringvariable that contains the name of the event streamevent– aJSONEventTypeclass instance which contains information about the user event
The eventStore.appendToStream(streamName, jsonEvent(event), {}); line will append a new event to the event stream that has the name is streamName. If the event stream is not existed yet, the '@eventstore/db-client' will automatically create it.
Below is an example usage of how to use this create function:
export const createUser = ({
username,fullName
}: CreateUserModel): UserEvent => {
return {
    type: 'user-created',
    data: {
    username,
    fullName,
    openedAt: new Date().toJSON(),
    },
};
};

const username = request.body.username;
const fullName = request.body.fullName;
const streamName = `user-${username}`;

const userEvent = createUser({username,fullName})

create(getEventStore(), streamName, userEvent);
Here the create function uses the getEventStore() function as the EventStoreDB client to connect to the EventStoreDB. Then it uses the streamName to create a new stream if it is not existed yet. Finally it will append the userEvent event to the stream.
Step 4: Create the functions to interact with EventStoreDB
Create a new directory named src/core by running the following command:
mkdir -p src/coreCreate a new file named eventstoredb.ts inside the src/core directory and copy the following content to it:
import { config } from '#config';
import {
  EventStoreDBClient,
} from '@eventstore/db-client';


let eventStore: EventStoreDBClient;

export function getEventStore(): EventStoreDBClient {
  if (!config.eventStoreDB.connectionString) {
    throw new Error(
      'EventStoreDB connection string not set. Please define "ESDB_CONNECTION_STRING" environment variable'
    );
  }

  if (!eventStore) {
    eventStore = EventStoreDBClient.connectionString(
      config.eventStoreDB.connectionString
    );
  }

  return eventStore;
}

export const disconnectFromEventStore = async () => {
  const eventStore = getEventStore();

  try {
    return await eventStore.dispose();
  } catch (ex) {
    console.error(ex);
  }
};
Here you have two functions getEventStore() and disconnectFromEventStore which are used for connecting to the EventStoreDB and disconnecting from it.
Step 5: Create the function to implement the API for creating new user
Create a new file named routes.ts inside the src/eventsourced directory and copy the following content to it:
import { NextFunction, Request, Response, Router } from 'express';
import { create } from './core/projection';
import { getEventStore } from '../core/eventstoredb';
import {UserEvent
  } from './users/events';


export const router = Router();

export type CreateUserModel = {
username: string;
fullName: string;
};


export const sendCreated = (
  response: Response,
  username: string,
): void => {
  response.status(201).json({ username: username });
};


export const createUser = ({
username,fullName
}: CreateUserModel): UserEvent => {
return {
    type: 'user-created',
    data: {
    username,
    fullName,
    openedAt: new Date().toJSON(),
    },
};
};

router.post(
'/users',
async (request: Request, response: Response, next: NextFunction) => {
    try {
    const username = request.body.username;
    const fullName = request.body.fullName;
    const userEvent = createUser({username,fullName})
    const streamName = `user-${username}`;

    create(getEventStore(), streamName, userEvent);

    sendCreated(response, username);
    } catch (error) {
    console.error(error);
    next(error);
    }
}
);
In this file, you define the API router.post(/users) for creating a new user. This API reads the username and fullNameinformation from the request body.
const username = request.body.username;
    const fullName = request.body.fullName;
Then it creates an event object for the userEvent using the createUser function.
const userEvent = createUser({username,fullName})Next, it creates a new event stream with streamName as the stream name and add the userEvent to it.
const streamName = `user-${username}`;
create(getEventStore(), streamName, userEvent);
Finally, the API will return the response with status code is 201 and the username of the user in the response body if success.
sendCreated(response, username);Step 6: Create a Docker Compose file to bring up the EventStoreDB
Create a new file named docker-compose.yml inside the root folder of the project and copy the following content to it:
version: '3'
services:
  eventstore.db:
    image: eventstore/eventstore:21.10.8-buster-slim
    environment:
      - EVENTSTORE_CLUSTER_SIZE=1
      - EVENTSTORE_RUN_PROJECTIONS=All
      - EVENTSTORE_START_STANDARD_PROJECTIONS=true
      - EVENTSTORE_EXT_TCP_PORT=1113
      - EVENTSTORE_HTTP_PORT=2113
      - EVENTSTORE_INSECURE=true
      - EVENTSTORE_ENABLE_EXTERNAL_TCP=true
      - EVENTSTORE_ENABLE_ATOM_PUB_OVER_HTTP=true
    ports:
      - '1113:1113'
      - '2113:2113'
    volumes:
      - type: volume
        source: eventstore-volume-data
        target: /var/lib/eventstore
      - type: volume
        source: eventstore-volume-logs
        target: /var/log/eventstore
volumes:
  eventstore-volume-data:
  eventstore-volume-logs:
In this file, you tell Docker Compose to create: the EventStoreDB container. You’re using the eventstore:21.10.8-buster-slimimage with environment variables for it such as TCP port, HTTP port. We also tell Docker Compose to create the persistent storage for the EventStoreDB using docker volumes for its data and log which are eventstore-volume-data and eventstore-volume-logs so that you won’t lose the stored events in the EventStoreDB if the container restarts.
Step 7: Create the config file
Create a new file named config.ts inside the root directory of the project and copy the following content to it:
import convict from 'convict';

const convictConfig = convict({
  eventStoreDB: {
    connectionString: {
      format: String,
      default: 'esdb://localhost:2113?tls=false&throwOnAppendFailure=false',
      arg: 'ESDB_CONNECTION_STRING',
      env: 'ESDB_CONNECTION_STRING',
    },
  },
});

convictConfig.validate({ allowed: 'strict' });

export const config = convictConfig.getProperties();
This file exports the config variable with information about the eventStoreDB connectionString. You use this exported config variable inside the core/eventstoredb.ts in order to connect to the EventStoreDB database.
Then, create a new tsconfig.json file in the root directory and copy the following content to it:
{
  "compilerOptions": {
    "target": "es2022",
    "module": "commonjs" ,
    "lib": [
      "es2022"
    ] ,
    "outDir": "./dist" ,
    "isolatedModules": true ,
    "strict": true ,
    "strictNullChecks": true ,
    "noUnusedLocals": false ,
    "noUnusedParameters": false ,
    "noImplicitReturns": true ,
    "moduleResolution": "node" ,
    "baseUrl": "./" ,
    "paths": {
      "#core/*": ["./src/core/*"],
      "#config": ["./config.ts"]

    } ,
    "esModuleInterop": true ,
    "resolveJsonModule": true ,
    "skipLibCheck": true ,
    "forceConsistentCasingInFileNames": true
  },
  "include": ["./src/**/*", "./config.ts"]
}
Generally speaking, the tsconfig.json sets the root level files and compiler options for Typescript. For example, we’re setting #core and #config as the modules of the user service project.
Step 8: Create the entrypoint of the user service.
Create a new file named index.ts inside the src/eventsourced directory and copy the following content to it:
import { disconnectFromEventStore } from '../core/eventstoredb';
import { router } from './routes';

process.once('SIGTERM', disconnectFromEventStore);

import express, { Application, Router } from 'express';
import http from 'http';

export const getApplication = (router: Router) => {
  const app: Application = express();
  app.use(express.json());
  app.use(
    express.urlencoded({
      extended: true,
    })
  );
  app.use(router);

  return app;
};

export const startAPI = (router: Router, port = 5000) => {
  const app = getApplication(router);

  const server = http.createServer(app);

  server.listen(port);

  server.on('listening', () => {
    console.info('server up listening');
  });
};

startAPI(router);
This file acts as the entrypoint of the user service and will apply the route for the creating new user API on port 5000 with path is /users.
npm run eventsourced:migrateStep 9: Bring up the EventStoreDB database
To bring up the EventStoreDB database, run the following command:
docker compose up -dOpen up a new browser instance, and navigate to “http://localhost:2113” Navigate to “http://localhost:2113” to see the EventStoreDB dashboard. In the “Stream Browser” tab you will find the streams we’ll create next.
You should see the dashboard of the EventStoreDB. Click on Stream Browser from the menu.
Currently there’s no event streams yet.
Step 10: Bring up the user service
To bring up the user service, run the following command:
npm run eventsourced:startNow that the user service is up and running, execute the following command to create a new user:
curl --location 'localhost:5000/users' \
--header 'Content-Type: application/json' \
--data '{
    "username":"donald-le",
    "fullName":"Donald Le"
}'
You should see the output as below:
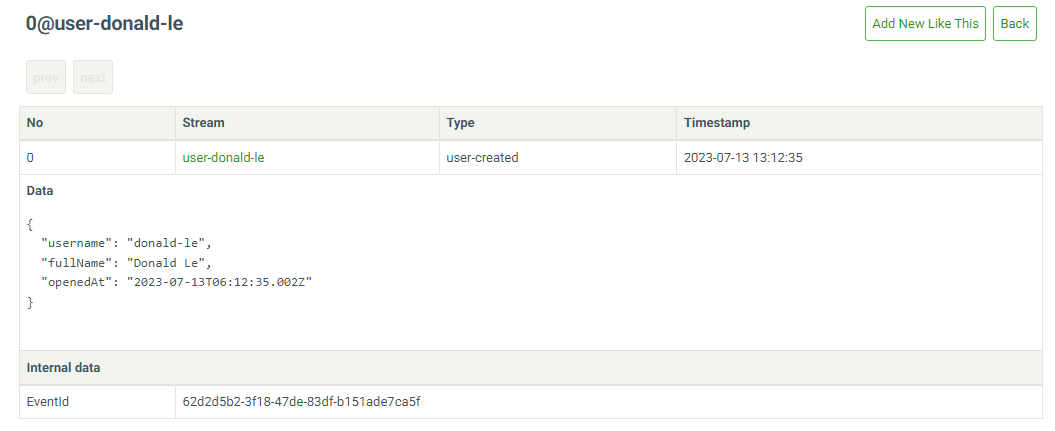
{"username":"donald-le"}Now refresh the “Stream Browser” page, you should see a new event stream is already created. Click on the event stream, you should see an event with type donald-le in there.
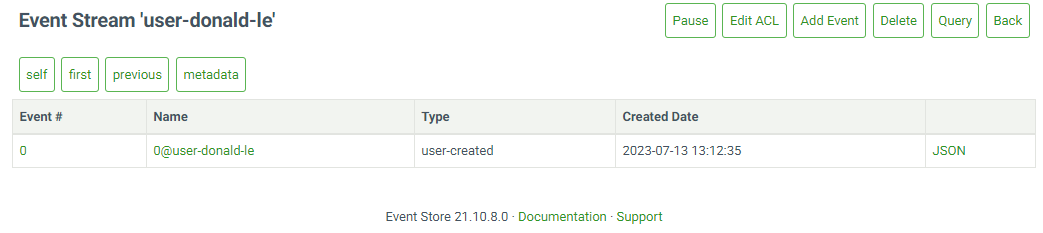
Click on the event name, you should see the event data in detail.
Second phase of the application
In the first phase, you already implemented the API to create new user. However, the API is only creating new event and store it in the EventStoreDB database. The user data is not stored in the PostgreSQL database yet.
In this phase, you will implement a process to sync the events from the EventStoreDB database to the PostgreSQL database. You will also create an API to retrieve the user information using their username.
You will need to execute the following steps in order to do that:
- Step 1: Create the functions to add data to the PostgreSQL database based on the user event
- Step 2: Create the functions for subscripting to the event streams
- Step 3: Create the functions for connecting and disconnecting with the PostgreSQl database
- Step 4: Update the
index.tsfile to add the subscription process - Step 5: Update the
routes.tsfile to add API for retrieving user information - Step 6: Update the
package.jsonfile - Step 7: Update the
docker-compose.ymlfile - Step 8: Create database migration file
- Step 9: Generate the data models for the PostgreSQL data table
- Step 10: Update the
config.tsfile - Step 11: Bring up the user service
Step 1: Create the functions to add data to the PostgreSQL database based on the user event
Create a new file named syncEvent.ts inside the src/eventsourced/users directory and copy the following content to it:
import { Transaction } from '@databases/pg';
import {user } from '../db';
import {
  UserEvent,
} from './events'

import {
    JSONRecordedEvent,
    RecordedEvent,
    AllStreamResolvedEvent
  } from '@eventstore/db-client';


export const isUserEvent = (
    event: RecordedEvent
  ): event is UserEvent & JSONRecordedEvent => {
    return (
      event != null &&
      (event.type === 'user-created')
    );
  };

export const insertUserWithNewEvent = (
  db: Transaction,
  resolvedEvent: AllStreamResolvedEvent
): Promise<void> => {

    if (
        resolvedEvent.event === undefined ||
        !isUserEvent(resolvedEvent.event)
      )

        return Promise.resolve();
  const { event } = resolvedEvent;

  return insertUser(db, event);

};

export const insertUser = async (
  db: Transaction,
  event: UserEvent,
): Promise<void> => {
  const User = user(db);

  await User.insertOrIgnore({
    username: event.data.username,
    fullName: event.data.fullName,
    createdAt: new Date(event.data.openedAt),
  });
};
In this file, you have the isUserEvent, insertUser and insertUserWithNewEvent functions.
The isUserEvent function checks the given event is UserEvent or not.
The insertUser function requires two inputs: an instance of Transaction class and an instance of the UserEvent class. Inside the function, it will insert a new row to the user table inside the PostgreSQL database.
The insertUserWithNewEvent function requires an instance of Transaction class and an instance of the SubscriptionResolvedEvent class. It will get the resolvedEvent value with type SubscriptionResolvedEvent then call the insertUser function to insert a new row to the user table. This insertUserWithNewEvent function will be used as an input of the handleEventInPostgresTransactionScope function in the next step.
Step 2: Create the file for subscripting to the event streams
In this step, you will implement the subscripting mechanism to scan all the events in the EventStoreDB database. In addition, if there’s new event created, the subscription process will be able to capture it. With every scanned and captured events, the subscription process will call the handleEventInPostgresTransactionScope function to insert data into the user table.
Create a new file named subscription.ts inside the src/eventsourced/core directory and copy the following content to it:
import { getPostgres } from '#core/postgres';
import { Transaction } from '@databases/pg';
import {
  AllStreamResolvedEvent,
  EventStoreDBClient,
  excludeSystemEvents,
} from '@eventstore/db-client';
import { finished, Readable } from 'stream';

export type EventHandler = (event: AllStreamResolvedEvent) => Promise<void>;

export const SubscriptionToAll =
  (
    getEventStore: () => EventStoreDBClient,handlers: EventHandler[]
  ) => {
      const subscription = getEventStore().subscribeToAll({
        filter: excludeSystemEvents(),
      });

      finished(
        subscription.on(
          'data',
          async (resolvedEvent: AllStreamResolvedEvent) => {
            for (const handler of handlers) {
                console.log(resolvedEvent);
                await handler({ ...resolvedEvent });
            }

          }
        ) as Readable,
        (error) => {
          if (!error) {
            console.info(`Stopping subscription.`);
            return;
          }
          console.error(
            `Received error: %s. Retrying.`,
            error ?? 'UNEXPECTED ERROR'
          );
          throw error;
        }
      );
      console.info('Subscription is running');

      return subscription;

  };

export type PostgresEventHandler = (
  db: Transaction,
  event: AllStreamResolvedEvent
) => Promise<void>;


export const handleEventInPostgresTransactionScope =
  (handle: PostgresEventHandler) =>
  async (event: AllStreamResolvedEvent) => {
    await getPostgres().tx(async (transaction) => {
      await transaction.task(async (db) => {
          // console.log(event);
          await handle(db, event);
      });
    });
  };
In this file, you have:
- The
EventHandlertype - The
SubscriptionToAllfunction - The
PostgresEventHandlertype - The
handleEventInPostgresTransactionScopefunction
The EventHanler type represents a function that requires an input with type AllStreamResolvedEvent and returns a Promisewith void value.
The SubscriptionToAll function is for scanning all existing events in the EventStoreDB database (excluding the system events inside the EventStoreDB filter: excludeSystemEvents() ). If there’s new event created, the SubscriptionToAll function will capture it too. The SubscriptionToAll requires two inputs:
- The first input is the
getEventStorefunction so that theSubscriptionToAllcan access to the EventStoreDB database - The second input is
handlerswhich is a group of functions withEventHandler[]type
For each captured event, there’s one handler function to handle that event. When the SubscriptionToAll function receives a stream of events, it will iterate over the handlers list and execute each handler function.
The PostgresEventHandler type defines a function type which requires the db argument as a transaction instance, and the event argument as an instance of the AllStreamResolvedEvent class.
The handleEventInPostgresTransactionScope function, will use this function type as an input create transaction to the database. Actually, this function type matches with the insertUserWithNewEvent function type in the syncEvent.ts file. When calling the handleEventInPostgresTransactionScope function, you will use the insertUserWithNewEvent as an input to insert data to the user table.
Step 3: Create the file for connecting and disconnecting with the PostgreSQl database
Create a new file named postgres.ts inside the src/core directory and copy the following content to it:
import { config } from '#config';
import createConnectionPool, { ConnectionPool } from '@databases/pg';

let db: ConnectionPool;

export const getPostgres = (): ConnectionPool => {
  if (!db) {
    if (!config.postgres.connectionString) {
      throw new Error(
        'Postgres connection string not set. Please define "DATABASE_URL" environment variable'
      );
    }

    if (!config.postgres.schemaName) {
      throw new Error(
        'Postgres schema name string not set. Please define "DATABASE_SCHEMA" environment variable'
      );
    }

    db = createConnectionPool({
      connectionString: config.postgres.connectionString,
      schema: config.postgres.schemaName,
    });
  }

  return db;
};

export const disconnectFromPostgres = async () => {
  const db = getPostgres();

  try {
    return await db.dispose();
  } catch (ex) {
    console.error(ex);
  }
};
In this file, you have the getPostgres function to connect to the PostgreSQL database. The disconnectFromPostgres function is for disconnecting from the database.
Step 4: Update the index.ts file to add the syncing process
In this step, you will add the code for creating the syncing process when the user service starts.
To do that, open the src/eventsourced/index.ts file and add the following code block to the end of the file:
SubscriptionToAll(getEventStore, [
  handleEventInPostgresTransactionScope(insertUserWithNewEvent),
]);
You also need to add the following import code right below the import { router } from './routes'; line:
import {
    handleEventInPostgresTransactionScope,
    SubscriptionToAll,
  } from './core/subscription';

import { disconnectFromPostgres } from '#core/postgres';
import { insertUserWithNewEvent } from './users/syncEvent';
import { getEventStore } from '../core/eventstoredb';
process.once('SIGTERM', disconnectFromPostgres);
The process.once('SIGTERM', disconnectFromPostgres); line tells the user service to remove connection from PostgreSQL database when you bring down the service.
SubscriptionToAll(getEventStore, [
  handleEventInPostgresTransactionScope(insertUserWithNewEvent),
]);
This line of code creates a separate process which executes the SubscriptionToAll function with getEventStore and [handleEventInPostgresTransactionScope(insertUserWithNewEvent)]as inputs. It will sync all existing events from the EventStoreDB database to the user table. When a new event is created, it will sync that event too.
Step 5: Update the routes.ts file to add API for retrieving user information
Now that you have implemented the process to sync events from the EventStoreDB database to the PostgreSQL database, let’s implement the API to retrieve user information by querying data from the user table using the username value.
Open the src/eventsourced/routes.ts file and add the following content to the end of the file:
router.get(
    '/users/:username',
    async (request: Request, response: Response, next: NextFunction) => {
      try {
        const User = user(getPostgres());

        let query: WhereCondition<User> = {
          username: request.params.username,
        };


        const result = await User.findOne(query);

        if (result === null) {
          response.sendStatus(404);
          return;
        }
        response.send({
          ...result,
        });
      } catch (error) {
        console.error(error);
        next(error);
      }
    }
  );
You also need to add the following code and put it in the import section to:
- Import the
WhereConditionfrom the@databases/pg-typeddependency, - Import the
uservariable, and theUserdata models which you will create later in the step 7.
 import {  WhereCondition } from '@databases/pg-typed';
  import { user, } from './db';
  import { User } from './db/__generated__';
  import { getPostgres } from '#core/postgres';
The API to retrieve user information will have the path as /users/:username. It will query the user information based on the username.
const User = user(getPostgres());

let query: WhereCondition<User> = {
  username: request.params.username,
};

const result = await User.findOne(query);
Step 6: Update the package.json file
Since you need to interact with the PostgreSQL database in this phase, you need to update the package.json file a bit.
Open the package.json file and replace the content from the scripts block with the following content:
...

  "scripts": {

    "eventsourced:generate": "npx @databases/pg-schema-cli --database postgres://postgres:Password12!@localhost:5432/postgres --schemaName eventsourcing --directory src/eventsourced/db/__generated__",
    "eventsourced:migrate": "pg-migrations apply --database postgres://postgres:Password12!@localhost:5432/postgres --directory ./src/eventsourced/migrations/ --ignore-error migration_file_edited",
    "eventsourced:start": "ts-node -r tsconfig-paths/register ./src/eventsourced/index.ts"
  },
  "dependencies": {
    "@databases/pg": "5.4.1",
    "@eventstore/db-client": "4.0.0",
    "convict": "6.2.3",
    "express": "4.18.2"
  },
  "devDependencies": {
    "@databases/pg-migrations": "5.0.1",
    "@databases/migrations-base": "3.0.0",
    "@databases/pg-typed": "4.3.0",
    "@types/convict": "6.1.1",
    "@types/express": "4.17.14",
    "@types/node": "18.11.9",
    "npm-run-all": "4.1.5",
    "ts-node": "10.9.1",
    "tsconfig-paths": "4.1.0",
    "typescript": "4.8.4"
  },

  ...
Here, you have the @databases/pg dependency in the dependencies block so that the user service can interact with the PostgreSQL database. You also use the @databases/pg-migrations and the @databases/migrations-base dependencies to migrate the PostgreSQL database from the predefined sql script in the next step.
Run the following command to install the newly added dependencies:
npm installStep 7: Update the docker-compose.yml file to add the PostgreSQL database definition
Replace the content at the docker-compose.yml file with the following content:
version: '3'
services:
  eventstore.db:
    image: eventstore/eventstore:21.10.8-buster-slim
    environment:
      - EVENTSTORE_CLUSTER_SIZE=1
      - EVENTSTORE_RUN_PROJECTIONS=All
      - EVENTSTORE_START_STANDARD_PROJECTIONS=true
      - EVENTSTORE_EXT_TCP_PORT=1113
      - EVENTSTORE_HTTP_PORT=2113
      - EVENTSTORE_INSECURE=true
      - EVENTSTORE_ENABLE_EXTERNAL_TCP=true
      - EVENTSTORE_ENABLE_ATOM_PUB_OVER_HTTP=true
    ports:
      - '1113:1113'
      - '2113:2113'
    volumes:
      - type: volume
        source: eventstore-volume-data
        target: /var/lib/eventstore
      - type: volume
        source: eventstore-volume-logs
        target: /var/log/eventstore
  postgres:
    image: postgres:15.3
    container_name: postgres
    environment:
      POSTGRES_PASSWORD: Password12!
    ports:
      - '5432:5432'
    volumes:
      - app-volume:/var/lib/postgresql/data

volumes:
  eventstore-volume-data:
  eventstore-volume-logs:
  app-volume:
In this file, you have added the configuration detail for bringing up the PostgreSQL database container. The database will use the docker volume named app-volume to store the data persistently.
To bring up the newly defined PostgreSQL database, run the following command:
docker compose up -dStep 8: Create database migration file
Create a directory named migrations inside the src/eventsourced directory. Create a file named 0001-initial_migrations.sql inside it, then copy the following content to it:
CREATE SCHEMA "eventsourcing";

CREATE TABLE
  "eventsourcing"."user" (
    "id" BIGSERIAL PRIMARY KEY,
    "username" VARCHAR(100) NOT NULL,
    "createdAt" TIMESTAMPTZ NOT NULL,
    "fullName" VARCHAR(100) NOT NULL
  );
With these sql scripts, you create a new schema named eventsourcing and create a new table named user into it.
Run the following command to apply the migration.
npm run eventsourced:migrateStep 9: Generate the data model for the PostgreSQL data table
In order to interact with the user table, such as creating new user or reading user data from it, you need to create the data model for the user table.
To automatically generate the data model, you will use the @databases/pg-schema-cli library. This library will read the usertable definition in the eventsourcing schema and generate the user data model accordingly.
Create a new directory named db inside the src/eventsourced directory. Inside the db directory, you create a new file named index.ts and add the following content to it:
import tables from '@databases/pg-typed';
import DatabaseSchema from './__generated__';
import databaseSchema from './__generated__/schema.json';

const {
  user: user,
} = tables<DatabaseSchema>({
  databaseSchema,
});
export { user };
With this file, you export the user variable which points to the generated user data model in the __generated__ folder . This exported user variable is for syncing events to the user table in the insertUser function inside the syncEvent.ts file. You also use it when querying data from the user table in the API retrieving user information which is defined in the routes.ts file.
Run the following command to generate the data model files:
npm run eventsourced:generateYou should see a newly created folder named __generated__ inside the db directory with index.ts, schema.json and user.ts file.
Step 10: Update the config.ts file
Open the config.ts file and replace its content with the following content:
import convict from 'convict';


const convictConfig = convict({
  eventStoreDB: {
    connectionString: {
      format: String,
      default: 'esdb://localhost:2113?tls=false&throwOnAppendFailure=false',
      arg: 'ESDB_CONNECTION_STRING',
      env: 'ESDB_CONNECTION_STRING',
    },
  },
  postgres: {
    connectionString: {
      format: String,
      default: 'postgres://postgres:Password12!@localhost:5432/postgres',
      arg: 'DATABASE_URL',
      env: 'DATABASE_URL',
    },
    schemaName: {
      format: String,
      default: 'eventsourcing',
      arg: 'DATABASE_SCHEMA',
      env: 'DATABASE_SCHEMA',
    },
  },
});

convictConfig.validate({ allowed: 'strict' });

export const config = convictConfig.getProperties();
In this file, besides the connection string for the EventStoreDB database, you added the connectino string for the PostgreSQL database, along with its schema name.
Step 11: Bring up the user service
Close the current session of the user service.
To bring up the user service with newly added features for syncing events process and adding new API to retrieve user information, run the following command:
npm run eventsourced:startYou should see the user service is now up and running. There should be a similar output in the console:
{
  event: {
    streamId: 'user-donald-le',
    id: '86af3de8-8c93-4e42-b563-f9512830a3b8',
    revision: 0n,
    type: 'user-created',
    data: {
      username: 'donald-le',
      fullName: 'Donald Le',
      openedAt: '2023-07-14T01:47:35.070Z'
    },
    metadata: undefined,
    isJson: true,
    created: 16892992554296240,
    position: { commit: 10135n, prepare: 10135n }
  },
  commitPosition: 10135n
}
This mean that the syncing process has successfully subscripted to the EventStoreDB database.
Let’s make an API request to retrieve the user information from the PostgreSQL database using the their username.
curl --location 'localhost:5000/users/donald-le'You should see the similar output as below:This means that the user event has already been synced to the user table inside the PostgreSQl database.
{"id":1,"username":"donald-le","createdAt":"2023-07-14T01:47:35.070Z","fullName":"Donald Le"}Strategy to Quickly Reproduce a Production Bug
Production bug is always the highest priority task you must resolve immediately because it directly impacts the user journey. As a result, it could damage the company’s reputation brand. To fix the production bug, you need to reproduce it first. However, reproducing a bug can be tricky because many things are happening in a production environment, from the primary and caching databases to third-party services. All these things combined can make the bug-reproducing task a nightmare.
By applying Event Sourcing to build your application, reproducing a production bug in your local development is now becoming a breeze. You only need to replay the captured events from the most recent snapshot data to the time the production bug happens. The steps that you need to do are:
- Create a local database version of your production database.
- For the database information, replace the production database connection values with the values of your local database.
- Add a filter mechanism for the application to only capture events from the last snapshot of the EventStoreDB database to the time the production bug happens.
- Bring up the application in your local environment
After the application starts in your local environment, all the captured events will be applied to your local database. As a result, you can see the exact state of the application when the user meets the bug. By quickly reproducing a production bug like this, you can resolve the production problem promptly.
Conclusion
Through the article, you have learned what Event Sourcing is and how to build an application with Event Sourcing approach. You also learned to reproduce a production bug quickly by replaying captured events in the EventStoreDB database.
If you want to learn about other implementations of applying Event Sourcing, such as Writing and Testing an Event Sourcing Microservices with Kafka and Go, visit the Semaphore blog page.
