Docker containers are designed to be disposable, offering the flexibility to stop, start, and restart containers multiple times during the lifespan of an application. This feature allows for seamless upgrades or patches and supports portability and consistency. However, this can be a double-edged sword; as any changes made to the container since its last started state will be lost.
Thankfully, by using Docker volumes or bind mounts, you can have the best of both worlds; these features let containers hold onto their data through all the changes and states. This allows you to combine the flexibility of temporary containers with the stability of lasting data storage.
Understanding Docker Volumes
Before diving into the technicals of Docker volumes, it is essential to understand their significance and how they contribute to managing data in containers.
What Are Docker Volumes?
Docker volumes are a feature of Docker that provide a way to persistently store and manage data in containers. A volume is a directory or a named storage location outside the container’s file system that is accessible to one or more containers. It allows data to be shared and retained even when containers are stopped, started, or removed.
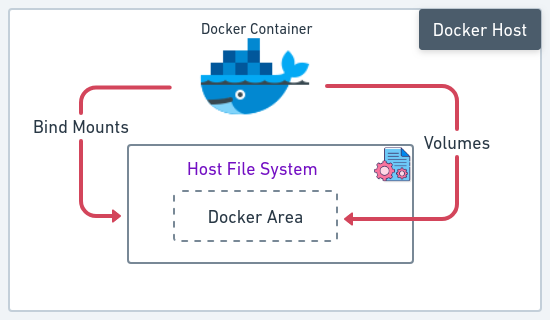
Docker Volumes vs. Bind Mounts
While both Docker volumes and bind mounts provide a way to manage data in containers, they have some differences:
| Docker Volumes | Bind Mounts |
|---|---|
| Docker volumes are managed by Docker and are typically stored in a specific directory on the host machine. | Bind mounts reference a directory on the host machine. The directory is directly mounted into the container at a specified path. |
| Volumes are independent of the container’s lifecycle and can be created, managed, and shared across multiple containers. | Bind mounts are tightly coupled to the host file system and do not have the same features and flexibility as Docker volumes. |
| Volumes offer more features, such as data management commands and integration with Docker ecosystem tools. | Bind mounts are useful when you need to directly access files or directories from the host in the container. |
Why Are Docker Volumes Important?
Docker volumes are important for several reasons:
- Persistent Data: Volumes store and preserve data beyond container lifespans, ensuring important data remains intact despite the containers’ state.
- Data Sharing: Multiple containers can share and exchange data by sharing the same volume, facilitating collaboration in distributed applications or microservices.
- Separation of Concerns: Volumes separate application code from data, enhancing modularity and enabling easy updates or replacements without affecting underlying data.
- Backup and Recovery: Volumes simplify data backup and recovery processes, allowing easy creation of backups or snapshots for disaster recovery or data replication.
In summary, Docker volumes provide versatile data management features for containers, while bind mounts offer a simpler way to access host machine files within containers.
Types of Docker Volumes
There are two main types of Docker volumes:
- Anonymous Volumes: Anonymous volumes are created with no specific source or name. They are typically used to store temporary or transient data generated by a container during its lifecycle.
- Named Volumes: Named volumes are created and managed with a user-defined name and specific source, allowing containers to independently share data across. Named volumes are generally recommended for the production environment.
In addition to these, there are other classes of Docker volumes:
- Remote Volumes: Created and managed on a remote host. This enables sharing of data between different Docker hosts.
- Host Volumes: Created and managed on the host machine.
- Third-Party Volume Plugins: Enables the use of external storage systems like cloud storage or distributed file systems as backing storage for Docker volumes.
By utilizing these volume types, you can choose the best approach based on data sharing, persistence, and control requirements for managing data in Docker containers.
Working with Docker Volumes
Using the volume management command you can create, manage, and utilize volumes effectively via Docker CLI or Docker Compose.
Usage: docker volume <COMMAND>
Creating Volumes
Use the create command to create a named volume with the name semaphore.
docker volume create semaphoreAlternatively, you can create an anonymous volume by using the -v option without specifying a source.
docker run -v /store -it busyboxListing Volumes
Use the ls command to list both anonymous and named volumes.
docker volume ls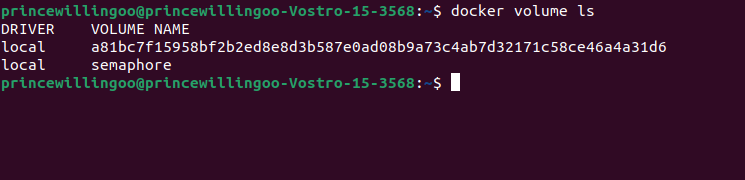
Here you can see the named and anonymous volumes created earlier.
Inspecting Volumes
Use the inspect command to display information about a specific volume.
docker volume inspect semaphore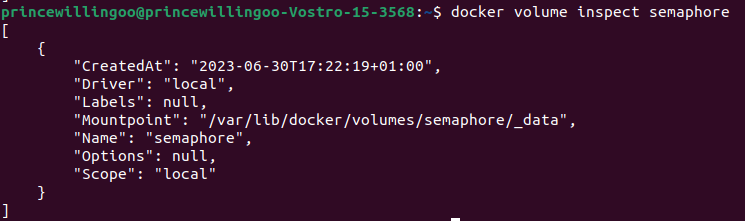
Removing Volumes
Use the rm command to permanently remove a volume. You’ll get an error if the volume is currently in use by a container.
docker volume rm semaphoreUse the --rm flag to tell Docker to remove a container after it exits. This means that the container’s volumes, filesystem, and network interfaces will be deleted along with it.
docker run -v /store --rm -it busyboxTo remove volumes that are not referenced or used by any containers, use the prune command.
docker volume pruneMounting Volumes in a Container
Volumes are mounted during the process of starting a container. To mount a volume in a container, you use the -v option and specify the volume name in the format volume_name:/path/in/container to mount it.
Syntax: docker run <options> -v <volume>:<container-path> <image> <command|args>
docker run -d \
--name devserver \
-v semaphore:/var/www/html \
httpd:latest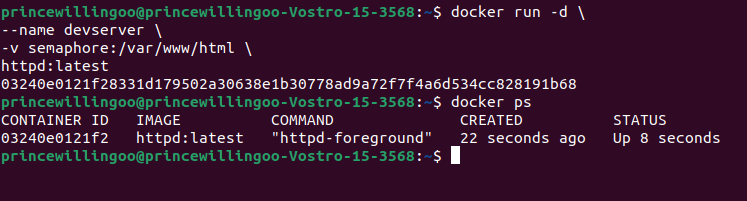
The command starts a container and mounts the volume (semaphore) into the containers directory (/var/www/html).
Docker automatically creates a volume when you start a container with a non-existent volume. Also, if there are files or directories in the designated mount directory (/var/www/html), Docker copies them into the volume. This way you can populate a volume using a container.
Inspect the container to see its mounts.
docker inspect devserver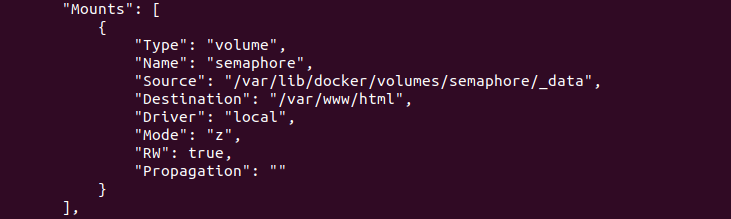
Using Docker Compose
Docker Compose allows you to define and manage multiple containers (services). It simplifies the process of deploying and orchestrating interrelated containers, making it easier to manage complex application setups and their dependencies.
You can create and assign a volume to a service in Docker Compose as shown below.
#docker-compose.yml
services:
  server:
    image: httpd:latest
    volumes:
      - store:/var/www/html
volumes:
  store:
You can use an externally created volume in Docker Compose by specifying the volume and setting its value of external to true. In the context of Docker Compose an external volume is one which was created outside of Docker Compose, mainly via Docker CLI. There are just like normal volumes but not created with Docker Compose.
#docker-compose.yml
services:
  server:
    image: httpd:latest
    volumes:
      - semaphore:/var/www/html
volumes:
  semaphore:
    external: true
Start containers (services) defined in Docker Compose in detached (-d) mode.
docker compose up -dSharing Volumes Across Containers
Docker volumes can be shared among multiple containers by simply reusing the same volume name when starting another container.
docker run -d \
--name devserver1 \
-v semaphore:/var/www/html \
httpd:latest

docker run -d \
--name devserver2
-v semaphore:/var/www/html \
httpd:latest
Inspect the new container to see its mounts
docker inspect devserver1
docker inspect devserver2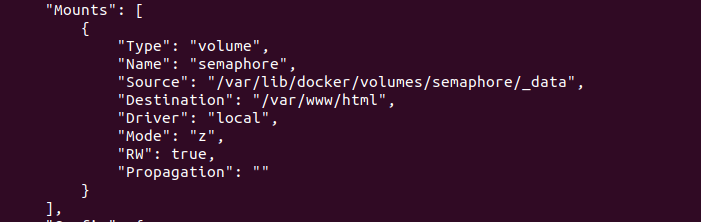
Both containers will have access to the same volume, allowing them to read from and write to the shared data.
Backing Up and Restoring Volumes
Volumes are useful for backups allowing for data migrations and easy restoration.
Assuming you have an application running in a container and stores its data in a volume.
Create a container with the name myapp and a volume myapp-vol.
docker run -d \
-v myapp-vol:/app/data/ \
--name myapp \
myapp
To backup the volume:
- Create a
backupdirectory on your host machine. - Start another container using the
--rmflag, along with the--volumes-fromflag to mount the volume from themyappcontainer. - Use the
-voption to mount yourbackupdirectory - Append a
tarcommand to create a tarball of the contents of themyapp-volvolume to yourbackupdirectory.
docker run -d --rm \
--volumes-from myapp \
-v $(pwd)/backup:/backup \
ubuntu \
tar cvf /backup/backup.tar -C /app/data/ .
The command creates a short-lived container that generates a backup of the volume.
Now, Assuming a complication occurred and the myapp-vol volume was lost. You can restore the volume from the backup by creating a new myapp container and untarring the backup file in the volume of the new container.
docker run -d --rm \
--volumes-from myapp \
-v $(pwd)/backup:/backup \
ubuntu \
bash -c "cd /app/data/ && tar xvf /backup/backup.tar --strip 1"
The command creates a short-lived container that extracts the backup into the volume mounts directory which automatically populates the volume.
Volumes Read-Only Mode
To use a volume in read-only mode, specify the :ro option when mounting the volume in a container.
docker run -d \
--name=httpdtest \
-v httpd-store:/var/www/html:ro \ (*)
httpd:latest
This way data can only be read from and not written to the volume.
With these you can easily create and manage Docker volumes, providing a reliable and flexible solution for data management in containerized environments.
Docker Volumes in Practice
Docker volumes are one of the best ways to persist data in production use cases. Let’s see practical scenarios where Docker volumes are applicable.
Database Management
Managing databases becomes simpler with Docker volumes. By storing database files in named volumes, you can separate application data from the container, allowing for seamless updates and migrations without data loss. This also ensures database integrity during container restarts or upgrades. For example:
docker run -d \
--name postgres-db \
-v dbdata:/var/lib/postgresql/data \
-e POSTGRES_PASSWORD=verystrongpassword \
postgres:latest
Here, a named volume dbdata is mount into the /var/lib/postgresql/data directory of a PostgreSQL container. This ensures that the PostgreSQL database files are stored persistently in the volume, separating the data from the container’s lifecycle.
Persistent Data Storage
Docker volumes provide a reliable and isolated way to store application data like configurations, uploads, and logs. This allows easy data sharing and collaboration between containers. For Example:
docker run -d --name appy -v uploads:/app/uploads myapp:v2A volume named uploads is mounted in the containers /app/uploads directory allowing the application running in the container to persistently store and access uploaded data.
Handling Log Files
Volumes are useful for handling log files generated by containerized applications. By mounting a volume, you can centralize log management, making logs easily accessible for monitoring and analysis. For example:
docker run -d --name app1 -v logs:/app/logs myapp:v3
docker run -d --name app2 -v logs:/app/logs myapp:v3
Here, two containers(app1 and app2) share the same volume (logs). Any log generated by the applications running in either container will be persisted in the volume, allowing for centralized log management and analysis.
Integrating with Container Orchestration Tools
Docker volumes integrate seamlessly with container orchestration tools like Docker Swarm or Kubernetes. These tools provide advanced features for managing and scaling containerized applications across multiple hosts. Volumes can be provisioned, managed, and scheduled alongside containers, ensuring high availability, fault tolerance, and data persistence.
To create, for example, a persistent volume in Kubernetes we need to declare a PersistenVolumeClaim and a PersistenVolume like this:
apiVersion: v1
kind: PersistentVolume
metadata:
  name: my-pv
spec:
  storageClassName: my-storage-class
  capacity:
    storage: 5Gi
  accessModes:
    - ReadWriteOnce
  hostPath:
    path: /data
---
apiVersion: v1
kind: PersistentVolumeClaim
metadata:
  name: my-pvc
spec:
  storageClassName: my-storage-class
  accessModes:
    - ReadWriteOnce
  resources:
    requests:
      storage: 1Gi
---
apiVersion: v1
kind: Pod
metadata:
  name: my-pod
spec:
  containers:
    - name: my-container
      image: my-image
      volumeMounts:
        - name: my-volume
          mountPath: /app/data
  volumes:
    - name: my-volume
      persistentVolumeClaim:
        claimName: my-pvc
A PersistentVolume (PV) and PersistentVolumeClaim (PVC) are defined, specifying the storage size and access mode. The PV is backed by a host path /data and a Pod is then defined with a container that mounts the PVC, enabling persistent data storage.
Best Practices for Docker Volumes
When working with Docker Volumes, it’s important to follow certain best practices to take full advantage of them and avoid data loss.
Proper Naming and Labeling Conventions
When creating Docker volumes, follow meaningful naming and labelling conventions. Here’s an example:
docker volume create \
--label description="My Volume" \
--label version="1.0" \
myVolume
Here, labels are added to the volume myVolume using the --label flag. Labels allow you to provide additional information about a volume. You can read the labels associated with a container with the docker inspect command.
Managing Volume Permissions
Ensure proper permissions are set for Docker volumes to maintain data integrity and security. Here’s an example:
FROM baseimage

RUN mkdir /app/data

RUN chown -R 1000:1000 /app/data
RUN chmod 644 /app/data

VOLUME /app/data
A directory /app/data is created within the container with ownership set to the user and group with IDs 1000. The permissions are adjusted to allow read and write access by the owner and read-only access by others. The VOLUME instruction is used to mark the /app/data directory for holding externally mounted volumes.
Monitoring and Managing Volume Usage
Regularly monitor and manage Docker volume usage to optimize resource utilization.
docker system df -v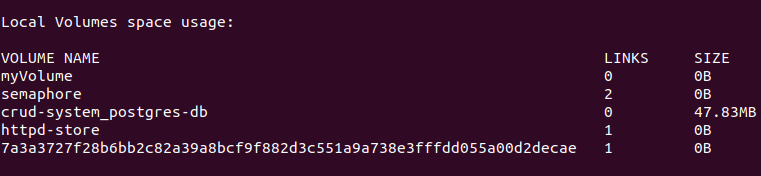
The command displays a summary of Docker disk usage, including volume space usage.
Data Security and Encryption
When dealing with sensitive or confidential data, it is essential to consider data security and encryption measures. Here are some best practices:
- Use encryption mechanisms, such as encrypted volumes or file-level encryption, to protect sensitive data stored in Docker volumes. This ensures that data remains secure even if the underlying storage infrastructure is compromised.
- Implement secure network communication for data transfer between containers and volumes. Use protocols such as HTTPS or VPNs to encrypt data in transit.
- Regularly update and patch Docker hosts, images, and storage systems to mitigate potential security vulnerabilities.
- Use authentication and authorization mechanisms to ensure that only authorized users or containers can access and modify data.
By adhering to these best practices, you can ensure efficient and secure management of data within containerized environments.
Conclusion
Docker volumes offer an effective solution for managing data in containerized environments. By leveraging the various types of volumes, you can ensure persistent storage, data sharing, and scalability.
In this article, we’ve covered the fundamentals of Docker volumes, their types, practical use cases, and best practices. With this knowledge, you can confidently harness the power of Docker volumes while enjoying the advantages offered by containerized applications.
Remember, Docker is an evolving technology, and it’s always recommended to refer to the official Docker documentation for the latest updates and best practices.

Thank you for this article…This is really helpful!