Introduction
Being a developer, you probably own a lot of computer books. In this post, we’ll get started by building an application to store our books. We’ll create a new application using Ember.js CLI and use TDD to fully test our application.
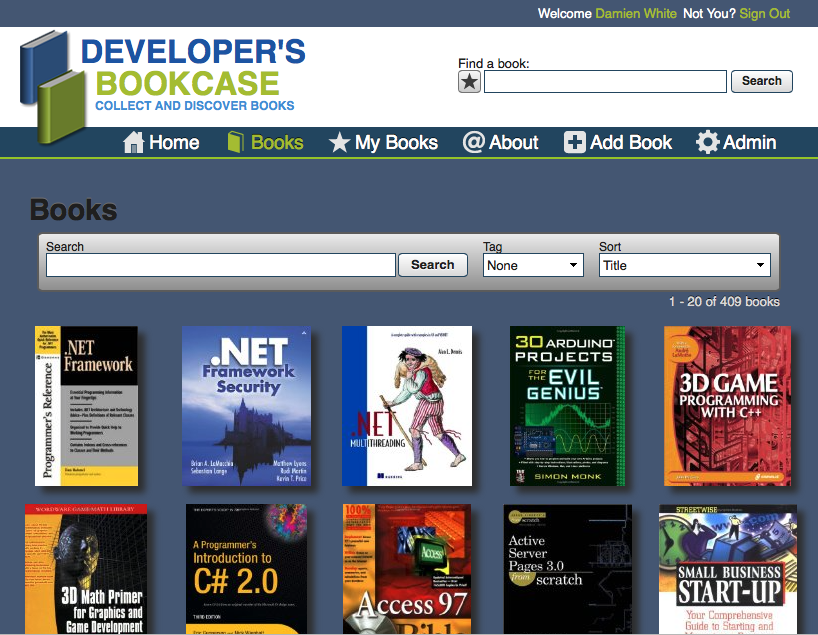
We’re going to be building a simplified version of the application DevBookcase. While we won’t be copying it, we will be taking some aspects of it, specifically in this post, the object models like author, publisher, and, of course, book. Here’s a snapshot of DevBookcase’s book list, so you can get an idea about what we’ll be building:
For our backend, we’ll use Rails for a simple API server. To communicate with the API server, we’ll use Ember Data. We’ll use TDD to “test-drive” the client, and BDD to “behavior-drive” our Rails server. For Ember we will use QUnit, and to test Rails we’ll use the popular BDD framework, RSpec. Let’s get started.
Prerequisites
For this post, we’ll be discussing Ember and Ember CLI. We will cover Rails in another post. To follow along with this post, you need to set up several things, starting with Node.js for installing npm packages. Git, which is used to access packages from the web, and we’ll be using it for source control. Google Chrome, which will be used to run our tests. Bower, needed for installing Ember CLI Bower packages. Installing Bower is as easy as running the following:
npm install -g bower
The -g installs the npm package globally so you can access it from anywhere on your system.
Ember CLI – the preferred way to create an Ember.js application. Again, installation is a snap with npm:
npm install -g ember-cli
Depending on when you install Ember CLI, you may get a different version of Ember than the one used to create this post. The code works fine with v1.13.x (the version in this tutorial’s sample code is 1.13.6). The code should also work as expected with v2.0.x. That said, we’ll be upgrading to newer versions of Ember as the series goes on so that you aren’t stuck using an old version.
Finally, PhantomJS is recommended for headless browser testing. This can also be installed with npm:
npm install -g phantomjs
New App
Once you have Ember CLI installed globally, you can create a new application.
ember new bookcase
Now, change into the bookcase directory and open it in your favorite text editor. We’re going to start by working with models in Ember. Since we have full control over the client and the API for this application, we’ll let our client guide what our server outputs. We’ll start off by creating a Publisher model. Why not start with the obvious book model, you ask? Well, we know that books have publishers and authors. Instead of jumping back and forth, adding things to the Book model, we’ll just add the associations when we initially create the model.
Generating The First Model
Creating a model and a test with Ember CLI is a snap. Ember CLI comes with blueprint generators for quite a few things, and a model is just one of the generators. Hop over to your terminal window and execute the following:
ember g model publisher
If you haven’t guessed it, the g in the code stands for generate. You are free to type out the full name if you’d like, but g saves a lot of typing. This blueprint created both the model in /app/models and a test in /tests/unit/models for us.
Our next step is to spin up a test server. Ember CLI will watch for changes and run our tests every time something changes. This is extremely useful for continuous feedback. It’s best to open another tab in your terminal and run the following command:
ember test --server
If you have PhantomJS installed, ember test --server will run your tests in PhantomJS and Google Chrome. Without PhantomJS, you’ll just get Chrome. If you aren’t familiar with PhantomJS, it is a headless browser. It’s extremely useful for running your JavaScript tests in a CI environment like Semaphore CI. You can just run ember test without the --server in a CI environment, and PhantomJS will run all your tests.
Now that our test server is running, we’re going to start populating our model. As stated earlier, we will use Ember Data to communicate with our API, and thus we’ll use Ember Data in our model code. Hop over to the publisher-test.js file, and you’ll notice there is already a test in there for us. It makes sense to keep the test to ensure the model exists, but feel free to delete it if you don’t think it’s necessary.
Writing Our First Test
Let’s create our first test. We are going to test to make sure that the publisher model has a property named name. Here’s what the first test looks like:
test('it has an attribute: name', function(assert) {
  var model = this.subject();
  var hasAttr = Object.keys(model.toJSON()).indexOf('name') > -1;
  assert.ok(hasAttr);
});
What we’re doing here is inspecting the model, and then using Object.keys to retrieve the custom attributes on the model. We convert it to JSON since the model itself won’t return our custom keys if passed in. Finally, we’re asserting that hasAttr is true.
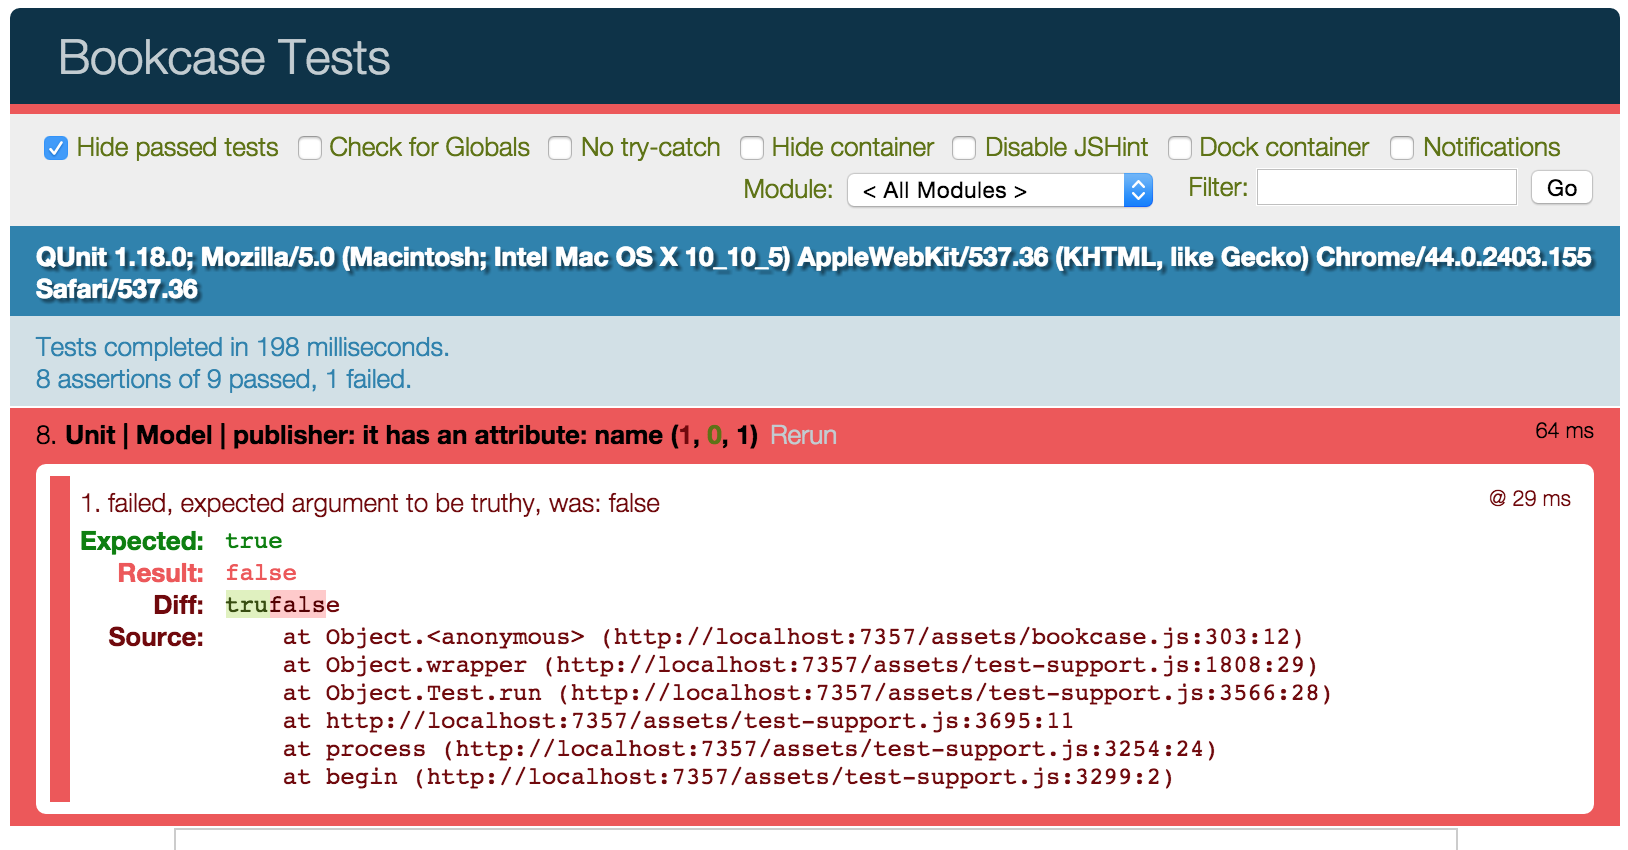
Check out Chrome and/or PhantomJS, and you’ll notice we now have a failing test (see image below). You’ve got to love continuous feedback of ember test --server.
Making the Test Pass
Let’s write the code to fix the failure. Open up publisher.js in the /app/models directory, and we’ll add the attribute. With the change, publisher.js should look like this:
import DS from 'ember-data';

export default DS.Model.extend({
  name: DS.attr('string')
});
The first line of the publisher model imports Ember Data by referencing it as DS (though this can be whatever you like). Ember CLI lets us use ES6 style import/export statements even though today’s browsers may not support them (thanks to Babel). Using import/export helps to build your dependency tree when the final JS files are created for our application.
Now all our tests are passing again. You may be wondering why we have nine tests despite writing one (and having the default test). Figure 3 (below) gives you the answer. Ember CLI has automatically injected JSHint tests for us to make sure all our JavaScript files conform to JSHint. This is a really nice feature, especially when you forget a silly semicolon at the end of the line (yes, we know they aren’t technically required, but it keeps our code clean).

Our publisher model is now complete. We’re simply going to just store the name of the publisher. We’re going to do the same thing with the author. Go ahead and add a test and a model for author. You can actually use the same test as the publisher to ensure that the author has a name attribute. But before you do that, you should check in your changes to source control. Ember CLI has set up git for us to use. We’re not going to go into detail on git here, but to commit your changes, you can run the following commands:
git add .
git commit -m 'Added publisher model'
Author Model
Did you already create your author model and a test to ensure that the author has a name attribute? If so, you can skip this section, or just double-check your results with ours. Here is our test (in /tests/unit/models/author-test.js):
test('it has an attribute: name', function(assert) {
  var model = this.subject();
  var hasAttr = Object.keys(model.toJSON()).indexOf('name') > -1;
  assert.ok(hasAttr);
});
It should look pretty familiar, as it’s the same as the publisher test that we created in the last step.
Finally, here’s what your author model should look like at this point (in /app/models/author.js):
import DS from 'ember-data';

export default DS.Model.extend({
  name: DS.attr('string'),
});
Book Model
Now that we have our dependencies, we can get started working on the book model. We can go pretty crazy here with attributes for a book, but for this post we’ll keep them rather short, and you can add whatever you see fit on your own. The importance of the book model in this post is the relationships between the book, publisher and author models.
We’ll start again by generating a model and a test using Ember CLI. Since we’re working using TDD, open the book-test.js file that was created for us (/tests/unit/models/book-test.js).
To kick things off, let’s add some tests for simple attributes. We’ll add a title attribute (of course), an isbn attribute, and let’s add a cover attribute so we can store a path to the book cover image. This will make for a nicer UI. Here are the tests, these should look very familiar by now:
test('it has an attribute: title', function(assert) {
  var model = this.subject();
  var hasAttr = Object.keys(model.toJSON()).indexOf('title') > -1;
  assert.ok(hasAttr);
});

test('it has an attribute: isbn', function(assert) {
  var model = this.subject();
  var hasAttr = Object.keys(model.toJSON()).indexOf('isbn') > -1;
  assert.ok(hasAttr);
});

test('it has an attribute: cover', function(assert) {
  var model = this.subject();
  var hasAttr = Object.keys(model.toJSON()).indexOf('cover') > -1;
  assert.ok(hasAttr);
});
Our book model now contains the three attributes, and our tests all pass.
import DS from 'ember-data';

export default DS.Model.extend({
  title: DS.attr('string'),
  isbn: DS.attr('string'),
  cover: DS.attr('string')
});
Next, we’re going to mix things up a little. We’re going to add relationships. A book belongs to a publisher and a book has many authors. So, how do we tell Ember Data about these relationships? Wait! We’re getting ahead of ourselves. Let’s add a test for the publisher relationship. The first thing we need to do in our book-test.js file, is require the publisher model. This is a requirement of using moduleForModel, a helper for testing Ember Data models. We also need to import Ember for our test. The top of your test should look like this:
import { moduleForModel, test } from 'ember-qunit';
import Ember from 'ember';

moduleForModel('book', 'Unit | Model | book', {
  // Specify the other units that are required for this test.
  needs: ['model:publisher']
});
Now we can go and test the relationship. Recall that we mentioned a book belongs to a publisher? We’ll test that relationship.
test('publisher relationship', function(assert) {
  var model = this.store().modelFor('book');
  var relationship = Ember.get(model, 'relationshipsByName').get('publisher');

  assert.equal(relationship.key, 'publisher');
  assert.equal(relationship.kind, 'belongsTo');
});
Here, we grab the model from the store in order to interrogate its relationships. We then check to make sure we have a key (a.k.a. an attribute) named publisher with a belongsTo type of relationship. This probably looks familiar for you Rails developers out there.
Fixing the failing test is as easy as a standard Ember Data attribute using the DS.belongsTo method:
publisher: DS.belongsTo('publisher')
We’ll also want to add that a publisher has many books, can you guess the syntax from that? Wait, wait… Add a test first! In publisher-test.js we have the following:
test('book relationship', function(assert) {
  var model = this.store().modelFor('publisher');
  var relationship = Ember.get(model, 'relationshipsByName').get('books');

  assert.equal(relationship.key, 'books');
  assert.equal(relationship.kind, 'hasMany');
  });
Don’t forget the import for Ember and requiring the model:book in the needs hash.
And the code that fixes the failing test (on the publisher model):
books: DS.hasMany('book')
There’s one other thing we should add onto our hasMany. It’s the default in Ember 2.0, but we should specify that our relationship is async. We can do this right in the hasMany method as follows:
books: DS.hasMany('book', {async: true})
This will come in handy when we have an API to work with. We don’t want to necessarily load all of the books for a publisher every time we grab one, and this will prevent that from happening. Books will be asynchronously loaded when we use them.
Our final relationships are that a book has many authors and an author has many books. In other words, a many-to-many relationship. We looked at testing relationships twice now, so you should have gotten the hang of it. Go ahead and add a test and the code for book has many authors.
How did you make out? If you got an error like “No model was found for ‘author'”, make sure that the author model exists in the test’s needs collection. Your final book model should look like this:
import DS from 'ember-data';

export default DS.Model.extend({
  title: DS.attr('string'),
  isbn: DS.attr('string'),
  cover: DS.attr('string'),
  publisher: DS.belongsTo('publisher'),
  authors: DS.hasMany('author', { async: true })
});
Go ahead and add a test and the relationship to the author as it has many books.
In the end, your author model should look like this:
import DS from 'ember-data';

export default DS.Model.extend({
		name: DS.attr('string'),
		books: DS.hasMany('book', { async: true })
});
Validations
We’re almost there with our models. However, models without validations are relatively useless. Garbage in, garbage out. We could rely on the server validations, but that makes for bad UX. Instead, we’ll add an awesome add-on Ember Validations. As of this writing, the current version is 2.0.0-alpha.4. Since this is an alpha, we aren’t going to install it like a regular Ember CLI addon (don’t worry, we will in future tutorials). For this, just simply open up package.json and add the following to the bottom:
"ember-validations": "2.0.0-alpha.4"
To install it, just run npm install, and it will get installed for you. Now we can go and add some more tests. Let’s start with the author — let’s verify that it has a name filled in:
test('name should be required', function(assert){
  var model = this.subject();
  Ember.run(function(){
    model.set('name', '');
  });
  assert.equal(model.get('isValid'), false, 'Object is valid without a name');
});
Before running this test, we need to add a reference to the Ember Validations so that QUnit can find them. Here we’ll use the presence validator. Before we use it, we need to modify the needs array of the test. We’ll be adding in 'ember-validations@validator:local/presence' as shown in the sample below.
moduleForModel('author', 'Unit | Model | author', {
  // Specify the other units that are required for this test.
  needs: ['model:book', 'ember-validations@validator:local/presence']
});
Before moving on, let us explain some of the new things you are seeing in this test. First, our model.set is wrapped in an Ember.run function. This is because Ember tests are asynchronous. Without wrapping our set, all sorts of “fun” stuff may happen (actually, Ember warns you about this if you forget to wrap it). The final thing we need to point out is that you supply custom messages to asserts, that’s what that third parameter is in the asser.equals function. Pretty handy, and it makes for easier testing.
Save your file, and you should have a failing test. Let’s fix that. Validations on an object require that you include EmberValidations when creating the object, and then add a validations hash of your validators. This is what the author model looks like with the presence validator in place:
import DS from 'ember-data';
import EmberValidations from 'ember-validations';

export default DS.Model.extend(EmberValidations, {
  validations: {
    name: {
      presence: true
    }
  },
  name: DS.attr('string'),
  books: DS.hasMany('book', { async: true })
});
Let’s add one more validator to author. Make sure that the author’s name is at least 5 characters long. A quick look at the docs, and the one we want is the length validator. Add a test, remembering to add a needs reference to 'ember-validations@validator:local/length'.
test('name should be at least 5 characters long', function(assert){
  var model = this.subject();
  Ember.run(function(){
    model.set('name', 'Dave');
  });
  assert.equal(model.get('isValid'), false, 'Object is valid with a short name');
});
Go ahead and add the length validator. Here’s what the new validation hash looks like for the author model:
  validations: {
    name: {
      presence: true,
      length: 5
    }
  },
Now that you know enough to be dangerous, go ahead and add some validations to the publisher and the book models.
Conclusion
We finally finished up our models! When you’re all done, you should have around 35 tests. Do you have more? That’s great! You really can never have enough tests.
If you want, you can check out the GitHub repo with the source code. It’s been labeled “Part1End” so you can revert back to this point in the series easily.
Now that we know what we need on the front-end for models, we’ll build an API next. We’ll want our models to be able to do something other than just work in tests with fixture data or something, right? So, before we go further with Ember, in the next post we’ll take a little detour to whip up a quick and simple API.
