Introduction
You’ve spent some time with React, maybe even written a few tests. But you’re not really sure how best to test your components. Where do you start? What exactly do you test?
Some React components seem so simple that it’s not even clear whether they need tests at all.
If you’ve come to React from Angular, you may have a bit of a love/hate relationship with tests.
On one hand, Angular comes with a lot of tools to help with testing, but at the same time, writing the tests can be difficult. There is a lot of boilerplate code, and forgetting a call to $digest can cause your tests to fail when you think they should pass, greatly increasing debugging time.
React tests are easier to wrap your head around and TDD with React captures the quick, fast iterations that make testing fun.
This tutorial will focus on React only — no Redux for now. The ecosystem can be totally overwhelming in the beginning, so we’ll start small.
Prerequisites
Environment
First things first, we need an environment to test with. Testing React Components with Enzyme and Mocha is a great starting point and explains the process nicely. If you’ve gone through that article already, or have the time to read it now, start there.
On the other hand, if you want to take a shortcut for now, follow these steps:
Install Quik. This package gets you up and running quickly without having to manually set up a build. We’ll use -g to install it globally, which will install a new quik command.
npm install -g quik
We need a library for making assertions in our tests. Chai is a popular one. We’ll install a library for setting up spies too — Sinon. We also want to install Enzyme, a library for testing React components created by Airbnb, and jsdom, a library for simulating a browser DOM in JavaScript.
npm install chai sinon enzyme jsdom
Enzyme requires React as a peer dependency, and also needs react-dom and react-addon-test-utils so we’ll install those as well:
npm install react react-dom react-addons-test-utils
We need a test runner. There are a few options out there — Mocha, Tape, Jasmine, and more. Mocha is a popular one in the React community, so we’ll use that. Install it globally so that we get a mocha command.
npm install -g mocha
Since we’ll be using ES6 and JSX in our test files, the tests need to be transpiled with Babel before Mocha can run them. To make that work, we’ll install Babel and a few presets (es2015 for ES6 aka ES2015, and react for JSX).
npm install babel-core babel-preset-es2015 babel-preset-react
Finally, Babel needs to be told to use those 2 presets. This configuration goes in a file named .babelrc. Create that file and paste this in:
{
  "presets": ["es2015", "react"]
}
Don’t forget the braces.
One more thing: we need a setup.js file to initialize our fake DOM. Create the setup.js file and paste this in:
require('babel-register')();

var jsdom = require('jsdom').jsdom;

var exposedProperties = ['window', 'navigator', 'document'];

global.document = jsdom('');
global.window = document.defaultView;
Object.keys(document.defaultView).forEach((property) => {
  if (typeof global[property] === 'undefined') {
    exposedProperties.push(property);
    global[property] = document.defaultView[property];
  }
});

global.navigator = {
  userAgent: 'node.js'
};
Testing the Environment
Before we go any further, this is a great time to check that your environment is set up and working.
Test that Mocha is working
Create a file called components.spec.js. Paste this in:
import { expect } from 'chai';

describe('the environment', () => {
  it('works, hopefully', () => {
    expect(true).to.be.true;
  });
});
Then, run Mocha as follows:
mocha --require setup.js *.spec.js
You should see a passing test. If you see an error, go back through the steps above and make sure you didn’t miss anything.
Test That Quik is Working
Let’s also test that Quik is working correctly. Create a file named index.js and paste this in:
import React from 'react';
import ReactDOM from 'react-dom';

let Hello = () => <span>Hi</span>

ReactDOM.render(<Hello/>, document.querySelector('#root'));
Then, run Quik as follows:
quik
You should see a browser window appear with the text “Hi.” If that doesn’t appear, try refreshing the browser, or restarting quik.
In case you’re curious, here’s how Quik works: when you installed Quik, it came bundled with its own hot-reloading Webpack build, which it applies to every project you invoke it in.
When you run the quik command, it looks for a file named index.js and treats it as the root of your application — that index.js file should at the very least call ReactDOM.render(). You can put as little or as much as you like in this file, and import other files as necessary.
Reviewing the Tools We’ll Use
Let’s go over the “tools of the trade,” the libraries and applications we’ll be using to test our React code.
Mocha is the test runner, or test “framework”. It’s the top-level tool in this hierarchy. Mocha is responsible for finding and loading test files, transpiling them, and running the test code itself: the describe and it blocks that compose the tests.
Chai is the assertion library. It supplies the expect and assert calls we’ll use in the tests to verify everything is working correctly.
Sinon is a library for creating and inspecting spies. Spies let you mock and stub pieces of functionality in order to keep the tests laser-focused on the component under test.
Enzyme is a library for rendering and making assertions on React components. It’s the only one of these 4 that is specific to React.
Here’s how these all work together:
- You run
mochaat the command line, with some arguments, - It finds your test files and transpiles them,
- It executes the tests, which are written in JavaScript (ES6 in our case), and
- Each test will
importenzyme and chai, then use them to render components and make assertions.
The roles of these tools will become clearer as we start to write some tests.
Understanding How and Why to Test
At the beginning of this article, we talked about some of the motivations: why are we testing our React components, and, more importantly, what exactly do we need to test about them?
React components can be very simple — so it’s questionable whether they are worth testing even if they’re very straightforward?
Why Test?
Every component is worth testing to some degree, even if the test is simple. This gives you confidence that the component works as expected, even if that seems obvious at a single glance, and it gives you confidence to refactor later on.
The ability to refactor is key. When you have tests for the simple components that render a user’s name and email address (for example), you can later split that component up into pieces and be confident that it still works correctly.
How to Test?
The technique we will be taking advantage of heavily is shallow rendering.
This means that when we render a component, it only renders one level deep. You can think of it as “running” the component, but not “running” any of its children.
Here’s an example. Let’s say we have a person object with a name and age. Here’s a component for displaying that person:
let Person = ({person}) => (
  <span>
    <Name person={person}/>
    <Age person={person}/>
  </span>
)
By running this through a shallow render process, we’ll end up with this element. Notice how the Name and Age are intact — their internals are not evaluated.
<span>
  <Name person={person}/>
  <Age person={person}/>
</span>
Whereas, if we had run a full (deep) render, React would evaluate the Name and Age resulting in an element like this:
<span>
  <span className="name">Dave</span>
  <span className="age">32</span>
</span>
Shallow rendering is valuable because rendering this way means that we don’t need to concern ourselves with how the child components are implemented. It’s a little like “mocking,” but we get it for free. It also means that we do not need a DOM.
In this case, it keeps our test focused on how Person works, instead of tightly coupling the implementation of Person to the way Name and Age work.
What would happen if we were testing with deep-rendered components, and the implementation of Name changed from first-name-only to “lastName, firstName”? Well, our test for Person would have to be updated, even though the implementation of Person didn’t change.
So, that’s why we’ll be making heavy use of shallow rendering in testing our components.
In some of the last few tests that deal with input handling, we’ll need to fully render the component — this is why we needed to install jsdom, and also why we need the setup.js file.
What to Test?
It must render: At the very least, make sure the component renders without error. This verifies there are no JSX syntax errors, that all variables are defined, etc. This could be as simple as verifying that the rendered output is not null.
Test the output: One step above “it renders” is “it renders the correct thing.” Given a set of props, what output is expected? Does Person render its name and age, or does it render a name and “TODO: age coming in v2.1”?
Test the states: Every conditional should be accounted for. If the classNames are conditional (e.g. enabled/disabled, success/warning/error, etc.), make sure to test that the className-deciding logic is working well. Likewise for conditionally-rendered children: if the Logout button is only visible when the user is logged in, for instance, make sure to test for that.
Test the events: If the component can be interacted with, e.g. an input or button with an onClick or onChange or onAnything, test that the events work as expected and call the specified functions with the correct arguments, including binding this, if it matters.
Test the edge cases: Anything that operates on an array could have boundary cases — an empty array, an array with 1 element, a paginated list that should truncate at 25 items, and so on. Try out every edge case you can think of, and make sure they all work correctly.
What We’re Testing
We’re going to build a very simple “list” application. It will allow adding items, and viewing a list of those items.
Even for such a simple set of functionality, there are a few ways to approach the implementation: bottom-up or top-down.
When building your own application, you’ll also want to decide between “UI-first” or “data-first” — do you create the UI you want to see, with fake data initially, or do you start with a data structure and build a UI around it? Here we’re doing UI-first.
Here is a mockup of the UI:
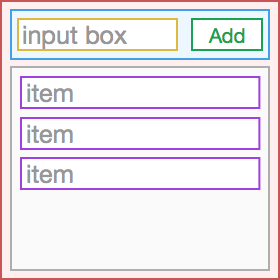
Let’s give the components some names, and then get started with the tests:
- BeerListContainer: The top-level wrapper component
- InputArea: A wrapper around the input + button
- input: A plain old HTML5 input tag
- button: A plain old HTML5 button
- InputArea: A wrapper around the input + button
- BeerList: The list of items (its root will be a
ul)- li: Each row is a plain
li
- li: Each row is a plain
Before we begin, you can clone the finished repository from Github and use it to check your work if something goes wrong.
Kicking off the TDD Process
Let’s start with some basic code to render a fairly empty container.
Open up the index.js file and replace the entire file with these contents:
import React, { Component } from 'react';
import ReactDOM from 'react-dom';
import {BeerListContainer} from './components';

ReactDOM.render(
  <BeerListContainer/>,
  document.querySelector('#root'));
This index.js file is responsible for rendering the root component.
We’ll write the components themselves in components.js. Create that file and type this in:
import React, { Component } from 'react';

export class BeerListContainer extends Component {
  render() {
    return <span>Beer!</span>
  }
}
For the sake of simplicity, we’ll be keeping everything in one file for this exercise. In your own code, you’d want to break these components up into separate files.
You may wonder why we split up the files at all — why not keep everything in index.js? The reason is because we need to import the components into our test, and if we import them from the index.js file, ReactDOM.render() will execute. This causes us to be dependent on the existence of a DOM, even though most of our tests won’t need it (because they’re using shallow rendering).
Before we begin, we’ll start up both quik and mocha so we’ll get live feedback about the tests and simultaneously see how the UI is coming together.
Back in your project directory start Quik:
quik
Then, open a separate terminal window, and start Mocha:
mocha --watch --require setup.js *.spec.js
Your browser should pop open and display “Beer!”
Now, let’s write the first test. Open up the components.spec.js file we created earlier. Replace the contents with this code:
import React from 'react';
import { expect } from 'chai';
import { shallow, mount } from 'enzyme';
import { BeerListContainer } from './components';

describe('BeerListContainer', () => {
  it('should render InputArea and BeerList', () => {
    const wrapper = shallow(<BeerListContainer/>);
    expect(wrapper.containsAllMatchingElements([
      <InputArea/>,
      <BeerList/>
    ])).to.equal(true);
  });
});
This will fail immediately because InputArea is not defined yet, and neither is BeerList.
ReferenceError: InputArea is not defined
Before we fix that, though, let’s look at what this is doing.
First, we import all the necessary parts. React is necessary because we’re using JSX (which will be compiled to a call to React.createElement). We also pull in expect and shallow, as well as our component. We’re importing mount now, but won’t use it until later.
We call shallow, passing in a JSX expression <BeerListContainer/>.
We want it to contain InputArea and BeerList, so we check for those children with wrapper.containsAllMatchingElements.
Note that even though we’re shallow-rendering the container, the child component names must be defined so that we can check that they exist. They’re not defined yet, so this test is erroring out. Let’s fix that.
Back in components.js, add these 2 components to the end:
export class InputArea extends Component {
  render() {
    return <input/>
  }
}

export class BeerList extends Component {
  render() {
    return <ul/>
  }
}
They’re minimal, and we’ll fix that later. But now that they exist, go back to components.spec.js and add this line to the imports up top:
import { InputArea, BeerList } from './components';
The test is still not passing. It no longer throws an error, which is progress, but we need to fix BeerListContainer. Back in components.js, modify the BeerListContainer component to read like this:
export class BeerListContainer extends Component {
  render() {
    return (
      <div>
        <InputArea/>
        <BeerList/>
      </div>
    );
  }
}
The test is now passing.
Notice that the shallow rendering isn’t just one level deep. It will actually render all of the built in components (div, span, etc.), and stop short of rendering any custom components.
To prove it to yourself, wrap another div around that div, and see that the test still passes.
Test 2: Testing the Container State
Architecturally, it would be ideal if the container was in charge of the list: maintaining the state, and adding items to it. Let’s work on that functionality before we descend into the child components.
Initially, it should contain an empty array of items. Write the test in components.spec.js:
describe('BeerListContainer', () => {
  ...

  it('should start with an empty list', () => {
    const wrapper = shallow(<BeerListContainer/>);
    expect(wrapper.state('beers')).to.equal([]);
  });
});
It fails:
Cannot read property ‘beers’ of null
The component’s state is null, because we never initialized it.
We need to add a constructor to BeerListContainer and initialize the state there. Back in components.js:
export class BeerListContainer extends Component {
  constructor(props) {
    super(props);
    this.state = {
      beers: []
    };
  }

  ...
}
It’s a good idea to call super with the given props, so we do that as well. Save that, and now the tests should pass.
Wait, it failed with another error:
AssertionError: expected [] to equal []
This is because we used .equal, which tests for object equality with the === operator. Two empty arrays are not the exact same object, therefore they’re not equal.
If we use eql instead, the test will pass. In components.spec.js, change that expectation to this:
expect(wrapper.state('beers')).to.eql([]);
The test is now passing.
Test 3: Adding an Item
Now that the container has an empty list, let’s give it a way to add items to that list.
Remember, the container is responsible for maintaining the list state. It will have an addItem function, which we’ll pass down to the InputArea later on.
In components.spec.js, add a test for the nonexistient addItem function:
describe('BeerListContainer', () => {
  ...

  it('adds items to the list', () => {
    const wrapper = shallow(<BeerListContainer/>);
    wrapper.addItem('Sam Adams');
    expect(wrapper.state('beers')).to.eql(['Sam Adams']);
  });
});
It fails because addItem doesn’t exist:
wrapper.addItem is not a function
Add that function in components.js:
export class BeerListContainer extends Component {
  ...

  addItem(name) {
    // do nothing for now
  }

  ...
}
The test is still not passing. We also got the same error:
wrapper.addItem is not a function
What happened is that the object returned by shallow(<BeerListContainer/>) is not actually an instance of BeerListContainer. However, we can access the class instance with wrapper.instance(). Change that line from:
wrapper.addItem('Sam Adams');
to
wrapper.instance().addItem('Sam Adams');
The test now fails differently:
expected [] to deeply equal [ ‘Sam Adams’ ]
Now, we can update state from inside addItem. Change addItem to look like this:
export class BeerListContainer extends Component {
  ...

  addItem(name) {
    this.setState({
      beers: [].concat(this.state.beers).concat([name])
    });
  }

  ...
}
Now, the test is passing.
The way we updated the array might look unfamiliar: doing it this way ensures that we don’t mutate the existing state. Avoiding mutations on state is a good habit to get into, especially if you use or plan to use Redux. It ensures that the rendered view is always in sync with the current state.
Using a library like Immutable.js makes it easier to write immutable code like this. We are not using Immutable.js in this tutorial in order to keep complexity down, but it is worth checking out once you have a handle on the basics.
Test 4: Passing Down the Function
Everything is working well in our container now, so let’s pass the addItem function as a prop to InputArea, which will be responsible for calling addItem later on.
Whenever we add a new prop to a component, it’s a really good idea to create a PropTypes definition for it. You can read more about why PropTypes are important, but in a nutshell, propTypes let you define the expected props and their types, and React will give you a console warning if you forget to pass a required prop or pass the wrong type.
PropTypes make debugging a lot easier — not only when you’re first writing a component, but also in the future when you’re going to reuse it.
So, before we write the test, we’ll add the PropType in components.js:
export class InputArea extends Component {
  ...
}
InputArea.PropTypes = {
  onSubmit: React.PropTypes.func.isRequired
};
Now, add the test to components.spec.js:
describe('BeerListContainer', () => {
  ...

  it('passes addItem to InputArea', () => {
    const wrapper = shallow(<BeerListContainer/>);
    const inputArea = wrapper.find(InputArea);
    const addItem = wrapper.instance().addItem;
    expect(inputArea.prop('onSubmit')).to.eql(addItem);
  });
});
We grab a reference to the InputArea, and then verify that its onSubmit prop is passed the addItem function. It should fail:
expected undefined to deeply equal [Function: addItem]
To make the test pass, modify the render method of BeerListContainer to pass the onSubmit prop to InputArea:
export class BeerListContainer extends Component {
  ...

  render() {
    return (
      <div>
        <InputArea onSubmit={this.addItem}/>
        <BeerList/>
      </div>
    );
  }
}
At this point we’ve got 4 passing tests.
Test 5: Verifying the Binding
Let’s just make sure that the function passed to InputArea is still working. This might seem a bit redundant, but add this test:
describe('BeerListContainer', () => {
  ...

  it('passes a bound addItem function to InputArea', () => {
    const wrapper = shallow(<BeerListContainer/>);
    const inputArea = wrapper.find(InputArea);
    inputArea.prop('onSubmit')('Sam Adams');
    expect(wrapper.state('beers')).to.eql(['Sam Adams']);
  });
});
and, it fails.
Cannot read property ‘setState’ of undefined
This can be difficult when using ES6 classes with React: the instance methods, like addItem here, are not automatically bound to the instance.
Quick aside: calling a function with dot notation is not the same as calling it directly:
// Calls addItem, setting 'this' === theInstance
theInstance.addItem()

// Save a reference to the addItem function
let addItemFn = theInstance.addItem;

// Calls addItem, setting 'this' === undefined
addItem()
There are 2 common ways to fix this in React:
- bind the function once, in the constructor and
- bind the function every time it’s passed as a prop
Option 1 is the better way to go, and what we’ll use here. Modify the constructor of BeerListComponent (in components.js) to read like this:
export class BeerListContainer extends Component {
  constructor(props) {
    super(props);
    this.state = {
      beers: []
    };
    this.addItem = this.addItem.bind(this);
  }
  ...
}
That new line at the end binds addItem once and for all, and now our test passes.
Test 6: Populating the InputArea
We’re all done with BeerListContainer, so we’ll move down the hierarchy into InputArea. The component already exists, but it doesn’t do much.
Let’s write a test that InputArea should contain an input and a button. In components.spec.js, create a new top-level describe block:
describe('InputArea', () => {
  it('should contain an input and a button', () => {
    const wrapper = shallow(<InputArea/>);
    expect(wrapper.containsAllMatchingElements([
      <input/>,
      <button>Add</button>
    ])).to.equal(true);
  });
});
This test also verifies the text of the button. And it fails.
AssertionError: expected false to equal true
Back over in components.js, modify InputArea to render correctly:
export class InputArea extends Component {
  render() {
    return (
      <div>
        <input/>
        <button>Add</button>
      </div>
    );
  }
}
With that, all of the tests are passing again.
Test 7: Accepting Input
Now, let’s wire up the input box to accept changes. Write the test:
describe('InputArea', () => {
  ...

  it('should accept input', () => {
    const wrapper = shallow(<InputArea/>);
    const input = wrapper.find('input');
    input.simulate('change', {target: { value: 'Resin' }});
    expect(wrapper.state('text')).to.equal('Resin');
    expect(input.prop('value')).to.equal('Resin');
  });
});
We use input.simulate here to fire the onChange event with the given object as an argument. This should set some internal state, which should feed back into the input’s value prop.
It should fail:
TypeError: Cannot read property ‘text’ of null
This might look familiar. It’s the same error we got in Test 2 when state wasn’t initialized.
Let’s initialize the state, and we’ll also add the setText method, complete with binding, which we’ll need shortly:
export class InputArea extends Component {
  constructor(props) {
    super(props);
    this.state = {
      text: ''
    };
    this.setText = this.setText.bind(this);
  }

  setText(event) {
    this.setState({text: event.target.value});
  }

  ...
}
You’ve seen a constructor like this before, and the setText method uses a common pattern to update the state with the new value of an input.
Now it fails with a different error:
AssertionError: expected ” to equal ‘Resin’
This is because the input isn’t wired up. We need to pass our setText method as the onChange prop, and pass the text from state as the value prop.
export class InputArea extends Component {
  ...

  render() {
    return (
      <div>
        <input value={this.state.text} onChange={this.setText}/>
        <button>Add</button>
      </div>
    );
  }
}
Even with this change, it’s still not working. We get the same error.
However, it’s failing on a different line: the first expect, which checks the state, passes fine. The second expect, however, is failing because the input’s value prop is not being updated.
Way back in the beginning I mentioned that we’ll need full rendering (instead of shallow) for the input handling. Now is the time to make that change. Update the test to call mount instead of shallow:
describe('InputArea', () => {
  ...

  it('should accept input', () => {
    const wrapper = mount(<InputArea/>);
    ...
All tests should be passing once again.
Test 8: Enabling the Add Button
We currently have an “Add” button that does nothing. Let’s fix that.
When the button is clicked, we want to call the onSubmit prop passed into InputArea. We already wrote tests to verify that the addItem function is being passed in correctly, so this should be the last piece of functionality to implement before we can add items to the list.
Before writing the test, we need to add a new import to the top of components.spec.js:
import { spy } from 'sinon';
Now we can use the spy() function in our test:
describe('InputArea', () => {
  ...

  it('should call onSubmit when Add is clicked', () => {
    const addItemSpy = spy();
    const wrapper = shallow(<InputArea onSubmit={addItemSpy}/>);
    wrapper.setState({text: 'Octoberfest'});
    const addButton = wrapper.find('button');

    addButton.simulate('click');

    expect(addItemSpy.calledOnce).to.equal(true);
    expect(addItemSpy.calledWith('Octoberfest')).to.equal(true);
  });
});
We create a spy to track calls to the onSubmit prop. Then we set the state’s text as if the user had typed in a value, and click the button. Finally, we verify that the spy was called and that it was called with the right value.
Of course, it should fail.
AssertionError: expected false to equal true
We need an intermediate handler function, handleClick, to respond to the click and call onSubmit with the current input text. This needs to be bound in the constructor, and passed in to the onClick prop on the button.
export class InputArea extends Component {
  constructor(props) {
    super(props);
    this.state = {
      text: ''
    };
    this.setText = this.setText.bind(this);
    this.handleClick = this.handleClick.bind(this);
  }

  ...

  handleClick() {
    this.props.onSubmit(this.state.text);
  }

  render() {
    return (
      <div>
        <input value={this.state.text} onChange={this.setText}/>
        <button onClick={this.handleClick}>Add</button>
      </div>
    );
  }
}
The test is now passing. We’re getting close, but we’re still not rendering a list. Let’s fix that.
Tests 9-11: Rendering the List
Let’s first test that the list handles the “empty” cases. These are the first tests for BeerList, so we’ll create a new top-level describe block, and add these tests:
describe('BeerList', () => {
  it('should render zero items', () => {
    const wrapper = shallow(<BeerList items={[]}/>);
    expect(wrapper.find('li')).to.have.length(0);
  });

  it('should render undefined items', () => {
    const wrapper = shallow(<BeerList items={undefined}/>);
    expect(wrapper.find('li')).to.have.length(0);
  });

  it('should render some items', () => {
    const items = ['Sam Adams', 'Resin', 'Octoberfest'];
    const wrapper = shallow(<BeerList items={items}/>);
    expect(wrapper.find('li')).to.have.length(3);
  });
});
The tests for empty lists pass, but this isn’t too surprising: the BeerList component is very barebones right now, just a single empty <ul/> tag. The 3rd test, rendering items, fails as expected.
AssertionError: expected { Object (root, unrendered, …) } to have a length of 3 but got 0
Update BeerList to render the array it receives via its items prop:
export class BeerList extends Component {
  render() {
    return (
      <ul>
        {this.props.items.map((item, index) => (
          <li key={index}>{item}</li>
        ))}
      </ul>
    );
  }
}
Now the ‘undefined items’ test is failing, but the other two are passing:
TypeError: Cannot read property ‘map’ of undefined
This makes sense, because this.props.items is undefined. There are 2 problems here:
- The component errors out of
itemsis undefined or null. - We’re not checking for
itemsinpropTypes.
To fix these, modify the BeerList render function to check that items is truthy before rendering it, and also add propTypes to the end.
export class BeerList extends Component {
  render() {
    return this.props.items ?
      (<ul>
        {this.props.items.map((item, index) => (
          <li key={index}>{item}</li>
        ))}
      </ul>)
    : null;
  }
}
BeerList.propTypes = {
  items: React.PropTypes.array.isRequired
};
All tests are passing again.
The code should also be working now. If you still have the Quik dev server running, switch over to your browser, you might need to refresh the tab, and try adding some items to the list.
If you’re clicking Add, but the items aren’t showing up, the first thing to do is to check the console. There’s a warning because we forgot to pass items:
Warning: Failed propType: Required prop
itemswas not specified inBeerList. Check the render method ofBeerListContainer.
Now we know exactly where to look.
Test 12: Rendering the Items
Before we fix the problem, let’s write a failing test for it. In components.spec.js, we want to assert that when doing a deep render of BeerListContainer with some items, the items should appear.
describe('BeerListContainer', () => {
  ...

  it('renders the items', () => {
    const wrapper = mount(<BeerListContainer/>);
    wrapper.instance().addItem('Sam Adams');
    wrapper.instance().addItem('Resin');
    expect(wrapper.find('li').length).to.equal(2);
  });
}
The test fails, as expected:
AssertionError: expected 0 to equal 2
Update BeerListContainer to pass down the beers:
export class BeerListContainer extends Component {
  ...

  render() {
    return (
      <div>
        <InputArea onSubmit={this.addItem}/>
        <BeerList items={this.state.beers}/>
      </div>
    );
  }
}
With this last test passing, the application should be fully functional. Refresh the browser, if Quik’s auto-refresh didn’t trigger, and make sure it works.
Wrapping Up
At this point, you have a very simple, but functional list. If you want to keep going, here are some ideas for enhancements:
- Clear the input box when the Add button is clicked,
- Allow the user to add items by simply pressing Enter, or
- Add a rating next to each list item, and keep track of the state in the
BeerListContainercomponent.
You’re sure to run into situations we didn’t cover here, and in addition to the ever-faithful Google, the official documentation can be a great help. Here are some links:
- Sinon docs,
- Enzyme docs, and
- Chai docs.
What Next?
By now you’ve got a good feel for TDD with React. The best thing you can do now is to try it out on your own. “Practice makes perfect” is as true about TDD as anything else.
Follow the ideas above to enhance this simple list component, and try building some more ambitious components with TDD too. As you work TDD into your routine, you’ll get faster at it — and your code will get better too!
Hopefully, this has been a helpful jumpstart into the world of TDD with React. Feel free to leave any comments or questions you may have in the comments section below.
