If you find yourself juggling with your testing framework, making your development process more cumbersome than it should be, maybe it’s time to try out Vitest. The native test runner for Vite.
Why Vitest?
When Vite came out, it stood out from the rest by offering an easy way to handle ESM imports (ECMAScript Modules). Vite provided a modern alternative to the older CommonJS, making your frontend code simpler and faster to render. However, Vite lacked a native test runner — until Vitest. Vitest is designed to be an ESM-native alternative to Jest.
Using both Vite and Jest means maintaining two separate pipelines: one for building your app and another for testing. Since Jest doesn’t natively support ESM imports, developers had to convert their code to CommonJS for testing, adding layers of complexity and configuration.
![[jest-pipeline.png]]
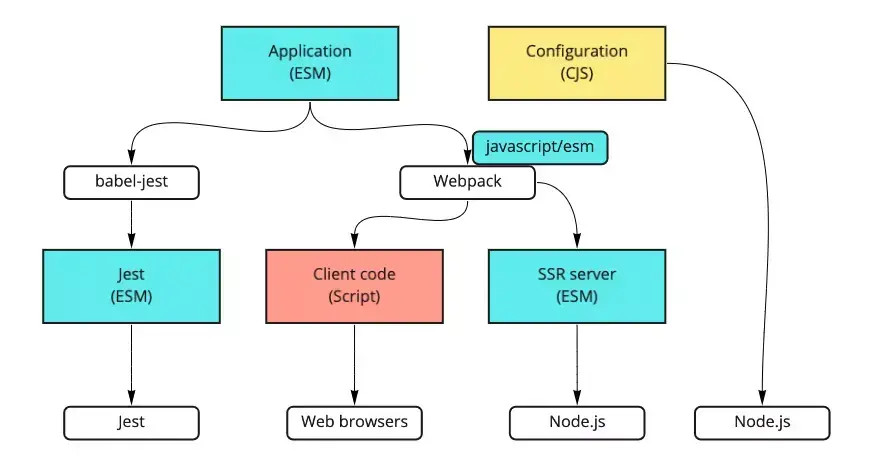
Vitest, on the other hand, uses the same pipeline, plugins, and configurations as Vite, drastically simplifying and speeding up the testing process.
Vitest features
Vitest comes packed with features, including:
- ESM Imports and top-level awaits
- Workspaces for monorepos
- Plugins
- TypeScript/JSX Support
- A GUI Dashboard
- In-Source testing
- Coverage reports
- Jest-compatible snapshots
- Experimental Browser mode
These features make Vite Test a comprehensive solution for modern web development testing needs.
Getting Started with Vitest
Let’s start from a brand-new Vite project. I’ll start with a vanilla TypeScript demo:
$ npm create vite .
✔ Select a framework: › Vanilla
✔ Select a variant: › TypeScript

Scaffolding project in /private/tmp/a...

Done. Now run:

  npm install
  npm run dev
To kick things off with Vitest, start by creating a new Vite project (e.g., using npm create vite).
Once your project is set up, we can install Vitest as a dev dependency:
$ npm install --save-dev vitestCreating some tests
Creating your test files is straightforward. Vitest looks for test code in files named with .test or .spec. From there, you can import your modules and use familiar test Jest keywords, making the transition easy for many developers.
For example, our demo code has a counter component that increments each time the button is pushed:
// src/counter.ts

export function setupCounter(element: HTMLButtonElement) {
  let counter = 0
  const setCounter = (count: number) => {
    counter = count
    element.innerHTML = `count is ${counter}`
  }
  element.addEventListener('click', () => setCounter(counter + 1))
  setCounter(0)
}
To test this component we can create src/counter.test.ts with the following contents:
import { setupCounter } from './counter';
import { describe, it, expect, beforeEach } from 'vitest';

describe('setupCounter', () => {
  let buttonElement: HTMLButtonElement;
});
Here we are importing the TDD keywords from “vitest” and creating a test block. Let’s add a beforeEach block to initialize the component before each test runs:
import { setupCounter } from './counter';
import { describe, it, expect, beforeEach } from 'vitest';

describe('setupCounter', () => {
  let buttonElement: HTMLButtonElement;

  beforeEach(() => {
    document.body.innerHTML = '<button id="test-button"></button>';
    buttonElement = document.getElementById('test-button') as HTMLButtonElement;
    setupCounter(buttonElement);
  });

});
Now we can add a test to check if the counter is initially zero:
import { setupCounter } from './counter';
import { describe, it, expect, beforeEach } from 'vitest';

describe('setupCounter', () => {
  let buttonElement: HTMLButtonElement;

  beforeEach(() => {
    document.body.innerHTML = '<button id="test-button"></button>';
    buttonElement = document.getElementById('test-button') as HTMLButtonElement;
    setupCounter(buttonElement);
  });

  it('initializes with count is 0', () => {
    expect(buttonElement.innerHTML).toBe('count is 0');
  });
});
Let’s add two more tests that click on the button:
import { setupCounter } from './counter';
import { describe, it, expect, beforeEach } from 'vitest';

describe('setupCounter', () => {
  let buttonElement: HTMLButtonElement;

  beforeEach(() => {
    document.body.innerHTML = '<button id="test-button"></button>';
    buttonElement = document.getElementById('test-button') as HTMLButtonElement;
    setupCounter(buttonElement);
  });

  it('initializes with count is 0', () => {
    expect(buttonElement.innerHTML).toBe('count is 0');
  });

  it('increments counter on click', () => {
    buttonElement.click();

    expect(buttonElement.innerHTML).toBe('count is 1');
  });

  it('increments counter on multiple clicks', () => {
    buttonElement.click();
    buttonElement.click();
    buttonElement.click();

    expect(buttonElement.innerHTML).toBe('count is 3');
  });
});
Before we can run this test, however, we need to import the document into the test environment. We can do that by installing [jsdom]():
$ npm install --save-dev jsdomAnd creating vite.config.js in the root of the project:
// vite.config.js

import { defineConfig } from 'vite';

export default defineConfig({
  test: {
    environment: 'jsdom'
  }
});
Note that we’re using the Vite config file here. Vitest supports using the same pipeline as Vite (with plugins and all!), so you only have to configure things in one place.
To finish setup, let’s add a "test" script in package.json:
{

  ...

  "scripts": {
    "dev": "vite",
    "build": "tsc && vite build",
    "preview": "vite preview",
    "test": "vitest"
  }

  ...

}
We can start Vitest in watch mode with:
$ npm test

 ✓ src/counter.test.ts (3)

 Test Files  1 passed (1)
      Tests  3 passed (3)
   Start at  14:24:23
   Duration  413ms (transform 28ms, setup 0ms, collect 26ms, tests 18ms, environment 548ms, prepare 78ms)


 PASS  Waiting for file changes...
       press h to show help, press q to quit
In-Source Testing: A Unique Feature
One of Vitest’s unique features is in-source testing, inspired by Rust. This allows you to place your test code in the same file as your actual code, simplifying management and making tests more accessible.
Configuring Vite to support in-source testing involves a few steps. First, we need to configure Vitest to look for tests inside source files:
// vite.config.js

import { defineConfig } from 'vite';

export default defineConfig({
  test: {
    environment: 'jsdom',
    includeSource: ["src/**/*.{ts,js}"]
  }
});
Next, we need to add the importMeta line to tsconfig.json. This imports the Vitest metadata into the environment:
{
  "compilerOptions": {

    ...

    "types": ["importMeta"],

    ...
  }
}
Finally, we can add our tests into the same file as the code using the following pattern:
// source code goes here ...

import { describe, it, expect, beforeEach } from 'vitest';

if(import.meta.vitest) {

    // your tests go here

}
This will ensure the tests only run when Vitest is invoked.
The final touch is to configure Vite to ignore the test code when creating a production bundle. To configure that, we need to add a define key in vite.config.js:
import { defineConfig } from 'vite';

export default defineConfig({
  test: {
    environment: 'jsdom',
    includeSource: ["src/**/*.{ts,js}"]
  },
  define: {
    "import.meta.vitest": "undefined"
  }
});
Now running npm run build will not include your tests in the bundle.
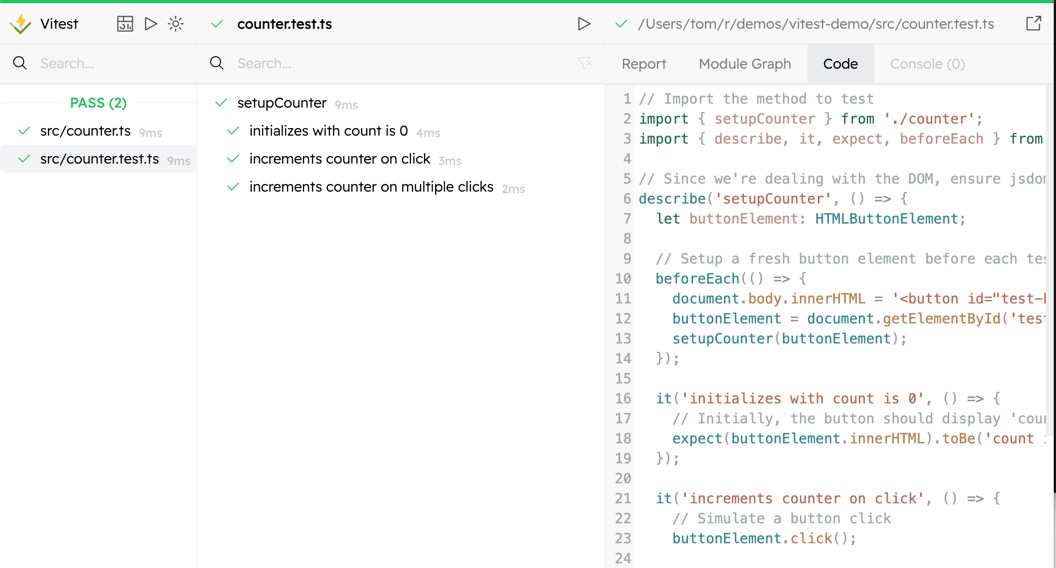
GUI Support
We can view the test results in the browser by installing @vitest/ui:
$ npm install --save-dev @vitest/uiAnd adding --ui to the Vitest invocation in package.json
{

  ...

  "scripts": {
    "test": "vitest --ui"
  }

  ...

}
Now running npm test will open a browser where we can see the results, filter tests and even re-run tests from the page.
Retry failed tests
Retrying is a great way to detect flaky tests. To make Vitest retry failed test we can use the CLI option:
vitest --retry=20Or via the Vite config:
export default defineConfig({
  test: {
    retry: 20
  },
});
However, one problem with this approach is that Vitest does not log the failures, so we cannot identify Flaky tests with this method.
I’ve tried several options, including creating a custom reporter to force Vitest to show something when it retries but I’ve not found any solutions. If you have one, please let me know.
Conclusion
Even if you are not using Vite, Vitest is still a great test runner and a decent alternative to Jest. Vitest, however, shines when coupled with Vite, since it greatly simplifies the project setup and makes things run much smoother.
Learn more about testing in JavaScript:
