


Bazel is an open-source build tool developed by Google to automate build processes for large-scale software. Companies such as Pinterest, Adobe, SpaceX, Nvidia, and LinkedIn use it, amongst others. In this tutorial, you’ll understand what Bazel is, how it works, and its important benefits. You’ll also learn how you can generate Bazel builds for your monorepo project.
Why should you use Bazel?
Bazel works along the lines of other build tools like Make, Maven, or Gradle. However, unlike other tools which are framework-specific, Bazel is tailor-fit for projects with multi-language dependencies.
For instance, you could have a Rust or Go server, a mobile client on flutter, and a web client on Angular. In this case, if you were to manually write your own build files that cater to each language’s ecosystem, it could be a daunting task. Luckily, Bazel does all the heavy lifting for you.
One of the most intriguing features of Bazel is you can easily hook it up with your project’s CI/CD. This helps you boost the productivity of your teams as you can produce more reliable builds to test your software regularly and rigorously. Consequently, you’ll also be able to ship and release more robust builds easily.
However, there’s more to Bazel than just handling multi-language dependencies. Let’s explore some of the benefits that make it so powerful.
What are the benefits of Bazel?
Here are the key advantages that make Bazel an outstanding build tool:
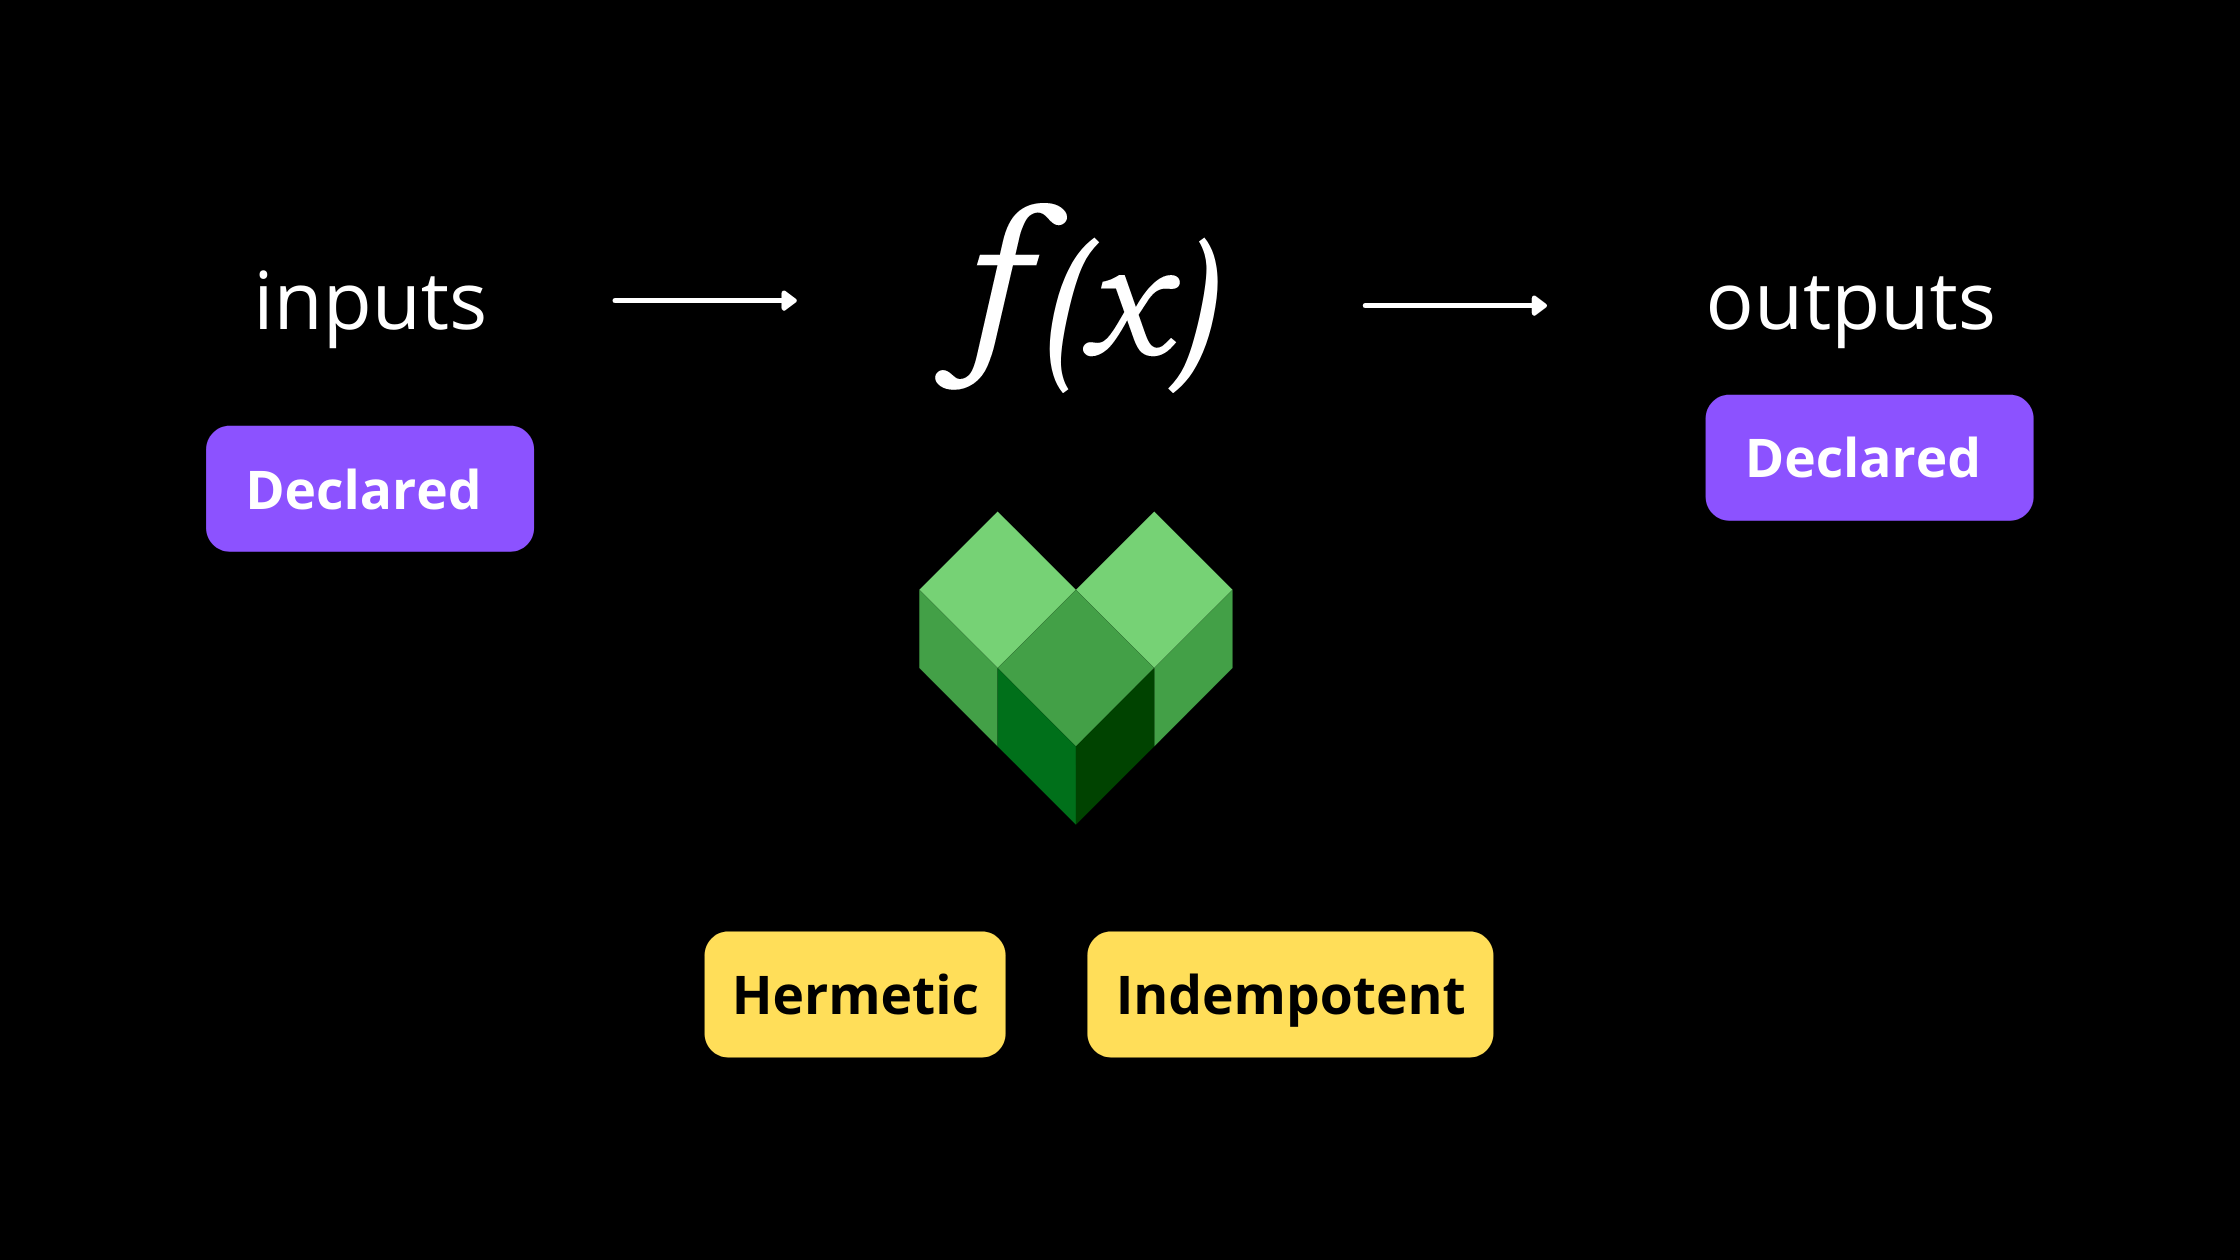
Reproducibility: Bazel produces pure functional builds where your output files are strictly dependent on your inputs. This gives two important characteristics to your builds. First, your builds are hermetic, which means only the inputs that you explicitly mention are readable by your build steps. Second, your builds are idempotent or in other words, reproducible. If you’re using a constant set of inputs, Bazel will produce the same build each time. Reproducible builds make debugging your build operations more convenient.
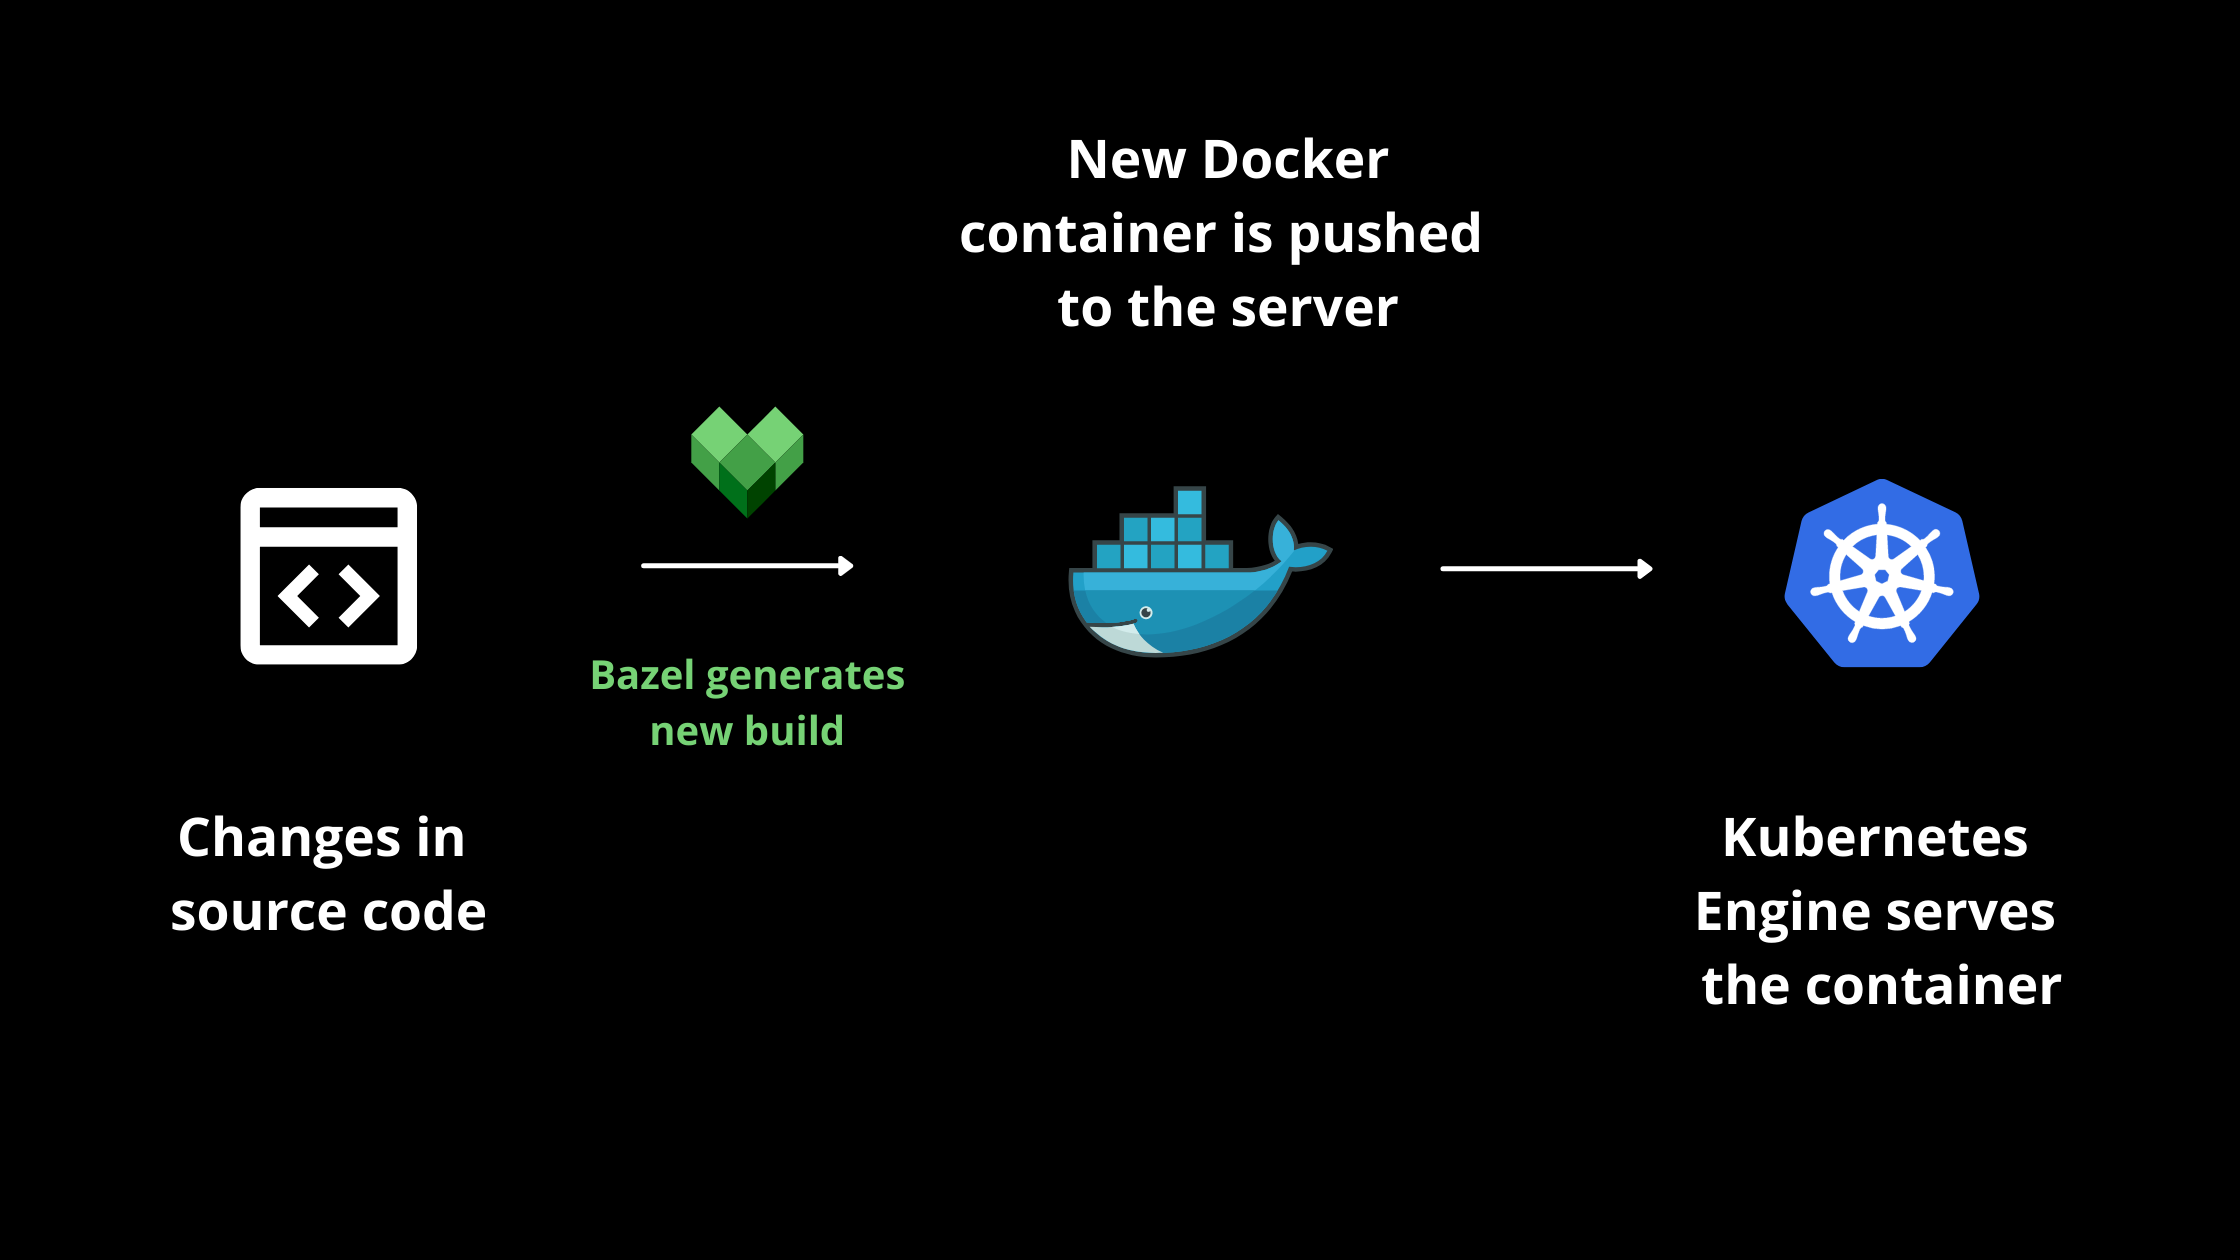
Integration with Docker and Kubernetes: Attributed to its versatility, Bazel complements modern platforms and systems like Docker and Kubernetes. For instance, you can have a handy Docker container for your monorepo containing a web client and a bunch of microservices. You can then use it to kickstart a testing environment that resembles your production environment. Thus you’ll be able to test your Bazel builds through your containers. Furthermore, you can enable incremental builds and manage your deployment using an orchestration engine like AWS Fargate or Kubernetes
Scalability: Bazel’s invention arose from one of Google’s internal build tools, Blaze. Within Google itself, Bazel handles builds for projects containing more than 100K source files. In other words, Bazel is perfect for large projects with enormous codebases. While it advocates the monorepo pattern, it handles microservices architecture just as easily. Dropbox used Bazel to scale their CI/CD pipelines to mitigate the number of tests executed on their commits. Uber also adopted Bazel to scale their Go monorepo. They leveraged Bazel’s hermetic builds to support incremental build generation that supports their distributed infrastructure.
Declarative programming: Writing build configurations for projects should be as simple as possible. Bazel is built using Starlark, a high-level language derived from Python. Thus it gives developers a more convenient way to write build configurations and properties that are easily readable. Additionally, the abstraction in Bazel saves developers from dealing with complicated stuff like compilers and linkers.
Parallelism and caching: Build tools at scale have to be high performant. Bazel speeds up your builds using a caching mechanism. It intelligently compares your subsequent builds with your previous cached builds and only builds those files which the developers updated. This ensures that Bazel only spends your CPU resources on building those pieces of your project that need to be re-built. Bazel also allows you to generate concurrent builds in a parallel fashion to save time across your distributed codebase. You can generate parallel builds on both a single machine as well as across multiple machines remotely.
Large, and growing open-source community: Bazel’s first version came out almost 2 years ago in 2019. Since then, Google has pushed more than 100 releases in a span of two years in an attempt to constantly evolve the tool for developers. Bazel’s Github repo has 17.4k stars and has more than 2K tagged questions and more than 6K search results on Stack Overflow. These small yet growing numbers are an indication of the fact that it’s gaining traction quite rapidly amongst the community.
Bazel terms and basics explained
Now, let’s look at some important terminology used with Bazel.
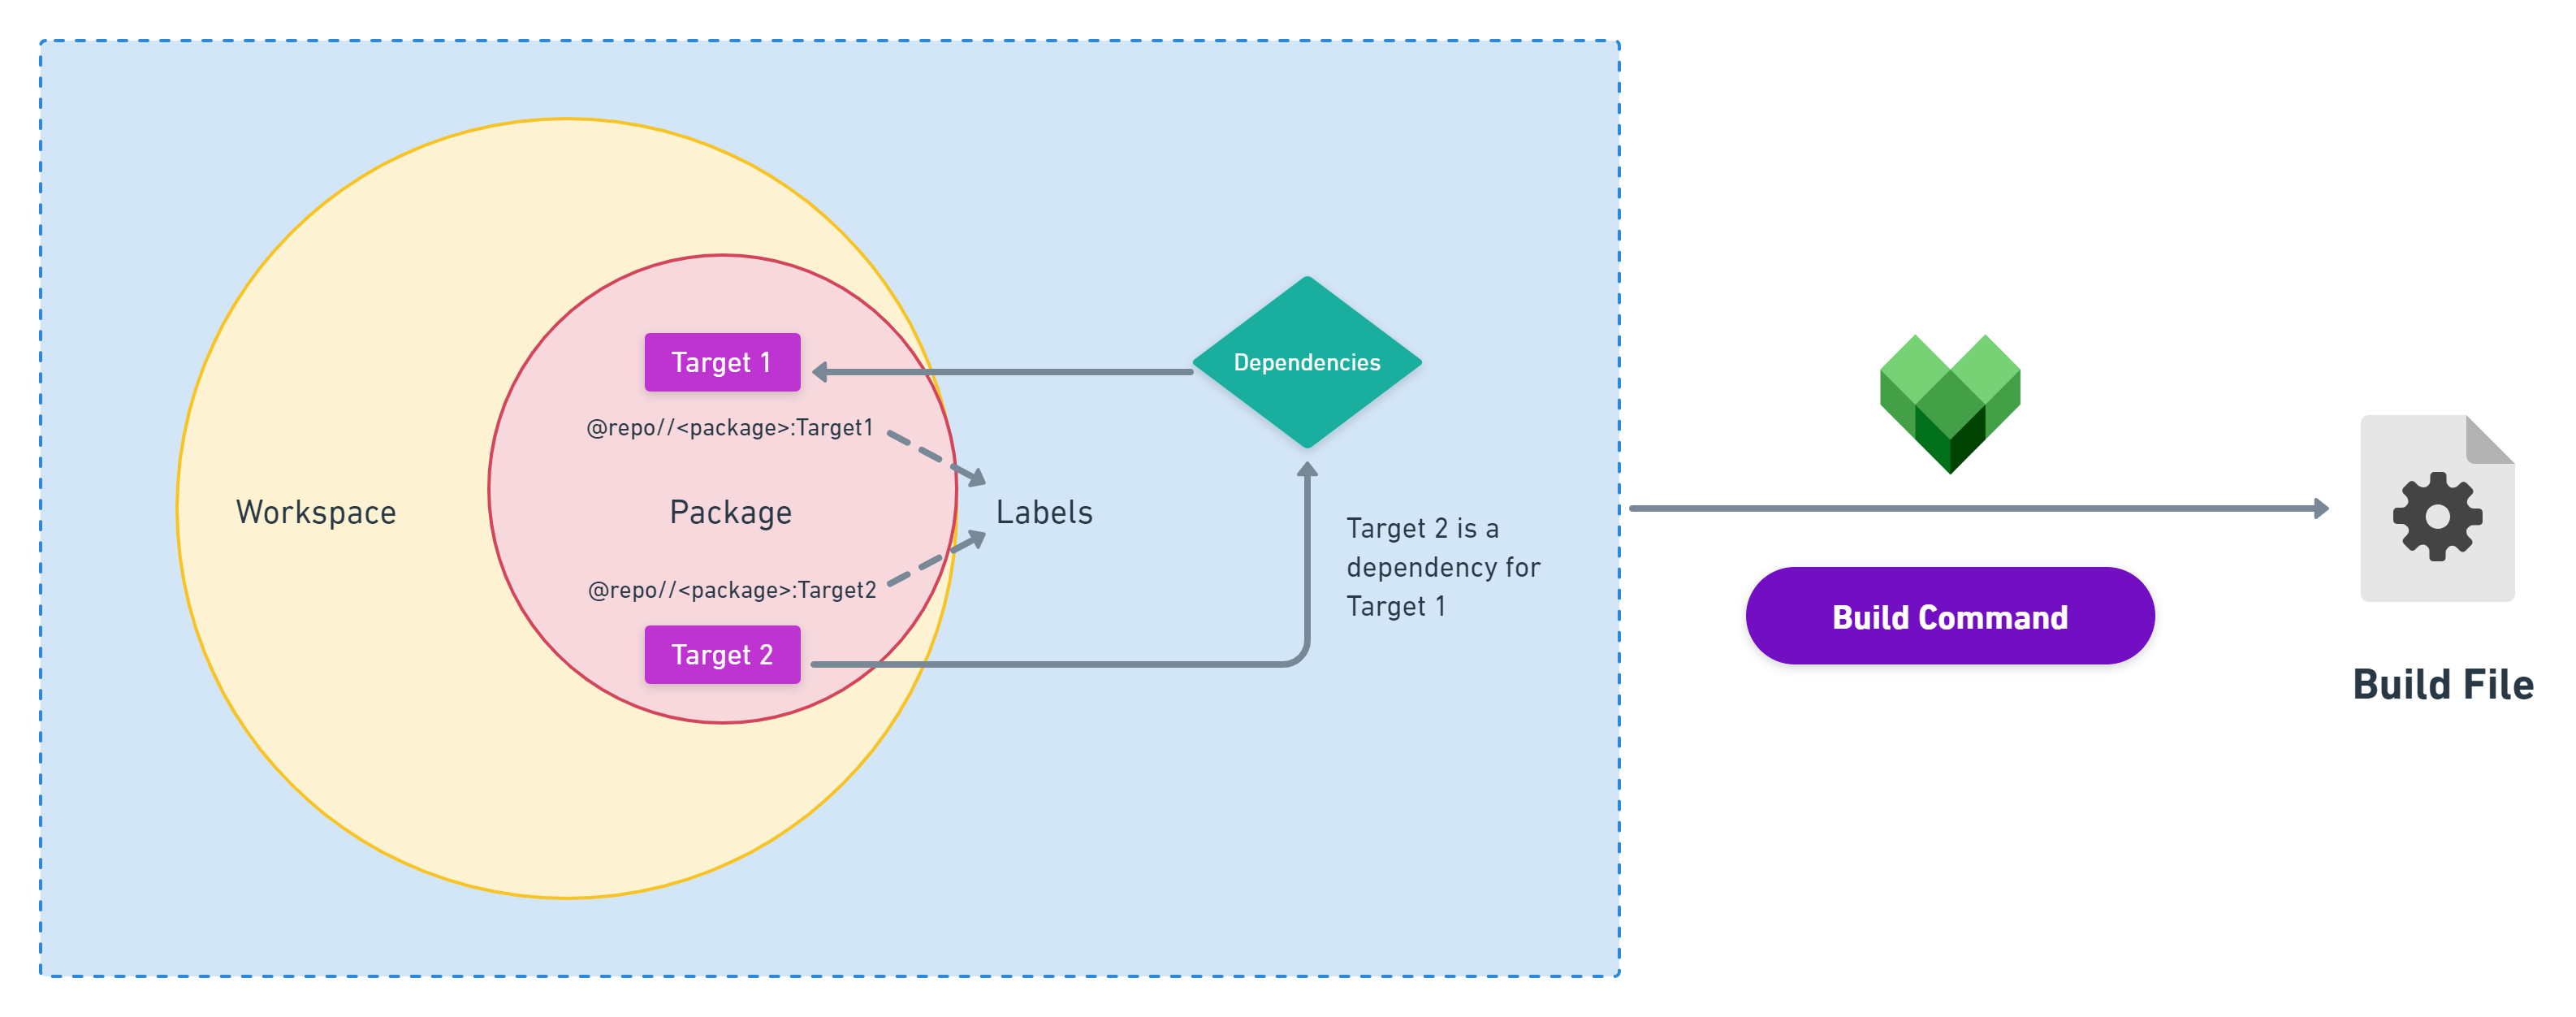
Workspace
The workspace is typically the directory where Bazel constructs your project’s build files from your source code. It contains various source files in a nested hierarchical fashion. At the highest or root level of your workspace, your project might also have a dedicated WORKSPACE text file. It contains references to all the external dependencies your project requires to generate your builds. Precisely, the workspace is where your inputs are extracted and converted to outputs to generate the desired build file.
Packages
Packages are simply directories located below the top-level directory in a workspace. They contain your build files that may be named BUILD or BUILD.bazel , along with other related files and specified dependencies. One package may be nested in another since your source code is organized in a hierarchical fashion. Consider the following working directory:
  src/application/BUILD
  src/application/main/render.txt
  src/application/staging/BUILD
The application is a package as it contains its own BUILD file. Similarly, staging is another package but since it falls directly under application, it can be considered as a subpackage. However, the main is not a subpackage but only a regular directory inside your application package since it doesn’t have its own BUILD file.
Targets
Everything inside your packages can be considered targets. It includes source files that developers of your team wrote and added to your project or generated files that Bazel constructs based on your build configurations. Other than files, targets often involve rules that govern the relationship between your input files and output files. In other words, target rules specify how Bazel is going to construct your build files, the intermediary steps it’s going to take along with every executable operation it will need to perform. Your input files for target rules could be either source files or generated files. Although, your output files are always generated files, since it’s an outcome of the build tool itself. You may specify your target rules to chain your inputs and outputs for consecutive build operations. For instance, you could use a generated file from a previous step as an input file for another step in the future.

Labels
The nomenclature of a target is known as a label. It’s just a way to recognize different targets falling under a package and distinguishing them from other targets in the same or different packages.
Consider the following label:
@repo//application:application_sourceThe above label describes the target application_source inside a package application. Similarly, in the below example main_binary describes a target inside a subpackage main under the package application.
@repo//application/main:main_binaryBoth targets have different labels and you can expect each label to uniquely identify a target.
Dependencies
When you build your specified targets, one or more target may depend on another for the build process. The latter is a dependency. To explain further, consider two targets Target1 and Target2. Let’s say Target1 needs Target2 at build or execution time. We can express this relationship as a Directed Acyclic Graph that demonstrates how Target1 is dependent on `Target12 in this process. Bazel calls this a dependency graph and is used to differentiate between actual and declared dependencies.
Build Files
Earlier, we said that under a WORKSPACE every package contains its own BUILD file. Build files contain the program that enables Bazel to generate the desired builds for your project. It’s evaluated using Starlark and contains a list of sequential statements that are executed by Bazel. The build files contain your declared rules, functions that execute these rules, and variables required in a simple syntax form.
We know that Bazel caches previous builds for speeding up the build process. Whenever your source files change, it is the BUILD file that Bazel references for understanding the underlying changes.
Commands
Bazel offers a set of commands that allow you to execute certain operations. The simplest command you can run is to check if Bazel is successfully installed in your system:
  $ bazel --version

  bazel 4.0.0
Other important commands are bazel build, bazel run and bazel test. The build command as the name suggests builds your output files for the specified inputs or targets.
  $ bazel build //foo

  INFO: Analyzed target //foo:foo (14 packages loaded, 48 targets configured).
  INFO: Found 1 target...
  Target //foo:foo up-to-date:
    bazel-bin/foo/foo
  INFO: Elapsed time: 9.905s, Critical Path: 3.25s
  INFO: Build completed successfully, 6 total actions
The run command runs your output files and the test command is equivalent to running both the build and run commands together.
Building/compiling code with Bazel
Now that we’re aware of common Bazel terminology, let’s understand we can build or compile our code with Bazel using the following steps:
1. The .bazelrc file
The first step that we do is write our build options in a dedicated .bazelrc file. These options determine the settings that are taken into account every time Bazel builds your project. Here’s how a typical .bazelrc file looks like if you’re building a JavaScript project:
build --disk_cache=~/.cache/bazel-disk-cache

build --enable_platform_specific_config

build --symlink_prefix=dist/

test --test_output=errors

test:debug --test_output=streamed --test_strategy=exclusive --test_timeout=9999 --nocache_test_results --define=VERBOSE_LOGS=1

run:debug --define=VERBOSE_LOGS=1 -- --node_options=--inspect-brk

build:debug --compilation_mode=dbg

build --nolegacy_external_runfiles

build --incompatible_strict_action_env
run --incompatible_strict_action_env

coverage --instrument_test_targets

try-import %workspace%/.bazelrc.user
2. Add the buildifier dependency
In order to ensure that all your build files are formatted in a similar fashion, Bazel uses a dependency called buildifier. You can install it as a development-time dependency for your project by running:
npm install --save-dev @bazel/buildifierIt makes sure that all your builds look the same so as to maintain consistency across various build steps in your project. This additionally aids Bazel when it’s comparing your current build with previous builds using its cached artifacts to speed up your build process.
3. Create targets
This is where you write all your source code that Bazel needs to build. Remember how Bazel builds output files for your specified targets? That’s basically the application-level code pertaining to your project. Once you define and declare your targets, Bazel knows which inputs to use while constructing the desired outputs.
4. Add build rules
When we’re through with our build options, we need to use some rules to build our project. In this step, you can either chose auto-generated rules or define your own custom rules. It is prudent to utilize auto-generated rules, and bear in mind that there’s a handful of them on Bazel’s official repository. We define these rules inside our build file.
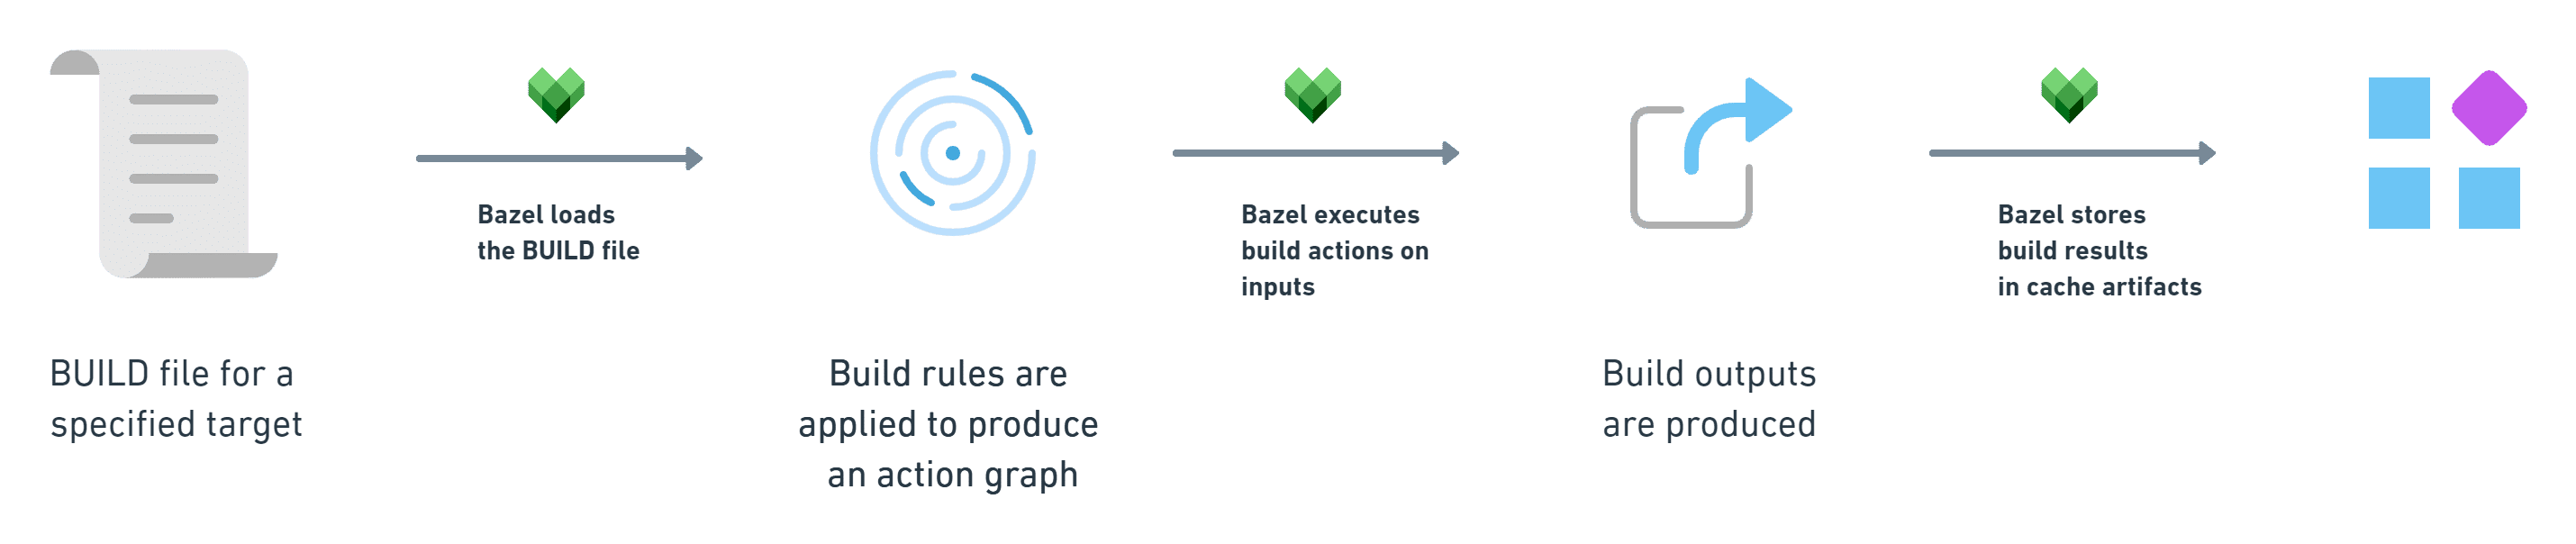
5. Build/compile project
After you have specified your build rules, Bazel typically receives your build file as an input and loads it to the analyzer. Next, it produces an action graph based on your targets and dependencies, and excuses build actions on your declared inputs. Finally, it produces the build outputs and stores them in cache artifacts for the subsequent build.
Let’s extend this theory in action by seeing step by step how this process allows us to build a JavaScript monorepo with Bazel.
Building a monorepo project with Bazel
To get started, we can use @bazel to directly setup Bazel in a new NodeJS project:
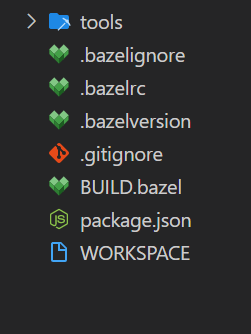
npm init @bazel bazel_js_monorepoHere’s what you should get back on the terminal when the above command runs successfully:

You will notice that now you have buildifier in your project, along with other required files such as the package.json for managing your JavaScript dependencies, your project’s WORKSPACE, and most importantly, the BUILD.bazel file.
You’ll also need to install Babel and other related dependencies to transpile your JavaScript code.
npm install @babel/core @babel/cli @babel/preset-envIf you head over to the WORKSPACE file, you’ll see how it articulates the dependencies Bazel needs to fetch when it builds your project. You need to explicitly tell Bazel about the rules you’ll use to generate your builds. For brevity, we’ll use auto-generated rules.
Go to the BUILD.bazel file present in the root of your project and add the following line:
load("@npm//@babel/cli:index.bzl", "babel")Consequently, you will also need to configure Babel for your project. Create a new file called es5.babelrc file in the root of your project. Recall that the purpose of a .babelrc file as we saw earlier is to describe our build options. Add the following code inside it:
{
    "sourceMaps": "inline",
    "presets": [
      [
        "@babel/preset-env",
        {
          "modules": "systemjs"
        }
      ]
    ]
  }
The above configuration is similar to how webpack adds Babel to your regular JavaScript project.
Before you add your build rules, you need to provide your input or source file to Bazel. Essentially, these inputs are what Bazel sees as targets to construct your builds. Let’s create a file called app.js inside the root directory. We’ll create a simple JavaScript class called User with a function that converts the name of the user in uppercase inside it.
class User{
    constructor(name){
        this.name=name
    }
    uppercaseName(){
        this.name=this.name.toUpperCase();
        return this.name;
    }
}

const user=new User("FuzzySid")
user.uppercaseName();
Next, you need to declare this file as input for your Bazel build. Previously, we loaded the build rules already inside BUILD.bazel file. Let’s use these rules to declare the inputs and outputs for our build inside the BUILD.bazel file:
babel(
    name = "compile",
    data = [
        "app.js",
        "es5.babelrc",
        "@npm//@babel/preset-env",
    ],
    outs = ["app.es5.js"],
    args = [
        "app.js",
        "--config-file",
        "./$(execpath es5.babelrc)",
        "--out-file",
        "$(execpath app.es5.js)",
    ],
)
Finally, you can run the build command to let Bazel do the magic for you:
npm run buildYou should see the following output on terminal:
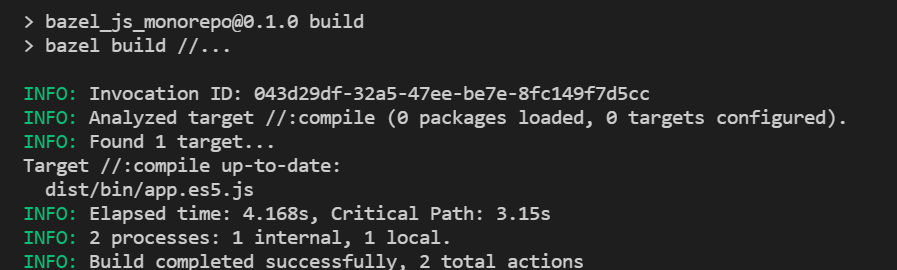
Inside your project, you should now have a bazel-out and a dist directory.
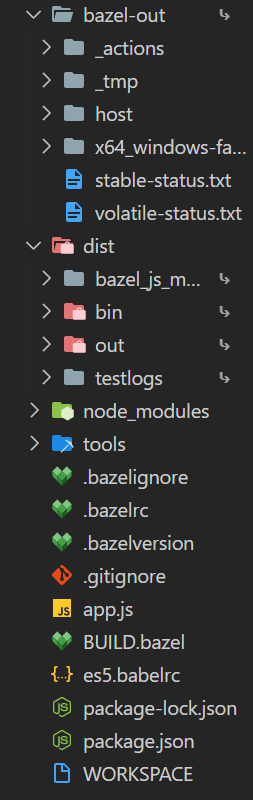
Your transpiled JavaScript code should be present inside dist/bin/app.es5.js. Kudos, you’ve successfully compiled a JavaScript monorepo using Bazel!
