Introduction
Continuous Integration/Delivery has gained widespread acceptance in the minds of developers, and has become an important aspect of the quick release cycles in the software industry. However, adopting continuous integration is not going to bring any benefits, if we don’t make sure that our build system can run in a CI environment with multiple stages (i.e. pipeline).
A highly granular build process requires the split of unit tests according to their speed, execution environment, and general stability. In this tutorial, we will learn how to split our JUnit tests into different categories, so that rather than executing them all at once, a different subset is active for any given build stage. This is an essential requirement in large enterprise projects with test suites that take a lot of time to finish.
We will cover:
- The combination of a custom naming scheme along with surefire exclusions,
- The adoption of the failsafe plugin for integration tests, and
- The usage of Categories which were added in newer JUnit versions.
We will also learn how all of these methods can be combined, for the ultimate testing pipeline.
Prerequisites
It is assumed that we already have a Java project with JUnit tests, that we can build locally but wish to automate on a build server. We will need:
- A sample Java project with JUnit tests,
- A valid
pom.xmlfile that builds the project, - Maven installed (the command
mvnshould be available in your command line), and - Internet access to download Maven dependencies.
It is also assumed that we already know our way around basic Maven builds. If not, then feel free to consult its official documentation first.
Using Default Maven Phases in a Build Pipeline
When setting up a build server for a Maven project, we should directly map the so-called Maven phases to build stages. The default Maven lifecycle has several phases. It may seem natural to us to map the Maven phases to build stages, in a continuous integration pipeline.
Here are some descriptions of Maven phases that are fit for a CI environment:
- compile – compile the source code of the project,
- test – test the compiled source code using a suitable unit testing framework, and
- deploy – done in the build environment, copies the final package to the remote repository.
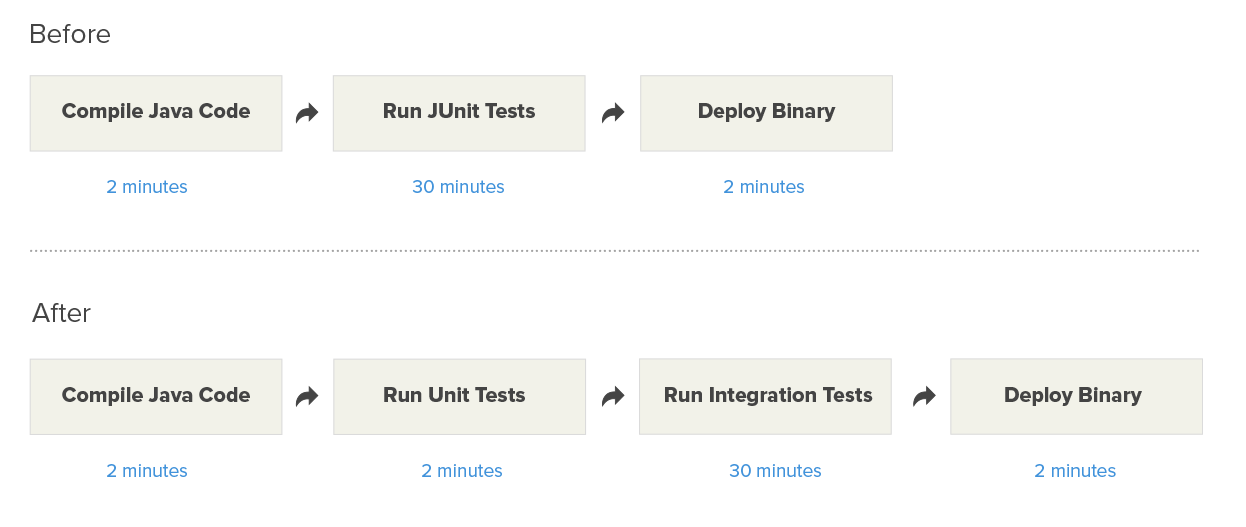
The names of Maven phases can be deceptive. We may assume that these present a one-to-one mapping to build stages, and attempt to create a simple pipeline like this:

This pipeline might work for really small projects, but it is not enough for a production ready environment.
The Need for Fast Feedback
The problem with the basic pipeline, presented in the previous section, is the fact that all unit tests are executed in a single step. Unfortunately, on a large-scale project, this would be a major mistake because not all unit test have the same weight, stability, or speed.
On a large-scale project, with many developers, we want the basic feedback cycle to be really quick. By feedback cycle we define the moment when a developer commits a change until the moment the basic build runs, and unit tests are executed.
At any given case, we want this cycle to last under 5 minutes. Developers should know right away if their code breaks something critical on the project. Having a longer feedback cycle is the root of a lot of shortcomings in the build process.
However, there are some projects (e.g. bank software or hospital software), where the sheer amount of unit tests makes this 5 minute cycle impossible.
To achieve the 5 minute feedback cycle, we need to split the tests and define priorities in the way they run. Different projects might have different priorities, but in most cases we can see that some general categories quickly emerge:
- JUnit tests that focus on the capabilities of a single Java class,
- JUnit tests that need mocks to run, but are still confined in one or two Java modules,
- JUnit tests that require a database, a web server, or an external system in order to run,
- JUnit tests that read or write big files from the filesystem, and
- End-to-end tests that hit REST endpoints or even HTML pages.
Our goal is to select a subset of all these tests, and split them from the other build steps, after making sure that they are running under 5 minutes.
Here is the conversion of a pipeline, where the main feedback time has been reduced from 30 minutes to 2 minutes, by splitting tests into two categories.
That was the theoretical part, and the rest of the article will show us different ways we can split our JUnit tests.
Splitting JUnit Tests According to Execution Speed
A first step in splitting our tests is to examine their execution speed. Plain unit tests, that depend only on Java code, usually run very fast (i.e. in milliseconds), while tests that need a filesystem or a database may run slower (i.e. in seconds).
We’re going to split:
- Fast tests that run in milliseconds as a first build step, and
- Slow tests that need several minutes as a second build step.
Developers will be more confident about their commit if the first step has finished successfully, instead of waiting for all the unit tests to be finished.
Using Surefire Exclusions to Split Fast Tests from Slow Tests
A very basic way to split unit tests, is by using the build system itself. Maven supports different profiles on the build that can be customized to run different tests.
The Surefire Maven plugin, that is responsible for running JUnit tests, can be configured to exclude or include specific tests, according to a custom naming scheme.
For the purposes of this tutorial, we will assume that all fast unit tests have the word “Fast” somewhere in their name. We need to rename all our unit tests with this naming scheme.
Here is an example:
public class FastUnitTest {

    @Test
    public void aQuickTest(){
        [..code that finishes in milliseconds...]
    }

    @Test
    public void anotherQuickTest(){
        [..code that finishes in milliseconds...]
    }

}
In a similar manner, slow unit tests contain “Slow” in their name.
public class SlowUnitTest {

	@Test
	public void anotherLengthyUnitTest() {
		[...code that is very slow..]
	}

}
We will instruct Maven to run these tests with different profiles.
Even though we could create two profiles, one for the slow tests and one of the fast tests, it is far easier to leave the fast tests running on the default profile, and run the slow tests only if they are explicitly required.
To instruct Maven to run only the fast tests by default, we will modify the pom.xml as following:
<build>
		<plugins>
			<plugin>
				<groupId>org.apache.maven.plugins</groupId>
				<artifactId>maven-surefire-plugin</artifactId>
				<version>2.19.1</version>
				<configuration>
					<includes>
						<include>**/*Fast*</include>
					</includes>
				</configuration>
			</plugin>
			[....other plugins here...]
		</plugins>
</build>
The important line here is the include directive. This accepts Ant-style directory syntax. The double asterisks make the pattern recursive across all test directories. This means that we can have a deep hierarchy of “fast” tests in several folders. As long as they have the word “Fast” somewhere in their name, they will be executed.
The result of this pom.xml is that if we now run mvn test on our command line, only fast tests will be executed. The rest will be ignored. This means that the first build step should now take only seconds to run, or 2-5 minutes in the worst case.
For the slow unit tests, we will create a Maven profile that replicates the surefire configuration, but with a different naming pattern. Here is the respective segment from pom.xml
    <profiles>
		<profile>
			<id>slow-tests</id>
			<build>
				<plugins>
					<plugin>
						<groupId>org.apache.maven.plugins</groupId>
						<artifactId>maven-surefire-plugin</artifactId>
						<version>2.19.1</version>
						<configuration>
							<includes>
								<include>**/*Slow*</include>
							</includes>
						</configuration>
					</plugin>
				</plugins>
			</build>
		</profile>
	</profiles>
If you notice the include directive in the configuration part, you will see that it now looks only at the tests that have the word Slow somewhere in their name.
We will name this custom profile “slow-tests”. The final result is that if we now run mvn test -Pslow-tests, only the slow tests will run, and the fast ones will be ignored.
We are now ready to split our pipeline in the following steps:
mvn compile(as before),mvn test(for fast tests only),mvn test -Pslow-tests(for slow tests only).

This is a good first step to split unit tests. In the next sections, we will refine this concept even further.
Splitting JUnit Tests According to Execution Environment
Another way to split tests is to observe their running environment. Two very obvious categories are
- Plain unit tests, that need only the Java source code, and
- Integration tests, that require a running instance of the application or a subset of it.
The first category is what most people would think of as “unit” tests, meaning tests that focus on one or two Java classes.
The second category comprises of tests that need an application server, database, special filesystem or even an external system to run. End-to-end tests, functional tests, integration tests and even performance tests fall into this category.
The general rule is that plain unit tests, which depend only on the Java source code, are usually faster and simpler to run, and running them on their own is a quick enhancement to the speed of the pipeline.
Integration tests might require some setup on their own (e.g. the launch of the application server), before they can actually run. Having them at a later stage in the pipeline is a very common technique to speed-up the main build.
Using the Failsafe Plugin to Split Plain Unit Tests from Integration Tests
We could use Maven profiles, as shown in the previous section, to further subdivide our tests. For integration tests, however, we do not need to do this, as Maven has a separate plugin that is specifically made to handle them.
The Maven failsafe plugin activates the extra Maven phases that come after the package phase. These are:
pre-integration-test,integration-test,post-integration-test, andverify.
Using the failsafe plugin has two advantages compared to basic Maven profiles:
- We gain two phases to setup and tear-down the testing environment, the pre-integration-test and post-integration-test ones.
- Maven will only fail the build in the verify stage (i.e. if a unit test has failed), instead of stopping at the integration-test phase, which would leave a running environment in an unknown state.
To use the failsafe plugin we need to add it on our pom.xml file as below:
    <build>
		<plugins>
			<plugin>
				<groupId>org.apache.maven.plugins</groupId>
				<artifactId>maven-failsafe-plugin</artifactId>
				<version>2.19.1</version>
				<executions>
					<execution>
						<id>integration-test</id>
						<goals>
							<goal>integration-test</goal>
						</goals>
					</execution>
					<execution>
						<id>verify</id>
						<goals>
							<goal>verify</goal>
						</goals>
					</execution>
				</executions>
			</plugin>
The Maven failsafe plugin splits JUnit tests with a different naming scheme as well. By default, it will treat all JUnit files with a name that starts or ends with IT as integration tests.
A normal JUnit test, like below, will not be executed by the failsafe plugin as it does follow the IT naming convention.
public class PlainUnitTest {

    @Test
    public void simpleTest(){
        [..code that checks a Java class...]
    }

    @Test
    public void anotherSimpleTest(){
        [..code that checks a Java class...]
    }

}
The following JUnit test will be executed by surefire as its name ends in IT.
public class DbRelatedIT {

	@Test
	public void aTestWithDBaccess() {
		[...code runs inside the application server..]
	}

  }
The final result is that with the failsafe plugin enabled, we can run the following:
mvn test(will run only the basic unit tests, and will stop the build if any of them fails),mvn integration-test(will run integration tests, and will not stop the build if any of them fails), andmvn verify(will stop the build if an integration test fails).
The main advantage of the failsafe plugin, is that it allows us to hook on the pre and post integration test phases, to set-up or tear down the execution environment. Here is an example:

The basic unit tests run, then another stage sets up the application server (e.g. it could launch Jetty or deploy the war to Weblogic), after that the integration tests run, the application server is stopped, and the result of the integration tests is examined.
Splitting JUnit Tests Into Logical Subsets
The two techniques shown so far, surefire exclusions and the failsafe plugin, are great for splitting JUnit tests when we’re working on a legacy project, that has an old version of JUnit.
Since version 4.8, JUnit comes with Categories, which is the modern way of splitting unit tests. If we have the option to upgrade JUnit to a new version, we should use this feature for large-scale projects.
Unlike the solutions shown before, JUnit categories allow us to create a deep hierarchy of unit test types. Each test can belong to multiple categories at once.
Using JUnit Categories to Create a Hierarchy of Unit Tests
JUnit categories don’t depend on any specific naming scheme. Instead, we can use the standard Java annotations to categorize our tests.
Firstly, we have to create marker interfaces, one for each category. Here are some examples:
    public interface Fast { /* category marker */ }
    public interface Slow { /* category marker */ }
    public interface Integration { /* category marker */ }
    public interface Smoke { /* category marker */ }
    public interface QA { /* category marker */ }
    public interface DbRelated { /* category marker */ }
Once we have these categories, we can annotate any unit test with any combination of these categories. Here are some examples:
@Category(Fast.class)
public class FastUnitTest {

	@Test
	public void oneAndOne(){
		[...code redacted for brevity...]
	}
}


@Category({Slow.class,Smoke.class})
    public class SlowUnitTest {

	@Test
	public void anotherLengthyUnitTest() throws InterruptedException{
		[...code redacted for brevity...]
	}
}
We can now select which categories we want to run on the command line by passing the groups parameter to the Maven executable. Examples:
mvn test -Dgroups="com.codepipes.Fast"mvn test -Dgroups="com.codepipes.Smoke,com.codepipes.Fast"
Alternatively, we can set up the category directly in the pom.xml file
    <plugin>
				<groupId>org.apache.maven.plugins</groupId>
				<artifactId>maven-surefire-plugin</artifactId>
				<version>2.19.1</version>
				<configuration>
					<groups>com.codepipes.Fast</groups>
				</configuration>
			</plugin>
The XML groups element is supported by both the surefire plugin, and the failsafe plugin. This allows us to gradually move to JUnit categories, even if we’ve already used the failsafe plugin for integration tests.
With Semaphore CI the different mvn commands can be mapped directly to build commands in a thread giving you insight on the run time of each stage.
Combining all of the Techniques
Even though JUnit categories are very flexible, there is nothing stopping us from mixing all of the previously mentioned techniques together. It is possible to use Maven profiles along with the failsafe plugin, with custom category annotations on the same code base.
Scaling the Pipeline as the Project Grows
A large-scale enterprise project will often require a lot of JUnit categories. A valid scenario is to start with surefire exclusions at the inception of the code, adopt the failsafe plugin once the test/staging environment is active, and finally employ JUnit categories as the project nears completion status.
Here is an example of multiple unit test splits in a big build pipeline:
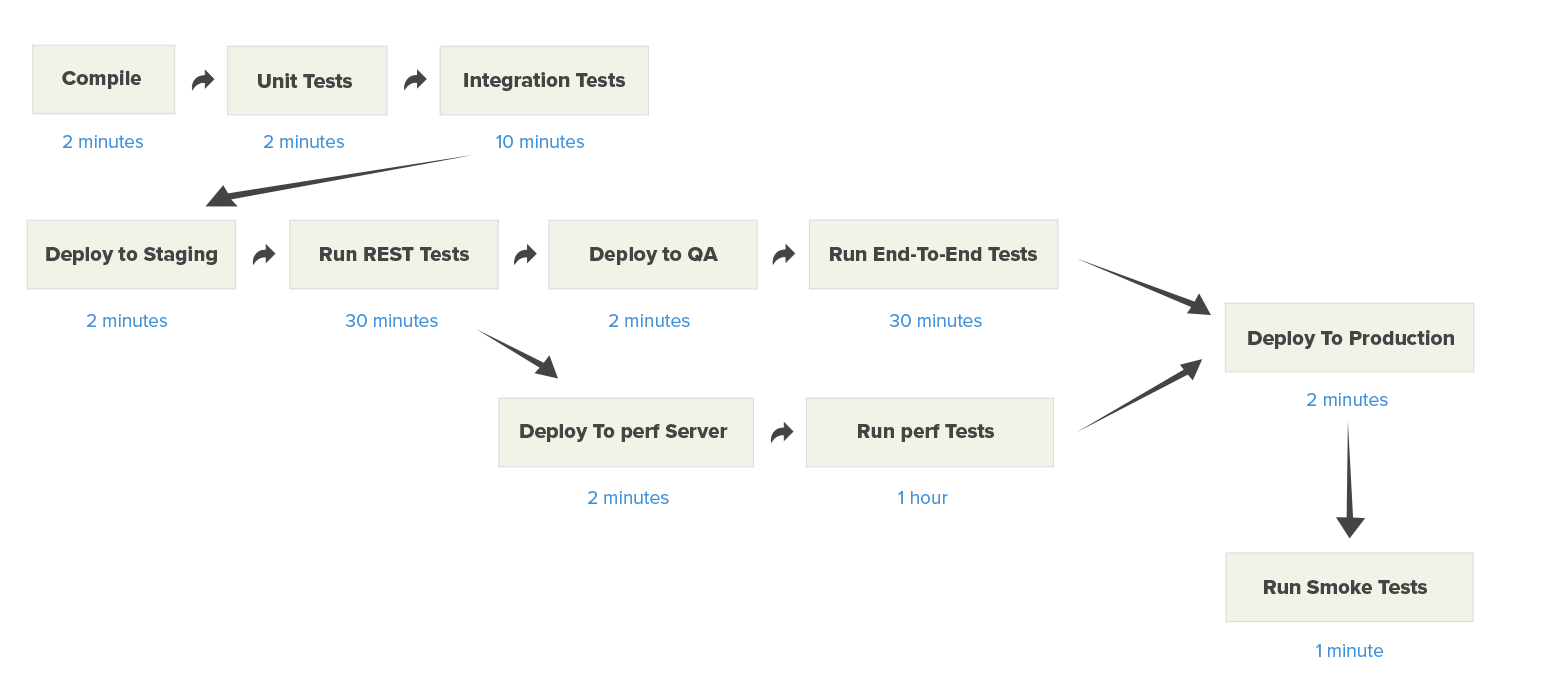
The build steps are:
- Compilation of code (takes 2 minutes),
- Basic unit tests (2 minutes),
- Integration tests with a mocked application server (10 minutes),
- Deployment to a real application server (2 minutes),
- REST endpoint tests (30 minutes),
- Deployment to a QA server (2 minutes),
- End-to-end browser testing (30 minutes),
- Deployment to performance server (2 minutes),
- Parallel running of performance tests (1 hour),
- Deploy to production server (2 minutes), and
- Run smoke tests (1 minute).
In this example, developers can notice critical problems after 4 minutes ,if the basic unit tests fail, or possibly after 14 minutes, if the integration tests fail, even though the total running time of all the tests is more than 2 hours.
Conclusion
Big enterprise projects require the setup of pipelines with different categories of unit tests. This allows developers to quickly find out about failed builds, without waiting for the full test suite to run, which may require hours.
If we’re using a recent version of JUnit 4, then JUnit categories is the best technique for splitting the running of unit tests along different build stages.
If our project still uses old JUnit version, we can use surefire exclusions or the failsafe plugin, and for the maximum flexibility on unit test categories, we can combine all of these techniques at once.

How do you run tests and then integration tests without recompiling everything each time?
We do this in our github actions right now. We compress our target folder, upload it as an artifact via upload-artifact and use download-artifact github action in downstream pipeline steps