When you begin learning about Kubernetes, you hear about the different types of sets it supports and start wondering about their differences.
Understanding the nuances and distinctions between these key concepts becomes crucial as you navigate the complex — yet rewarding — waters of container orchestration.
In this blog, I am going to go over each type and explain the differences between them, so that you can understand how exactly we use each set, how they differ from each other, and the purpose that each serves.
Prerequisites: A beginner-level familiarity with Kubernetes and its purpose will be enough to understand the details of this blog. This blog’s audience is both expert professionals and beginners. Have fun reading 😄.
Kubernetes Controllers

Each of these sets is what’s called a Kubernetes object. More specifically, they’re called Kubernetes controllers. A controller’s job is to monitor the current state of a resource such as pods or services and take action to ensure that the desired state is achieved. Each controller manages a specific type of Kubernetes resource.
Controllers use the Kubernetes API to monitor the state of a particular resource and then perform actions such as scaling, updating, or deleting resources. They are implemented as a loop that monitors for changes in the resource and makes changes if necessary.
The controllers mentioned in this article are built into the Kubernetes system with the difference between them being that each of these solves a unique use case. Let’s start with the first one: the ReplicaSet.
ReplicaSets
Introduction
The simplest unit in Kubernetes is the pod. We run our containers inside the pod. Say you’ve deployed your app inside a pod and you’re now getting huge traffic. So much that your single pod instance can’t handle it. How do you take care of that? Enter ReplicaSet. A ReplicaSet helps manage traffic by scaling your application to have multiple instances of the same pod. This helps reduce traffic to one particular instance and also helps in load-balancing traffic between each of these instances.
Sample manifest
Based on your application’s needs you get to scale the number of instances for your pods easily. Let’s look at what a sample manifest file would look like:
apiVersion: apps/v1
kind: ReplicaSet
metadata:
  name: nginx-replicaset
  labels:
    app: nginx
spec:
  replicas: 3
  selector:
    matchLabels:
      app: nginx
  template:
    metadata:
      labels:
        app: nginx
    spec:
      containers:
      - name: nginx
        image: nginx:1.14.2
        ports:
        - containerPort: 80
This manifest defines a ReplicaSet for an application called nginx, with three replicas. The pod template specifies a container named nginx using the nginx:1.14.2 image, listening on port 80. The ReplicaSet ensures that there are always three replicas of the pod running and available, labeled with app: nginx.
Let’s look at the spec field inside.
.spec.replicasdenotes the number of replicas – the number of instances of the pod you would be running. This number would depend on how much you’d want to scale the pod..spec.selectorcontains thematchLabelsfield among others which contains a map of key-value pairs used to match labels on pods. The ReplicaSet will then identify and manage any pods whose labels match the ones specified under this field..spec.templatecontains the pod template that is used to create the replicas. These replicas are then managed by the ReplicaSet..spec.template.metadatacontains labels which need to match those under the.spec.selector.matchLabelsfield for the ReplicaSet to identify said pod..spec.template.speccontains information for creating the desired pod. It has the container definition, and configuration options such as the volume needed, security context and more.
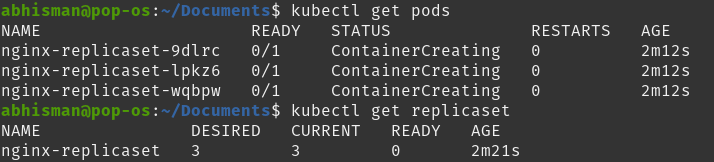
Here, you can see the output and see that there are 3 different pods under kubectl get pods, denoting the 3 replicas.
In a production-level setting, we wouldn’t be using ReplicaSets. Instead, we would be using something called Deployments. Deployments are preferred in production as they provide more advanced features such as rolling updates, rollbacks and more which allow for easier scaling and management of the application. This makes Deployments help streamline the deployment process and ensure that the deployed application is running smoothly and efficiently.
Deployments
A Deployment is the preferred way to deploy an application inside a pod. It is a higher-level abstraction built on top of ReplicaSets that uses ReplicaSets internally to manage applications. In addition to the work carried out by a ReplicaSet, it provides added functionality such as:
- Rolling Updates: Rolling updates ensure that an application is updated gradually, one replica at a time, while ensuring that the overall availability of the application is not impacted. In comparison, ReplicaSets only support scaling and managing replicas.
- Rollback: Deployments automatically rollback to a previous version of an application if an update fails. For ReplicaSets, this process would need to be manually performed.
- Version Control: Similar to the previous feature, Deployments implement version control, hence allowing for the ability to rollback to a previous specific version.
Hence for such reasons, Deployments are the preferred way to go as they take care of a lot of the update and rollback functionality without any downtime and ensure that your application stays available and up to date. If you’d like to instead set up custom update functionality, then you could work with ReplicaSets.
Sample manifest
Let’s look at a sample Deployment manifest:
apiVersion: apps/v1
kind: Deployment
metadata:
  name: nginx-deployment
  labels:
    app: nginx
spec:
  replicas: 3
  selector:
    matchLabels:
      app: nginx
  template:
    metadata:
      labels:
        app: nginx
    spec:
      containers:
      - name: nginx
        image: nginx:1.14.2
        ports:
        - containerPort: 80
This manifest defines a Deployment for the nginx application. It specifies that there should be three replicas of the Deployment and that each pod should be labeled with app: nginx. The .spec section is similar to the ReplicaSet’s, defining the pod template for each replica.
The differences in this manifest are:
- Using
kind: Deploymentto state the resource type. - The
.metadata.namefield.
Additional fields in .spec can be used such as minReadySeconds, paused and more. Kubernetes docs talk more about it.
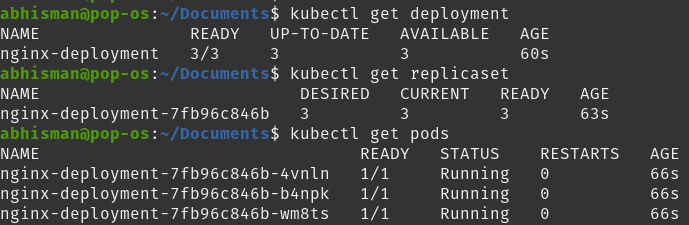
Here you can see how the Deployment itself runs a ReplicaSet that then runs 3 pods.
💡Check out Kubernetes Deployments: The Ultimate Guide to understand more about how Deployments and ReplicaSets are used in a production setting.
StatefulSet
Now let’s talk about StatefulSets. What are StatefulSets and why are they needed?
StatefulSet is the controller that manages the deployment and scaling of a set of Stateful pods. A stateful pod in Kubernetes is a pod that requires persistent storage and a stable network identity to maintain its state all the time, even during pod restarts or rescheduling. These pods are commonly used for stateful applications such as databases or distributed file systems as these require a stable identity and persistent storage to maintain data consistency.

A StatefulSet helps manage these pods by providing some key unique features:
- Unique Identity: StatefulSets assign each pod a unique index, which provides a consistent and unique identity even if pods are deleted or recreated. This is important for stateful applications that rely on a stable identity to maintain the application state or communicate with other nodes in the cluster.
- Persistent Network Identity: StatefulSets provide each pod with a persistent network identity in the form of a stable hostname based on its ordinal index. This hostname is used for DNS resolution within the cluster, making it easy for other services to discover and communicate with the pods in the StatefulSet, even if they are deleted or recreated.
- Persistent Storage: StatefulSets provide persistent storage to their pods through Kubernetes PersistentVolumes, which can be dynamically provisioned and attached to pods as needed. This allows stateful applications to store their data reliably across pod restarts and rescheduling, which is important for applications that need to maintain stateful data, such as databases or distributed file systems.
Hence, in comparison to ReplicaSets or Deployments, which are useful for managing general-purpose tools, StatefulSets are used in managing stateful pods that require a unique identity and stable network identity to maintain their state. Take, for example, a database that requires persistent storage. The database’s nodes would maintain their state so that a new node could take over the previous node’s hostname (unique identity) and network identity and hence make sure that data is consistent.
Sample manifest
Let’s look at a StatefulSet manifest:
apiVersion: apps/v1
kind: StatefulSet
metadata:
  name: nginx-statefulset
  labels:
    app: nginx
spec:
  replicas: 3
  selector:
    matchLabels:
      app: nginx
  template:
    metadata:
      labels:
        app: nginx
    spec:
      terminationGracePeriodSeconds: 10
      containers:
      - name: nginx
        image: nginx:1.14.2
        ports:
        - containerPort: 80
        volumeMounts:
        - name: nginx-data
          mountPath: /var/www/html
  serviceName: nginx
  volumeClaimTemplates:
  - metadata:
      name: nginx-data
    spec:
      accessModes: [ "ReadWriteOnce" ]
      resources:
        requests:
          storage: 1Gi
This is a StatefulSet manifest that manages three nginx pods. The StatefulSet ensures that each pod has a unique identity, a persistent network identity, and a stable hostname. There seem to be additional fields in here. Let’s talk about them:
- Inside the pod template (
.spec.template.spec):terminationGracePeriodSecondsfield is used to specify the amount of time after which Kubernetes should be allowed to forcefully terminate a Pod. This allows time for any cleanup task.volumeMountsfield specifies which volumes should be mounted inside the container and where in the container they should be mounted. Volumes allow containers to share or persist data between restarts. ThevolumeMountsfield is defined inside thecontainersfield and includes the name of the volume and the path for the volume.
.spec.serviceNameis used to specify the name for the service that the StatefulSet will manage. This is used to give each pod in the StatefulSet a stable network identity and allows for load-balancing of traffic to these pods..spec.volumeClaimTemplatesis used to define a persistent volume claim that is used by each pod in the StatefulSet, hence providing each pod with its persistent storage. Here, it requests 1GB of storage and uses theReadWriteOnceaccess mode.

You can see here the nginx StatefulSet running along with its 3 pods. You can also run the kubectl get pv command to display information about persistent volumes or the kubectl get pvc command to display information about persistent volume claims.
The official Kubernetes documentation page contains more about the different types of fields inside a StatefulSet spec.
DaemonSet
Let’s talk about our final set type: a DaemonSet. A DaemonSet ensures that a single instance of a pod is running on each node in a cluster. While the earlier controller types ensure that a specific number of replicas are running across the cluster, DaemonSets are intended to run exactly one pod per node. This is particularly useful for running pods as system daemons or background processes that need to run on every node in the cluster. Due to this, DeamonSets can be used for collecting logs, monitoring system performance, and managing network traffic across the entire cluster.

Let’s talk about a few points about DaemonSets and their difference as compared to the other controller types :
- Pod Scheduling: DaemonSets are designed to run one instance of a pod on each node in a cluster. If you need multiple instances, then the other controller types would be more useful.
- Pod Identity: similar to StatefulSets, a DaemonSet runs a unique pod on each node as compared to having unique identities for every pod on each node.
- Rollout Strategy: since other controller types have multiple instances of a pod, rollouts are done one pod at a time to prevent downtime but as a DaemonSet needs to run a single pod on every node, the rollout process is done one node at a time instead.
Sample manifest
Now that we’ve talked about how DaemonSets differ from the previous set types, let’s take a look at a sample DaemonSet manifest.
apiVersion: apps/v1
kind: DaemonSet
metadata:
  name: fluentd
spec:
  selector:
    matchLabels:
      app: fluentd
  template:
    metadata:
      labels:
        app: fluentd
    spec:
      containers:
      - name: fluentd
        image: fluent/fluentd:v1.7.4-1.0
        volumeMounts:
        - name: varlog
          mountPath: /var/log
      terminationGracePeriodSeconds: 30
      volumes:
      - name: varlog
        hostPath:
          path: /var/log
This manifest runs a single pod of a Fluentd log collector on each node of the cluster. It has a selector to match the label app: fluentd and uses the Fluentd container image.
This manifest should be similar to the ones that we’ve come across. I’ll go over the details in this one:
- The labels under
.spec.selector.matchLabelsand .spec.template.metadata.labelsshould be matching for the DaemonSet to select the fluentd pod. .spec.template.specfield specifies the pod template for the pod to be created.- containers specifies the image to be run along with the volume name and its corresponding
mountPath. mountPathspecifies where in the container would the volume be mounted whereas the type of volume is specified in thevolumesfield, later. terminationGracePeriodSecondsmentions the time allowed for graceful termination- volumes defines the
hostPathvolume type with thename: varlog. Thepathfield shows the path on the host system which will be mounted on the container.
- containers specifies the image to be run along with the volume name and its corresponding

Here, you can see the DaemonSet running with its single pod instance. This is due to the absence of the replicas field, which signifies a single instance of the pod being run – in our case, running a logging agent.
Conclusion
In conclusion, Kubernetes controllers are used to monitor the current state of a resource and ensure that the desired state is achieved. The controllers mentioned in this article, ReplicaSets, Deployments, StatefulSets and DaemonSets, are built into the Kubernetes system and each solves a unique use case. ReplicaSets help manage traffic by scaling your application to have multiple instances of the same pod, while Deployments provide added functionality such as rolling updates, rollback, and version control. StatefulSets are used to manage stateful applications and DaemonSets ensure that all (or a subset of) nodes run a copy of a pod. Understanding the difference between each set type is useful to understand which one to use in which scenario.

Great post, thanks a lot!
Very informative and understandable. Thanks!
Good one. Thanks a lot.
Excellent
Great explanation! Keep going.