Kubernetes as a container orchestration system helps us in managing and automating our workloads by helping us scale our containerized applications. All these applications have specific purposes and requirements depending on the use case. In this scenario, it becomes important to be able to control where we’d want our pods to run.
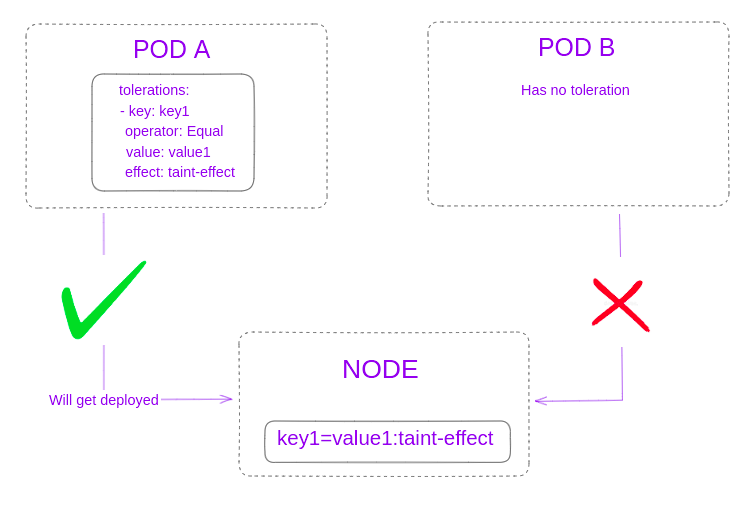
In such cases, you could take a look at taints and tolerations in Kubernetes. A taint is simply a key1=value1:taint-effect pair that you’d apply to a node with the taint command. Here, the taint-effect is the particular effect that you’d want your taint to have.
Now, for a pod to match this taint, it’ll need to have a toleration field in its specification with the following values:
tolerations:
  - key: key1
    operator: Equal
    value: value1
    effect: taint-effect
Hence, only those pods which have the toleration with the same key1,value1 pair in its specification will be deployed on the tainted node.

Use cases
Why use taints? Here are a few examples where this Kubernetes feature is useful:
- Let’s say you have clients or tenants to whom you’d like to provide exclusive pod access. Using taints, you can create isolation between groups of tenants by making sure that each tenant gets their own pods on their specific node hence ensuring multi-tenancy.
- You might need backup pods to have traffic re-directed to them in case of some internal failure or have specialized pods for different environments like prod, dev and testing. In these scenarios, tainting nodes to run specialized pods offers a great advantage as you get to have pods with customized resources.
- You might also need to scale certain pods separately. Let’s take an everyday use case where we have a website and traffic to our site is increasing. To solve increasing traffic, what we can do is set aside nodes with higher resources and taint them so that pods with tolerations get deployed on them.Now, along with the help of the Kubernetes Autoscaler, pods deployed on the tainted nodes get scaled automatically depending on the traffic and both customers and executives are happy.
The use cases covered here aim to cover a few general use cases that you may encounter in your daily scenarios. Of course, with the addition of more tools such as the Autoscaler, you get a truly customizable experience when it comes to deploying your containerized workloads.
Taints
Quick Note: Before we get to taints I need to tell you something about scheduling in Kubernetes. Usually, you define the spec for your deployment and send it over to Kubernetes for the pods to get deployed on the appropriate node. If for some reason your pod doesn’t get deployed, it’ll remain in a Pending state.

Now, let’s take an analogy for explaining taints. Imagine you’re at a big event. At this event, there are organizers who manage the event. They usually have a backstage which is reserved for staff and performers. All these people who are allowed to the backstage need to have a particular wristband to go in and hence you, an attendee will only be allowed if you have that wristband.
Thinking about this in Kubernetes terms, the organizers are the Kubernetes cluster who make sure that you an attendee (pod) can’t get to the backstage (node with taint) unless you have a wristband (toleration).
One example of tainted nodes that you might see in your Kubernetes cluster out of the box will be the tainted Master Nodes in your cluster since these nodes are kept away to run control plane level components such as the api server, scheduler, etcd server etc and not user pods.
Now, let’s take a look at the different ways of tainting a node:
- Using the kubectl command: You can use
kubectlcommand to set up taints for your nodes. This is the simplest way of tainting your nodes. - Using the Kubernetes API: You can use the different Kubernetes clients to set up taints for your nodes programmatically.
For this blog post, we will be exploring the first method of applying taints and tolerations.
Tolerations
Tolerations exist inside the pod’s spec file under the .spec field. A toleration would have the following fields: key, operator, value and effect.

key: The toleration’s key which will match the node’s taintkeyoperator: This is the operator that would define the relation between thekeyandvalue. The differentoperatorvalues are:Existswhich states that no tolerationvaluewill need to be specified. Only thekeyis matched against the taint.Equalwhich states that both thekeyandvalueshould be matched against the taint’skeyandvalue.
value: This is the toleration’s value which will match the taint’svalueeffect: States the toleration taint-effect that will be compared with the taint’staint-effect.
Applying taints and tolerations to nodes and pods
Now that we’ve learned about taints and tolerations, we’ll be applying our knowledge by tainting nodes and running pods on them.
I have used k3d to spin up a local cluster and then added a worker node. You are free to set up your multi-node cluster in any way you want to but if you intend to follow the way I did, I’m listing the commands down below:
# Command for installing k3d
wget -q -O - https://raw.githubusercontent.com/k3d-io/k3d/main/install.sh | bash

# Command for starting your k3d cluster and adding a node to it
k3d cluster create mycluster
k3d node create worker-node --cluster=mycluster
You can now run kubectl get nodes to get a list of the nodes in your cluster. You should see something similar to the below picture with the worker node name as k3d-worker-node-0.

Now that you have a cluster with a worker node to experiment on, what we want to do is schedule a pod to run on this k3d-worker-node-0 specifically. For that, we’ll be using labels and a nodeSelector inside our pod spec.
First, we label our node:
kubectl label nodes k3d-worker-node-0 node=workerAnd apply the deployment nginx.yaml with the following spec:
apiVersion: apps/v1
kind: Deployment
metadata:
  name: nginx-deployment
spec:
  replicas: 1
  selector:
    matchLabels:
      app: nginx
  template:
    metadata:
      labels:
        app: nginx
    spec:
      containers:
      - name: nginx
        image: nginx
        imagePullPolicy: IfNotPresent
      nodeSelector:
        node: worker
Now, we apply our deployment and then confirm to see if it indeed is running on the desired node:
kubectl apply -f nginx.yaml
kubectl get pods -o wide
Now that we’ve confirmed our pod (from our deployment) to be running on the node: k3d-worker-node-0, we’ll go ahead and delete our nginx deployment, taint our worker node and then try to re-deploy our deployment on k3d-worker-node-0 but ultimately fail as our current deployment spec doesn’t have the toleration for the tainted node.
kubectl delete deployment nginx-deploymentNow before we get to tainting a node, let’s take a look at the different taint-effects available:
NoSchedule: The Kubernetes scheduler will allow pods already deployed in the node to run but only allow pods that have tolerations for the tainted nodes in the future.PreferNoSchedule: The Kubernetes scheduler will try to avoid scheduling pods that don’t have tolerations for the tainted nodes.NoExecute: Kubernetes will remove all pods from the nodes if they don’t have tolerations for the tainted nodes.
Now that we’re done learning about the taint-effects, let’s go back to tainting our node. The taint will have the key: taint, the value: start and the effect: NoSchedule.
kubectl taint nodes k3d-worker-node-0 taint=start:NoScheduleNote: To delete the taint, you would run
kubectl taint nodes k3d-worker-node-0 taint=start:NoSchedule-. You just need to add a “-” at the end.
This now means that the node: k3d-worker-node-0 with the new taint-effect: NoSchedule will not allow future pods without the appropriate toleration to be deployed on itself
You will see the following output in your terminal: node/k3d-worker-node-0 tainted.
Let’s now re-apply our deployment and then check its status:
kubectl apply -f nginx.yamlYou should see this when running kubectl get pods -o wide:

The Pending status confirms that not having the toleration made us unable to deploy our pod on the desired node.
You can run kubectl get events to look at the events being generated in your cluster. You’ll find a message that says: 1 node(s) had untolerated taint {taint: start} which shows that our pod didn’t have the toleration for the worker node’s taint.
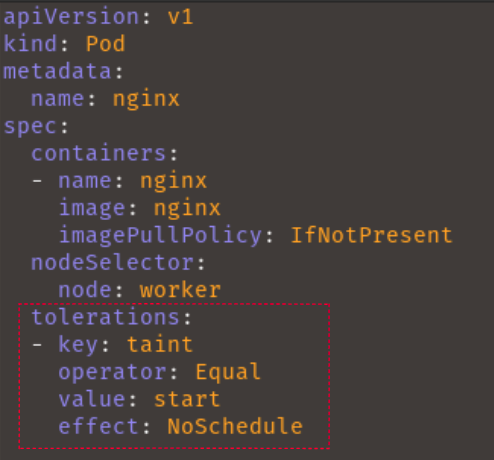
To run our deployment successfully, we’ll add the toleration to our deployment spec and then re-apply it.
New deployment spec:
apiVersion: apps/v1
kind: Deployment
metadata:
  name: nginx-deployment
spec:
  replicas: 1
  selector:
    matchLabels:
      app: nginx
  template:
    metadata:
      labels:
        app: nginx
    spec:
      containers:
      - name: nginx
        image: nginx
        imagePullPolicy: IfNotPresent
      nodeSelector:
        node: worker
      tolerations:
      - key: taint
        operator: Equal
        value: start
        effect: NoSchedule
kubectl apply -f nginx.yamlNow, after re-applying your nginx deployment, your pod should be in a running state like the image below:

This nginx pod has now been allowed to run on the tainted node since it has the required toleration, awesome 🙂
Conclusion
In conclusion, the usage of tainting and tolerating nodes in Kubernetes brings in an added level of control and optimization to cluster management. By effectively pairing taints on nodes with matching tolerations on pods, administrators can tailor deployment strategies for enhanced security, environment specialization, and efficient scaling.
