A recent survey by Red Hat found that more than half of the Kubernetes environments are misconfigured. Even worse, about 90% of respondents had at least one security incident last year, leading to the very first wave of Kubernetes-native malware. In this tutorial, we present three tools to validate and secure your Kubernetes deployments.
Continuous deployment with Kubernetes
Kubernetes main selling point is in its declarative nature — we write a manifest describing the desired final state of a deployment and let the platform figure out the rest. But the fact of the matter is that these manifests are easy to get wrong, breaking stuff in the process.
Continuous delivery with Kubernetes is only viable when we test at every stage. For example:
- First, test the code in the build stage.
- Then, build the container image and check its structure.
- Validate the manifest before deployment (where we are today).
- After deployment, test the system in production using something like canary deployments or blue-green deployments.
Validating Kubernetes manifests
You don’t need to be a Kubernetes authority to deploy safely — no one should; that’s what we have testing tools for. You do have to have some familiarity with how it works, though. So, if this is the first time you hear the word Kubernetes, pods, or containers, check out our free ebook CI/CD for Docker and Kubernetes.
The first thing to check is that the manifests are formally correct — in other words, they follow the Kubernetes OpenAPI specification. We’ll introduce two tools for this: kubeval and kubeconform.
Kubeval
Kubeval is a command-line tool and a Go library for validating Kubernetes manifests. It supports Linux, macOS, Docker, and Windows.
Kubeval does one job but does it well. Once installed, we can begin testing manifests in YAML or JSON. It’s highly recommended to use the --strict flag to fail the tests when unknown properties are found.
$ kubeval --strict deployment.ymlKubeconform
Inspired by Kubeval, Kubeconform does the same with a focus on speed and extensibility. Unlike Kubeval, Kubeconform can validate manifests that include Custom Resource Definitions (CRDs), a way of extending Kubernetes with functionalities such as persistent databases or additional logging.
Kubeconform automatically downloads CRDs definitions from remote repositories and runs validation tests. It also self-updates to Kubernetes’ latest specification.
Kubeconform is released for Docker, MacOs, Linux, and Windows. Once installed, we run the test with:
$ kubeconform deployment.ymlAny errors will be reported. If you want more verbose output, add the --summary option.
Securing deployments with Kube-Score
Short of having a Kubernetes expert at hand to check every deployment, a checklist with sane practices is the next best thing. Kube-Score scans your deployment manifests, offers advice, and throws errors before we get into trouble. You can see the complete list of checks here.
Kube-Score runs in Windows, Linux, macOS, Docker, and you try it out online. Let’s see how well our Ruby “Hello, World” demo does. You may fork and clone the demo here:
We run kube-score score deployment.yml to get these results:
apps/v1/Deployment semaphore-demo-ruby-kubernetes                             💥
    [CRITICAL] Container Resources
        · semaphore-demo-ruby-kubernetes -> CPU limit is not set
            Resource limits are recommended to avoid resource DDOS. Set
            resources.limits.cpu
        · semaphore-demo-ruby-kubernetes -> Memory limit is not set
            Resource limits are recommended to avoid resource DDOS. Set
            resources.limits.memory
        · semaphore-demo-ruby-kubernetes -> CPU request is not set
            Resource requests are recommended to make sure that the application
            can start and run without crashing. Set resources.requests.cpu
        · semaphore-demo-ruby-kubernetes -> Memory request is not set
            Resource requests are recommended to make sure that the application
            can start and run without crashing. Set resources.requests.memory
    [CRITICAL] Container Image Pull Policy
        · semaphore-demo-ruby-kubernetes -> ImagePullPolicy is not set to Always
            It's recommended to always set the ImagePullPolicy to Always, to
            make sure that the imagePullSecrets are always correct, and to
            always get the image you want.
    [CRITICAL] Pod NetworkPolicy
        · The pod does not have a matching NetworkPolicy
            Create a NetworkPolicy that targets this pod to control who/what
            can communicate with this pod. Note, this feature needs to be
            supported by the CNI implementation used in the Kubernetes cluster
            to have an effect.
    [CRITICAL] Pod Probes
        · Container is missing a readinessProbe
            A readinessProbe should be used to indicate when the service is
            ready to receive traffic. Without it, the Pod is risking to receive
            traffic before it has booted. It's also used during rollouts, and
            can prevent downtime if a new version of the application is failing.
            More information: https://github.com/zegl/kube-score/blob/master/README_PROBES.md
    [CRITICAL] Container Security Context
        · semaphore-demo-ruby-kubernetes -> Container has no configured security context
            Set securityContext to run the container in a more secure context.
v1/Service semaphore-demo-ruby-kubernetes-lb                                  ✅
The initial assessment is definitely not looking good. The deployment has five critical errors. It’s time to make lemonade out of these lemons.

What is Image Pull Policy?
When we deploy something in Kubernetes for the first time, kubelet pulls the image from the appropriate registry. The image will stay in the node’s cache to be reused. This caching behavior works as long as we’re meticulous about tags. With this, I mean that we are safe if we don’t reuse tags (I’m looking at you, latest). Otherwise, unexpected things will happen because we can never be sure which particular image a node is running: the one in the cache or the one in the registry.
The ImagePullPolicy value defines how the cache works. By default, its value is IfNotPresent, meaning “pull the image if not cached.” The recommendation is to change it to Always, so cache is disabled and a fresh image is always pulled.
We apply this setting at the container level. This translates to the element spec.template.spec.containers[] in our manifest.
spec:
  template:
    spec:
      containers:
      - name: semaphore-demo-ruby-kubernetes

        # ... add this line to never cache the image
imagePullPolicy: AlwaysSetting CPU and Memory limits
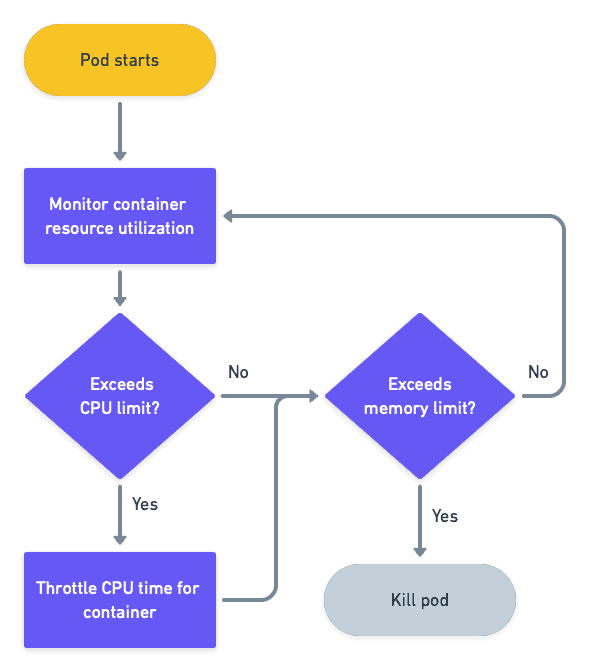
Containers in Kubernetes don’t have any limits. Wild and free they are to take as much CPU and memory as they may. Having a single pod with a runaway container taking all of a node’s memory is no fun. To keep these guys in check, we should specify limits for all pods in the deployment.
Of course, setting limits too low could be worse than having none in place. So monitoring is critical. Unless you really need unlimited pods, in which case it’s best to corral them in “no-throttle” nodes to maintain the cluster’s stability.
Back to fixing our deployment. We can specify resource quotas in two ways: requests and limits.
A request is the least amount of memory and CPU a container needs to get in order to run correctly. The Kubernetes scheduler will use this information to assign the pod to a node with enough free resources.

A limit is the maximum amount of memory and CPU a container is allowed to consume. A container may use more than its permitted requests value, but never more than its limits.
Both requests and limits are specified as:
- CPU: a value of
1is equal to one hyperthreaded processor on a bare-metal machine or 1 vCPU core in a VM. For instance, a value of0.25is a quarter of a core, which can also be written as250m(millicpus). A container is not to use more than its allowed share of CPU time or risk throttling. Containers and pods will never be killed for exceeding their processor quota. - Memory: defined either in bytes (1Mb = 10^6 bytes) or mebibytes (1Mi = 2^20 bytes). When a container uses more memory than allowed, it will be terminated with an out-of-memory (OOM) error, killing the pod.
It’s important to note that these values are set per container. They are summed up when pods are composed of more than one container.
So, now that we know how requests and limits work. What values should we choose for our demo? A simple application like ours needs very few resources. Complex systems will require more; how much more is a question best answered with monitoring in place and a bit of experimentation.
Let’s say we set a request quota of 100m and 64 Mi. We’ll double those values for the limits. Remember that resources are applied at container level: spec.template.spec.containers[].
spec:
  template:
    spec:
      containers:
      - name: semaphore-demo-ruby-kubernetes

        # ... add resource requests and limits
        resources:
          requests:
            cpu: "100m"
            memory: "64Mi"
          limits:
            cpu: "200m"
            memory: "128Mi"
Using Liveness and Readiness Probes
Once a container is up, how does Kubernetes keep track of it’s health? And is it ready to accept user connections? The answers to these questions involve using probes. A probe can work in two modes:
- command: run a command inside the container and check its exit code.
- network: ping a port or perform an HTTP request and check the result.
In our example, we can check that the webserver (puma) process is running:
spec:
  template:
    spec:
      containers:
      - name: semaphore-demo-ruby-kubernetes

		# ... add liveness probe
        livenessProbe:
          exec:
            command:
              - pgrep
              - -f
              - puma
          initialDelaySeconds: 5
          periodSeconds: 5
The probe above is called a liveness probe. If the exit code is zero, the application is considered alive. Failed probes make the container to be restarted.

There’s another type of probe called readiness probe. It checks if the pod is ready to accept connections. A failed probe does not automatically restart the pod, but it disconnects from the load balancer, preventing users from reaching it. Readiness probes are meant to cope with temporary problems.
We define probes at the container level, but Kubernetes handles pods instead of containers. This means that all its container probes must pass together for a pod to be considered alive and ready.
Let’s add a readiness probe that attempts a GET request on port 4567. The probe passes as long as the return code is between 200 and 399.
spec:
  template:
    spec:
      containers:
      - name: semaphore-demo-ruby-kubernetes

        # ... and a readiness probe
        readinessProbe:
          httpGet:
            port: 4567
            path: /
          initialDelaySeconds: 5
          periodSeconds: 20
Controlling access with a pod network policy
Unless stated otherwise, pods in Kubernetes are allowed to send and accept packets to and from anywhere. While it’s true that the pods cannot receive traffic from outside without configuring some kind of endpoint, all pods inside the cluster are allowed free communication. We use pod network policies to lock down their access.
Within the cluster, we can define inter-pod and inter-namespace policies to isolate pods. From without, we lock down external access with IP-based policies.
Our demo does not really need a network policy because we want our pods to be reachable from the Internet. But it’s good practice to make implicit behavior explicit, so we’ll add an “allow all” policy to the pods in the deployment.
# pod network policies are a different resource
# add these lines at the end of deployment.yml

---

apiVersion: networking.k8s.io/v1
kind: NetworkPolicy
metadata:
  name: allow-all
spec:
  podSelector:
    matchLabels:
      app: semaphore-demo-ruby-kubernetes
  ingress:
  - {}
  egress:
  - {}
  policyTypes:
  - Ingress
  - Egress
IP-based policies have some downsides, unfortunately. For one, its implementation depends on network plugins enabled on the cluster. And in many cases, policies might be ignored completely, as not every cloud supports them in the same way.
Locking down containers with a security context
While network policies secure pods by controlling communications, security contexts define privileges that pods and containers have while running. A security context allows us to run pods with more (or less) capabilities, grant or deny access to files inside, or control which system calls are permitted.
This is a topic that needs quite a deep understanding of Linux and container internals to use well. We’ll create a basic security context that marks the filesystem read-only and runs the container with a high ID user. This should be enough to pass Kube-Score.
Go back to the deployment part of the manifest and add the security context to the container image:
spec:
  template:
    spec:
      containers:
      - name: semaphore-demo-ruby-kubernetes

        # add a security context for the container
        securityContext:
          runAsUser: 10001
          runAsGroup: 10001
          readOnlyRootFilesystem: true
Run Kube-Score once more to ensure no more errors. You can enable optional tests with --enable-optional-test TEST_ID, or disable mandatory tests with --ignore-test TEST_ID.
Once done, commit the file to the repository, so you’re ready for the following section: automating tests with Semaphore CI/CD.
apps/v1/Deployment semaphore-demo-ruby-kubernetes                             ✅
networking.k8s.io/v1/NetworkPolicy allow-all                                  ✅
v1/Service semaphore-demo-ruby-kubernetes-lb                                  ✅
For reference, the final version of the manifest looks like this:
apiVersion: apps/v1
kind: Deployment
metadata:
  name: semaphore-demo-ruby-kubernetes
spec:
  replicas: 1
  selector:
    matchLabels:
      app: semaphore-demo-ruby-kubernetes
  template:
    metadata:
      labels:
        app: semaphore-demo-ruby-kubernetes
    spec:
      imagePullSecrets:
      - name: dockerhub
      containers:
      - name: semaphore-demo-ruby-kubernetes
        image: $DOCKER_USERNAME/semaphore-demo-ruby-kubernetes:$SEMAPHORE_WORKFLOW_ID

        # don't cache images
        imagePullPolicy: Always

        # resource quotas
        resources:
          requests:
            cpu: "100m"
            memory: "64Mi"
          limits:
            cpu: "200m"
            memory: "128Mi"

        # liveness probe
        livenessProbe:
          exec:
            command:
              - pgrep
              - -f
              - puma
          initialDelaySeconds: 5
          periodSeconds: 5

        # readiness probe
        readinessProbe:
          httpGet:
            port: 4567
            path: /
          initialDelaySeconds: 5
          periodSeconds: 20

        # security context for the container
        securityContext:
          runAsUser: 10001
          runAsGroup: 10001
          readOnlyRootFilesystem: true

---

apiVersion: v1
kind: Service
metadata:
  name: semaphore-demo-ruby-kubernetes-lb
spec:
  selector:
    app: semaphore-demo-ruby-kubernetes
  type: LoadBalancer
  ports:
    - port: 80
      targetPort: 4567

---

# pod network policy
apiVersion: networking.k8s.io/v1
kind: NetworkPolicy
metadata:
  name: allow-all
spec:
  podSelector:
    matchLabels:
      app: semaphore-demo-ruby-kubernetes
  ingress:
  - {}
  egress:
  - {}
  policyTypes:
  - Ingress
  - Egress
Testing manifests with CI/CD
All that we’ve learned so far was a preparation for this. Our goal now is to incorporate these tools into the CI/CD pipeline.
You can combine the following steps with the pipeline configured in Structure Testing for Docker Containers, which showed how to test containers before deployment. I’ll assume you have some familiarity with how Semaphore works. Check out our beginner guide if that’s not the case.
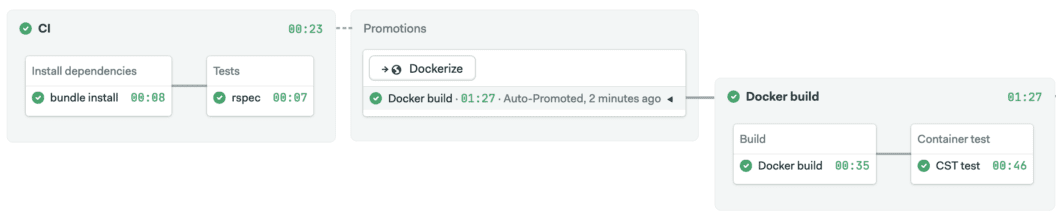
This is where we are now. A pipeline that builds a Docker image, tests it, and deploys it with Kubernetes. The demonstration code can be found here:
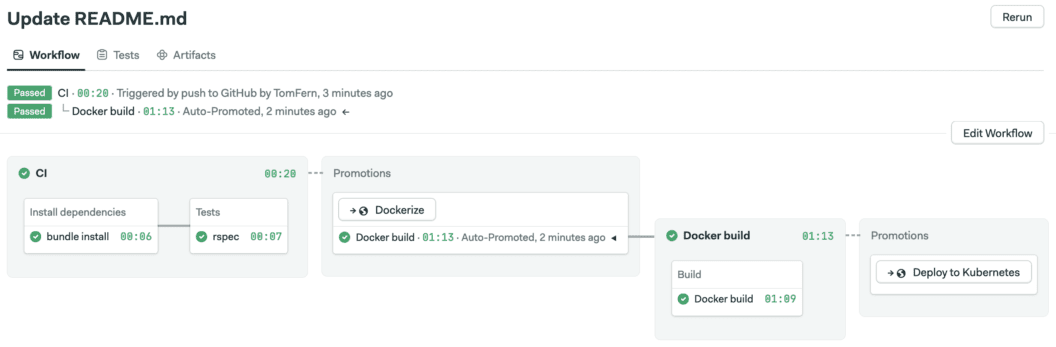
Manifest validation should take place before deployment. The first pipeline does continuous integration, the second builds the Docker image. Deployment happens in the last pipeline, so we’ll add manifest validation before deploying to Kubernetes.
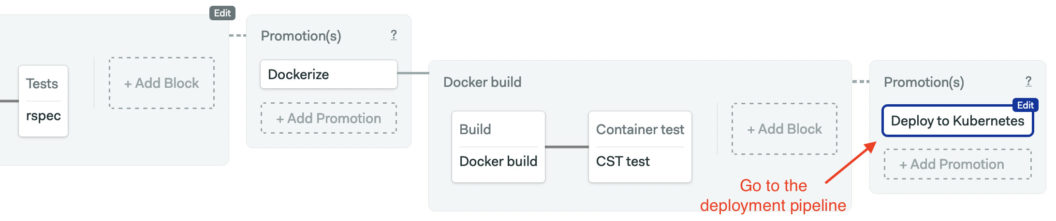
Open the workflow editor and position yourself in the deployment pipeline.
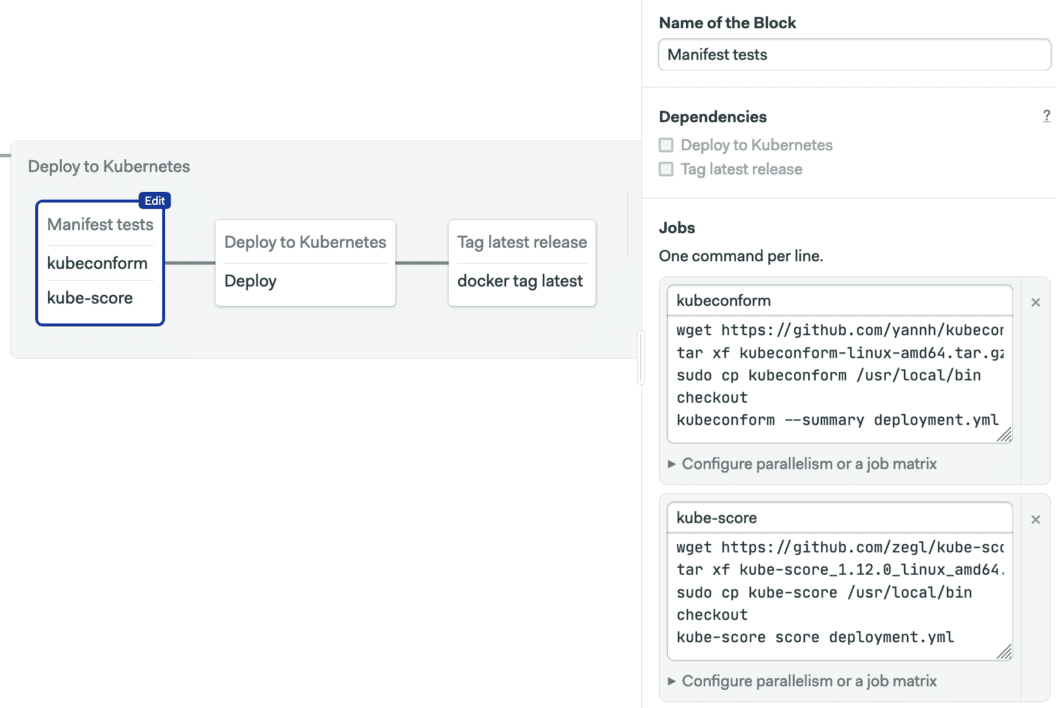
Create a new block and remove all its dependencies. We’ll configure two jobs. The first one installs Kubeconform, clones your repository with checkout, and runs the test.
wget https://github.com/yannh/kubeconform/releases/download/v0.4.12/kubeconform-linux-amd64.tar.gz
tar xf kubeconform-linux-amd64.tar.gz
sudo cp kubeconform /usr/local/bin
checkout
kubeconform --summary deployment.yml
The second job does the same with Kube-Score:
wget https://github.com/zegl/kube-score/releases/download/v1.12.0/kube-score_1.12.0_linux_amd64.tar.gz
tar xf kube-score_1.12.0_linux_amd64.tar.gz
sudo cp kube-score /usr/local/bin
checkout
kube-score score deployment.yml
Now we want to stop deployment if either of the jobs fails. Click on the “Deploy to Kubernetes” block and add the new test block as a dependency.
Before trying out the pipeline, review the Kubernetes deployment job. The full detail on how it works is available in our guide for Continuous deployment with Kubernetes.
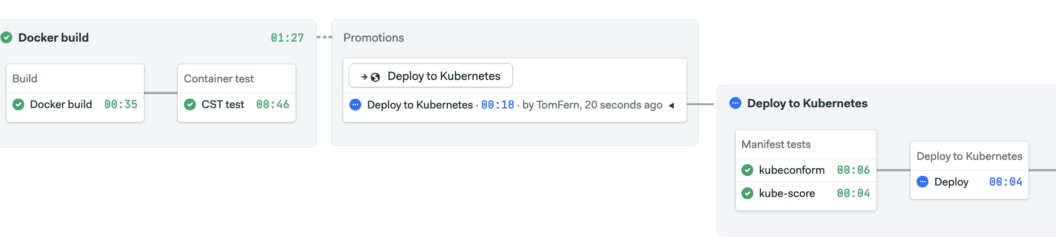
Click on Run the workflow and Start. Wait until the CI and Docker build pipelines end before trying out the deployment.
Click on Deploy to Kubernetes to start the pipeline.
Conclusion
Being able to deploy any day of the week safely is a powerful thing. But to do it with confidence requires good testing in place at every stage.
Interested in Kubernetes? Read these next: