Monorepos are coming into mainstream, and JavaScript, with notable projects like Babel, Meteor, Ember, or React — all of them unarguably successful — is one of the reasons.
It shouldn’t surprise that this arena has seen plenty of work in tooling. We have projects like Lerna, Yarn, RushJS, or Bit. Monorepos are becoming so popular that even npm v7, the latest release, comes with native support for them.
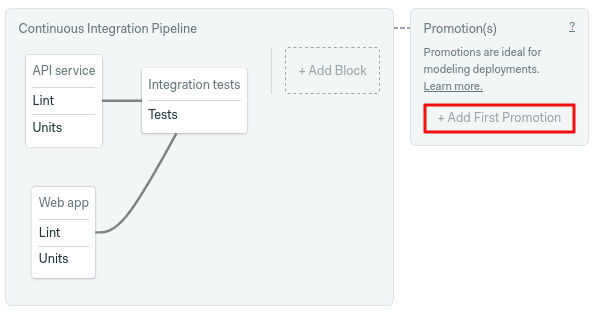
On this occasion, I want to explore Yarn workspaces. We’ll learn how to structure JavaScript workspaces and how we can leverage Semaphore’s monorepo innovations. The objective today is to set up a smarter pipeline that builds only recently-changed applications, skipping already-tested code. The end result should look like this:
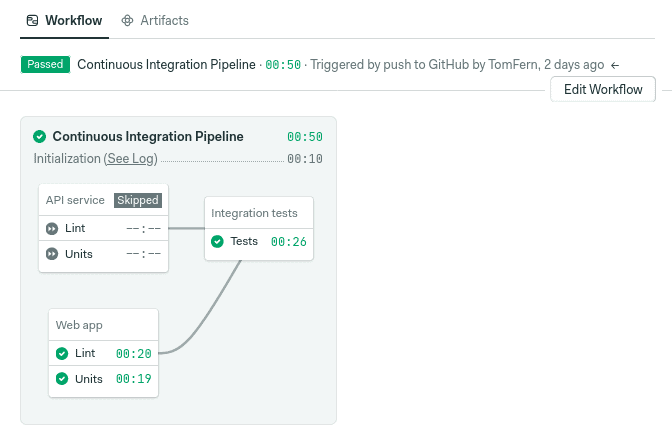
By skipping untouched code, you can scale out monorepos, obtain test results faster, and save money in the process.
Monorepos and Yarn
A monorepo allows multiple applications to coexist in the same repository and cross-reference each other, easing the overhead of repository management and allowing a higher degree of collaboration among teams.
Yarn is an alternative package manager to npm. Yarn version 2 was released in 2020 with a lot of monorepo goodies:
- Zero installs setups: dependencies are deduped and committed directly to the repository, making builds more reproducible and avoiding version conflicts.
- Plug’n’play: replaces Node’s dependency resolution mechanic. Provides more reliable installs and faster application startups.
- Workspaces: Yarn can now manage dependencies across many independent projects in the same repository. Instead of having several big
node_modulesfolders scattered all over, we now have all dependencies compressed in one repository-level folder.
Prerequisites
To follow the tutorial, you’ll need:
We’re going to use one example repository as a guide. Please, feel free to fork it on GitHub. You can peek at the final form in the final branch. The steps laid down here, however, should mostly work with any JavaScript application.
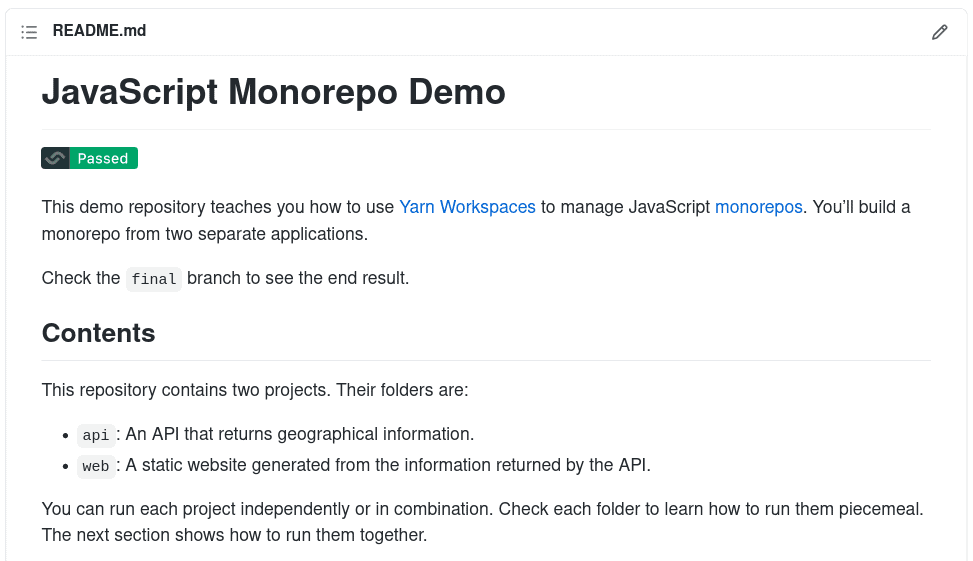
The example repository contains two applications:
- api: provides a GraphQL API server that returns information about countries and cities of the world.
- web: a Next.js static website generated programmatically with the API.
Both of them ship with linting checks and unit tests, plus some integration tests to confirm that they can work together.
Set up Monorepo
The first thing to do is set up the workspaces. Start by ensuring that you’re running the latest Yarn version.
$ yarn set version berryNext, initialize the monorepo workspaces.
$ yarn init -wThis will generate a root-level package.json. It will also create a packages folder, where Yarn will expect the applications to be. The paths are defined in a list inside the workspaces key in the main package.json.
Now, move all applications into the new folder. Yarn should pick up the package manifests in each subfolder in packages/*. Yarn will map the name of each workspace from using the application-level package.json.
.
├── package.json
├── packages
│   ├── api
│   │   └── package.json
│   └── web
│       └── package.json
└── yarn.lock
You can confirm that workspaces are working by running yarn workspaces list.
$ git mv api web packages
$ yarn workspaces list
The next step is to install all the dependencies.
$ yarn installYou should now have a few new files at the root of the repository:
.yarn/cache: this is your newnode_modulesfolder. With the difference that each dependency is only downloaded once and saved in compressed state..pnp.js: the Plug’n’play file provides Node a complete map of your dependencies by listing their versions and locations in the repository.yarn.lock: the checksum file contains the exact dependency versions installed.
Delete the old yarn.lock as sometimes Yarn gets confused by them.
$ git rm -f packages/*/yarn.lockThe monorepo is ready. You can commit the changes.
$ git add .yarnrc.yml .yarn yarn.lock .gitattributes .gitignore package.json .pnp.js
$ git commit -m "finalize monorepo setup"
$ git push
Bear in mind that, by default, Yarn does zero install setups. That means that all downloaded modules are committed to the remote repository. Therefore, the first push might take longer than usual. If you don’t want to push the modules to, change these two lines in .gitignore and commit.
# comment this line
# !/.yarn/cache

# uncomment this line
/.pnp.*
Working with workspaces
What did we gain with all this work? For one thing, we now have all dependencies compressed and deduplicated, making application startup faster and reducing the space required on disk. It is now a lot more feasible to push all dependencies into the repository. For another, we also gained the ability to run any application directly from the repository root.
# run a script listed on packages.json
$ yarn workspace <workspace-name> run <script-name>

# run an arbitrary JS file
$ yarn workspace <workspace-name> node <file-name>
Start and test any application with:
$ yarn workspace <workspace-name> start
$ yarn workspace <workspace-name> test
In the example repository, we have two already-configured lint and test scripts. You can test both applications like this:
$ yarn plugin import workspace-tools
$ yarn workspaces foreach lint
$ yarn workspaces foreach test
If you want to try running both applications together, run these commands:
$ yarn workspace api start &
$ yarn workspace web build
$ yarn workspace web start
Setup Continuous Integration
Setting a monorepo pipeline works the same as creating any other kind of CI/CD pipeline. Once logged in to Semaphore, use the create new link on the top of the page to add your repository.
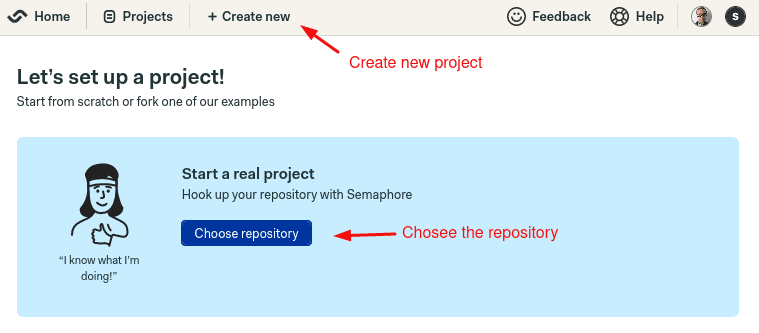
Choose the repository from the list.

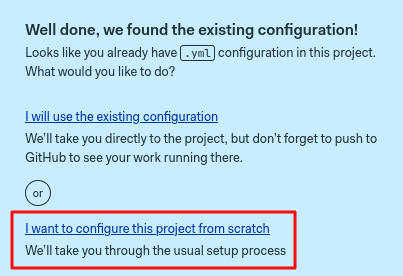
Click on continue and select I want to configure this project from scratch if prompted.
Choose single job and click on customize.
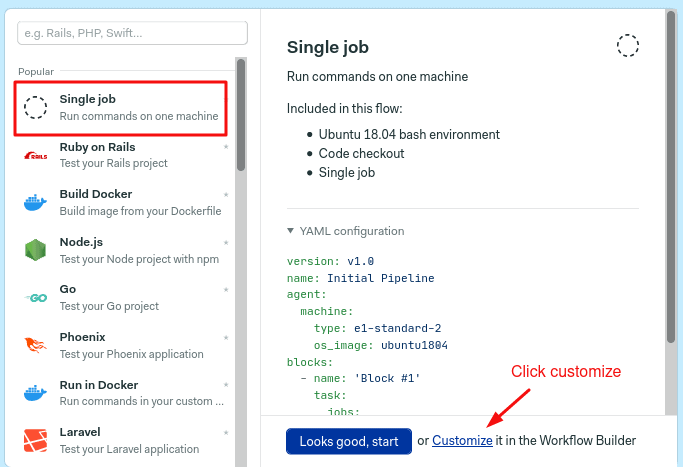
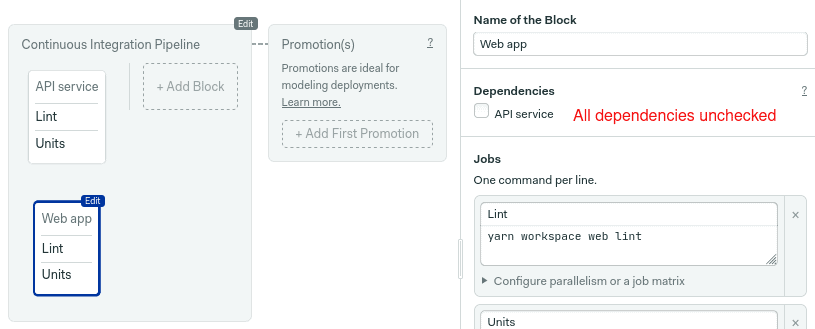
This will open the workflow builder, which lets you visually edit the pipeline. The first block should already be selected.
We’ll start with the API service. Open the prologue section on the right pane. The prologue commands are always executed first. Add the following commands in the box:
checkout
sem-version node 15.14
yarn install
What we did there was clone the repository inside the CI machine with checkout. Then, we changed the active Node.js version with sem-service. Also, you have noticed that there’s a yarn install there. We need this command because some of the modules need to be rebuilt.
If you have used Semaphore before, you may have noticed we haven’t used the cache. That’s one of the benefits of Yarn’s zero-install feature.
Next, add the first job. The linting command will be executed after the prologue.
yarn workspace api lint
To complete the test block, add the unit tests. These will run simultaneously with the other job.
yarn workspace api start &
sleep 5
yarn workspace api test
killall node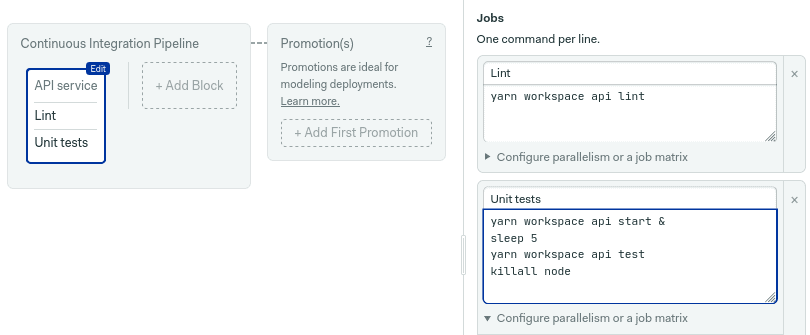
As you can see, the unit test job starts the GraphQL server and runs some test queries.
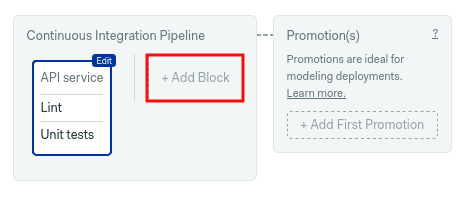
Moving on. Let’s add a second block for the web application. Click on +add block.
Add the same prologue as you did earlier.
checkout
sem-version node 15.14
yarn install
Create the two test jobs as you did earlier. One for linting:
yarn workspace web lintAnd one for unit testing:
yarn workspace web test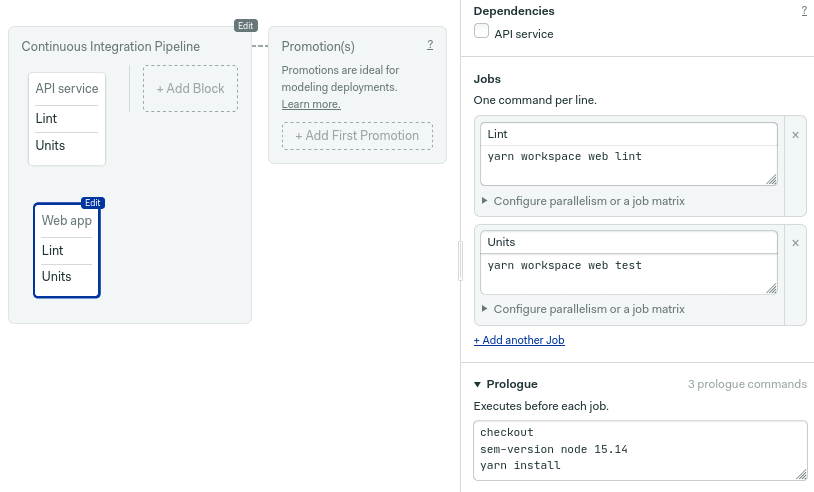
We’re almost done. Before testing the pipeline, uncheck the API service in the dependencies to run both blocks simultaneously.
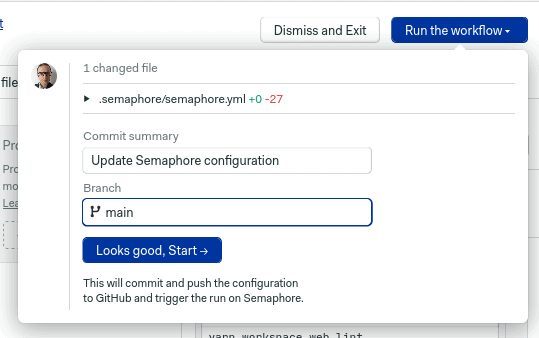
Good 👏 Click on run the workflow, check that the chosen branch is your main branch (in the example, it’s called main, yours may be master), and click on looks good, start.
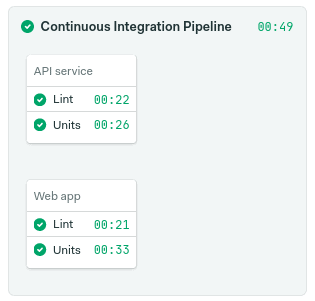
Check that everything is green before continuing.
Change-based execution
This is the fun part. Our repository has two applications that can be independently built. We can save some time and money by only testing the one that changed, skipping old code.
For that, Semaphore has support for change-based execution. With it, we can add execution conditions to the blocks.
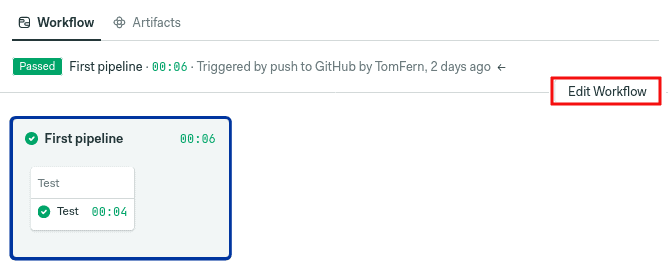
Click on edit workflow to re-open the workflow builder.
Select the API service block and open skip/run conditions.
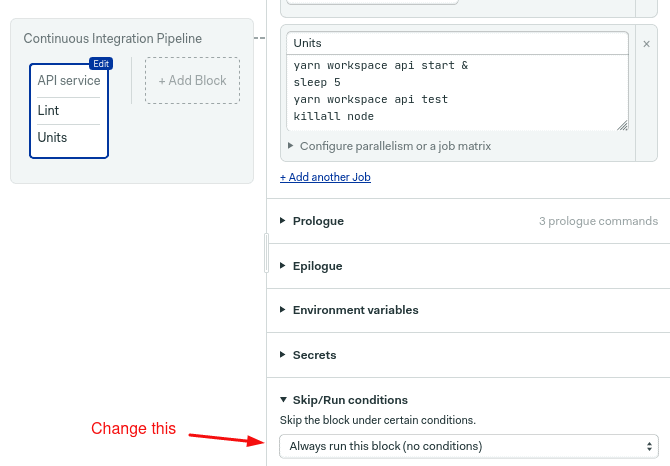
Choose run this block when conditions and met and in the box, type the following line:
change_in('/packages/api/')This means: “when a file changes in the api folder, relative to the root of the repository, run this block.”
When the repository’s default branch is NOT master, we need to supply an additional option: default_branch. Semaphore uses the default branch to calculate the commit range.
change_in('/packages/api/', {default_branch: 'main'})On the default branch, change-detections behaves as you would expect: all commits in the latest push are added up and evaluated for changes.
Things are different for topic branches and pull requests; in view of them being short-lived, Semaphore evaluates all commits in a branch since veering off the default branch. For more details, read the change_in reference page.
Repeat the same change in the web application block, but reference /web/ instead of /api/.
change_in('/packages/web/', {default_branch: 'main'})Testing out the pipeline
Run the pipeline to save the changes. Semaphore will re-run both blocks (because the pipeline itself has changed). The interesting part comes later when you make a change in only one of the applications. For example:
$ git pull
$ echo "This is a simulated change in a file" > packages/api/anyfile.txt
$ git add packages/api
$ git commit -m "Test change-based execution"
$ git push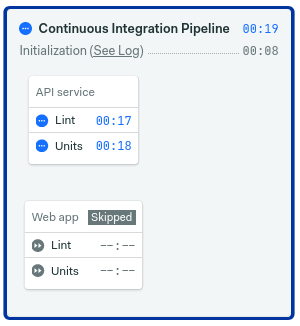
As long as you make changes on the default branch, Semaphore will only run the appropriate blocks for each application.
Integrating several applications
You can use this setup with any number of applications in your monorepo. Using change_in, you can selectively start or ignore blocks based on the changes contained in recent commits.
The block <-> source-code relationship doesn’t need to be one-to-one. When a block depends on more than one folder, we can use an array of paths:
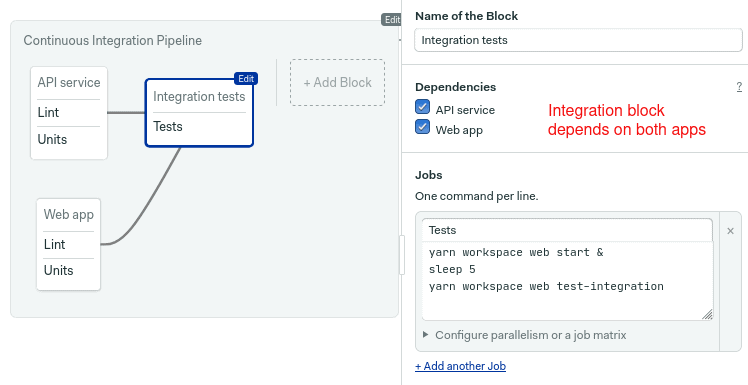
change_in(['/app1/', '/app2/', '/app3/'])To try that, we’ll add integration tests to the pipeline. The new block should depend on the previous two.
Type the same prologue we have used so far.
checkout
sem-version node 15.14
yarn install
Then add three a few commands to begin the integration build.
yarn workspace api start &
sleep 5
yarn workspace web build
In the job, type in the test commands:
yarn workspace web start &
sleep 5
yarn workspace web test-integration
Use the epilogue to ensure all Node processes stop. The epilogue runs after all jobs in the block, even if they have failed.
killall nodeFinally, type the change conditions. We want this block to run when either api or the web have changed.
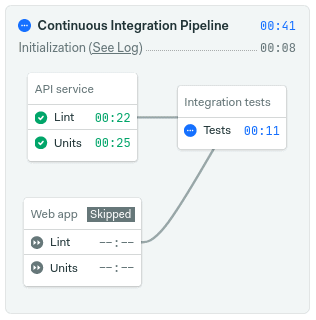
change_in(['/packages/api/', '/packages/web/'], {default_branch: 'main'})Save the pipeline. See what happens when you make a change in only one of the applications. This time, the related block and the integration tests should run, skipping the untouched code.
Change-based deployment
Our friend, the change_in function, can be also used to automatically start promotions. With this, we can configure smarter continuous delivery pipelines that deploy only recently updated applications 🚀
New promotions can be added with the +add promotion button in the workflow builder.
Check enable automatic promotion to set the promotion criteria. Type the following conditions:
change_in('/packages/web/', {default_branch: 'main'}) and branch = 'main' and result = 'passed'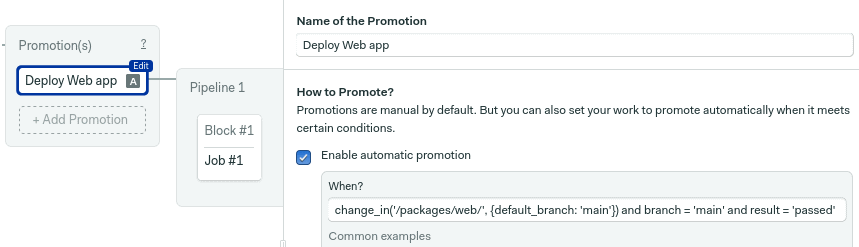
This promotion will start when all these conditions are met:
- When a file in
/package/web/changes. - The commit was to the
mainbranch. - And all tests have passed.
Next, you should define the commands to release the application in the new pipeline. That’s up to you. For instance, you can deploy the website to Vercel (formerly Zeit Now) with a single command.
Following the same pattern, we can create a second promotion to deploy the API. For example, you can package the application in a container and publish the image. In this case, the change conditions should be:
change_in('/packages/api/', {default_branch: 'main'}) and branch = 'main' and result = 'passed'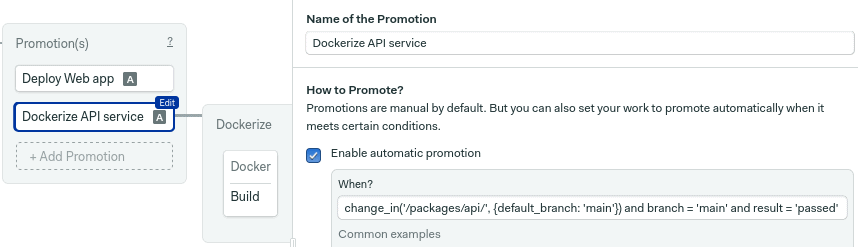
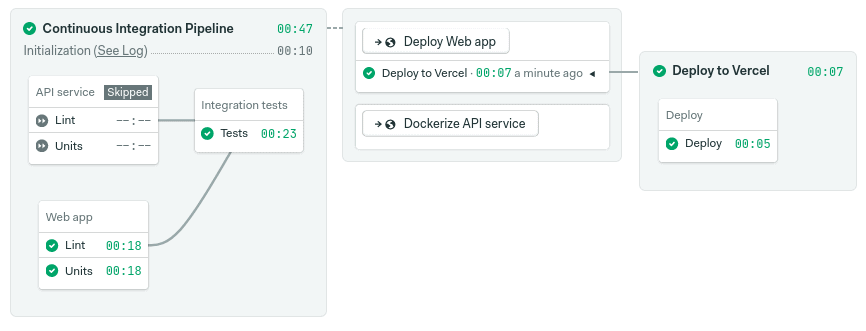
That’s it. You should now have pipelines with change-based, fully automatic continuous deployment.
Final words
A monorepo is an excellent way of collaborating, provided you can overcome the technical challenges of scaling out large repositories. With Semaphore’s built-in monorepo support, this is easier than ever before.
To continue reading about monorepos, check these:
- What is monorepo? (and should you use them?)
- Continuous integration for monorepos
- Monorepo and building at scale with Benjy Weinberger
- Monorepo workflows
Want to discuss this article? Join our Discord.