In the beginning, Google created Kubernetes. “Let it be open source,” Google said, and the sources opened. And Google saw that it was good. All kidding aside, if anyone knows about Kubernetes, it’s Google.
In this hands-on post, we’ll learn to deliver continuously a demo application to Google Kubernetes using Semaphore CI/CD. By the end, you’ll know how Semaphore and Google Cloud can work together and, even better, you’ll have a continuous delivery pipeline to play with.
Prerequisites
Before we begin, you’ll need to sign up a few services:
- Google Cloud Platform will be our cloud provider.
- GitHub for the application code
- Semaphore for the CI/CD.
In this section, we’ll do some preparation tasks.
Fork the repository
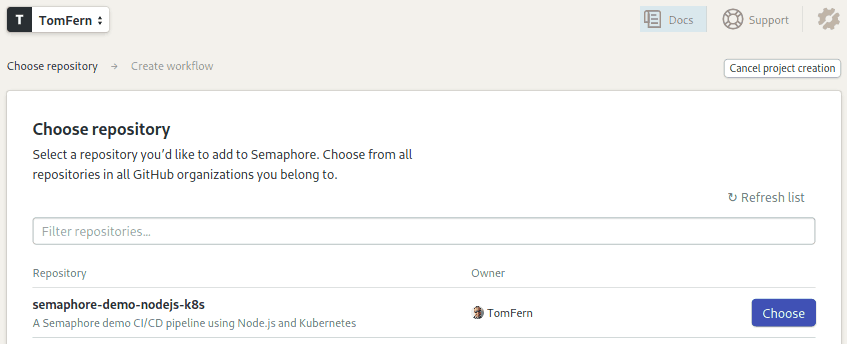
Now, grab the demo code from the Semaphore Demo Repository. Go to GitHub and use the Fork button to get your copy. Use the Clone & download button and copy the URL as shown. Clone the repository to your machine:
$ git clone https://github.com/your-repository…Grant Semaphore access to your fork:
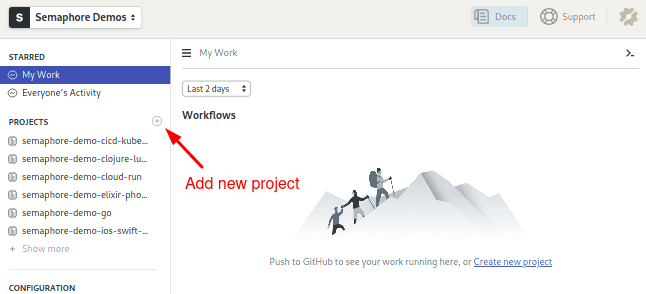
- Log in to Semaphore with your GitHub account.
- On the left navigation bar, click on the + (plus sign) next to Projects.
- Click on the Choose button next to your fork:
Create a Google Cloud Project
Create a Google Cloud project to provision your resources. First, open the Projects: Select a project menu on the top left. Then, click on New Project. Finally, name the project as “semaphore-demo-nodejs-k8s”.
To get the project’s Account Key:
- Under IAM & admin in the navigation menu, select Service Accounts.
- Click on the Create a Service Account button. Set the Permissions as “Project > Owner”.
- Use the Create Key button to download a JSON access key. Keep it secure and handy. We’ll upload it to Semaphore
Getting Started
We’ll use Semaphore to run our Continuous Integration and Delivery workflow, which consists of three pipelines:
- Install & Test: the tiniest error can bring down a site and crash an application. We’ll put the code through a Continuous Integration pipeline that can weed out the bugs before they creep into our deployment.
- Docker Build: generates Docker images for each update so that we can track the exact version that is running in production and we can rollback or forward in seconds.
- Kubernetes Deploy: 100% automated deployment to Google Kubernetes. No human intervention means more reliable and frequent release.
The Integration Pipeline
In this section, we will discuss the integration pipeline that builds and tests the application.
Semaphore will pick up any existing pipelines the first time we make a push into the repository; creating an empty file, for example, is enough:
- Open a new window to GitHub.
- Create any empty file using the button:
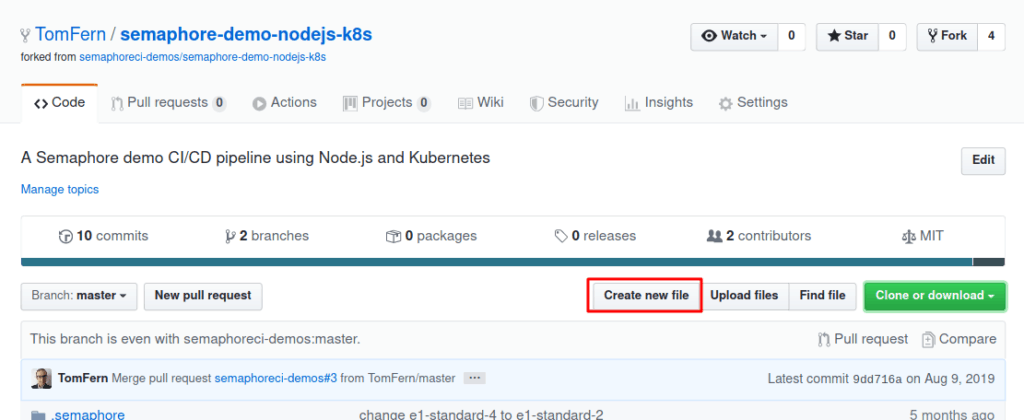
- Commit the change.
- Semaphore will detect the change and start the initial pipeline:
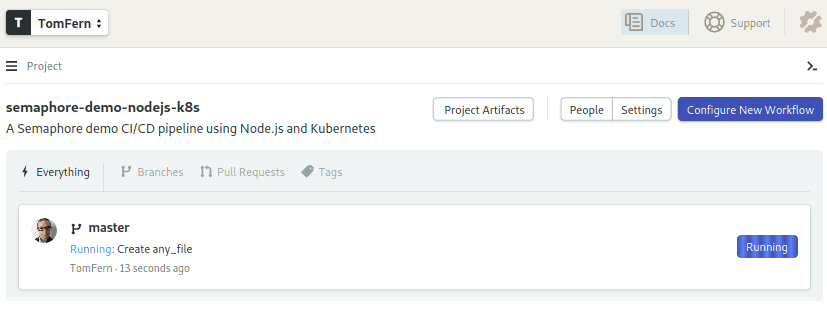
- Click on the master branch to see the push.
- Click on the revision. Semaphore will show the pipeline visual representation:
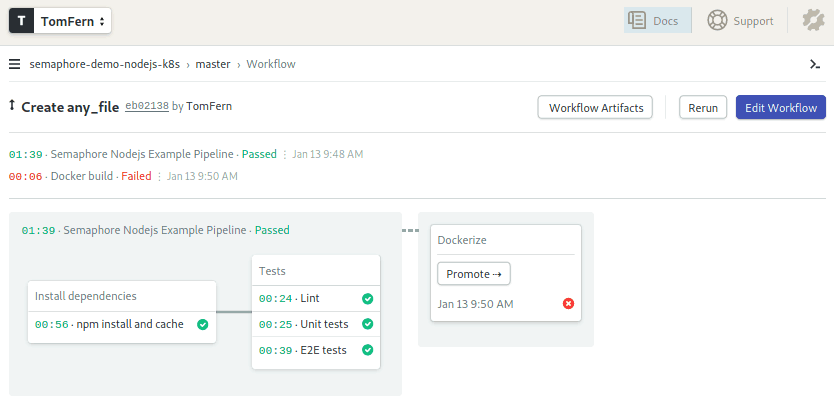
If the Docker Build part appears as failed, that’s to be expected, as we haven’t configured Google authentication yet. We’ll do that in the next sections.
Let’s focus on the CI Pipeline. We have three kinds of tests here:
- Lint: code analysis tools, also called linters, look for dubious code and other things that could lead to trouble, such as missing semicolons, variables left unused or convoluted structures.
- Unit tests: tests written for individual functions and methods. In them, we try different inputs and verify the outputs.
- E2E Tests: end-to-end tests the application top-to-bottom, using a real test database.
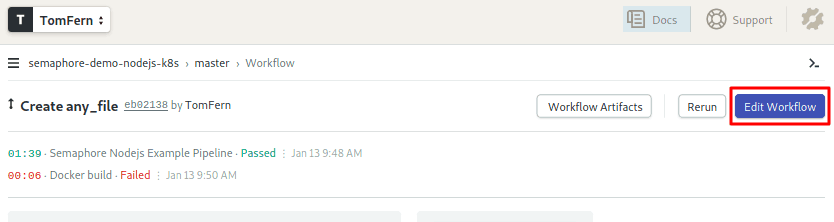
Click on the Edit Workflow button near the top-right corner to access the Workflow Builder:
A Semaphore workflow consists of several components:

Every Semaphore pipeline has a name and an agent. The agent is a virtual machine that powers the pipeline. We have three machine types to choose from and we’ll use an Ubuntu 18.04 for its Operating System.
Jobs are where everything happens. Each job belongs in a block and runs in an isolated virtual machine. We can use blocks and jobs to organize the execution order. All jobs in a block run in parallel. Semaphore will wait for all jobs in the block to pass before starting the next one. If one job fails, the whole process stops with an error.
The integration pipeline is composed of four jobs spread among two blocks:
The first block, which is called Install dependencies, installs the npm modules:
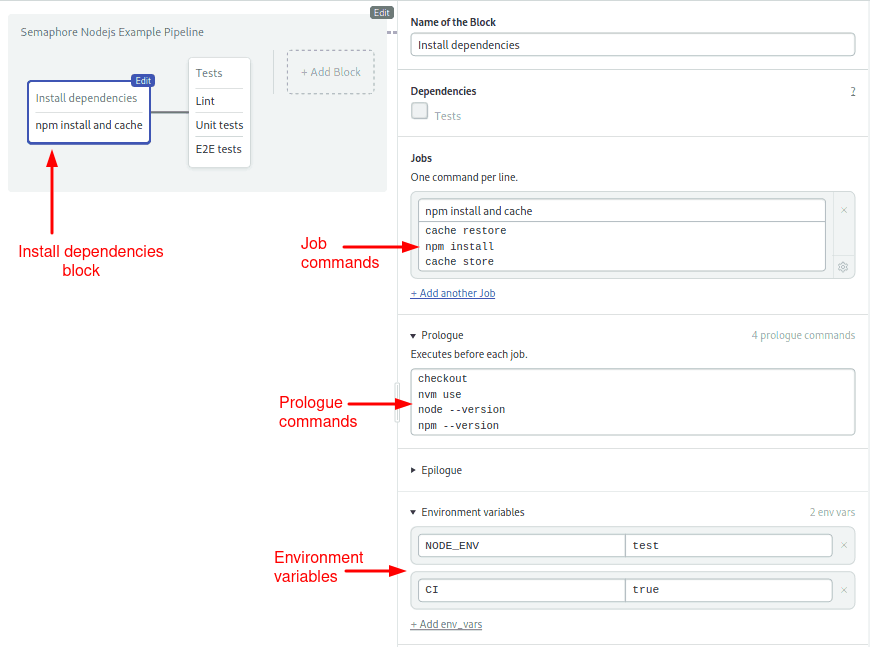
The Ubuntu image comes with lots of goodies. We have everything needed to build JavaScript and Nodejs software, including npm to install modules and nvm to switch between Node.js versions.
As you can see, we can set Environment variables at the block level. We can also define a prologue to run set up commands before each job.
Sharing files between jobs is easy with the cache tool. It can figure out which files should be saved in the project-level storage. In this instance, it will detect package-lock.json and node_modules.
The second block runs the three tests we’ve discussed above:

The first part of the tests block sets the environment and the prologue the same as before. We have three jobs in the block:
- Run static code analysis with tslint.
- Run unit tests with Jest. Jest looks for the
*.spec.tsandp*.test.tsfiles sprinkled over the repository. - Run End-to-End tests. For this, we have to start a database in the CI environment with the built-in sem-service command and run the migration script to create the tables.
We have reached the end of the file. However, there is still work to do. Instead of putting everything in one big unruly pipeline, we can split work among many and connect them with promotions:
- Right next to the test block, you’ll find the Dockerize promotion. Select it.
- Check the Enable automatic promotion. This will make the next pipeline start automatically when all tests pass.

Promotions can also be started manually with the Promote button.
Continuous Deployment for Google Kubernetes
As a rule of thumb, manual deployments should be avoided whenever possible, since they usually lead to faulty releases. A Continuous Deployment pipeline gives us more frequent and safer deployments. The pipeline also acts as a sort of living documentation for all the steps that make the release.
Our application provides RESTful API endpoint to run on Google Cloud Kubernetes. For our data needs, we’ll rely on Google’s fully managed Cloud SQL. The service is built on top of the Nest framework. For the database abstraction layer, we haveTypeORM.
Here’s the workflow we’re aiming for:

Create the Google Kubernetes Cluster
Welcome to the main course for the night, the Kubernetes cluster. To provision it, follow these steps:
- Open the main navigation menu and select Kubernetes Engine.
- Click on the Create cluster button.
- On the left side choose one of the Cluster templates to get started:
- Standard cluster is the entry-level cluster for production. It has three nodes for higher availability. I’ll pick this one.
- Your first cluster is an alternative to play while keeping costs low. It’s a single node cluster with a low-end machine (1.7 GB RAM).
- On Location Type select Zonal.
- Choose the same Zone and region you selected for the database.
- Click on Create cluster.

It usually takes a few minutes before it’s ready to use.
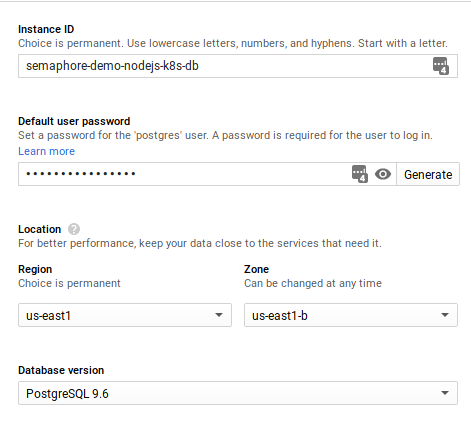
Create the Database
In this section, we’ll provision a PostgreSQL database.
- In the main menu, select the SQL console.
- Click on the Create Instance button.
- Select PostgreSQL.
- Choose a name for the instance.
- Generate a password for the default user.
- Select a region and a zone.
- Choose the highest stable version available.
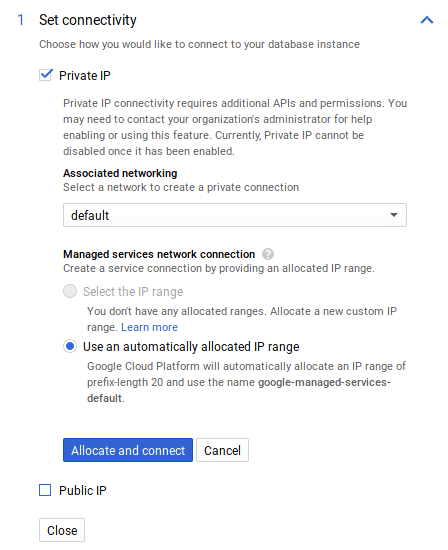
- Click on Show configuration options.
- Check Private IP and uncheck Public IP.
- In Associated Networking select default.
- If this is your first time using a private IP, you’ll be prompted to enable the Service Networking API, click on Enable API. Then click on the Allocate and connect button.
- Click on the Create button to start the database.
- Wait for a few minutes until the new instance is ready. On the initial Dashboard view, copy the assigned IP Address.
Create a database and a user for the application:
- Go to the Users tab and click on Create user account.
- Create a user called “demouser”.
- Go to the Databases tab and click on Create database.
- Set the name of the database to demo.
Secrets and Environment Files
The application reads its database connection parameters from two files:
- environment: a regular shell file exporting environment variables.
- ormconfig: a config file for the ORM library.
Since the files have sensitive information, we shouldn’t check them into GitHub. Instead, we will upload them as encrypted Secrets.
Copy the provided sample configs outside your repository, for instance to your /tmp directory:
$ cp ormconfig.sample.json /tmp/ormconfig.production.json
$ cp sample.env /tmp/production.env
Edit ormconfig.production.json. Replace the “YOUR_DB_IP” and “YOUR_DB_PASSWORD” values with your database IP address and the password for the demouser:
{
  "type": "postgres",
  "host": "YOUR_DB_IP",
  "port": 5432,
  "username": "demouser",
  "password": "YOUR_DB_PASSWORD",
  "database": "demo",
  ...
}
Edit production.env:
- Set
NODE_ENV=production - Leave
PORTunmodified. - Fill in the values of “YOUR_DB_PASSWORD” and “YOUR_DB_IP”:
NODE_ENV=production
PORT=3001
URL_PREFIX=v1/api
DATABASE_HOST=YOUR_DB_IP
DATABASE_USER=demouser
DATABASE_PASSWORD=YOUR_DB_PASSWORD
DATABASE_DBNAME=demo
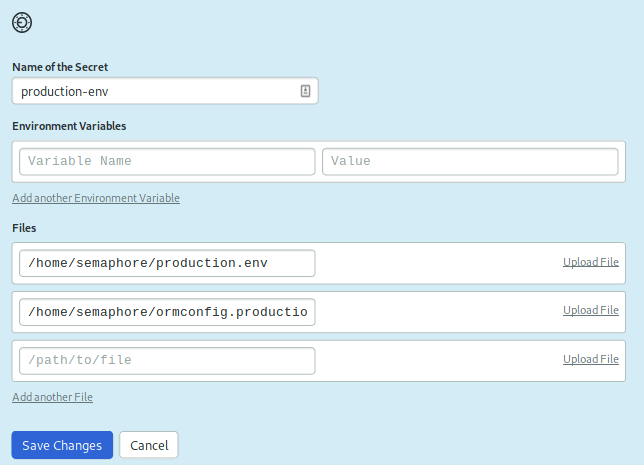
DATABASE_PORT=5432Upload both files to Semaphore in a Secret:
- Login to Semaphore and click on Secrets on the left side navigation bar.
- Click the Create New Secret button.
- Name of Secret:
production-env - Upload the environment file to
/home/semaphore/production.env - Upload the ormconfig file to
/home/semaphore/ormconfig.production.json
- Name of Secret:
- Save the secret.
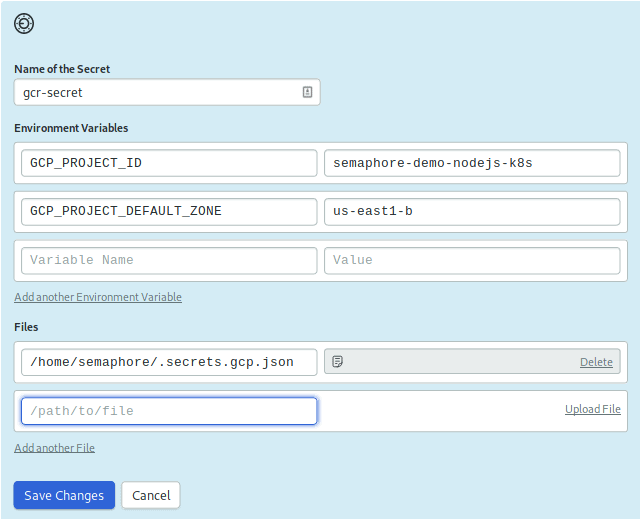
We need a second secret to store the Google-related information:
- Create New Secret called
gcr-secret - On environment variables:
GCP_PROJECT_ID=semaphore-demo-nodejs-k8sGCP_PROJECT_DEFAULT_ZONE= the region where you provisioned the db and the cluster.
- On Files: upload the account key JSON file to
/home/semaphore/.secrets.gcp.json - Save the secret.
We are ready to start working on the delivery pipeline.
Docker Build Pipeline
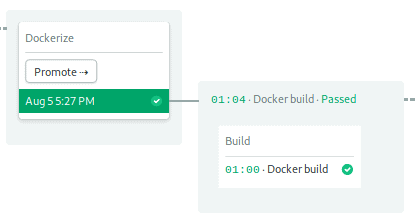
This pipeline prepares the Docker image in a 1-job block. The image is pushed into Google Private Container Registry.
Shall we see how it works?
- Go back to the master branch and open the pipeline.
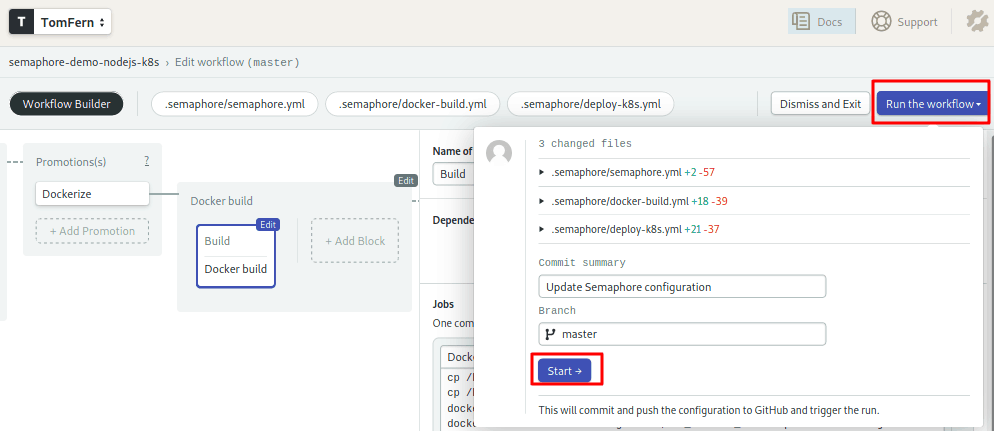
- Click on Edit Workflow to open the Workflow Builder:

- Click on the first promotion, the once called Dockerize to open the pipeline.
- Click on the Build block:

We can import Secrets at the block level. When a secret is imported, the files are copied to the specified locations in the machine. All jobs in the block will have access to the variables and files defined in the secrets.
The prologue sets up gcloud to work with the project:
gcloud auth activate-service-account --key-file=.secrets.gcp.json
gcloud auth configure-docker -q
gcloud config set project $GCP_PROJECT_ID
gcloud config set compute/zone $GCP_PROJECT_DEFAULT_ZONE
checkout- First, we need to get authorized using the access file.
- Next, we enable gcloud to work as a docker helper.
- Finally, we set the active project and zones for the session.
The Docker build job copies the config files inside the Docker image and pushes it to the registry. We can speed up the build process if there is a cached image to start from, this is why we try pulling the latest image. To tag the new image, we use $SEMAPHORE_WORKFLOW_ID which is unique for every workflow.
cp /home/semaphore/ormconfig.production.json ormconfig.json
cp /home/semaphore/production.env production.env
docker pull "gcr.io/$GCP_PROJECT_ID/semaphore-demo-nodejs-k8s-server:latest" || true
docker build --cache-from "gcr.io/$GCP_PROJECT_ID/semaphore-demo-nodejs-k8s-server:latest" -t "gcr.io/$GCP_PROJECT_ID/semaphore-demo-nodejs-k8s-server:$SEMAPHORE_WORKFLOW_ID" .
docker push "gcr.io/$GCP_PROJECT_ID/semaphore-demo-nodejs-k8s-server:$SEMAPHORE_WORKFLOW_ID"
Once the image is ready, the next step to starting the deploy pipeline:
- Press Run the Workflow.
- Click on Start.
After the pipeline runs, you should see a Docker Image in your private Google Registry.
Deployment Pipeline for Google Kubernetes
A Kubernetes deployment is like one of those Russian dolls. The application lives inside a Docker container, which is inside a pod, which takes part in the deployment.
A pod is a group of Docker containers running on the same node and sharing resources. Pods are ephemeral; they are meant to be started and stopped as needed.
To get a stable public IP address, Kubernetes provides a load balancing service that forwards incoming requests to the pods.
The most straightforward way to define a deployment is to write a manifest file, which can be found at deployment.yml. We have two Kubernetes resources separated by three dashes.
First, we have the pod deployment, it has a name and a spec which defines the final desired state:
- replicas: how many pods to create. Set the number to match the amount of nodes in your cluster. For instance, I’m using three pods, so I’ll use
replicas: 3. - spec.containers: defines the docker image running in the pods.
apiVersion: apps/v1
kind: Deployment
metadata:
  name: semaphore-demo-nodejs-k8s-server
spec:
  replicas: 3
  selector:
    matchLabels:
      app: semaphore-demo-nodejs-k8s-server
  template:
    metadata:
      labels:
        app: semaphore-demo-nodejs-k8s-server
    spec:
      containers:
        - name: semaphore-demo-nodejs-k8s-server
          image: gcr.io/$GCP_PROJECT_ID/semaphore-demo-nodejs-k8s-server:$SEMAPHORE_WORKFLOW_ID
          env:
            - name: NODE_ENV
              value: "production"
The second half describes the load balancer service:
---

apiVersion: v1
kind: Service
metadata:
  name: semaphore-demo-nodejs-k8s-server-lb
spec:
  selector:
    app: semaphore-demo-nodejs-k8s-server
  type: LoadBalancer
  ports:
    - port: 80
      targetPort: 3001
If you modified deployment.yml, push the change to GitHub before continuing:
$ git add deployment.yml
$ git commit -m "update deployment manifest"
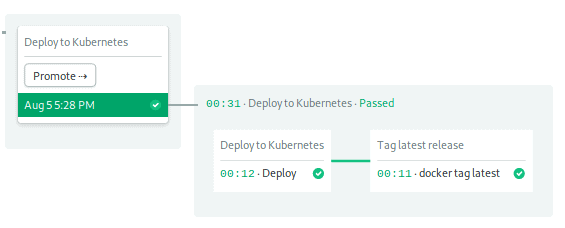
$ git push origin masterTake a look at the continuous deployment pipeline to the rightmost side of the workflow:
Let’s see how it works:
- Open the Workflow Builder again.
- Scroll right, open the Dockerize promotion.
- To the right, open the Deploy to Kubernetes promotion.
- Click on the first block, called Deploy to Kubernetes:
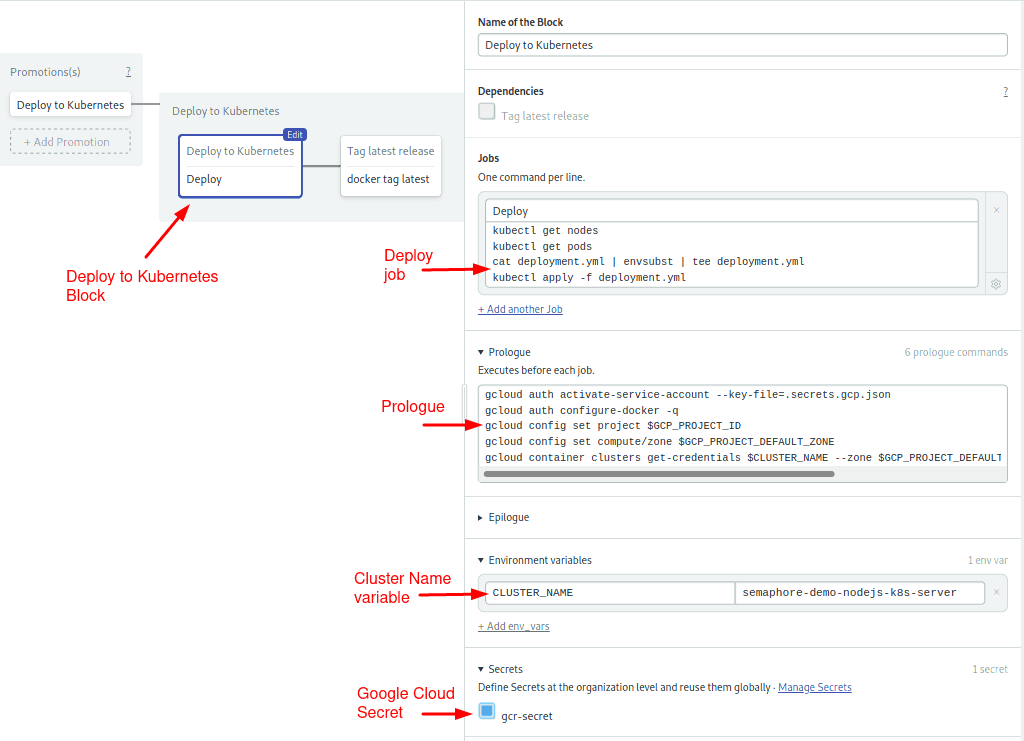
Most of the gcloud commands in the prologue we’ve already seen. The only new guy here is gcloud container which sets up connectivity with the cluster.
gcloud auth activate-service-account --key-file=.secrets.gcp.json
gcloud auth configure-docker -q
gcloud config set project $GCP_PROJECT_ID
gcloud config set compute/zone $GCP_PROJECT_DEFAULT_ZONE
gcloud container clusters get-credentials $CLUSTER_NAME --zone $GCP_PROJECT_DEFAULT_ZONE --project $GCP_PROJECT_ID
checkout
The block also imports the gcr-secret with the Google credentials and defines the CLUSTER_NAME variable with the Kubernetes cluster name.
With envsubst, we expand in-place the environment variables. The resulting file should be plain YAML. The last command sets the deployment in motion with kubectl apply:
kubectl get nodes
kubectl get pods
cat deployment.yml | envsubst | tee deployment.yml
kubectl apply -f deployment.yml
At this point, we’re almost done. There is one additional job to tag the current image as latest:
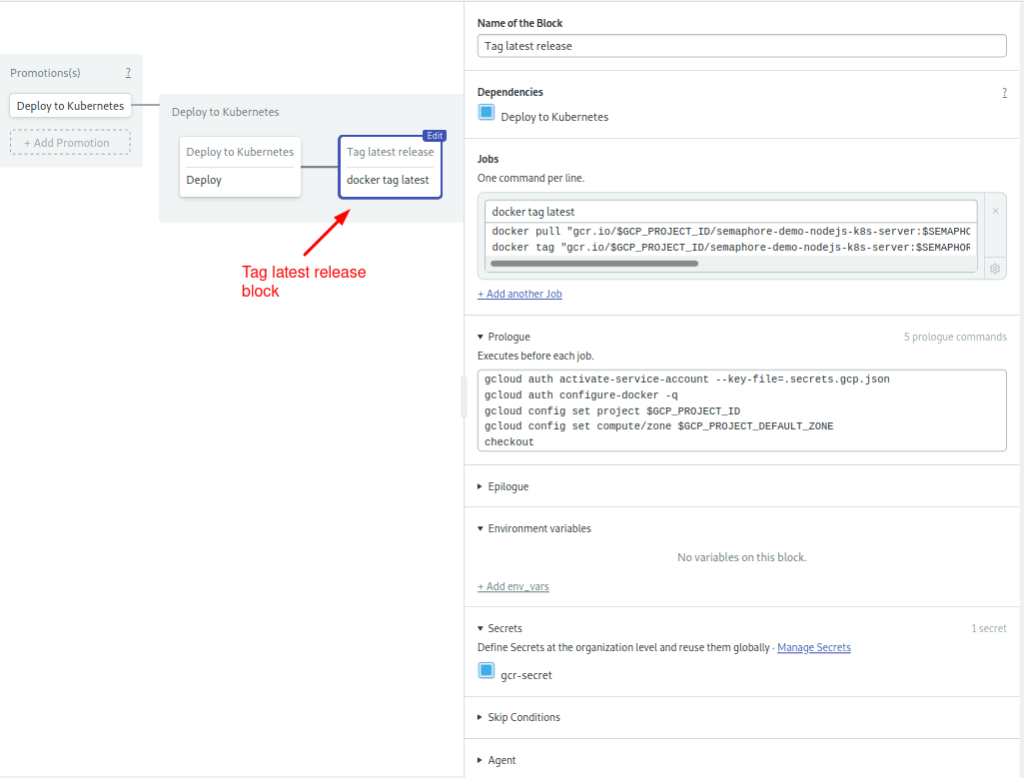
The prologue sets the Google Docker Container as before:
gcloud auth activate-service-account --key-file=.secrets.gcp.json
gcloud auth configure-docker -q
gcloud config set project $GCP_PROJECT_ID
gcloud config set compute/zone $GCP_PROJECT_DEFAULT_ZONE
checkout
And the job pulls the image, re-tags it and pushes it back:
docker pull "gcr.io/$GCP_PROJECT_ID/semaphore-demo-nodejs-k8s-server:$SEMAPHORE_WORKFLOW_ID"
docker tag "gcr.io/$GCP_PROJECT_ID/semaphore-demo-nodejs-k8s-server:$SEMAPHORE_WORKFLOW_ID" "gcr.io/$GCP_PROJECT_ID/semaphore-demo-nodejs-k8s-server:latest"
docker push "gcr.io/$GCP_PROJECT_ID/semaphore-demo-nodejs-k8s-server:latest"
Ready to deploy! Push the modifications and watch the pipelines go.
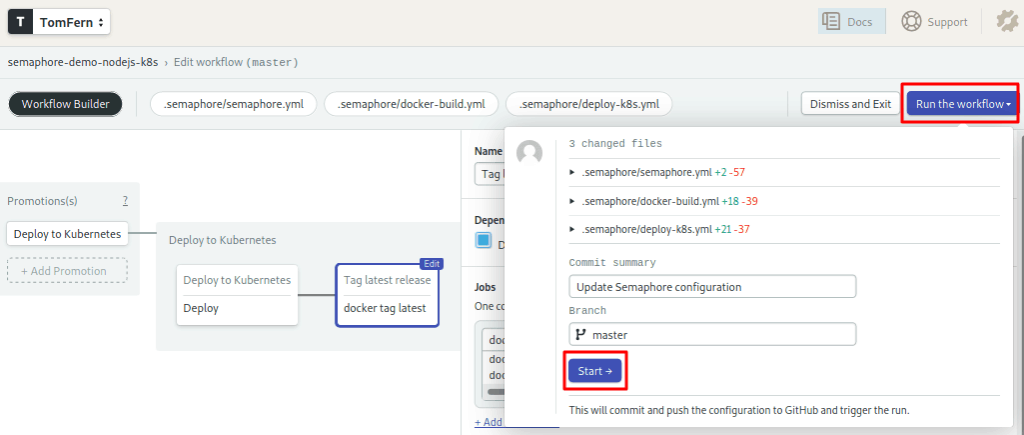
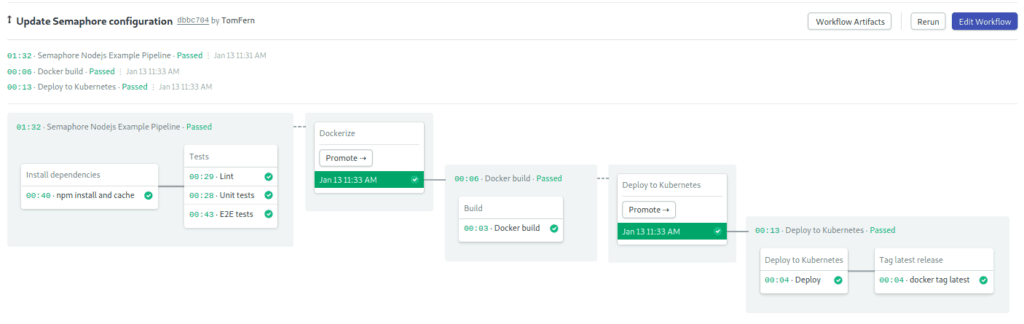
The deployment should be ready in a few minutes.
Test the Application
The application should be up and running. We can use curl to make some requests and check out how it works. The API endpoint v1/api/users has the following methods:
- GET: return one person by id or all persons.
- POST: create or update one person.
- DELETE: delete one person by id.
What’s the IP address for the newly created service? You can get it from the Google Cloud console. Select Services & Ingress for your Kubernetes cluster and copy the IP address of the load balancer for your cluster.
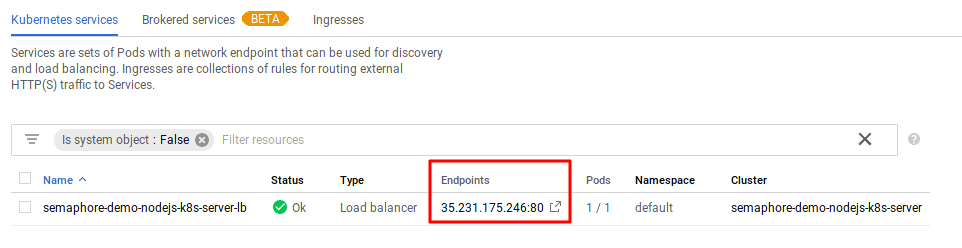
In the following tests, replace YOUR_EXTERNAL_IP with the IP that was assigned to your service.
First, let’s create a person:
$ curl -w "\n" -X POST -d \
  "username=jimmyh&firstName=Johnny&lastName=Hendrix&age=30&description=Burn the guitar" \
  http://YOUR_EXTERNAL_IP/v1/api/users
{
    "username": "jimmyh",
    "description": "Burn the guitar",
    "age": "30",
    "firstName": "Johnny",
    "lastName": "Hendrix",
    "id": 1,
    "createdAt": "2019-08-05T20:45:48.287Z",
    "updatedAt": "2019-08-05T20:45:48.287Z"
}
The API returns the person object that was created. Notice that “jimmyh” got assigned the id 1. You can retrieve the person at any time using its id:
$ curl -w "\n" http://YOUR_EXTERNAL_IP/v1/api/users/1
{
    "id": 1,
    "username": "jimmyh",
    "description": "Burn the guitar",
    "firstName": "Johnny",
    "lastName": "Hendrix",
    "age": 30,
    "createdAt": "2019-08-05T20:45:48.287Z",
    "updatedAt": "2019-08-05T20:45:48.287Z"
}
Next, create a second person:
$ curl -w "\n" -X POST -d \
   "username=bobdylan&firstName=Robert&lastName=Zimmerman&age=60&description=Blowing in the Wind" \
   http://YOUR_EXTERNAL_IP/v1/api/users
{
    "username": "bobdylan",
    "description": "Blowing in the Wind",
    "age": "60",
    "firstName": "Robert",
    "lastName": "Zimmerman",
    "id": 2,
    "createdAt": "2019-08-05T20:50:18.969Z",
    "updatedAt": "2019-08-05T20:50:18.969Z"
}
By now, we should have two persons in the database:
$ curl -w "\n" http://YOUR_EXTERNAL_IP/v1/api/users
[
    {
        "id": 1,
        "username": "jimmyh",
        "description": "Burn the guitar",
        "firstName": "Johnny",
        "lastName": "Hendrix",
        "age": 30,
        "createdAt": "2019-08-05T20:45:48.287Z",
        "updatedAt": "2019-08-05T20:45:48.287Z"
    },
    {
        "id": 2,
        "username": "bobdylan",
        "description": "Blowing in the Wind",
        "firstName": "Robert",
        "lastName": "Zimmerman",
        "age": 60,
        "createdAt": "2019-08-05T20:50:18.969Z",
        "updatedAt": "2019-08-05T20:50:18.969Z"
    }
]
If we get a few more people, we could start a band. Let’s try deleting one person:
$ curl -w "\n" -X DELETE http://YOUR_EXTERNAL_IP/v1/api/usersNow only one person remains:
$ curl -w "\n" http://YOUR_EXTERNAL_IP/v1/api/users
[
    {
        "id": 2,
        "username": "bobdylan",
        "description": "Blowing in the Wind",
        "firstName": "Robert",
        "lastName": "Zimmerman",
        "age": 60,
        "createdAt": "2019-08-05T20:50:18.969Z",
        "updatedAt": "2019-08-05T20:50:18.969Z"
    }
]
We’ve covered all the methods of our simple server. Feel free to add more and play around.
Next steps
I hope you can use the demo project and pipelines as a foundation for your application. Kubernetes deployments can get tricky, but a clever CI/CD workflow makes them safe and simple.
Here are some ideas to try out:
- Create a staging cluster.
- Build a development image and run tests inside it.
- Extend the project with more Google Cloud services.
If you wish to learn more about how Semaphore can work Kubernetes and Docker, check out these resources: