Virtual Private Network (VPN) software allows us to extend private computer networks over the Internet. Machines connected to a VPN see each other as if they were on the same network, even though they may be geographically distant. As for the question of privacy, VPN technology relies on cryptography to keep data safe from prying eyes.
What do VPNs have to do with continuous integration? A VPN will make Semaphore work as if it were inside your internal network. So, whether you use one depends on your setup. Suppose you’re running your applications on the cloud. In that case, you hardly need a VPN—cloud platforms provide first-party tools you can run in the pipeline to deploy your code. However, if you have on-premise servers, if you run your own hardware, or if you need direct access to machines that are not facing the Internet, a VPN is the right tool for the job.
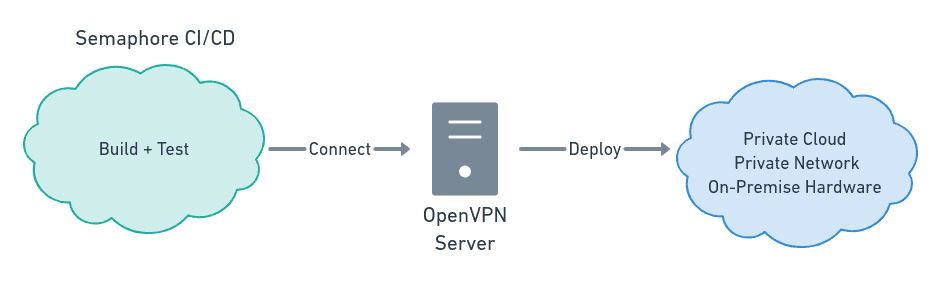
This tutorial will teach you how to run jobs in Semaphore that connect with your private networks using OpenVPN, one of the oldest and most popular open-source VPN implementations. You’ll learn how to issue certificates and configure a pipeline to perform continuous deployment over a VPN.
What Is OpenVPN?
OpenVPN is an open-source VPN project. It started in 2001, and it has become a de-facto standard for VPNs. There are several distributions:
- Community Edition: this is the free, open-source edition of OpenVPN. It has all the basic features we need.
- Access Server: based on the Community Edition, the paid version has extra features like LDAP integration and a Web UI management console. These are nice to have, but not necessary for the job.
- OpenVPN Cloud: this is a paid managed service that runs a VPN on the cloud. This version is the easiest to run as you don’t need to install or operate a server.
Both paid versions have a Web UI for issuing certificates. I’ll focus on the free edition, which takes a bit more work to set up.
Prerequisites
I’ll assume that you already have an OpenVPN server running as a gateway to a private network. You’ll need the following things to configure Semaphore as a VPN client:
client.conf: the client config file with all the connection settings.client.crtandclient.key: a client certificate and key file for Semaphore. To issue new certificates, you need to access the PKI (Public Key Infrastructure) folder in your VPN server. You may need the passphrase to decrypt the files if they’re password-protected.ca.crt: the Root Certification Authority (CA). This file is used to issue and verify self-signed certificates. It can be found in the PKI folder in your OpenVPN server.ta.key: if the server uses TLS authentication, you’ll need an extra key file.
Step 1: Prepare the Client Configuration File
The client configuration file includes the connection settings for your OpenVPN server. As an example, here’s the default client.conf, which is distributed with the Community Edition of OpenVPN:
client
dev tun
proto udp
remote 34.123.183.23 1194
resolv-retry infinite
nobind
persist-key
persist-tun
ca ca.crt
cert client.crt
key client.key
remote-cert-tls server
tls-auth ta.key 1
cipher AES-256-CBC
verb 3
As you can see, the config file defines the address, the port, as well as the files for the certificates and keys, among other things. I’ll assume your config uses the default filenames for the rest of this tutorial. If not, you may need to adjust the paths in steps 3 and 4 below.
ca: defines the root CA, defaults toca.crt.cert: the client certificate file. Defaults toclient.crtkey: the client’s key file. Defaults toclient.key.tls-auth: the TLS Authentication file. By default, it’s calledta.key. If your config lists this option, it means TLS Authentication is enabled on your VPN server.
To prepare the file for Semaphore, locate the line starting with remote and change the IP address and port with variables as shown below:
remote $OPENVPN_SERVER $OPENVPN_PORTThese parameters will help us update the VPN server address if it changes in the future.
Step 2: Generate Client Certificates
OpenVPN uses bidirectional, public-key cryptography to prevent man-in-the-middle attacks. The server must authenticate with the client, and the client must authenticate with the server before trust can be established.
You have to generate two new files to let Semaphore in your VPN.
- Certificate (
client.crt): a certificate for the client signed by the root CA. - Key (
client.key): a private key for the client.
Note: always issue new certificates and keys. Avoid reusing credentials. If a key gets compromised, you can always revoke it without impacting other clients or users.
To generate both files simultaneously, you can use Easy RSA, an utility for managing PKI files. Get started by cloning the EasyRSA scripts with Git:
$ git clone https://github.com/OpenVPN/easy-rsa.git
$ cd easy-rsa
Next, locate the server’s pki folder. These are the files we’re most interested in:
pki
├── ca.crt             <- root CA
├── issued
│   └── server.crt     <- server certificate
└── private
    ├── ca.key         <- root CA key (secret)
    └── server.key     <- server key (secret)
Copy the entire pki folder into easyrsa3. If you’re copying to another machine, use a secure channel like SSH. You can also generate the certificates directly in the OpenVPN server.
$ scp -r OPENVPN_SERVER:/path/to/pki easyrsa3And build the client certificate. You’ll need to define a unique Common Name (CN) for it. In this example, I’m giving the client the name of semaphore-cicd.
$ cd easyrsa/easyrsa3/
$ ./easyrsa build-client-full semaphore-cicd

Using SSL: openssl OpenSSL 1.1.1h  22 Sep 2020
Generating a RSA private key
.........................................................+++++
.............................................+++++
writing new private key to '/tmp/vpn/easy-rsa/easyrsa3/pki/easy-rsa-22065.UYdAO4/tmp.o265Q3'
Enter PEM pass phrase:
Verifying - Enter PEM pass phrase:
-----
Using configuration from /tmp/vpn/easy-rsa/easyrsa3/pki/easy-rsa-22065.UYdAO4/tmp.jeIFbc
Enter pass phrase for /tmp/vpn/easy-rsa/easyrsa3/pki/private/ca.key:
Check that the request matches the signature
Signature ok
The Subject's Distinguished Name is as follows
commonName            :ASN.1 12:'semaphore-cicd'
Certificate is to be certified until Mar  6 20:39:01 2023 GMT (825 days)

Write out database with 1 new entries
Data Base Updated
Finally, follow the on-screen instructions. Once done, you should have two new files in your pki folder:
pki
├── ca.crt
├── issued
│   ├── semaphore-cicd.crt      <- client certificate
│   └── server.crt
└── private
    ├── ca.key
    ├── semaphore-cicd.key      <- client key (secret)
    └── server.key
Step 3: Upload Certificates to Semaphore
In this section, we’ll begin uploading the certificates and keys to Semaphore. We’ll store them using Semaphore secrets, which securely encrypts your private data.
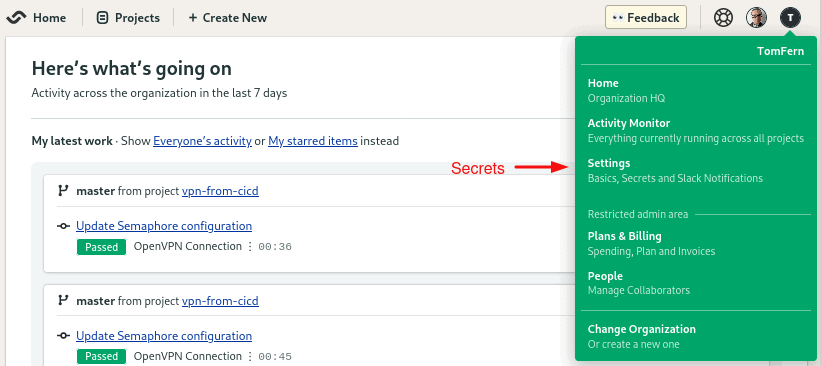
To create a secret, log in to your Semaphore organization and open your account badge on the top-right corner. Click on Settings.
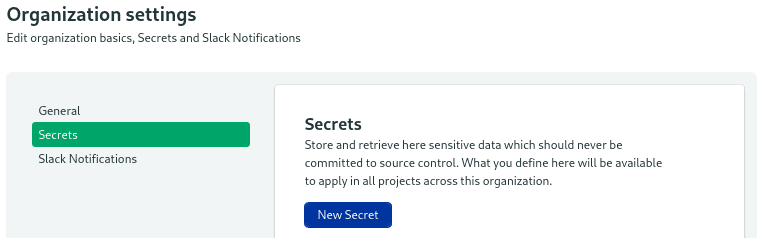
Select Secrets and click on New Secret.
Fill in the details as follows:
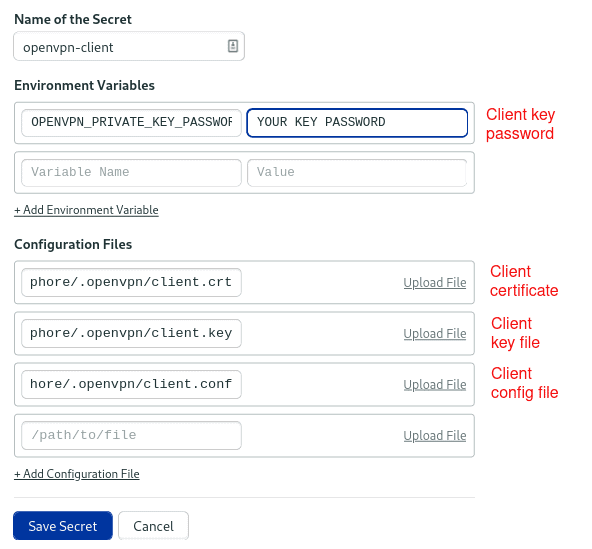
- Name of secret:
openvpn-client - Variables
OPENVPN_PRIVATE_KEY_PASSWORD: the password you typed while creating the client key on the previous section.
- Files
/home/semaphore/.openvpn/client.crt: the certificate file you generated earlier, in the example the file was calledsemaphore-cicd.crt./home/semaphore/.openvpn/client.key: the key file, for examplesemaphore-cicd.key./home/semaphore/.openvpn/client.conf: the client config file you prepared on step 1.
The secret should look like this before you upload the files:
Step 4: Upload Server Certificates
We’re almost done. All that is left is to upload two more files:
- Root CA certificate (
ca.crt): used to confirm the server identity. - TLS authentication (
ta.key): only needed if thetls-authfeature is enabled on the server. This setting adds a second signature to the SSL/TLS handshake process, hardening security.
We could add these files to the existing secret, but it’s cleaner to create a new one, just for the VPN server side. That way, if we decide to add more client certificates later, we don’t have to upload the server files again.
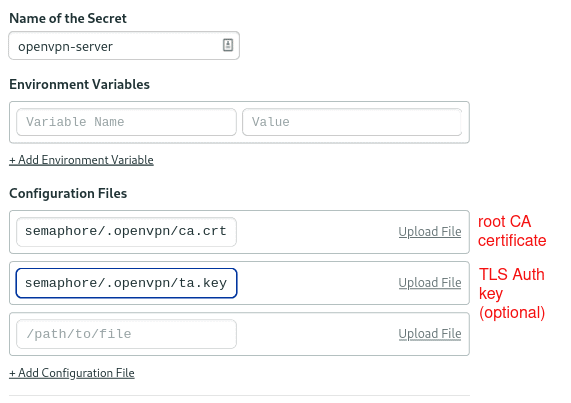
Create a new secret with the following details:
- Name of secret:
openvpn-server - Files
/home/semaphore/.openvpn/ca.crt: the Root CA certificate./home/semaphore/.openvpn/ta.key: the TLS Auth key (optional).
This is how the secret looks before you upload the files:
Certificates and Keys Summary
It’s easy to get lost with so many files going around. Let’s go back a bit to recap what each of them does. At most, we’ll need to upload four of the files in the following table to Semaphore.
| File | Purpose | Needed by | Is Secret? | Upload to Semaphore? |
|---|---|---|---|---|
ca.crt | Root CA cert | server + all clients | NO | YES |
ca.key | Root CA key | key-signing machine only | YES (very) | NO |
server.crt | Server cert | server only | NO | NO |
server.key | Server key | server only | YES | NO |
client.crt | Client cert | client only | NO | YES |
client.key | Client key | client only | YES | YES |
ta.key | TLS auth key | server + all clients | YES | YES (if option enabled) |
Note that the *.key files are private and should always be protected. On the other hand, *.crt files are public certificates and are safe to circulate.
Step 5: Connect From CI/CD Pipelines
At this point, Semaphore has everything it needs to talk with your VPN server. Once you add the connection commands in the CI/CD pipeline, you should be all set.
For this tutorial, I’ll create an empty GitHub repository just to test that everything is working.
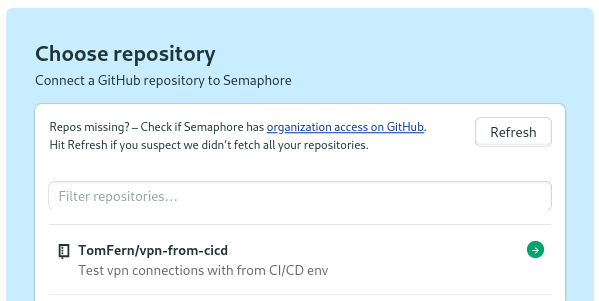
Go to your project and open the Workflow Editor to get started.
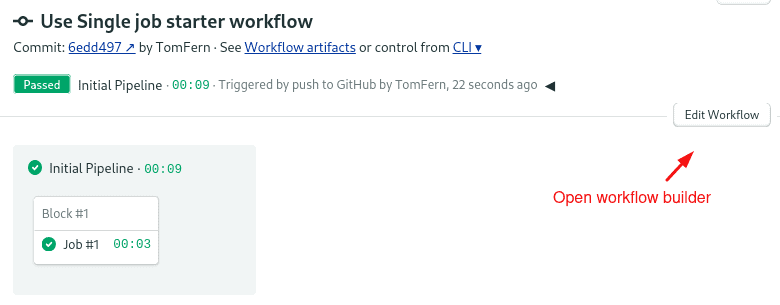
Click on the pipeline.

Open the Execution time limit section and set a timeout in line with the expected pipeline runtime. The default timeout is 1 hour. This will prevent leaving a pipeline running for too long in case the connection hangs.

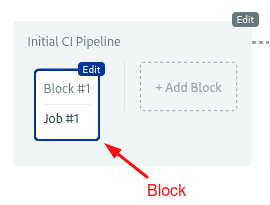
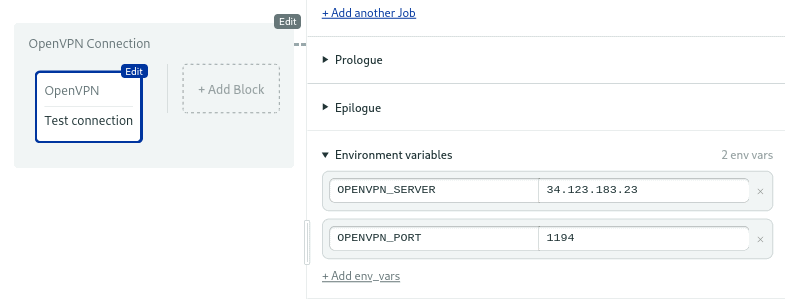
Click on the block where you want to connect to the private network.
Expand the Environment Variables section and add the OPENVPN_SERVER and OPENVPN_PORT variables. Type the values for your VPN server.
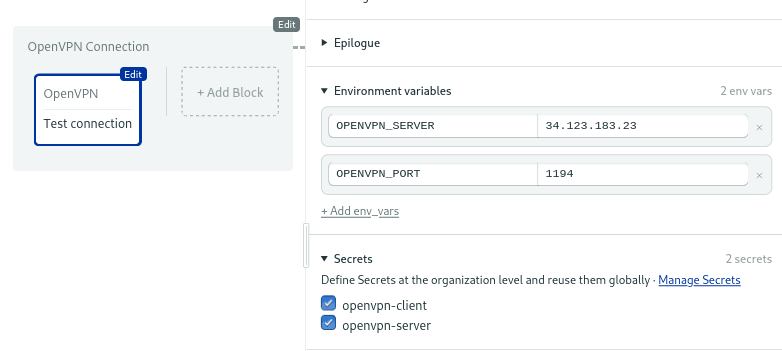
Open the Secrets section and tick the openvpn-server and openvpn-client secrets.
Open the Prologue and add the following commands.
Install OpenVPN in the CI machine.
sudo apt-get update && sudo apt-get install -y openvpnPut the private key password into a file
echo "$OPENVPN_PRIVATE_KEY_PASSWORD" > ~/.openvpn/_passwordExpand the OPENVPN_SERVER and OPENVPN_PORT variables in the client config.
envsubst < ~/.openvpn/client.conf > ~/.openvpn/_client.confStart the VPN connection in background mode.
sudo openvpn --cd ~/.openvpn --config _client.conf --askpass _password --log openvpn.log --daemonWait until the connection is established by examining the log.
while ! sudo grep -q "Initialization Sequence Completed" ~/.openvpn/openvpn.log; do sleep 1; doneWait a few more seconds to ensure the network is stable.
sleep 10The complete prologue sequence is:
sudo apt-get update && sudo apt-get install -y openvpn
echo "$OPENVPN_PRIVATE_KEY_PASSWORD" > ~/.openvpn/_password
envsubst < ~/.openvpn/client.conf > ~/.openvpn/_client.conf
sudo openvpn --cd ~/.openvpn --config _client.conf --askpass _password --log openvpn.log --daemon
while ! sudo grep -q "Initialization Sequence Completed" ~/.openvpn/openvpn.log; do sleep 1; done
sleep 10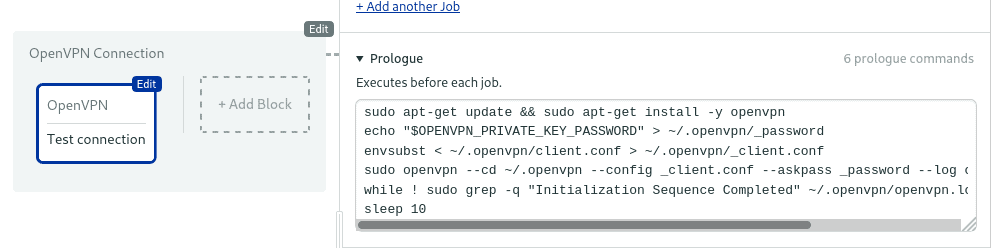
Next, open the Epilogue. We’ll add a command to stop the connection when we’re done. In Semaphore, all jobs run in an isolated VM, so this won’t interfere with other jobs in the block or in the pipeline.
sudo killall -q openvpn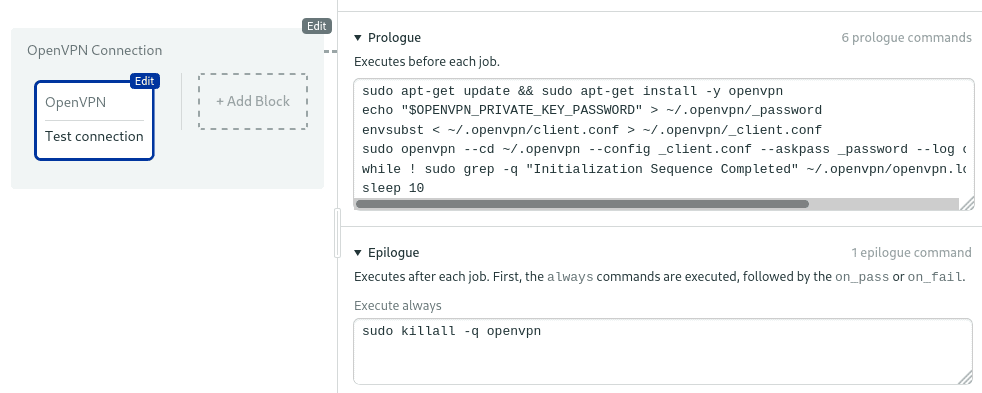
Finally, add your jobs and commands to the block. You can assume that the jobs all have a connection to your private network. Thus, you can target private IPs that are behind your VPN gateway for deploying software, copying data, or accessing internal services.
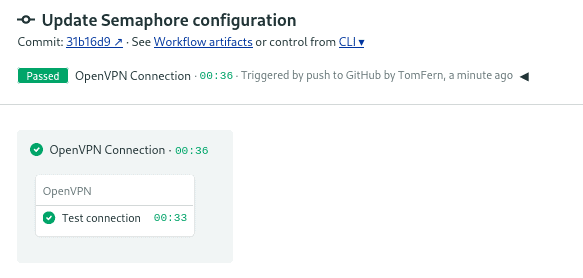
Click on Run the workflow > Start to try the pipeline.
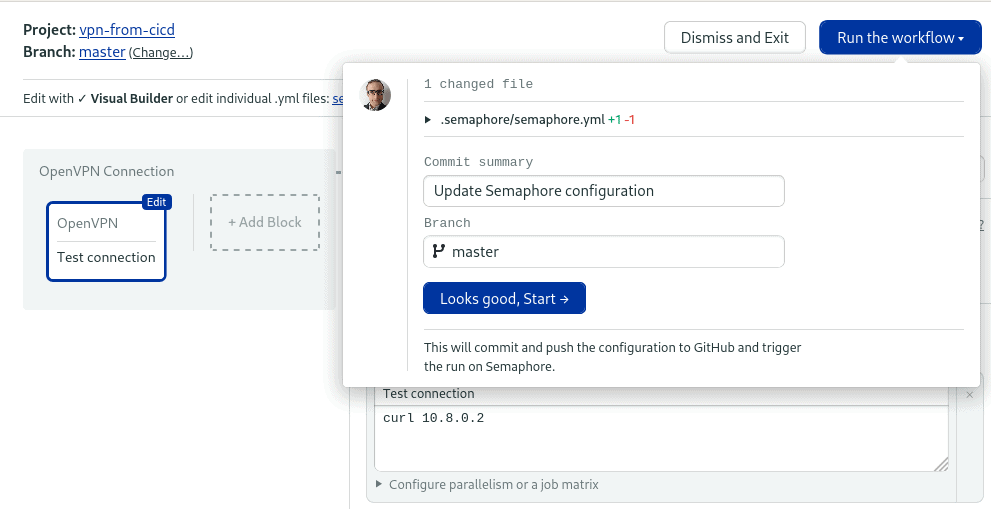
Check that the pipeline completes successfully.
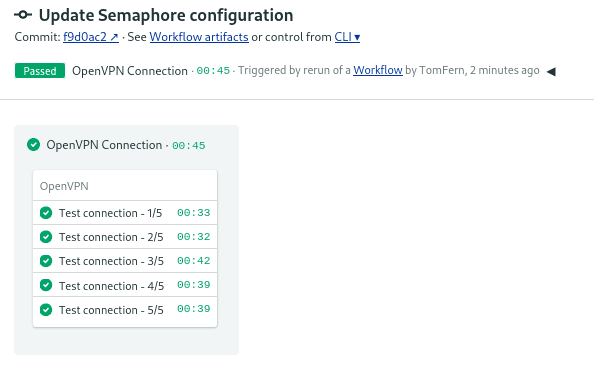
Handling Parallelism
By default, the OpenVPN server allows one connection per client certificate. When duplicate connections are detected, the server will begin disconnecting other clients. Therefore, if you have multiple jobs in the block, some jobs will fail, making the pipeline stop or hang. The same thing may happen when there are simultaneous pipeline executions.
There are two ways of handling parallelism with OpenVPN:
- Allow duplicate clients: configure the server to allow duplicate clients. To do this, add this line to the server config file and restart the VPN. This is the easiest solution, but it makes your OpenVPN server a bit less secure.
duplicate-cn 0- Issue more certificates: generate more client certificates with different Common Names. Then, use pipeline queues to ensure no two same-certificate pipelines run at the same time.
Whatever option you choose, simulate multiple connections to check that the pipeline can handle parallel connections.
Conclusion
We’ve learned how to configure Semaphore to connect using OpenVPN. You can follow these steps to link cloud and private networks seamlessly and securely.