A microservices architecture consists of several independent backend services that communicate with each other through APIs. Given the popularity of the microservices approach, chances are that your backend needs to make several API calls to receive data from and send data to other backends.
Making an HTTP request to call an API takes only a few lines of code. However, you likely need to call the same API in different places. This implies repeating the same logic over and over again. Such an approach is cumbersome and leads to code duplication. Just think about when the endpoint of an API changes. In this common scenario, you will have to update the code at all points where the API is called.
Now, imagine that your backend software architecture had a layer to contain everything required to call all APIs. Centralizing all the code to make API calls in one place would provide several benefits and help mitigate the negative aspects mentioned earlier. This is what an API layer is all about!
Let’s figure out what an API layer is, understand why your backend app should have one, and learn how to integrate an API layer into your Spring Boot backend.
What is an API Layer?
An API layer is the part of the backend Application that encapsulates all the Programming logic required to receive and send data through an Interface (API). In other words, all external API calls a backend application relies on pass through this architectural layer. Keep in mind that this is nothing new, and you can take advantage of an API Layer also in a frontend application. Find out more about how to build an API Layer in React.
In a Spring Boot application, all the logic required to implement the API layer should be placed in an api package. Then, you can use the following format to name the Java class files contained in that package:
<ExternalService>API.javaThis Java file should expose all API calls related to a particular external microservice as functions. Thus, the api package will consist of several classes. Each of these files will collect all APIs related to the service identified with the <ExternalService> qualifier. This will also make finding APIs of the same type more intuitive.
Keep in mind that a backend API layer usually also requires some utility classes. These files do not follow the naming convention presented above. So, here is what an API layer in a Spring Boot application may look like:
api
├── utils
│    └── APIHandler.java
│
├── APILayer.java
.
.
.
├── AuthorizationAPI.java
.
.
.
├── CmsAPI.java
.
.
.
└── SemaphoreAPI.java
As you can see in the file diagram above, the API layer groups together all the APIs of external services that your backend application uses.
In particular, let’s focus on the APILayer.java file. This is a special file that encapsulates all the <ExternalService>API.java files as follows:
package com.apilayer.service.api;

import org.springframework.beans.factory.annotation.Autowired;
import org.springframework.stereotype.Service;

@Service
public class APILayer {
    private final AuthorizationAPI authorizationAPI;
    private final CmsAPI cmsAPI;
    private final SemaphoreAPI semaphoreAPI;
    // other <ExternalService>API ...

@Component
    APILayer(
        @Autowired AuthorizationAPI authorizationAPI,
        @Autowired CmsAPI cmsAPI,
        @Autowired SemaphoreAPI semaphoreAPI
        // ...
    ) {
        this.authorizationAPI = authorizationAPI;
        this.cmsAPI = authorizationAPI;
        this.semaphoreAPI = semaphoreAPI;
        // ...
    }

    public AuthorizationAPI getAuthorizationAPI() {
        return authorizationAPI;
    }

    public SemaphoreAPI getSemaphoreAPI() {
        return semaphoreAPI;
    }

    public CmsAPI getCmsAPI() {
        return cmsAPI;
    }

    // other getters...
}
APILayer is annotated with @Component because it is generally contained in the service layer. The reason for this is that retrieving and writing data via API is part of the business logic, which should be defined in the service layer.
So, if your Spring Boot backend follows a multi-tier architecture with a package for each layer, the api package should be placed inside the service layer:
com.your-app
├── controller
│    └── ...
├── dao
│    └── ...
├── data
│    └── ...
├── dto
│    └── ...
├── model
│    └── ...
.
.
.
└── service
     ├── api
     │    ├── utils
     │    └── ...
     └── ...
Note the api folder under the service directory. The API layer can be considered a specialized sub-layer of the service layer.
Thanks to APILayer, importing the entire API layer requires only one @Autowired variable. Specifically, you can now call an API in a @Service class as follows:
package com.apilayer.service;

import com.apilayer.service.api.APILayer;
import org.springframework.beans.factory.annotation.Autowired;
import org.springframework.stereotype.Service;
import java.util.List;

// ...

@Service
public class ArticleService {
    private final APILayer apiLayer;

    // registering the APILayer bean
    // via constructor dependency injection
    public ArticleService(@Autowired APILayer apiLayer) {
        this.apiLayer = apiLayer;
    }

    public List<Article> getAllArticles(
    )  {
        // retrieving some data from an external CMS
        // through an API call
        List<Article> articles = apiLayer.getCmsAPI().getAllArticles();

       // remaining business logic...

        return articles;
    }

    // ...
}
This example shows how the API layer simplifies the process of sending and receiving data via API. In detail, the API layer provides functions that encapsulate all the logic required for performing API calls.
Let’s now dig into the benefits an API layer can bring to your backend architecture.
Why Your Spring Boot Application Should Have an API Layer
An API layer offers several advantages to the architecture of a Spring Boot application. Let’s take a look at the three most important reasons why you should use it.
1. Avoiding Code Duplication
In the microservices architecture, backend applications use APIs to communicate with each other. So, your backend is likely to make a lot of API requests. In a Spring Boot application with a traditional architecture, this means repeating the lines of code shown below throughout your backend codebase:
// verifying if an authorization token
// is valid by calling an API
// exposed by the authentication microservice
HttpHeaders httpHeaders = new HttpHeaders();
httpHeaders.add(HttpHeaders.AUTHORIZATION, token);

boolean isValid = return restTemplate.exchange(
       "https://your-auth-backend.com/api/v1/verifyToken",
        HttpMethod.GET,
        new HttpEntity<>(null, httpHeaders),
        Boolean.class
);
The example above shows how to call an API in Spring Boot with RestTemplate, the default Spring Boot Web HTTP client. Specifically, it demonstrates how to make an authentication API request. Since all authenticated APIs in your backend will rely on this external API call, you will have to replicate this logic multiple times. This will lead to duplication, which increases the lines of code in the codebase and thus the possibility of introducing errors and bugs. Specifically, even a single API called incorrectly could cause your application to crash, and you want to avoid this. Plus, the number of APIs a backend depends on is generally very limited. So, duplicating some logic to call the same APIs seems inevitable with this approach.
Now, consider centralizing all the logic behind your API calls in functions exposed by an API layer. Performing an API call would take a single line of code, the function call. Also, when an API endpoint changes, you would only need to update a single function. Without the API layer, you would have to find and change every API call made throughout the code. A huge difference!
Therefore, an API layer makes the Spring Boot backend more modern, easier to maintain, and cleaner, without the same lines of code repeated again and again.
2. Simplifying Integration of Third-Party Services
Today’s most successful services are based on a composable architecture. This involves integrating best-in-class online services into a single application. After all, no one wants to reinvent the wheel, and relying on successful products makes everything easier.
You can apply the same logic to a backend application, especially considering that most SaaS (Software as a Service) services are now API-based. This means that you can get access to their data and functionality via API.
With an API layer, you already have the infrastructure in place to handle API calls. In particular, integrating a new third-party service into your backend simply involves defining a new <ExternalService>API.java file. To make things even simpler, you can also configure a custom RestTemplate instance as follows:
// building a RestTemplate instance
// with custom default headers
RestTemplate semaphoreRestTemplate = new RestTemplateBuilder()
            .defaultHeader("Authorization", "Token: <YOUR_SEMPAHORE_API_KEY>")
            .build();
For example, you can use this instance of RestTemplate in your SemaphoreAPI.java file. Every API call made with that instance will automatically have the Authorization HTTP header set to the desired value.
Thanks to the API layer, integrating external services requires only a few lines of code. All the logic is centralized in one file and exposed through functions. so switching from one service to another is simple. You only have to update the code inside each function in the corresponding <ExternalService>API.java file. This saves you from major refactoring.
3. Making It Easier to Add Retry Logic on API Failure
No API-based SaaS offers 100% uptime. In addition, some of these external services may be error-prone, especially during updates. This means that third-party services are no strangers to server-side HTTP 5xx errors, especially the 503 Service Unavailable variety.
When a third-party service responds with an error, your backend may fail as a result. Therefore, errors returned by any external service used by the backend are also your problem. At the same time, third-party services base their success on the effectiveness and availability of their features. So, these errors must be temporary. This is why retrying HTTP requests in case of specific errors is so important.
Thanks to Spring Retry, you can effortlessly integrate retry logic into your Spring Boot app. All you have to do is decorate the API layer methods with the Spring Retry @Retryable annotation. These methods will then be executed up to three times, with a delay of one second between each attempt.
Adding an API Layer to a Spring Boot App
You now know what an API Layer is and what benefits it can bring to a Spring Boot application. It is time to learn how to implement one!
Prerequisites
First, you need a Spring Boot Web application in Java. You can create one with Spring Initializr as follows:
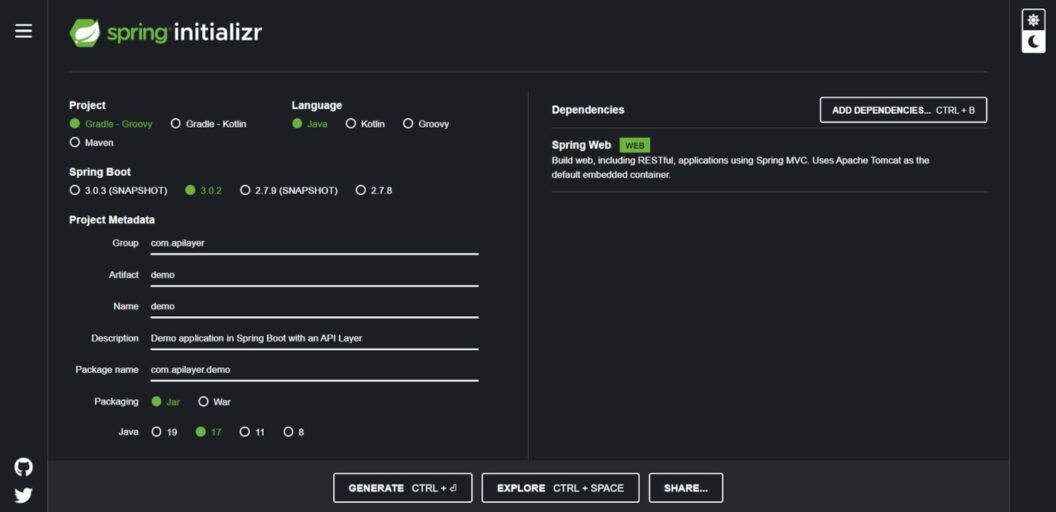
You are free to choose Gradle or Maven as the build tool, but you must select Java as the programming language and add Spring Web as a dependency. This way, Spring Initializer will automatically add spring-boot-starter-web to your project’s dependencies. Note that Spring Web includes RestTemplate– the HTTP client used by the Spring Boot API Layer to perform HTTP requests.
Implementing an API Layer
Let’s see how you can add an API layer to a Spring Boot Web app. The first thing you need to do is create a utility class to make calling APIs easier.
In the utils package, you can define an APIHandler.java class as shown below:
package com.apilayer.service.api.utils;

import org.springframework.boot.web.client.RestTemplateBuilder;
import org.springframework.http.HttpEntity;
import org.springframework.http.HttpHeaders;
import org.springframework.http.HttpMethod;
import org.springframework.http.ResponseEntity;
import org.springframework.stereotype.Component;
import org.springframework.web.client.RestClientException;
import org.springframework.web.client.RestTemplate;

@Component
public class APIHandler {
    private final RestTemplate restTemplate;
    public APIHandler(RestTemplateBuilder restTemplateBuilder) {
        // initializing a RestTemplate instance
        // to perform API calls
        this.restTemplate = restTemplateBuilder.build();
    }

    // defining a utility function
    // to perform API calls
    public <T, R> ResponseEntity<R> callAPI(
            String apiEndpoint,
            HttpMethod httpMethod,
            HttpHeaders httpHeaders,
            T requestBody,
            Class<R> classToConvertBodyTo
    ) {
        // setting the HTTP headers and HTTP body (if present)
        HttpEntity<T> requestEntity = new HttpEntity<>(requestBody, httpHeaders);

        try {
            // performing the HTTP request
            return restTemplate.exchange(
                    apiEndpoint,
                    httpMethod,
                    requestEntity,
                    classToConvertBodyTo
            );
        } catch (RestClientException e) {
            // logging errors when the HTTP request fails
            // or there is an error in decoding the response
            e.printStackTrace();

            // other default behavior...
            // (e.g. register the error in an APM service, ...)

            throw e;
        }
    }
}
As you can see, this class initializes an instance of RestTemplate in the constructor with RestTemplateBuilder. Then, it uses that instance in callAPI() to make HTTP requests via the RestTemplate exchange() method.
The advantage of centralizing API call logic in an APIHandler utility class is that you can define custom behavior for all your calls directly here. For example, you can log errors in callAPI() when the exchange() method raises a RestClientException. This is particularly useful for debugging purposes.
Similarly, you can add custom global configs to the RestTemplate instance when initializing it in the constructor. For example, you can add a custom HTTP header to the request performed with that RestTemplate instance using the defaultHeader()method:
// add a custom HTTP header to the RestTemplate instance
RestTemplate scrapingRestTemplate = new RestTemplateBuilder()
            .defaultHeader("User-Agent", "Mozilla/5.0 (Windows NT 10.0; Win64; x64) AppleWebKit/537.36 (KHTML, like Gecko) Chrome/109.0.0.0 Safari/537.36")
            .build();
Therefore, as different third-party services typically have different requirements in terms of headers or procedures for calling their APIs, you may need to create many APIHandlers. Each will have dedicated utility functions that rely on a specifically configured RestTemplate instance.
Now, let’s see how to use APIHandler to build an <ExternalService>API.java API layer file:
package com.apilayer.service.api;

import com.apilayer.data.pokeapi.NamedApiResourceList;
import com.apilayer.service.api.utils.APIHandler;
import org.springframework.beans.factory.annotation.Autowired;
import org.springframework.http.HttpMethod;
import org.springframework.http.ResponseEntity;
import org.springframework.stereotype.Component;
import org.springframework.web.util.UriComponentsBuilder;
import com.apilayer.data.User;

@Component
public class AuthorizationAPI {

    private final APIHandler apiHandler;

    private final String BASE_URL = "https://your-auth-backend.com/api/v1/users";

    AuthorizationAPI(@Autowired APIHandler apiHandler) {
        this.apiHandler = apiHandler;
    }

    public User getUserDataByToken(String token) {
        // retrieving a single User by token
        ResponseEntity<User> response = apiHandler.callAPI(
                String.format(BASE_URL + "?token=%s", token),
                HttpMethod.GET,
                null,
                null,
                User.class
        );

        return response.getBody();
    }

    public bool isAuthenticated(String token) {
        // inserting the token string in the
        // HTTP "Authorization" header
        HttpHeaders httpHeaders = new HttpHeaders();
        httpHeaders.add(HttpHeaders.AUTHORIZATION, token);

        // verifying whether a user is authenticated
        // by checking his authorization token
        ResponseEntity<Boolean> response = apiHandler.callAPI(
                BASE_URL,
                HttpMethod.GET,
                httpHeaders,
                null,
                Boolean.class
        );

        return response.getBody();
    }

    // other authorization API functions...
}
Your backend may rely on different APIs from your authentication backend. Each of these APIs will correspond to an API layer function, which contains all the logic to call the API encapsulated in a few lines of code. Do not forget that this is just one <ExternalService>API.java file, and your Spring Boot app might require many more API layer files.
Integrating the Retry Logic
As explained earlier, you now need Spring Retry. Since Spring Retry annotations require the Spring AOP dependency, you need to install two packages. Let’s add both spring-retry and spring-boot-starter-aop to your project’s dependencies.
If you are a Maven user, add the following lines inside the <dependencies> tag of your pom.xml file:
<dependency>
    <groupId>org.springframework.retry</groupId>
    <artifactId>spring-retry</artifactId>
    <version>2.0.0</version>
</dependency>
<dependency>
    <groupId>org.springframework</groupId>
    <artifactId>spring-boot-starter-aop</artifactId>
    <version>3.0.2</version>
</dependency>
Otherwise, if you are a Gradle user, add the two lines below in the dependencies object:
implementation "org.springframework.retry:spring-retry:2.0.0"
implementation "org.springframework.boot:spring-boot-starter-aop:3.0.2"
Enable Spring Retry by decorating your @SpringBootApplication class or one of your @Configuration classes with the @EnableRetry annotation:
You can now use @Retryable to implement retry logic in the APIHandler callAPI() method as shown below:
package com.apilayer;

import org.springframework.boot.SpringApplication;
import org.springframework.boot.autoconfigure.SpringBootApplication;
import org.springframework.retry.annotation.EnableRetry;

@SpringBootApplication
@EnableRetry
public class DemoApplication {

   public static void main(String[] args) {
      SpringApplication.run(DemoApplication.class, args);
   }

}
You can now use @Retryable to implement retry logic in the APIHandler callAPI() method as shown below:
@Retryable(
        // attempting up to 10 times
        maxAttempts = 10,
        // with a delay of 2 seconds between attempts
        backoff = @Backoff(delay = 2000),
        // when the Http5xxException is raised by the method
        retryFor = Http5xxException.class
)
public <T, R> ResponseEntity<R> callAPIWithRetryLogic(
        String apiEndpoint,
        HttpMethod httpMethod,
        HttpHeaders headers,
        T body,
        Class<R> classToConvertBodyTo
) {
    // setting the HTTP headers and HTTP body (if present)
    HttpEntity<T> requestEntity = new HttpEntity<>(body, headers);

    try {
        // trying to perform the request
        return restTemplate.exchange(
                    apiEndpoint,
                    httpMethod,
                    requestEntity,
                    classToConvertBodyTo
        );
    } catch (RestClientResponseException e) {
        // in case of a 5xx error, throwing a custom
        // exception that triggers the retry logic
        if (e.getStatusCode().is5xxServerError()) {
            throw new Http5xxException(e.getMessage());
        }

        // some default behavior...
        e.printStackTrace();

        throw e;
    } catch (RestClientException e) {
        // logging errors when the HTTP request fails
        // or there is an error in decoding the response
        e.printStackTrace();


        // other default behavior...
        // (e.g. register the error in an APM service, ...)

        throw e;
    }
}
Now, when the server returns a 5xx HTTP error, the backend will try up to ten times to execute the API call. Note that retrying on 4xx HTTP errors does not make sense. This is because 4xx errors are client errors, and retrying would result in the same error over and over again.
In detail, callAPIWithRetryLogic() retries on Http5xxExceptions. This is a custom error exception that you can define as follows:
package com.apilayer.exceptions;

public class Http5xxException extends RuntimeException {
    public Http5xxException(String message) {
        super(message);
    }
}
Note that not all API calls need repeat logic. For this reason, you should define two callAPI()-like functions in APIHandler and annotate only one with @Retryable. You can name these two functions callAPIOnce() and callAPIWithRetry(). To make APIHandler more elegant and avoid repeating code, you should define a private function callAPI() containing the logic to call an API and make the two functions use it as done in the demo codebase.
Furthermore, you should define two callAPI()-like functions in APIHandler and annotate only one with @Retryable.
Well done! You just learned how to implement an API layer in Spring Boot with RestTemplate and Spring Retry!
API Layer in Action
Let’s now see the API layer in action in a Spring Boot demo application. As a third-party sample service, the application uses the free-to-use PokeAPI service. Also, it relies on the Java API models from the pokeapi-reactor repo.
Clone the GitHub repository supporting this article and launch the demo app locally by running the following commands:
git clone https://github.com/Tonel/api-layer-spring-boot
cd api-layer-spring-boot
./gradlew build
./gradlew bootRun
You can now call the /v1/getPokemons endpoint with the curl command below:
curl -H "Accept: application/json" -H "Content-Type: application/json" -X GET "http://localhost:8080/api/v1/pokemon/getBlastoise"Alternatively, visit http://localhost:8080/api/v1/pokemon/getBlastoise in your browser.
In both cases, you should get the following result:
{
  "id": 9,
  "name": "blastoise",
  "image": "https://raw.githubusercontent.com/PokeAPI/sprites/master/sprites/pokemon/9.png",
  "height": "160 cm",
  "weight": "85 kg"
}
This is nothing more than a transformed version of some data retrieved from a PokeAPI API call!
Conclusion
In this tutorial, you learned what a backend API layer is, its essential benefits in the microservices world, and how to integrate it into a Spring Boot Web application. The API layer is nothing more than a set of components that provide complete functionality for sending and receiving data via API calls. This allows you to consolidate API logic into a single layer of the Spring Boot application architecture, making the entire codebase easier to maintain and more reliable, reducing the possibility for human error . As demonstrated in a complete example, implementing an API layer in Spring Boot is simple and takes only a few minutes.