High-performance continuous integration can double your Android development productivity. Here’s how you can set it up in minutes, not days.
As we work on an Android app, we test our code regularly — hopefully with the help of automated tests. And when it’s time to release a new version, we assemble the source code into an APK or AppBundle format which we deploy into the Google Play Store.
It seems like a simple process, but there are several other steps involved, like signing the package and updating the version code and name.
After a while, going through this process manually gets very tedious and tiring, so how can we automate this process?
Enter Semaphore
Semaphore is the fastest continuous integration (CI) and continuous delivery (CD) service which helps you automate your workflow by building, testing, and deploying your Android project. This way you can focus on what matters: your code.
In this tutorial we will explain how to set up Semaphore for a native Android project.
Prerequisites
If you wish to follow this tutorial you’ll need the following:
- Git and a GitHub account.
- A Semaphore account. You can get one for free at semaphore.io.
- A Google Play Developer account to publish the app.
How to finish this tutorial in 1 minute
To get started really quickly, do this:
In Semaphore, follow the link in the top navigation to create a new project.
From the examples list, select Android (Kotlin).
Semaphore will fork a demo project and set up a complete CI/CD pipeline for you in less than a minute.
That’s it. You’re done. *mic drop*
The demo is a simple app that lists all the open source Semaphore demo projects on GitHub. It includes unit and integration tests, and has the Gradle Play Publisher plugin set up that adds a Gradle task to publish your app to the store.
You can see the demo app live on the Play Store.
However we know that you’re most likely here to learn how to set up continuous integration for your own Android project. So in the rest of this tutorial we’ll explain that using our demo project as a foundation.
Adapting these instructions to your project should not be too difficult. But if you do run into a challenge, feel free to ask a question in the comments section.
Configuring CI/CD on Semaphore from scratch
After creating your Semaphore account you’ll need to create your first Semaphore project. Your Semaphore configuration is stored in a directory at the root of your repository called .semaphore. The entry point of your CI/CD pipeline is defined by the semaphore.yml file.
In this tutorial we will explain how to configure an Android CI/CD workflow by editing that file directly. That way you’ll learn the most about Semaphore and Android continuous integration in general.
You can also use Semaphore’s graphical workflow builder for a more visual approach.
See this public workflow to get a taste of Semaphore’s UI and the final project running.
Continuous integration: the safety net for your Android project
We want to perform regular checks on the code by running a linting tool and by running the project tests, and we want those to be automated. Let’s check on what can we do on Semaphore and edit the semaphore.yml configuration file.
You can see the full Semaphore configuration file of the demo project on GitHub.
Agent: where your code runs
agent:
  machine:
    type: e1-standard-2
    os_image: ubuntu1804
  containers:
    - name: main
      image: registry.semaphore.io/android:29
Here we’re defining the environment where the build will run. We want a Linux machine with 2 vCPUs, 4 GB of RAM that runs Ubuntu 18.04 OS. We also want to run our jobs in a container that has the latest (at the time of writing) Android SDK installed, provided by Semaphore Container Registry.
Semaphore always caches the two latest stable versions of Android SDK to ensure that the machine is ready in no time, making our builds blazing fast.
Global job configuration
global_job_config:
  env_vars:
    - name: ADB_INSTALL_TIMEOUT
      value: "10"
  secrets:
    - name: android_keys
  prologue:
    commands:
      - checkout
      - mv ~/release-keystore.jks ~/$SEMAPHORE_GIT_DIR/app/release-keystore.jks
      - cache restore gradle-wrapper
      - cache restore gradle-cache
      - cache restore android-build
Global Job Config allows us to define a set of configurations that are shared across the whole pipeline. This is very helpful since it allows us to define everything in one place instead of repeating it in every task.
Here we’re defining a new environment variable ADB_INSTALL_TIMEOUT so that adb doesn’t timeout while we’re setting up the emulator and running the integration tests.
We’re also saying that we want to use the global secrets android_keys that will allow us to use our keys and passwords defined as secrets, as environment variables in the build.
Specifically on the demo project we’re saving the following secrets on android_keys:
release-keystore.jks: the keystore file used to sign our release builds;RELEASE_KEYSTORE_PASSWORD: our keystore password;RELEASE_KEY_ALIAS: our keystore key alias;RELEASE_KEY_PASSWORD: our keystore key password;service-account-key.json: the service account key, used to deploy the demo app to the Play Store.
This is the ideal place so save sensitive data, such as keys. Be sure to use secrets on your builds instead of pushing sensitive information into your git repository.
The prologue section allow us to run a set of commands before the job begins. We’re checking out the code from the git repository, moving our keystore file to the correct path and restoring our cache so builds are faster.
Pipeline blocks
Here’s where we can add all the build tasks we want to run. We define the jobs of each task, and the commands we want to execute in this pipeline. Let’s start at the top.
Build Block
- name: 'Build'
  skip:
    when: "(branch != 'master' OR branch != 'dev') AND pull_request !~ '.*'"
  task:
    jobs:
      - name: 'Build Project'
        commands:
          - ./gradlew bundle
    epilogue:
      on_pass:
        commands:
          - cache clear
          - cache store gradle-wrapper ~/.gradle/wrapper
          - cache store gradle-cache ~/.gradle/caches
          - cache store android-build ~/.android/build-cache
The first thing we want to do is to build our project by running ./gradlew bundle to check that everything is ok. Then, on the epilogue, that will only run if this job is successful, we are refreshing the cache.
Another important thing is that we have a condition that tells that we only want to run this block on master or dev branches or when a pull request is opened.
Verification Block
- name: 'Verification'
  skip:
    when: "pull_request !~ '.*'"
  task:
    jobs:
      - name: 'Analyze Code'
        commands:
          - ./gradlew lint
      - name: 'Unit Tests'
        commands:
          - ./gradlew test
      - name: 'Integration Tests'
        commands:
          # Install the required tools and the emulator itself
          - sdkmanager "platform-tools" "platforms;android-29" "build-tools;30.0.0" "emulator"
          # Install system images for the emulator
          - sdkmanager "system-images;android-29;google_apis;x86"
          # Create an emulator with the installed system images
          - echo no | avdmanager create avd -n test-emulator -k "system-images;android-29;google_apis;x86"
          # Start the emulator with no audio, boot animation, window, and with GPU acceleration off
          - emulator -avd test-emulator -noaudio -no-boot-anim -gpu off -no-window &
          # Wait for the emulator to boot completely
          - adb wait-for-device shell 'while [[ -z $(getprop sys.boot_completed) ]]; do sleep 1; done;'
          # Dismiss the emulator lock screen and wait 1 second for it to settle
          - adb shell wm dismiss-keyguard
          - sleep 1
          # Disable window and transition animations. This is required to run UI tests correctly
          - adb shell settings put global window_animation_scale 0
          - adb shell settings put global transition_animation_scale 0
          - adb shell settings put global animator_duration_scale 0
          - ./gradlew connectedAndroidTest
    epilogue:
      always:
        commands:
          - artifact push job --expire-in 2w --destination reports/ app/build/reports/
Now the real work begins. This is the verification block where we’re doing a lint check and running our tests. We also have a skip condition that tells Semaphore that we only want to run this block when a pull request is open.
Here’s what’s happening:
./gradlew lintruns the Android Lint that analyzes the code to check if there’s any problems../gradlew testwill run all the Unit Tests on our project../gradlew connectedAndroidTestwill run the Integration Tests, after setting up the emulator.
Usually, this is enough to verify the code and should always be checked/ran before merging and deploying a new app version so that we’re sure that we’re not introducing bugs or bad code into the project. You can add more jobs here if you need to perform additional checks.
After everything completes, on the epilogue, we’re uploading our test reports as artifacts so if something goes wrong with our tests we can consult the reports to see more details, making our lives a bit easier.
It’s important to note that everything will run in parallel making Semaphore builds extremely fast.
Promotions
We use promotions when we want to branch out our pipeline when certain conditions are met. This is perfect for deployments.
promotions:
  - name: Internal Deploy
    pipeline_file: deploy-internal.yml
    auto_promote:
      when: "result = 'passed' AND branch = 'dev'"
  - name: Beta Deploy
    pipeline_file: deploy-beta.yml
    auto_promote:
      when: "result = 'passed' AND branch = 'master'"
We have two other pipelines, and like so two promotions. We want to promote to the pipeline that deploys our app to the internal track when we push new code to dev, and to the beta track when we push new code to master.
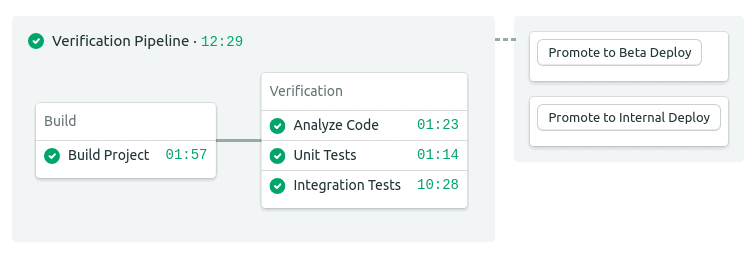
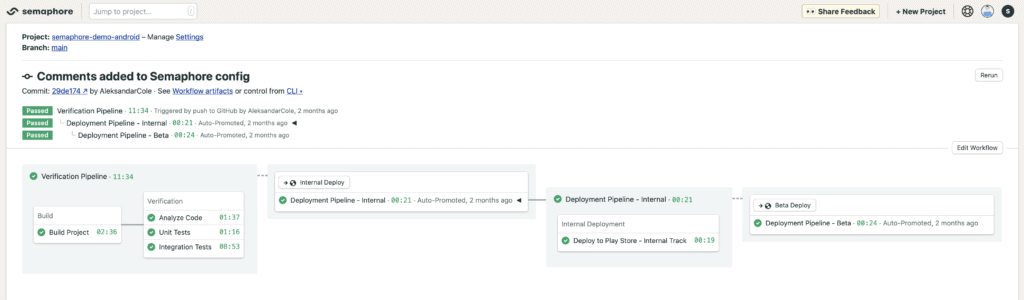
Here’s the CI pipeline in its’ full glory. Notice how fast it is.
Continuous deployment: you can do it with Android too!
After verifying that everything is ok with our project we want to automate deploys to certain environments or tracks, in this case, when new code is pushed to our protected branches dev and master.
Like it was explained before, these pipelines are promoted from the main pipeline when those conditions are met.
Check the full configurations for the internal pipeline and beta pipeline.
Most of the configuration is the same as explained before. We only added a command to the global config to move the service account key to the correct path as that is needed to deploy the app and added a new block.
Deployment Block
- name: 'Internal Deployment'
  task:
    jobs:
      - name: "Deploy to Play Store - Beta Track"
        commands:
          - ./gradlew publishReleaseBundle --track beta
Here we’re simply running the publish task that was created by the Google Play Publisher Gradle plugin. The only thing that differs from the internal pipeline is the argument track that specifies that we want to deploy to the internal track instead. Also, we don’t have to worry about incrementing the versionCode every time because we’re using the Semaphore workflow number environment variable for that, that is always incremented when new a new build is running.
On to you
Remember to check the complete demo project on GitHub for a complete example and be sure to explore the code on your own. Feel free to fork it and use it as the base of your next Semaphore project.
There are still some things that you can do to improve the workflow further, like adding Slack notifications, using webhooks, updating a CHANGELOG file or even creating GitHub releases, but the nice thing about Semaphore, and CI/CD tools in general, is that now you can finally focus on what matters. The code for your next Android app.
Have questions about this tutorial? Want to show off your results? Reach out to us on Twitter @semaphoreci or leave a comment below.
Want to discuss this article? Join our Discord.