Introduction
In this article, we’ll look at how to unit test components built with Angular 2. Components are the centerpiece of Angular 2. They are the nucleus around which the rest of the framework is built. We’ll explore what a component is, why it is important, and how to test it.
Prerequisites
Before starting this article, it is assumed that you have:
- An understanding of Angular 2,
- Knowledge of TypeScript and how it relates to JavaScript,
- An understanding of ES6/ES2015 concepts such as arrow functions, modules, classes, and block-scoped variables,
- Comprehension of using command line or terminal such as Git Bash, iTerm, or your operating system’s built-in terminal,
- You have Node >= v4 and NPM >= v3 installed while knowing how to run NPM scripts, and
- Have a setup capable of unit testing Angular 2 applications. If you need an explanation on how to do so, see the article Setting Up Angular 2 with Webpack. The structure used in this tutorial is available at this GitHub repository.
The Sample Project
Throughout this tutorial we will be creating a very simple application. Our application will allow users to provide an array of questions that will generate a form. Despite its simplicity, this will give us insight both into creating components as well as some other features of Angular 2, such as NgModule and the forms package.
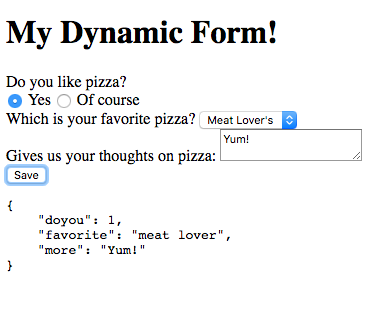
The final output will look similar to the following:
Before we dive into testing, let’s look at what components are and why they’re important for developing an Angular 2 application.
What are Components?
Many of the manufactured products we use every day were built using components. Let’s take a car for an example. It’s comprised of a few systems — braking, drive train, and engine — which are integrated together. These systems are then broken down into subsystems, which are broken into further subsystems until we get down to the nuts and bolts.
In software development, our programs are no different — they are just a set of systems, composed together to create a larger system. The term “component” is really just analogous term for system. Think of a blog post:
- Blog post
- Header
- Title
- By line
- Date
- Body
- Footer
- Tags
- Categories
- Comments
- Header
Each of the levels in the above list is really just a component. We can create a title component, by-line component, and date component. We then compose them together to create the header component. The header component, along with the body, footer, and comments components make up the whole blog post.
Why Use Components?
The larger an application gets, the more complexity it incurs and the more there is to manage. Components help us build web applications by providing the following advantages:
- Separation of concerns — developing the tags section of a blog post doesn’t necessarily need to be concerned with the details of developing the date display,
- Easier to manage — having small, focused components makes understanding what and where code exists, and
- Easier to unit test — testing our applications becomes component-based, making it easier to verify that, at each hierarchical level, our code is doing what we intended it to do.
The Components of Our System
Before developing a component we’ll need to identify what components our system has. We need to provide various ways of presenting a question:
- Single-line text,
- Multi-line text,
- Radio buttons, and
- Select list.
This will be our question component. We’ll be creating a dynamic form component which will act as the parent of the question component. The parent component of the form will be a top-level application component.
So we will end up with the following component structure:
- Application
- Form
- Question
- Form
Having a form component gives us the ability to expand our application in case we would want to add another aspect to our site, such as a results section.
Test-driven Development
We’ll be using test-driven development as we build our sample application. If you are unfamiliar with the term, take a look at the “Test-Driven Development” section of Setting Up Angular 2 with Webpack.
Generating a Dynamic Form
We are going to start by generating the form.
First, add a directory named components to the src directory which should be at the root-level of your project. In that directory, add another directory named dynamic-form. Create two files in the dynamic-form directory: dynamic-form.component.ts and dynamic-form.component.spec.ts.
dynamic-form.component.spec.ts file is going to contain all the tests needed to unit test the component’s code, which will live in dynamic-form.component.ts. You may be wondering what “spec” means. In short, specs are test files which, as we’ll see when we write our tests, read in a more natural way.
We’ll start by adding code to the spec file:
import {
    TestBed
} from '@angular/core/testing';

import {
    FormGroup,
    ReactiveFormsModule
} from '@angular/forms';

import { DynamicFormComponent } from './dynamic-form.component';
Our first step is to import dependencies. We have two sources we’re importing from — @angular/core/testing and ./add.component. This import syntax is ES2015-specified.
The first source is from the Angular 2 core library. We’re pulling in the TestBed class from it . TestBed is the main entry to all of Angular’s testing interface. It will let us create our components, so they can be used to run unit tests.
We also pull in the FormGroup and ReactiveFormsModule classes. FormGroup will just be used to test the type of a variable. The ReactivesFormModule is a single-access point to many of the functions, classes, and attributes we need from Angular’s forms library. If you haven’t installed Angular’s forms library, go to your console and input the following:
npm i -S @angular/formsThe ./dynamic-form.component import source is our own file, which we will create in a moment. It’ll contain our DynamicFormComponent class, which we will import here for use in our tests.
describe('Component: DynamicFormComponent', () => {
    let component: DynamicFormComponent;
Next, we’ll use Jasmine’s describe function to tell Jasmine that we want to run a suite of tests. Then we’ll declare a variable, component, which will eventually hold the reference to our DynamicFormComponent.
This is the first spot where you may be seeing TypeScript in action. Not only are we using the ES2015 let keyword, but we’re also declaring that the type of component will be an DynamicFormComponent. All TypeScript type declarations look like this. If you see a: B it just means the variable a is of type B.
   beforeEach(() => {
        TestBed.configureTestingModule({
            declarations: [DynamicFormComponent],
            imports: [ReactiveFormsModule]
        });

        const fixture = TestBed.createComponent(DynamicFormComponent);
        component = fixture.componentInstance;
    });
Now, we’re getting more into using Angular. First, we use the beforeEach function from Jasmine which tells the testing framework to run the function passed to it before each test.
We then set up our testing module using TestBed.configureTestingModule. Our testing module needs access to the form classes, methods, and attributes that the ReactiveFormsModule pulls in, so we import that in to our testing module configuration. We also need Angular to see our DynamicFormComponent, so we declare that it will be used in our testing module.
Note that we could also have specified any part of NgModuleMetadata, as you can see in the official documentation for more information.
Once we’ve set up our testing module, we’ll use TestBed.createComponent to create our component. The createComponent method actually returns a ComponentFixture. Our component actually lives at the fixture’s componentInstance attribute. So, we’ll set our component variable to fixture.componentInstance.
    it('should have a defined component', () => {
        expect(component).toBeDefined();
    });
First, we’ll add a simple test to see if our component was created. We use the Jasmine-provided it function to define a spec. The first parameter of it is a text description of what the spec will be testing — in this case we have a defined component. The second parameter is a function that will run the test.
We then use Jasmine’s expect function to define our expectation. The expectations read just as they are written. In this spec, we expect that the component will be defined.
If we wanted to test that it wasn’t defined, we could just write:
expect(component).not.toBeDefined();To run our test, fire up your favorite terminal, navigate to your project and run
npm run test:headlessThis will run the test through PhantomJS. To understand what headless or PhantomJS is, take a look at the Unit Testing Dependencies section of Setting Up Angular 2 with Webpack.
Running it at this point will result in an error since we haven’t defined our SingleLineComponent yet. Let’s do that:
import { Component } from '@angular/core';In single-line.component.ts we first pull in Angular’s Component decorator which allows us to declare a class as a reusable component.
@Component({
    selector: 'dynamic-form',
    template: ''
})
export class DynamicFormComponent {

}
We then use that component class to declare the most basic version of our component. We declare it’s selector as dynamic-form which means that any parent component that would use it would put <dynamic-form></dynamic-form> into its HTML template. For now, we declare an empty template, which we will fill in later.
If you’ve set your code up correctly, when you run your test, you should see output similar to:

Congratulations, you’ve created and tested your first Angular 2 component.
Our form will take in an array of questions and turn them into a form. In order to to create the form, we will need a common data model to define questions.
To do this, under the src directory create a models directory. In that directory, add a file name question.model.ts. In that file, add the following code:
export interface Question {
    controlType: string;
    id: string;
    label: string;
    options: Array<any>;
    required: boolean;
    type?: string;
    value?: any;
}
Create another file under models named index.ts and in that file put the following:
export * from './question.model';This way, we will have a single point of access to our models, instead of pulling in each model file separately.
In our spec file, we’ll add another spec to test that when the DynamicFormComponent initializes, it will create a FormGroup for the list of passed in questions array.
A FormGroup is a container for FormControls. When any of the FormControls in a FormGroup have an invalid state, the whole FormGroup is also invalid.
In dynamic-form.component.spec.ts, after the spec we wrote before, add the following:
    it('should create a FormGroup comprised of FormControls', () => {
        component.ngOnInit();
        expect(component.formGroup instanceof FormGroup).toBe(true);
    });
This test will simply call the ngOnInit method of our component class . Once that method completes, we just test that the formGroup attribute of the class is an instance of a FormGroup.
With TDD we write just enough to application code to satisfy the test, so let’s do that. The new dynamic-form.component.ts becomes:
import {
    Component,
    Input,
    OnInit
} from '@angular/core';
import {
    FormGroup
} from '@angular/forms';

import { Question } from '../../models';

@Component({
    selector: 'dynamic-form',
    template: ''
})
export class DynamicFormComponent implements OnInit {
    @Input() questions:Array<Question>;

    formGroup: FormGroup;

    ngOnInit() {
        this.formGroup = this.generateForm(this.questions);
    }

    private generateForm(questions: Array<Question>): FormGroup {
        return new FormGroup({});
    }
}
A lot has changed here. First off, we are importing two more dependencies from Angular’s core library — Input and OnInit. Input is a decorator that lets Angular know that an attribute of our class is a data-bound input property. This means that the value comes from a parent component. If a parent component was to use the following markup:
<dynamic-form [questions]="myQuestions"></dynamic-form>The value that DynamicFormComponent would have for questions would be the value of the parent component’s myQuestions attribute.
OnInit is a life-cycle hook. It is actually a class interface which we implement by adding a public ngOnInit method in our class. Angular will run this method after our component’s data-bound inputs have been checked for the first time, but before any of the child components have been checked.
In the case of the DynamicFormComponent, the ngOnInit method is where we convert the passed-in questions into a FormGroup full of FormControls. To pass the test, we create an empty FormGroup.
When you run the test, you should see green again. The next thing we need to test is that each of the questions is converted into a FormControl. To do that, we’ll add another test:
    it('should create a FormControl for each question', () => {
        component.questions = [
            {
                controlType: 'text',
                id: 'first',
                label: 'My First',
                required: false
            },
            {
                controlType: 'text',
                id: 'second',
                label: 'Second!',
                required: true
            }
        ];
        component.ngOnInit();

        expect(Object.keys(component.formGroup.controls)).toEqual([
            'first', 'second'
        ]);
    });
We set the array of questions passed in to the component. Next, we call ngOnInit on the component. Finally, we pull the keys of the questions attribute to get the controls that are part of the FormGroup. We’ll set the keys for the set of FormControls to the id property of each question.
In dynamic-form.component.ts, we need to update our imports from @angular/forms to be:
import {
    FormControl,
    FormGroup,
    Validators
} from '@angular/forms';
We’ll use FormControl and Validators in the updated application code. The rest of the application code to satisfy this is:
    ngOnInit() {
        this.formGroup = this.generateForm(this.questions || []);
    }

    private generateForm(questions: Array<Question>): FormGroup {
        const formControls = questions.reduce(this.generateControl, {});

        return new FormGroup(formControls);
    }

    private generateControl(controls: any, question: Question) {
        if (question.required) {
            controls[question.id] = new FormControl(question.value || '', Validators.required);
        } else {
            controls[question.id] = new FormControl(question.value || '');
        }

        return controls;
    }
First, we updated the call to generateForm to use an empty array if a questions value is not provided. If we didn’t do this our first test would fail.
Next, we updated generateForm to use the Array.r educe method to create an object of FormControls. If you need more information on how reduce works, take a look here.
The method the reduce method uses is generateControl. This function takes the controls object and the current question and creates the control with or without a required validator depending on if the question is required.
We then pass that formControls object as the argument to our FormGroup instantiation, which will set the controls attribute of the FormGroup to the formControls object.
If everything is set up correctly, you should see green again.
We’ve now generated the different FormControls needed to create the form, and now need a component to handle generating individual questions on the DOM.
Dynamically Generating Questions
We need two items to properly generate each question — the question itself and its FormControl. The component structure of Angular allows us to attach values as properties to DOM objects. The component for displaying questions will be a DynamicQuestionComponent with a selector of dynamic-question. It will have a form attribute and a question attribute. It can be used as follows:
<dynamic-question [form]="form" [question]="question"></dynamic-question>Our dynamic question component will only have one non-Input attribute — isValid, which will check if our control is valid. We will be able to use this method in the component DOM to output an error if the user has not entered a value in for a required field. We pass in the form instead of the control because Angular requires the parent FormGroup to be referenced with the child FormControl.
First, create a folder dynamic-question under src/components. Add 3 files: dynamic-question.component.html, dynamic-question.component.ts, and dynamic-question.component.spec.ts.
Open up dynamic-question.component.spec.ts and add the following imports:
import {
    TestBed
} from '@angular/core/testing';

import {
    FormControl,
    FormGroup,
    ReactiveFormsModule
} from '@angular/forms';

import { Question } from '../../models';
import { DynamicQuestionComponent } from './dynamic-question.component';
Notice that the Angular testing imports are the same as the spec for creating the form. We also import the DynamicQuestionComponent instead of the DynamicFormComponent.
describe('Component: DynamicQuestionComponent', () => {
    let component: DynamicQuestionComponent;

    beforeEach(() => {
        TestBed.configureTestingModule({
            declarations: [DynamicQuestionComponent],
            imports: [ReactiveFormsModule]
        });

        const fixture = TestBed.createComponent(DynamicQuestionComponent);
        component = fixture.componentInstance;
    });
Again, similar to before, but substituting DynamicQuestionComponent for DynamicFormComponent.
    it('should return true if the form control is valid', () => {
        const formControl = new FormControl('test');

        component.control = formControl;
        expect(component.isValid).toBe(true);
    });
We’re testing that when the control is valid, the isValid attribute returns true.
Running the test will fail because we don’t have our component set up, so let’s do that. Just like our test, the setup will be similar to the DynamicFormComponent.
import {
    Component,
    Input
} from '@angular/core';
import {
    FormGroup
} from '@angular/forms';

import { Question } from '../../models';

@Component({
    selector: 'dynamic-question',
    template: require('./dynamic-question.component.html')
})
export class DynamicQuestionComponent {
    @Input() form: FormGroup;
    @Input() question: Question;

    get isValid(): boolean {
        return this.form.controls[this.question.id].valid;
    }
}
There are some differences here. The first is that we’re only pulling in Component and Input from the core library. Additionally, we’re only pulling in FormControl from the forms library.
Another difference is that the template attribute of the component is populated with require('./dynamic-question.component.html'). This allows Webpack to pull in the HTML template file as a string and populate the template attribute, creating a pseudo-inline template. We’ll come back and fill in the template after we’ve completed all our templates.
Additionally, we’re using the get accessor to return the value of our control’s valid attribute. To learn more about accessor methods, take a look at the TypeScript documentation.
Now, if we run our tests, we should be seeing green.
Filling in the HTML
We left the templates empty in our components. Let’s go back and fill them in.
Dynamic Question
The dynamic-question.component.html file should be filled in with the following:
<div class="question" [formGroup]="form" [ngSwitch]="question.controlType">
    <label [attr.for]="question.id">{{ question.label }}</label>

    <input class="control" [id]="question.id" [type]="question.type"
        *ngSwitchCase="'text-input'" [formControlName]="question.id">

    <select class="control" [id]="question.id"
        *ngSwitchCase="'select'" [formControlName]="question.id">
        <option [value]="answer.value" *ngFor="let answer of question.options">
            {{ answer.label }}
        </option>
    </select>

    <textarea class="control" [id]="question.id"
        *ngSwitchCase="'textarea'" [formControlName]="question.id"></textarea>

    <div class="radio-group" *ngSwitchCase="'radio'">
        <span class="radio" *ngFor="let answer of question.options">
            <input type="radio" [id]="question.id + answer.value" [value]="answer.value"
                [formControlName]="question.id">
            <label [attr.for]="question.id + answer.value">{{ answer.label }}</label>
        </span>
    </div>

    <div class="error" *ngIf="!isValid">
        This question is required!
    </div>
</div>
In this template, we learn a lot about Angular’s HTML templating system. You may have noticed all the square brackets in the template, and you may be wondering what they’re for. In Angular 2 templates, these square brackets denote an input binding. This means, for instance, that using:
[id]="question.id"would bind the question.id attribute to the DOM object’s id property. In the same way, doing [attr.for] binds to the DOM object’s for attribute.
Another syntax form you may notice is the use of * on some attributes. This syntax denotes a template. It basically says to use this markup as the template when the condition in quotes is met. We have couple ways its being used in the question template: ngFor and ngSwitchCase.
With ngFor, we use the template for each item used in the array. For instance:
        <option [value]="answer.value" *ngFor="let answer of question.options">
            {{ answer.label }}
        </option>
We will loop through question.options, assign it to the answer variable and create an option DOM element that uses answer.value as the the option’s value and answer.label as the option’s display text.
The ngSwitchCase will use the DOM object it’s on when the value of the [ngSwitch] binding at the top of the template equals the value in quotes. So, if the question’s controlType is “textarea”, it would use the textarea markup.
Angular 2 templates use the double-curly syntax for outputting variables, just like Angular 1.
Dynamic Form
We also have to create HTML for the DynamicFormComponent. First, we need to update the component class to import the template. Change the template attribute of dynamic-form.component.ts to be as follows:
@Component({
    selector: 'dynamic-form',
    template: require('./dynamic-form.component.html')
})
Then, create the HTML file dynamic-form.component.html in the dynamic-form directory and fill in the following:
<form [formGroup]="formGroup" (ngSubmit)="submit()">
    <div *ngFor="let question in questions" class="row">
        <dynamic-question [form]="formGroup"
            [question]="question"></dynamic-question>
    </div>

    <div class="row">
        <button type="submit" [disabled]="!formGroup.valid">Save</button>
    </div>
</form>

<pre *ngIf="payload">{{ payload }}</pre>
We create a form and let Angular know that we want to recognize our DynamicFormComponent‘s formGroup attribute as the form‘s attribute of the same name. This helps attach validation to the form if we want to utilize it.
Next, we just do an ngFor loop over the questions of our DynamicFormComponent and create a dynamic-questions for each one.
The parentheses around the ngSubmit is new here. Those parentheses let us know that ngSubmit is an event binding. ngSubmit wraps the normal form submit functionality, so that when our submit button fires off, the function specified for ngSubmit will fire.
But our component class doesn’t have a submit method. Let’s add it.
Adding Another Function and Its Test
If you were to run your unit tests at this point, you might come across some serious issues. This is because we’ve started using attributes, such as ngFor or formGroup, and we haven’t let Angular know that we are going to use them. To alleviate this, let’s add our bootstrapping code, where we’ll let Angular know what we’re going to use.
To make sure our tests work, we need to set up our tests to import those attributes. Let’s start with dynamic-form.component.spec.ts.
First, we need to update our imports:
import {
    TestBed
} from '@angular/core/testing';

import {
    FormGroup,
    ReactiveFormsModule
} from '@angular/forms';

import { DynamicFormComponent } from './dynamic-form.component';
import { DynamicQuestionComponent } from '../dynamic-question/dynamic-question.component'; // ADDED
We’ve noted the line added and are now pulling in the DynamicQuestionComponent, so that Angular knows it can be used by other components. To do this, we add DynamicQuestionComponent to the list of declarations in our testing module configuration.
    beforeEach(() => {
        TestBed.configureTestingModule({
            declarations: [DynamicFormComponent, DynamicQuestionComponent],
            imports: [ReactiveFormsModule]
        });
    });
Finally, let’s add the submit test, after the “should create a FormControl…” spec:
    it('should set the payload to a stringified version of our form values', () => {
        component.questions = [
            {
                controlType: 'text',
                id: 'first',
                label: 'My First',
                required: false
            },
            {
                controlType: 'text',
                id: 'second',
                label: 'Second!',
                required: true
            }
        ];
        component.ngOnInit();

        component.formGroup.controls['first'].setValue('pizza');
        component.submit();

        expect(component.payload).toEqual(JSON.stringify({first: 'pizza', second: ''}));
    });
Here, we create a list of questions, initialize the component, and set first‘s value — not second‘s. We then call our submit method and verify that it’s created our stringified JSON.
The application code to match this would be as follows:
    submit() {
        this.payload = JSON.stringify(this.formGroup.value);
    }
Add it at the bottom of the component class.
You’ll also need to add a payload: string declaration at the top of the class below the formGroup declaration. You can, optionally, initialize the value to an empty string in ngOnInit as well, but it won’t affect the test if you do not.
In the submit method, all we do is that the formGroup.value, which is an attribute that tracks the value of each FormControl in a FormGroup and run it through JSON.stringify. We assign that to payload and have some semblance of a submit method!
Run the tests one more time, and you’ve got it!
Making It Work in the Browser
At this point, we are unit tested and, for the most part, done. However, we need to create our overall application to get it working in the browser.
To do so, we’ll need to create an AppComponent, create module using NgModule that bootstraps that AppComponent, and then bootstrap the module.
Let’s create our AppComponent first.
App Component
Create an app directory in src/components and add two files, app.component.html and app.component.ts. In app.component.ts, add the following code:
import { Component } from '@angular/core';

import { Question } from '../../models';

@Component({
    selector: 'dynamic-form-app',
    template: require('./app.component.html')
})
export class AppComponent {
    questions: Array<Question>;

    constructor() {
        this.questions = [];
    }
}
This is pretty standard at this point, we created a basic component with a questions array. Populate this array with whatever questions you want to display in the form.
Next, in app.component.html:
<h1>My Dynamic Form!</h1>

<dynamic-form [questions]="questions"></dynamic-form>
We just use our dynamic-form component to generate the form, and our AppComponent is all set up.
App Module
The module system of Angular 2 is new as of RC5. If you are not familiar with the term, RC5 refers to Angular 2’s “Release Candidate 5”. Information about what’s changed for RC5 can be found on Angular 2’s changelog. It can also be added to a project by specifiying “2.0.0-rc.5” in your package.json.
It uses the NgModule dependency to compartmentalize a suite of functionality, such as our dynamic form, without needing to import every little dependency individually. In our tests above, when we were configuring our test modules, we were mimicking the NgModule functionality per-component.
It consists of a TypeScript file, which we’ll add in src with the filename app.module.ts.
import { NgModule } from '@angular/core';
import { ReactiveFormsModule } from '@angular/forms';
import { BrowserModule } from '@angular/platform-browser';

import {
    AppComponent,
    DynamicFormComponent,
    DynamicQuestionComponent
} from './components';

@NgModule({
    bootstrap: [ AppComponent ],
    declarations: [ AppComponent, DynamicFormComponent, DynamicQuestionComponent ],
    imports: [ BrowserModule, ReactiveFormsModule ]
})
export class AppModule {}
We import NgModule as well as the module containing the dependencies for handling forms and working in the browser. We also need to import all of our components.
Then, we set up our module class using the NgModule decorator, telling it to use our AppComponent to bootstrap the module while using the declarations and imports like we did in the tests, letting Angular know that we’ll need to use these dependencies within our application.
Bootstrapping the Application
The last and the easiest part is to bootstrap everything. Create a file named bootstrap.ts under src with the following code:
import { platformBrowserDynamic } from '@angular/platform-browser-dynamic';
import { AppModule } from './app.module';

platformBrowserDynamic().bootstrapModule(AppModule);
We load platformBrowserDynamic to do template processing and dependency injection. Then, we bootstrap our AppModule.
If you go to a terminal and execute:
npm startYour application should be available at http://localhost:9000/webpack-dev-server
Continuous Testing
Nothing makes the development process feel as complete as having an continuous integration (CI) process in place. We’re going to use Semaphore as our CI service.
If you haven’t done so already, push your code to a repository on either GitHub or Bitbucket.
Once our code is committed to a repository, we can add a CI step to our Angular 2 development without much effort.
- You’ll be prompted to select an organization, just select your account,

- Next, if you haven’t already, select either Github or Bitbucket, depending on where your repository lives,

- Then, from the provided list, select the project repository,
- Next, select the branch (most likely “master”),
- Once Semaphore completes analysis of your project, update the job to
npm run test:headless,

- Click “Build with These Settings” and it’s building.

From now on, any time you push code to your repository, Semaphore will start building it. Using Semaphore makes testing and deploying your code continuously fast and simple.
Conclusion
In this article, we looked at the complexities of unit testing components. In the process, we developed a dynamic form component that could take in any number of questions and output a form. We created a crude submission method and saw how easy it is to integrate SemaphoreCI into our projects, taking only a few steps to get up and running. Webpack and SemaphoreCI stay out of your way and make your development process easy, keeping you focused on developing your Angular 2 applications.
If you’d like to see the final code, you can get it at this GitHub repository. Once you have the code pulled down, ensure you are seeing the correct version by running the following command from the project directory:
git checkout componentsThe application, though functional, leaves some room for improvement. We’re statically defining our questions, there’s a bit too much logic in the DynamicFormComponent for turning questions into FormControls, and our submit output goes nowhere. We’re going to improve that in the future tutorials. If you have any questions and comments, feel free to leave them in the section below.