Introduction
If you are even slightly familiar with configuration management, you have probably heard of Ansible before.
In short, Ansible is a configuration management tool that allows you to manage nodes over SSH or PowerShell written in Python. Ansible then uses YAML to express reusable descriptions of systems.
The most simplistic usage is sending ad-hoc commands or one big playbook to (multiple) nodes. However, that’s not where its true power lies. As a developer or system engineer, you want to be able to re-use your code. This is where Ansible roles come in.
Ansible Roles
An Ansible role is a collection of tasks that need to be performed so you can achieve a certain outcome.
As a best practice, you want your role to focus on only one thing. As the Unix philosophy states: do one thing, and do it well.
So, in this example, we will create a role for installing the Erlang programming language.
Ansible roles have the following structure:
# Role structure:
ansible-role-erlang/
  defaults/
  	  main.yml
  tasks
  	  main.yml
  tests/
     test.yml
     inventory
Role Default Variables
The defaults/main.yml file is for configuring some default variables that will be used throughout the execution of the role. By adding them to the defaults/main.yml file, you can easily overwrite values later if you need to.
Our default values look as follows:
---

erlang_ppa_repo: 'deb http://packages.erlang-solutions.com/{{ ansible_distribution | lower }} {{ ansible_distribution_release | lower }} contrib'
erlang_ppa_key: 'http://packages.erlang-solutions.com/ubuntu/erlang_solutions.asc'
erlang_ppa_key_id: 'A14F4FCA'
erlang_packages:
  - erlang
Let’s break down the variables:
erlang_ppa_repo: this is the repository address used by the Aptitude package manager.
erlang_ppa_key: the location of the PPA key to verify the package integrity
erlang_ppa_key_id: the ID of the PPA key
erlang_packages: contains a list of packages you want to install
Role Tasks
In your tasks folder, you can store all the tasks that need to be executed on the nodes. To install Erlang on our node, we need to execute 3 tasks:
---

- name: repository - add the GPG key
  apt_key:
    url: '{{ erlang_ppa_key }}'
    id: '{{ erlang_ppa_key_id }}'
    state: present
  when: erlang_ppa_key != None

- name: add repository to install Erlang from
  apt_repository:
    repo: '{{ erlang_ppa_repo }}'
    update_cache: yes
  when: erlang_ppa_repo != None

- name: install packages
  apt:
    pkg: '{{ item }}'
    state: installed
    update_cache: yes
    cache_valid_time: 3600
  with_items: erlang_packages
In the first task, we add the GPG key to Aptitude, while the second task adds the repository. Both tasks have a conditional. This is to check if the erlang_ppa_key and erlang_ppa_repo are filled in. If those variables are not filled in, Ansible will skip those tasks.
For instance, you might not wish to install Erlang for another PPA, but just want to install the package from the default distro repositories.
The last task will install all the packages defined in the erlang_packages variable. In our case, the Erlang package.
How to Determine What to Test
Before continuing with the content of the test directory, let’s take some time to think about what exactly we want to test.
There are 3 points you need to consider:
- Is the YAML syntax of my role correct? Even though writing YAML is easy, everyone makes typos once in a while.
- Does your role run through all tasks without failing?
- Is your role built in an idempotent way? This means that a second run cannot create new changes.
Now that we have a clear view on what we will be testing, it’s time to put things into practice.
Setting Up the Test Environment
As you saw in the role structure, we have 2 files inside our tests directory. The name of this directory can be chosen freely, but it’s a good convention to keep the name as clear as possible.
Playbook Inventory
The inventory file contains the nodes you want to access. Since we will be testing our role on Semaphore, we will be adding localhost to the file
localhost
We will eventually use the command’s --connection=local option to tell Ansible to run the test playbook on the local machine.
Playbook Play
The tests.yml file is where we define our actual play.
- hosts: all
  roles:
    - { role: ../../ansible-role-erlang, sudo: Yes }
Here we tell Ansible to run this play on all nodes: hosts: all. In the roles list, we define our Erlang role that needs to be executed. With the sudo: Yes variable, we tell Ansible to run the tasks as a super user.
Configuring Test Tasks
You’ll need to define your build settings inside the Semaphore interface. You can do this by going to the Project Settings and selecting Build Settings.
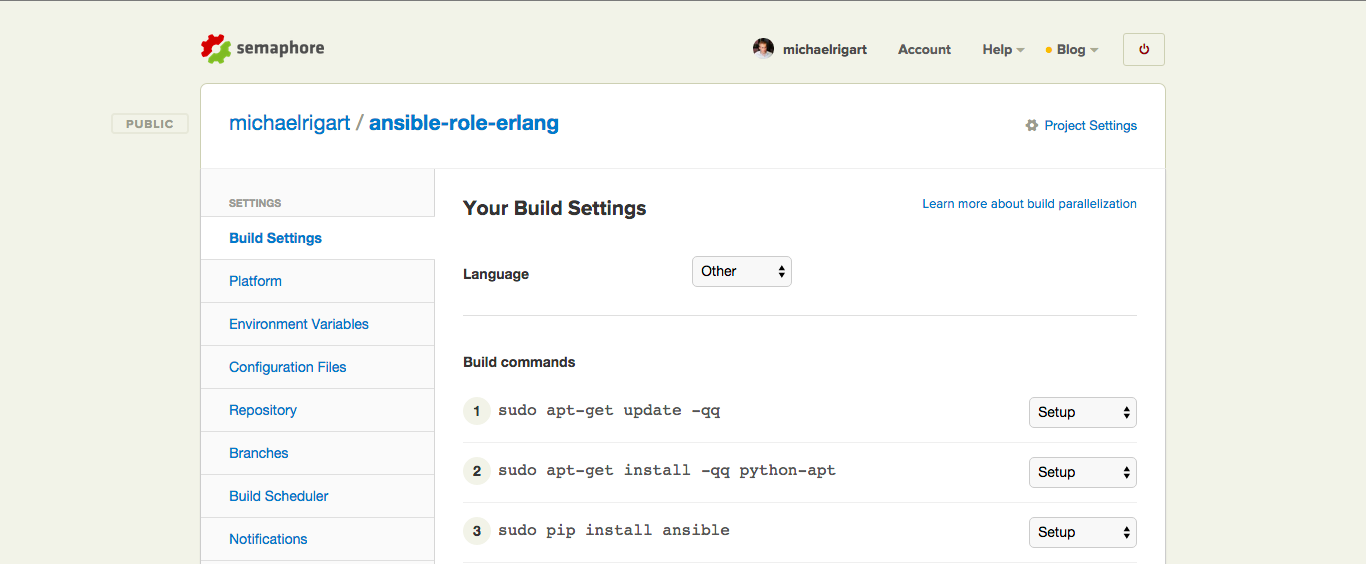
Inside your build settings, you can start by adding the build command that you need. For each build setting, you can select when a certain command needs to be executed. Semaphore gives you 4 options:
- During setup
- After a thread is finished (post-thread)
- In thread 1
- In thread 2
Thread 1 and 2 make it easy for you to run certain tests in parallel, which can speed up things.
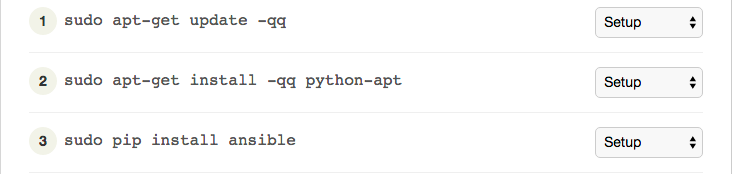
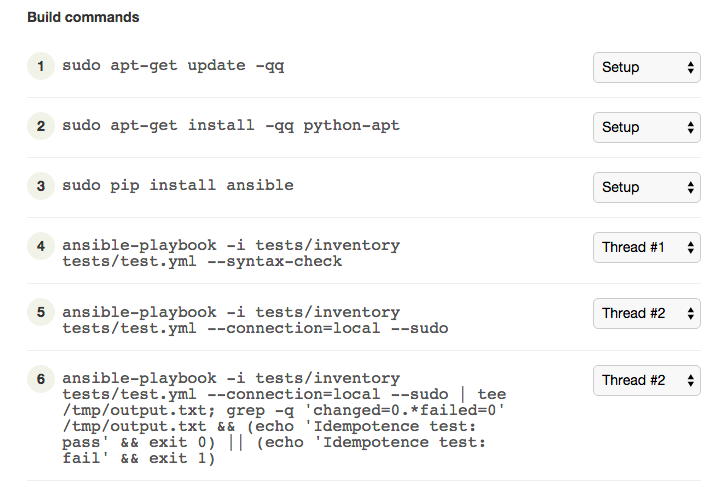
Before you can start running tests, you’ll need to set up your build environment. Use these 3 build commands to set up your environment:
sudo apt-get update -qq
sudo apt-get install -qq python-apt
pip install ansible==1.9.1
Here you are saying that apt-get needs to update its package list, install the python-apt package through apt, and then install Ansible version 1.9.1 through pip. You can omit the Ansible version if you like. Then the latest Ansible version will be installed.
You can also install Ansible through Aptitude, but this will require you to configure the Ansible PPA before installing. As you can see below, there are some extra steps to take into account, which will slow down your build time.
sudo apt-get install software-properties-common
sudo apt-add-repository ppa:ansible/ansible
sudo apt-get update -qq
sudo apt-get install python-apt ansible
Keep in mind that you might need to install other Python libraries as well. This depends on the modules you will be using. Ansible will raise an exception when you run your role if a Python library is still missing. If it does, just add it to the list.
Assign these commands to the Setup thread.
1. Test Your Role Syntax
The first item in our list is testing the role syntax. The ansible-playbook command has a built-in command for this, that will check a playbook’s syntax (and all files included in a role).
ansible-playbook -i tests/inventory tests/test.yml --syntax-check
Assign this command to Thread #1. If your role contains any syntax errors, the build will fail.

2. Test Your First Role Run
After we have checked the syntax, we will want to make sure our role runs correctly. So, we run the ansible-playbook command against the test.yml playbook on the local host. In the ansible-playbook command, we specify the --sudo option to run the command as a super user and specify our test inventory file:
ansible-playbook -i tests/inventory tests/test.yml --connection=local --sudo
Ansible returns a non-zero exit if the playbook fails, so Semaphore knows whether the command has succeeded or not. Assign this build command to Thread #2. By assigning this command to a new thread, we can run the role syntax test and first run in parallel.

3. Test Your Role Idempotency
After our first test has run successfully, it is now time to test the role idempotency again. This basically means testing if your role changes anything if it runs a second time. This should not be the case, since all tasks you perform via Ansible should be idempotent.
ansible-playbook -i tests/inventory tests/test.yml --connection=local --sudo | tee /tmp/output.txt; grep -q 'changed=0.*failed=0' /tmp/output.txt && (echo 'Idempotence test: pass' && exit 0) || (echo 'Idempotence test: fail' && exit 1)
As you can see, this is the exact same Ansible command as before. The only difference here is that we pipe the Ansible output to the tee utility. Tee does 2 things — it pipes it to the file /tmp/output.txt and shows it at the same time. We then grep the /tmp/output.txt file to make sure that both the changed and failed output report 0. If they do, then the idempotency test passes, and we exit with 0 (OK). Otherwise, it fails, and we exit with 1. This way, Semaphore knows if our test has passed or failed.
Assign this test to Thread #2. You don’t want to assign this test to Thread #1, because otherwise your test will fail due to the fact your first run happens in Thread #2.

Ready… Set… Test
Now that your build settings are all configured, you are all set. Once you start committing changes to your repository, Semaphore will start running your tests.
The only thing left to do is to get your Semaphore build badge, and show the world your role is fully functional.
Caveats
There are of course some points you need to consider.
- Semaphore currently runs Ubuntu 14.04. If your Ansible roles are targeting other versions or platforms, you could use a Docker container inside your build.
- The Semaphore builds also come with some pre-installed software packages, so make sure to purge those if you are running a role that targets an already pre-installed package. For instance, Semaphore comes with MySQL pre-installed. In this pre-installation, the password for the root user has already been set, while on a clean installation, the root password will be blank. Another example could be if you create a role for installing nginx. Semaphore comes with Apache pre-installed. So, your Ansible role could fail when you try to start nginx, since port 80 will already be in use.
- The Semaphore team update their platform regularly, so keep your eyes open for any updates. It could be that a platform update conflicts with what you want to achieve with a certain role.