Smoke testing is a technique for discovering major software flaws using CI/CD pipelines. It consists of very shallow but broad tests that verify the crucial parts of the application. This means that smoke testing is typically a very cost-effective operation.
In this article, we will explore the origins of smoke testing and how it can be incorporated into your continuous integration or continuous delivery pipelines.
Origins of smoke in testing
The term “smoke test” originally comes from electrical engineering. Once the circuit of an electrical device is ready for testing, it is attached to a power source. If there are major issues, the circuit will start smoking immediately. This shows that the system must first be fixed before any other tests are undertaken.
The same concept has been adopted in software development, together with the original term.

What and how we should test
Smoke tests should determine if the system is stable enough for it to proceed to the next phase, i.e. to more granular tests. This is achieved by testing the system’s main functionalities at a fundamental level.
Smoke tests don’t need to be comprehensive. For example, if we are working on an e-commerce web application, we only need to check that customers can buy a product. We don’t need to verify all the details and edge cases of the purchasing process.
Although it is common to smoke test the main user-facing features of an application, smoke tests are also applicable at many different abstraction levels throughout your entire system. The value of this multi-level smoke testing approach is that you can discover defects on a more controlled and granular level. When working on distributed systems that involve many teams, this can end up being a big time saver.
Depending on what you are testing, the actions that you will take based on the results you get can vary greatly. However, smoke tests must be fast in order to ensure a fast feedback loop. The value of a smoke test lies in being able to fail very fast, so you don’t waste time and resources on unit and acceptance testing when there is a fundamental problem with your project.
Tools that serve well for writing smoke tests can be very simple. For instance, a simple curl api.myapp.com/is_alive is a good start. Checking versions of installed dependencies with a simple Bash script could also be sufficient.
For more complex checks, you can rely on a testing library in your favorite programming language. If you are using Ruby, for example, and want to test some of the main features of your web application, you can run a few Cucumber scenarios against your production instance.
Where Should We Smoke Test?
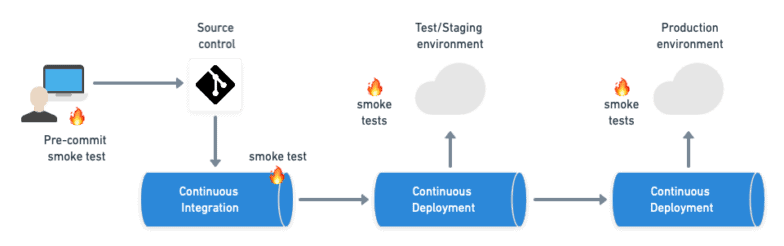
Within a CI/CD process, there are at least four places where smoke tests fit in:
- Before committing code — allowing developers to run smoke tests locally.
- Before end-to-end and acceptance tests (and other long-running tests) — checking that the application can boot up.
- Before deployment — validating the configuration and infrastructure.
- After deployment — ensuring that the application is running and testing basic functionality.
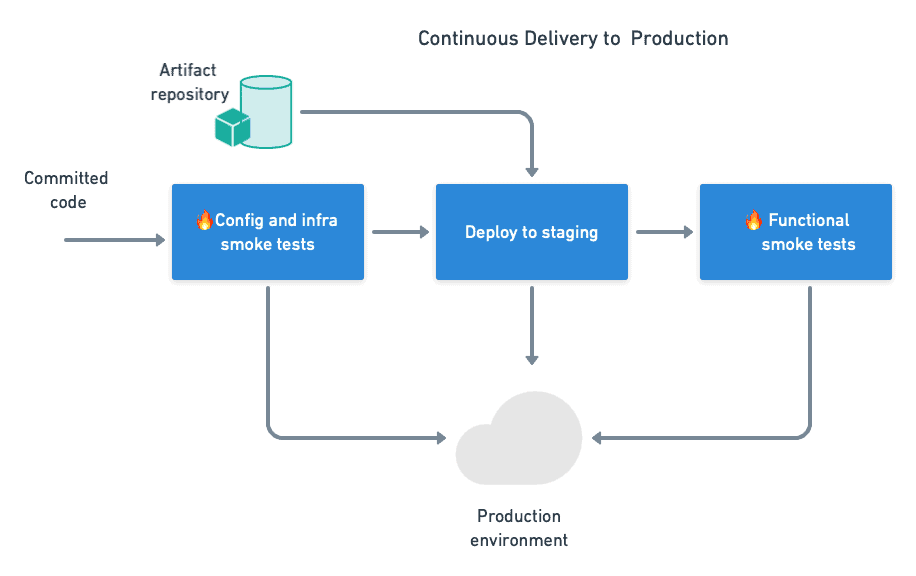
The following diagram shows where these points are located:
Local smoke testing
The first possible place for smoke tests is, in fact, before any CI/CD. Developers can run tests on their machines before pushing code to the repository. A Git test script coupled with a client-side hook should be enough to automate the process.
Git hooks are little scripts that run upon seeing certain events. To run a smoke test when a developer attempts a commit, first create a pre-commit executable file inside the .git/hooks folder in your repository:
$ touch .git/hooks/pre-commit
$ chmod +x .git/hooks/pre-commit
The hook can then call the smoke test script and evaluate its exit code:
#!/bin/bash
# .git/hook/pre-commit
# executes smoke test previous to commit
./scripts/smoke-test-local
if [ $? -ne 0 ]; then
echo "Commit is rejected due to smoke test failure"
exit 1
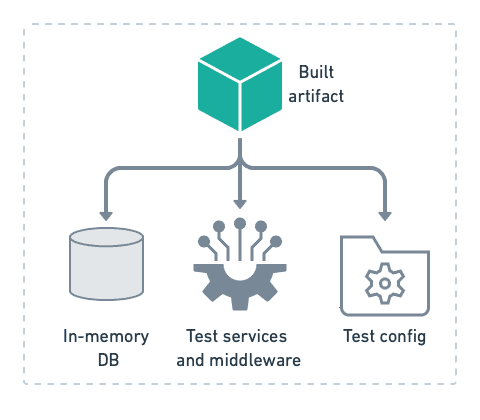
fiBuilding and booting up an application on a developer’s workstation is made more approachable by the fact that we don’t need a complete runtime environment to conduct our smoke test. We can often get an environment that is “good enough” with an in-memory database and mocked components.
You may think that this smoke test is a waste of time. After all, there are probably hundreds of other tests in your pipeline that go much deeper than just checking that the application can start. But don’t be fooled into thinking that smoke tests are useless due to their simplicity. Your code might pass unit and integration tests with flying colors and still fail to boot up. Smoke tests are your code’s first instance of a reality check.
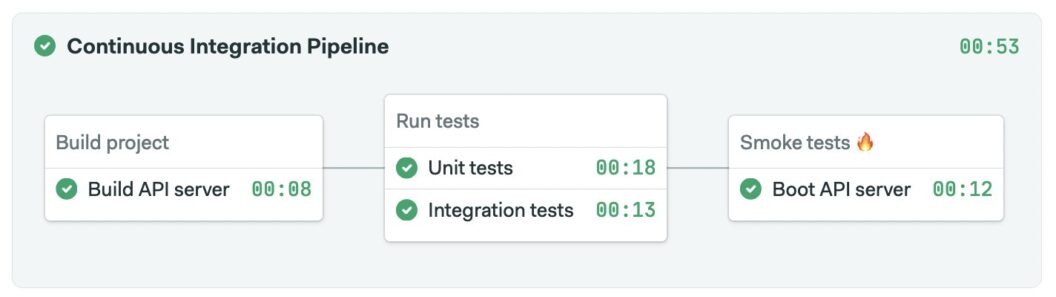
Smoke tests in the CI pipeline
The next logical point for a smoke test is in the build stage. In this stage, we build the binary/executable artifact and run various types of tests. Often, we can reuse the same script used to run the Git hook smoke tests.
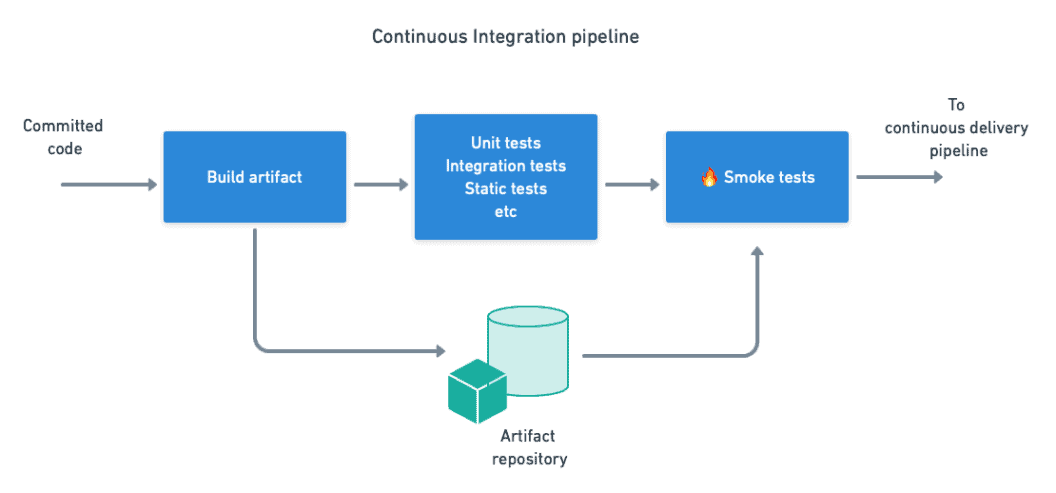
The point of this check is to confirm that the application can boot up and perform some basic functionality, but this time in the clean environment that the CI machine provides. Ideally, you build the artifact once (and only once) and test it over the course of the pipeline. The test does not need to be exhaustive, but it must be able to expose major problems.
Smoke tests as a part of the acceptance test suite
Once basic testing is done, we can tackle more comprehensive items such as acceptance tests and end-to-end tests. These types of tests usually take a long time to set up and run, because they need a production-like environment and they interact with the application via the UI.
Because of this longer runtime, failed acceptance tests are more frustrating than most other types of tests. Smoke testing presents another opportunity to fail fast and potentially save time. A few well-placed smoke tests that verify the most critical application paths can catch most problems before we begin the end-to-end testing phase.
Pre- and post-deployment tests
In some cases, we can run acceptance smoke tests directly in the CI pipeline, while in others — like in our example — we can use a separate staging environment.
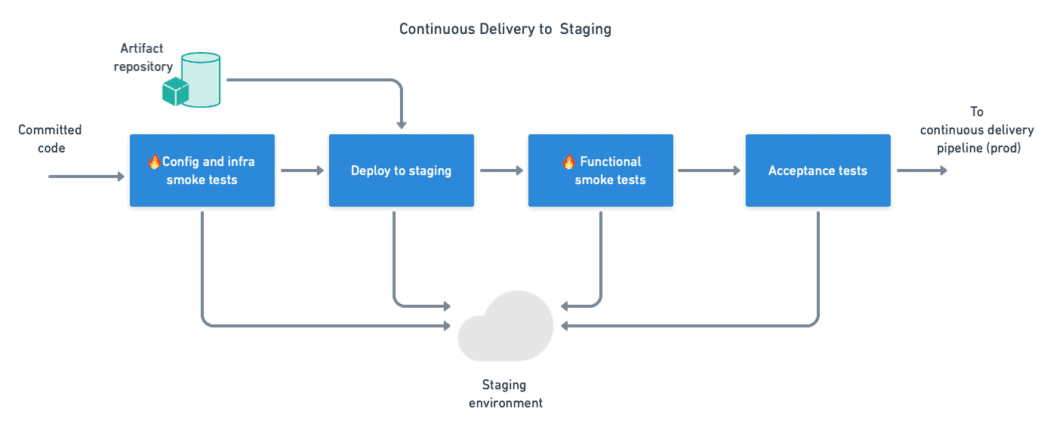
A staging environment presents an opportunity to test the deployment procedure. This process benefits from smoke tests at several points:
- We can perform a configuration smoke test and infrastructure smoke tests to validate that the required services are online and reachable in the network.
- We can deploy the application in the staging environment.
- A post-deployment smoke test validates that the application has correctly started and is healthy.
- Smoke tests have passed, so the application does not seem to have any major problems. The final step is to run the acceptance or end-to-end test suite for a more in-depth verification.
Smoke tests in DevOps
Production deployment introduces a few more opportunities for smoke tests.
Like we did during acceptance testing, we’ll sanity check the environment with config and infrastructure tests, then deploy and run a post-deployment smoke test.
- Configuration smoke test — validates the configuration before deployment. Some basic sanity checks can prevent the application from starting with the wrong settings.
- Infrastructure smoke test — checks various elements that can disrupt the deployment or prevent the application from starting up once deployed. With a good smoke test, you can quickly and cheaply save yourself from introducing broken servers into production. Infrastructure smoke tests include: – Checking that servers are online. – Pinging network ports and checking that firewalls are open. – Checking DNS records and SSL certificates. – Trying out API endpoints. Validating some of their responses. – Performing queries on databases.
- Post-deploy smoke test — checks that the application is running. Failures at this point can trigger a rollback process, possibly using some form of canary or blue-green strategy.
A few examples of smoke testing
In this section, we’ll move on to a more concrete example and try to apply everything we’ve learned so far.
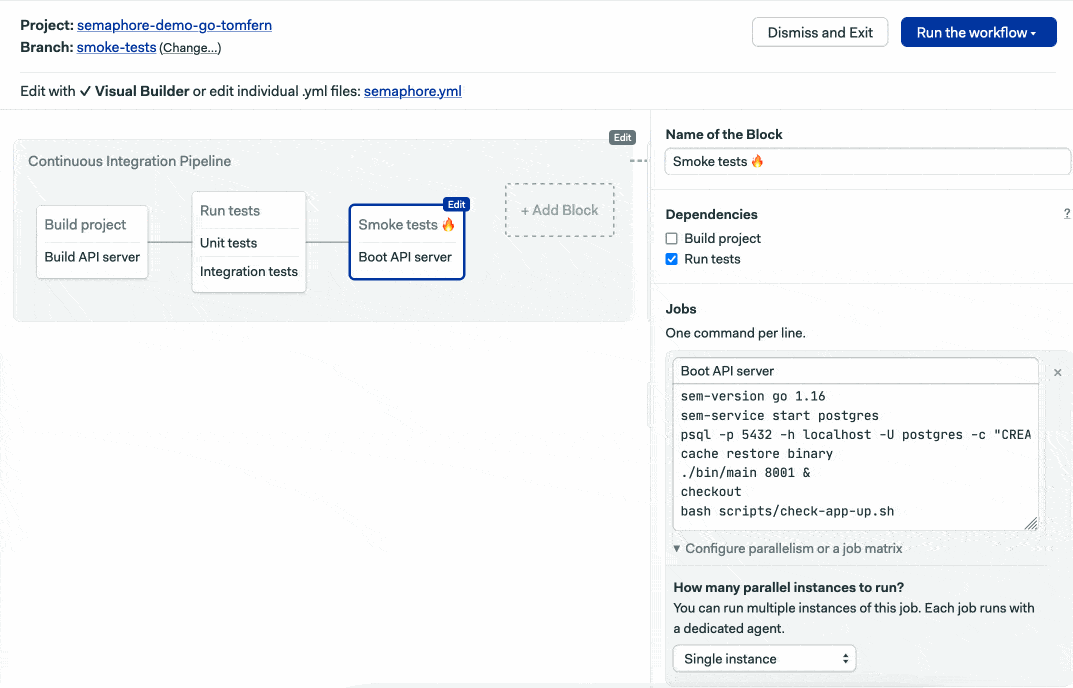
Let’s say we’re writing an API server and that we already have a working CI pipeline. We now want to extend the process with continuous delivery.
First, we’ll need a small test script. Pinging one of the endpoints with curl should be enough for a basic smoke test:
#!/bin/bash

# check-app-up.sh
# Checks that the URL `$APP_URL/is_online` returns HTTP status 200

set -e
status=$(curl --silent --output /dev/stderr --write-out "%{http_code}" "$APP_URL"/is_alive)
if [ $status -ne 200 ]; then
    echo "Got status code $status instead of expected 200"
    exit 1
fi
Next, we have to prepare the CI machine to run the application. The steps to do this are as follows:
- Retrieve the built binary from the artifact store.
- Start any dependent services, such as a database.
- Boot up the application.
- Run the smoke script and capture the result.
We can fulfill the steps above with the following commands:
# clone the repository
checkout

# get the compiled binary from the artifact store
artifact pull workflow myapiserver.bin

# prepare a test db with sample data
sem-service start postgres
psql -U postgres -c "CREATE DATABASE myApiDB;"
psql -U postgres -d myApiDb -c "COPY mytable FROM 'sample_data.csv' WITH (FORMAT csv);"

# start and smoke test the application
export APP_URL=localhost
./myapiserver.bin &
bash scripts/check-app-up.sh
Once the smoke test job is introduced, the pipeline looks like this.
Smoke testing deployments
Encouraged by the success of the first smoke test, the next step is to deploy to the staging environment and run more tests. In our example, there are two items to check before we can say that the infrastructure is ready:
- The server should be up and reachable.
- The database should be ready to accept connections.
Both checks can be solved with small Bash scripts. First, we check the server via SSH:
#!/bin/bash

# check-server-up.sh
# Checks that remote server is reachable at $SERVER_ADDRESS
# and that it's hostname is equal to $SERVER_HOSTNAME

set -e
remote_server_name=$(ssh "${SERVER_ADDRESS}" hostname)
if [ ! "$remote_server_name" = "$SERVER_HOSTNAME" ]; then
    echo "Server name doesn't match: expected $SERVER_HOSTNAME found $remote_server_name"
    exit 1
fi
Second, to ensure the PostgreSQL database is ready, we can use pg_isready:
#!/bin/bash
# check-db-up.sh
# Checks that PostgreSQL database is ready
PGPASSWORD="${DB_PASS}"
pg_isready \
-h "${DB_HOST}" \
-p "${DB_PORT}" \
-d "${DB_NAME}" \
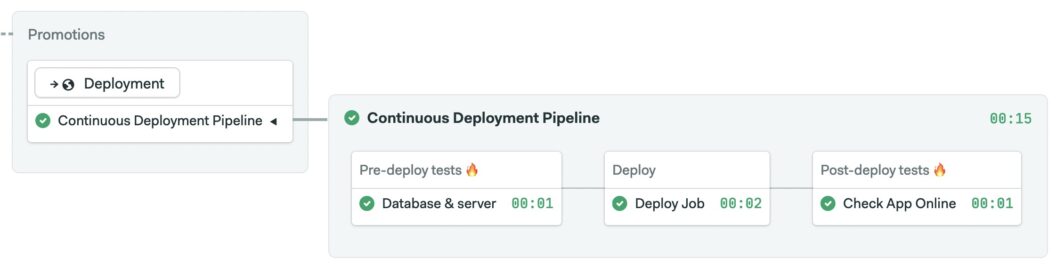
-U "${DB_USER}"The following screencast shows how to add a continuous deployment pipeline with two smoke tests and a deployment job.
Below you’ll find the YAML snippet for the pipeline for reference. You’ll need to create a couple of secrets to store sensitive data, such as SSH keys and database credentials, to complete the setup.
version: v1.0
name: Continuous Deployment
agent:
  machine:
    type: e1-standard-2
    os_image: ubuntu1804
blocks:
  - name: Pre-deploy test
    task:
      jobs:
        - name: Server & database
          commands:
            - checkout
            - bash ./scripts/check-db-up.sh
            - bash ./scripts/check-server-up.sh
      env_vars:
        - name: SERVER_HOSTNAME
          value: myserver-prod
        - name: SERVER_ADDRESS
          value: api.myapp.com
      secrets:
        - name: db-params
        - name: ssh-keys
  - name: Deploy Application
    task:
      jobs:
        - name: Deploy
          commands:
            - checkout
            - bash ./scripts/deploy.sh
      env_vars:
        - name: SERVER_ADDRESS
          value: api.myapp.com
      secrets:
        - name: db-params
        - name: ssh-keys
  - name: Post-deploy test
    task:
      jobs:
        - name: Smoke test
          commands:
            - checkout
            - bash ./scripts/check-app-up.sh
      env_vars:
        - name: APP_URL
          value: api.myapp.com
        - name: APP_PORT
          value: '80'
Try the continuous deployment pipeline to see the smoke tests in action.
At this point, it should be fairly obvious how to extend the workflow with a production-deployment pipeline. You should repeat the steps and direct the deployment script to your production environment.
Would you like to see smoke tests and deployments in action? Let me know on Twitter and I’ll prepare and link a ready-to-use demo project.
Conclusion
Smoke tests should evolve as your application grows. In the beginning, they check one or two essential functions and, over time, grow to serve the purpose of catching errors quickly and cheaply. It takes a bit of effort but can save a lot of time and headaches.