Introduction
This tutorial will guide you through installing behave_django and FactoryBoy to set up a BDD stack for a Django application. For this purpose, we will create a simple login form as a base for developing BDD tests.
BDD puts the user at the center of your tests. It is an increasingly popular method that helps you validate your code from an end-user point of view. Tests are expressed as scenarios (use cases).
Prerequisites
In this tutorial, we are assuming you are running on MacOS or Linux. It may work on Windows machines with some changes to the commands we provide.
This tutorial also requires:
- Python (preferably 2.7+, 3.4+)
- PIP (Python package manager)
Initiating the Project
Start by creating a Django application as follows:
pip install django
django-admin startproject bdd_example
cd bdd_example/
Since this tutorial serves as an example to kickstart your BDD project, we will use Django’s default settings, as well as the default SQLite database driver. Follow the steps of this Django guide if you need special configuration.
Installing behave_django
behave_django will be used to run BDD feature tests via the Behave module. Feature can be read as another word for scenario.
Before starting to develop your application, ensure that phantomjs is available on your system:
which phantomjs
If the command returns “not found”, you will need to install phantomjs by downloading it from there. If you are running Ubuntu or Debian, this thread will help you install it on your system.
Ensure selenium is installed. It will enable you to connect to PhantomJS from your tests:
pip install selenium
For headless browser testing purposes, phantomjs will be used by Behave through selenium. This will prevent your system from launching a Firefox browser UI to perform the tests, and will allow you to easily execute tests on test servers (which, by nature, do not dispose of a graphical environment).
You can now install behave_django using PIP:
pip install behave_django
Edit the bdd_example/settings.py file to add the behave_django application to your INSTALLED_APPS, so that your INSTALLED_APPS looks as follows:
INSTALLED_APPS = (
	'behave_django',
	'django.contrib.admin',
	'django.contrib.auth',
	'django.contrib.contenttypes',
	'django.contrib.sessions',
	'django.contrib.messages',
	'django.contrib.staticfiles',
)
Installing FactoryBoy
We’ll use FactoryBoy to create easy-to-use fixtures for our tests. Fixtures are a great way to populate your app with mock data, thus simulating a real-world use of your app.
They help you with the following:
- When you update your database schema, you only need to update the factory.
- They help factoring code by reducing the amount of “junk” code you put in your tests, making them clearer.
- They reduce the time spent on testing and may in some cases speed up test execution.
Install FactoryBoy using PIP:
pip install factory_boy
Writing the Login Form
After installing Behave and FactoryBoy, we will need to create a login application to be tested. It will consist of three templates, supporting view code and routes.
Initializing the Application
Let’s initiate the login application:
python manage.py startapp login
cd login/
Edit the ../bdd_example/settings.py file to add the login app to your INSTALLED_APPS, so that INSTALLED_APPS looks as follows:
INSTALLED_APPS = (
	'login',
	'behave_django',
	'django.contrib.admin',
	'django.contrib.auth',
	'django.contrib.contenttypes',
	'django.contrib.sessions',
	'django.contrib.messages',
	'django.contrib.staticfiles',
)
Creating Templates
Our login application requires three templates – the login form itself, the fail template and the success template.
First, we’ll need to create the template folder which will contain all of our views:
mkdir templates/
Login Form Template
The next step is to create templates/login_root.html and paste the following template code:
<form action="/login/" method="POST">
	{% csrf_token %}

	<div>
		<label for="username">Username</label>
		<input type="text" name="username" id="username">

		<label for="password">Password</label>
		<input type="password" name="password" id="password">

		<input type="submit" name="submit" value="login">
	</div>
</form>
Login Success Template
Create the login success message template in templates/login_success.html and paste the following template code:
<h1 id="main_title">Login success</h1>
<a href="../">Back to login form (we do not remember sessions)</a>
Login Fail Template
Create the login fail message template in templates/login_fail.html and paste the following template code:
<h1 id="main_title">Login failure</h1>
<a href="../">Back to login form, try again!</a>
Creating a View
Next, we will create the view that will render the template file in views.py and paste the following code:
from django.shortcuts import render
from django.core.urlresolvers import reverse
from django.http import HttpResponseRedirect
from django.contrib.auth import authenticate

def login_root(request):
	# Login form submitted?
	if request.method == 'POST':
		username=request.POST.get('username')
		password=request.POST.get('password')

		if username and password:
			user = authenticate(username=username, password=password)

			# Login succeeded
			if user is not None:
				return HttpResponseRedirect(reverse('login.views.login_success'))

		# Login failed
		return HttpResponseRedirect(reverse('login.views.login_fail'))

	return render(request, 'login_root.html')

def login_success(request):
	return render(request, 'login_success.html')

def login_fail(request):
	return render(request, 'login_fail.html')
Defining Routes
Now that we have the view, we can bind it to the login route.
Edit the ../bdd_example/urls.py file to import the following package:
from login import views as login_views
Next, we’ll append our login routes to the existing urlpatterns so that it looks as follows:
urlpatterns = [
	url(r'^admin/', include(admin.site.urls)),
	url(r'^login/$', login_views.login_root, name='login_root'),
	url(r'^login/success/$', login_views.login_success, name='login_success'),
	url(r'^login/fail/$', login_views.login_fail, name='login_fail')
]
We now have a simple login application that we can test.
Testing the Application
It’s time to test the application we just wrote:
cd ../
python manage.py runserver
Let’s point our Web browser to http://127.0.0.1:8000/login/.
Since your user database is empty, each login you submit should fail with an error message. If you did not start from scratch and you already had Django accounts in your database, you should be able to log into the existing accounts.
Writing FactoryBoy Factories
The login form test requires a dummy user to be instantiated — a factory can help with this.
Create the user factory file:
mkdir -p test/factories/
touch test/__init__.py test/factories/__init__.py
Place the following code in the test/factories/user.py file:
import factory
from django.contrib.auth.models import User

class UserFactory(factory.django.DjangoModelFactory):
	class Meta:
		model = User
		django_get_or_create = ('username', 'email')

	# Defaults (can be overrided)
	username = 'john.doe'
	email = 'john.doe@example.com'
Note that this factory is directly bound to the built-in Django user model – models.User. It doesn’t require you to write a custom model.
Writing Behave Scenarios
Behave tests are made of 2 types of files:
- Feature description: contains the human-readable form of your tests, written as scenarios (named
test_file.feature) - Test script: contains the machine-executable form of your tests, written in Python (named
test_file.py)
Describing Features
We will start by defining the tests in a human-readable form.
First, create the test container folder:
mkdir -p features/steps/
Then, create the feature file features/login.feature and place the following content in it:
Feature: Login form

  Scenario: Access the login form

	Given an anonymous user
	When I submit a valid login page
	Then I am redirected to the login success page

	Given an anonymous user
	When I submit an invalid login page
	Then I am redirected to the login fail page
Writing Automated Tests
The test script is deeply linked to the feature description, since it contains references to our feature file.
Initializing the Test Environment
We’ll start by initializing the test environment and determining which test browser to use, since we will rely on a Web browser to execute our tests.
Append the following code in features/environment.py:
from selenium import webdriver

def before_all(context):
	# PhantomJS is used there (headless browser - meaning we can execute tests in a command-line environment, which is what we want for use with SemaphoreCI
	# For debugging purposes, you can use the Firefox driver instead.

	context.browser = webdriver.PhantomJS()
	context.browser.implicitly_wait(1)
	context.server_url = 'http://localhost:8000'

def after_all(context):
	# Explicitly quits the browser, otherwise it won't once tests are done
	context.browser.quit()

def before_feature(context, feature):
	# Code to be executed each time a feature is going to be tested
	pass
Test Procedure
Next, we’ll create the test script by placing the following code in features/steps/login.py:
from behave import given, when, then
from test.factories.user import UserFactory

@given('an anonymous user')
def step_impl(context):
	from django.contrib.auth.models import User

	# Creates a dummy user for our tests (user is not authenticated at this point)
	u = UserFactory(username='foo', email='foo@example.com')
	u.set_password('bar')

	# Don't omit to call save() to insert object in database
	u.save()

@when('I submit a valid login page')
def step_impl(context):
	br = context.browser
	br.get(context.base_url + '/login/')

	# Checks for Cross-Site Request Forgery protection input
	assert br.find_element_by_name('csrfmiddlewaretoken').is_enabled()

	# Fill login form and submit it (valid version)
	br.find_element_by_name('username').send_keys('foo')
	br.find_element_by_name('password').send_keys('bar')
	br.find_element_by_name('submit').click()

@then('I am redirected to the login success page')
def step_impl(context):
	br = context.browser

	# Checks success status
	assert br.current_url.endswith('/login/success/')
	assert br.find_element_by_id('main_title').text == "Login success"

@when('I submit an invalid login page')
def step_impl(context):
	br = context.browser

	br.get(context.base_url + '/login/')

	# Checks for Cross-Site Request Forgery protection input (once again)
	assert br.find_element_by_name('csrfmiddlewaretoken').is_enabled()

	# Fill login form and submit it (invalid version)
	br.find_element_by_name('username').send_keys('foo')
	br.find_element_by_name('password').send_keys('bar-is-invalid')
	br.find_element_by_name('submit').click()

@then('I am redirected to the login fail page')
def step_impl(context):
	br = context.browser

	# Checks redirection URL
	assert br.current_url.endswith('/login/fail/')
	assert br.find_element_by_id('main_title').text == "Login failure"
Notice how the code follows the feature file? This will make tests much easier to understand for non-developer people.
The test suite above is just a simple example which tests the login behavior. If needed, we can interact with more elements from the page using PhantomJS DOM access and manipulation methods. Refer to the Selenium Python driver documentation for a complete list of available methods.
In order to clean up your tests, you can define shared methods. For example, we could have done this for the “when” part of our tests that are similar in both cases (success and failure).
Executing Tests
Tests can be executed at will, using the Django command-line interface:
python manage.py behave
You should get the following terminal output:
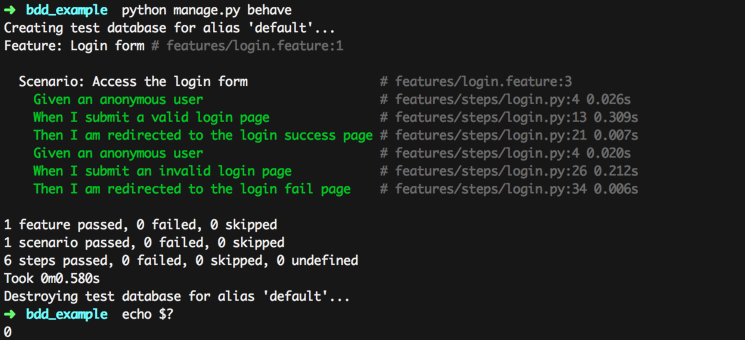
The text results print to stdout. If all tests succeed, the command return code will be 0. In POSIX fashion, this means success. If one – if not all – of the tests fail, the command return code will be greater than 0. This means failure.
The return code is used when your code is automatically tested on a CI system, such as SemaphoreCI. If you need to add this command to your SemaphoreCI tests, you can read this article on how to customize build commands.
General Note About Testing
This general note covers Unit Testing and BDD feature testing.
There is no limit to the number of tests you can create, although it is a good idea to avoid writing too many of them. Depending on what your application does, you will generally be better off going straight to the point. Write only tests that are mission critical.
When writing software, always remember that code quality is more important than how deep your code is tested – not to say tests are trivial. Tests ensure that your features remain resilient over time.
They help you grow your codebase substantially over time, without testing everything by hand before each release.
There are some exceptions to that, of course. Systems that may potentially temper with someone’s life, health or finances upon failure must put a huge emphasis on test coverage (unit tests) and edge use case tests (BDD feature tests).
For more on the topic, you can read about Pragmatic Test-Driven Development.
Conclusion
This tutorial outlined the procedure on writing BDD feature tests for a simple application.
The power of BDD feature tests lies in the fact that they’re located on the delivery-end of your workflow. This is great, because sole unit tests don’t guarantee your app will work as expected in production environments, while BDD feature tests do.
BDD abstracts the tester’s point of view. This is done by leveraging the power of writing human-readable text scenarios to abstract a wide range of possible test cases, which the tester may not be aware of when writing complex test scripts, or testing all scenarios manually.