


Introduction
Behaviour-driven Development (BDD), is getting increasingly popular over time. This methodology is related to test-driven development (TDD), except that it is aimed at testing the behaviour of the entire application instead of just the individual units. The idea is that you have your BDD acceptance tests written as a living specification of how your entire application should function, and then they can be executed against the application to prove that it does work correctly.
Often, BDD tests are written at the UI level. This can lead to very high coverage of your application, but at a high cost. This is because UI testing is very brittle and unreliable.
In cases where your application exposes an API, e.g. in a single page application, then you can write your BDD Tests against this API. These tests can be significantly easier to write, more reliable when running, and a lot faster as well, since there is no browser component to work with.
These APIs represent the entire server-side portion of your application. If the APIs work as expected, then you can potentially do UI testing in a much more constrained manner, removing a lot of the difficulty from it, and still get the certainty that the application works. If the APIs do not work correctly then you can guarantee that the application will not work. Getting this feedback faster and with better information on what the problem is will make resolving problems easier.
This article is going to show how to set up the Cucumber test framework to write good BDD tests against the API of an application, including executing all of this as part of a CI build to get a very fast feedback. It will also cover how to write the tests in a way that gives the most benefit to all stakeholders in the project. This means writing the tests in a way that is readable by everybody involved, not just the developers, which in turn means writing it in higher level concepts and not just including JSON blobs in the test scripts.
The article will be testing a highly contrived application written especially for this purpose. The application offers endpoints for:
- Getting an insecure resource —
GET /api/insecure, - Getting a secure resource, which needs an access token to retrieve —
GET /api/secure, - Getting an access token by authenticating —
GET /api/auth, - Getting a list of resources —
GET /api/list, - Modifying a resource —
POST /api/insecure, and - Resetting the system to a known state —
POST /api/reset.
Between all of these various activities you should be able to expand to cover any HTTP API that you are working with in your real projects.
Prerequisites
This article will require a recent version of the Node.js system. If you wsh to follow along, the application being tested is available from Github.
Setting Up the Test Framework
For this tutorial, we are going to be adding Cucumber to an existing project in order to test it. This is going to involve configuring Grunt to start up the project and execute the Cucumber tests against it. The exact same can be achieved in most task runners, so simply use this as a guide to achieve what you need for your project.
To configure Grunt, we are going to make use of the grunt-freeport, grunt-express-server and grunt-shell modules, as well as the cucumber module for actually running the Cucumber tests.
Our Grunt configuration will be as follows:
  grunt.initConfig({
    freeport: {
      acceptance: {
        options: {
          start: 3000
        }
      }
    },
    express: {
      acceptance: {
        options: {
          script: 'src/server/index.js',
          background: true,
          output: 'Server listening on port',
          port: '<%= freeport.acceptance %>'
        }
      }
    },
    shell: {
      acceptance: {
        command: 'cucumber.js src/acceptance/features -r src/acceptance/steps',
        env: {
          PORT: '<%= freeport.acceptance %>'
        }
      }
		}
  });

  grunt.registerTask('acceptance',
    ['freeport:acceptance', 'express:acceptance', 'shell:acceptance']);
The end result of this is that, by running the “grunt acceptance” task, we get:
grunt-freeportlocates a network port on the local machine that is not currently in use,grunt-express-serverstarts up the application by executing “src/server/index.js”, ensuring that the “PORT” environment variable is set to our located free port, and waits until it sees “Server listening on port” output to the console. This will be shut down when the Grunt process finishes, so we don’t need to worry about tidying up, andgrunt-shellexecutes Cucumber, looking in “src/acceptance/features” for our Feature files and “src/acceptance/tests” for our Javascript code. We also ensure that the PORT environment variable is set to our exact same port number so that the Cucumber tests are able to find the server to test.
Set Up Semaphore to Build and Run the Tests
Before we write any tests, lets set up Semaphore to build our project. This way we will get continuous feedback from the CI system as we write our tests, and a record of what has happened as we’ve progressed.
If you are following along, make sure you have committed the base application to a Github or Bitbucket Repository, and created a free Semaphore account.
We then want to configure Semaphore for our project, as follows:
- From the “Create new” menu, select “Project”.

- Find and select the project from the list.
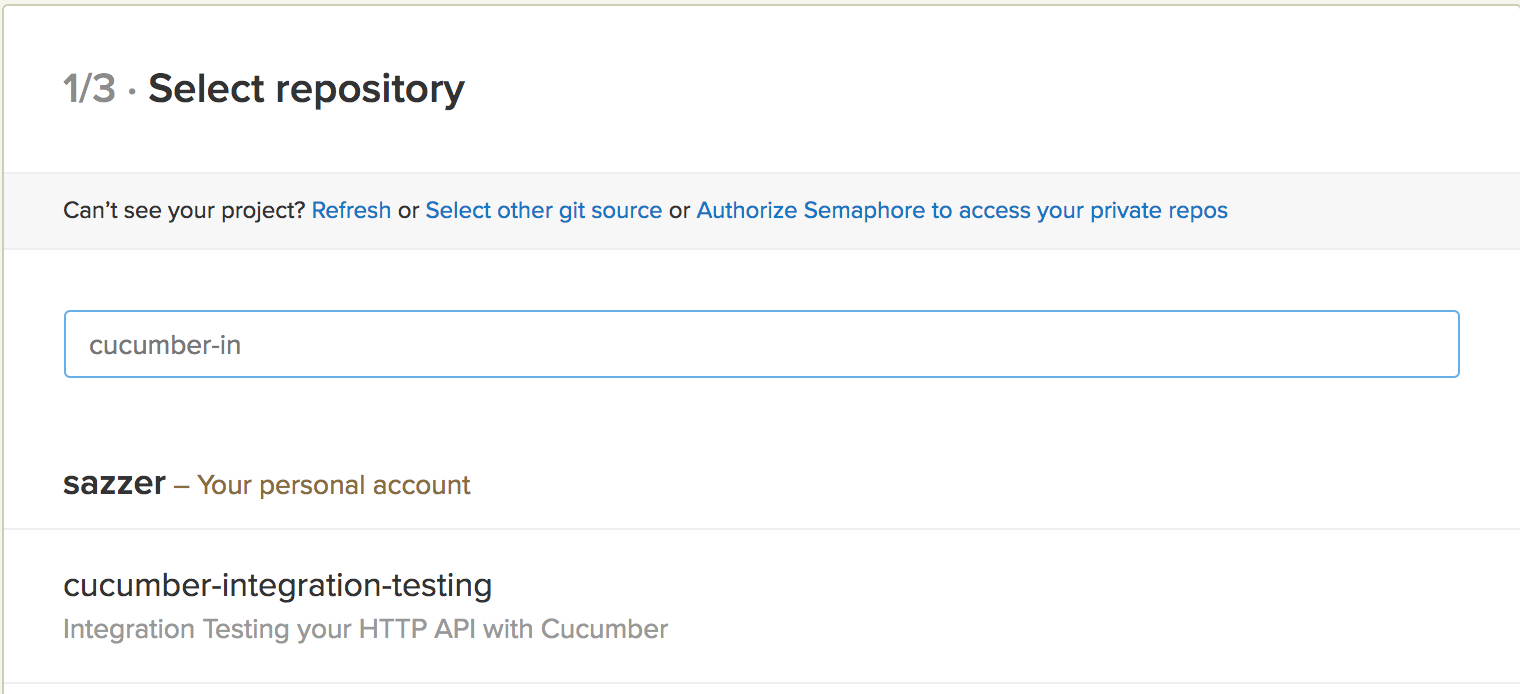
- Select the branch to test from the list.
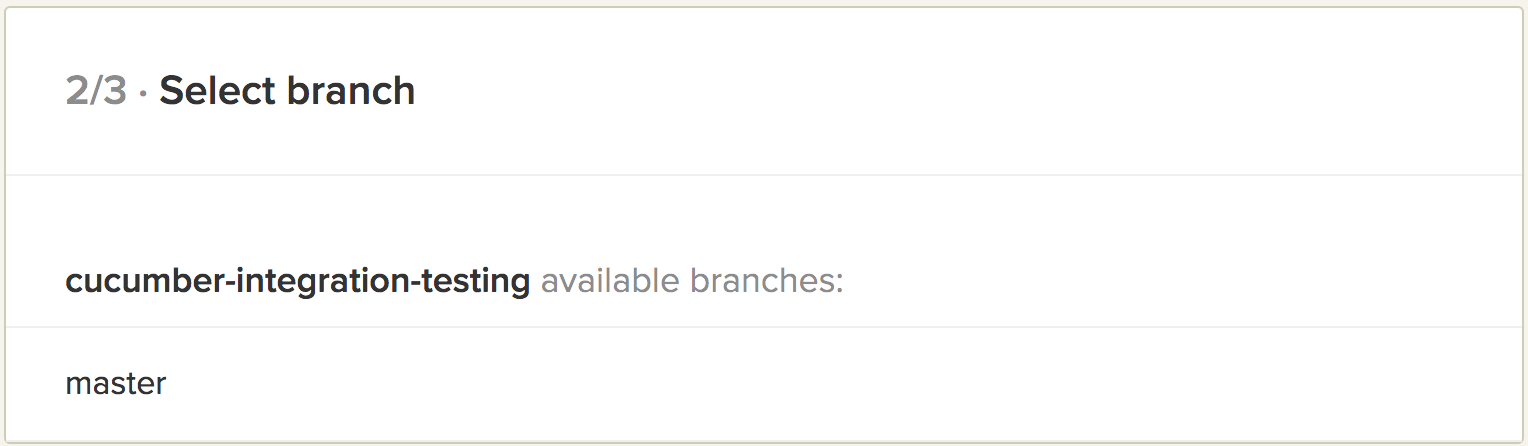
- Set up the project with the following settings.
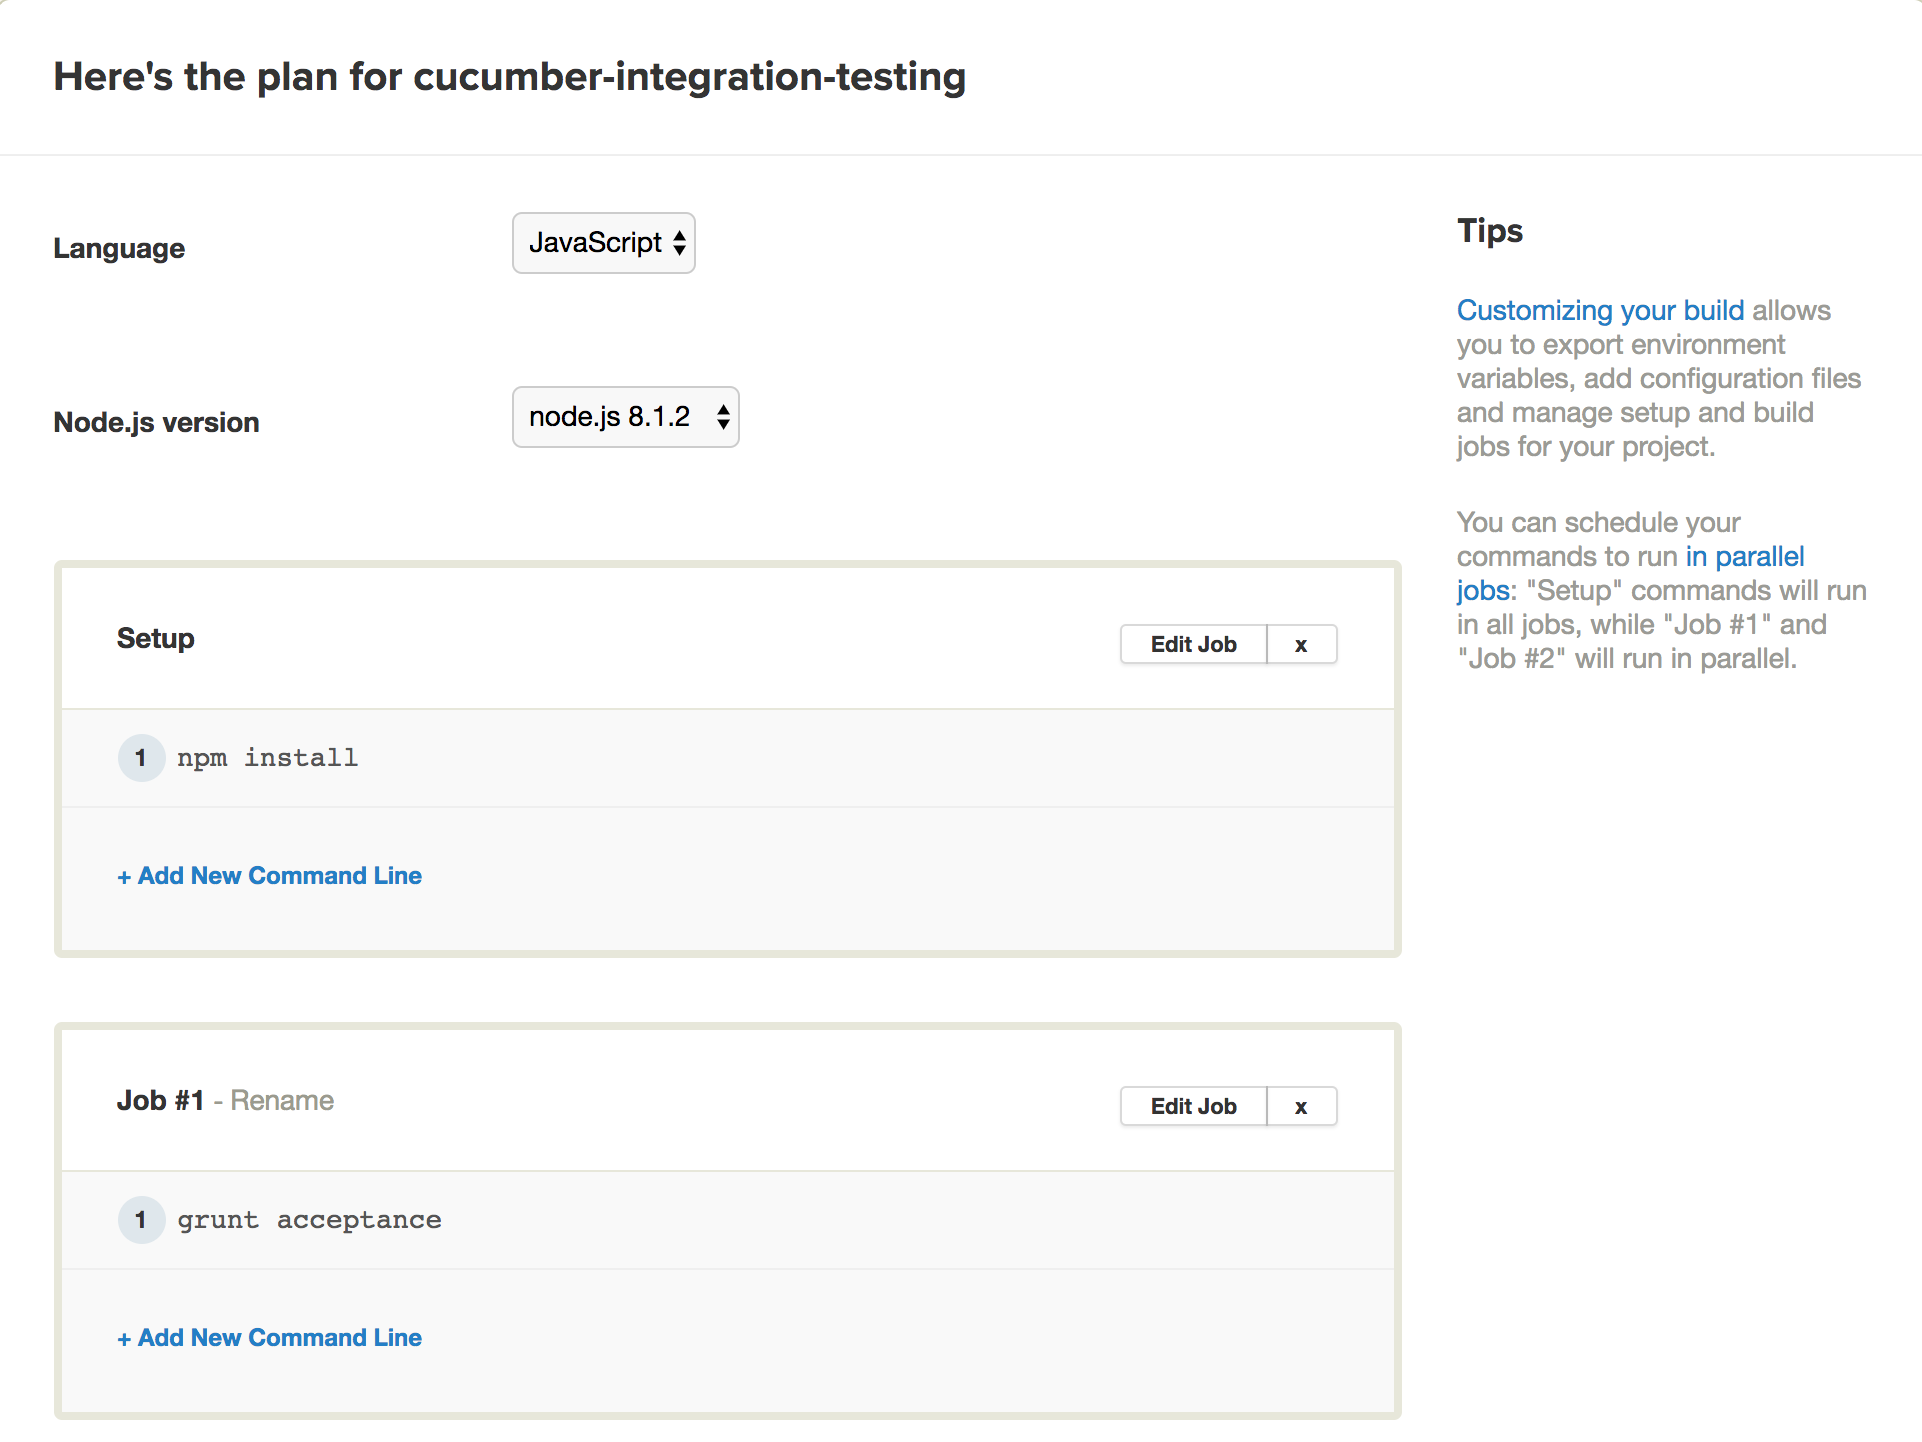
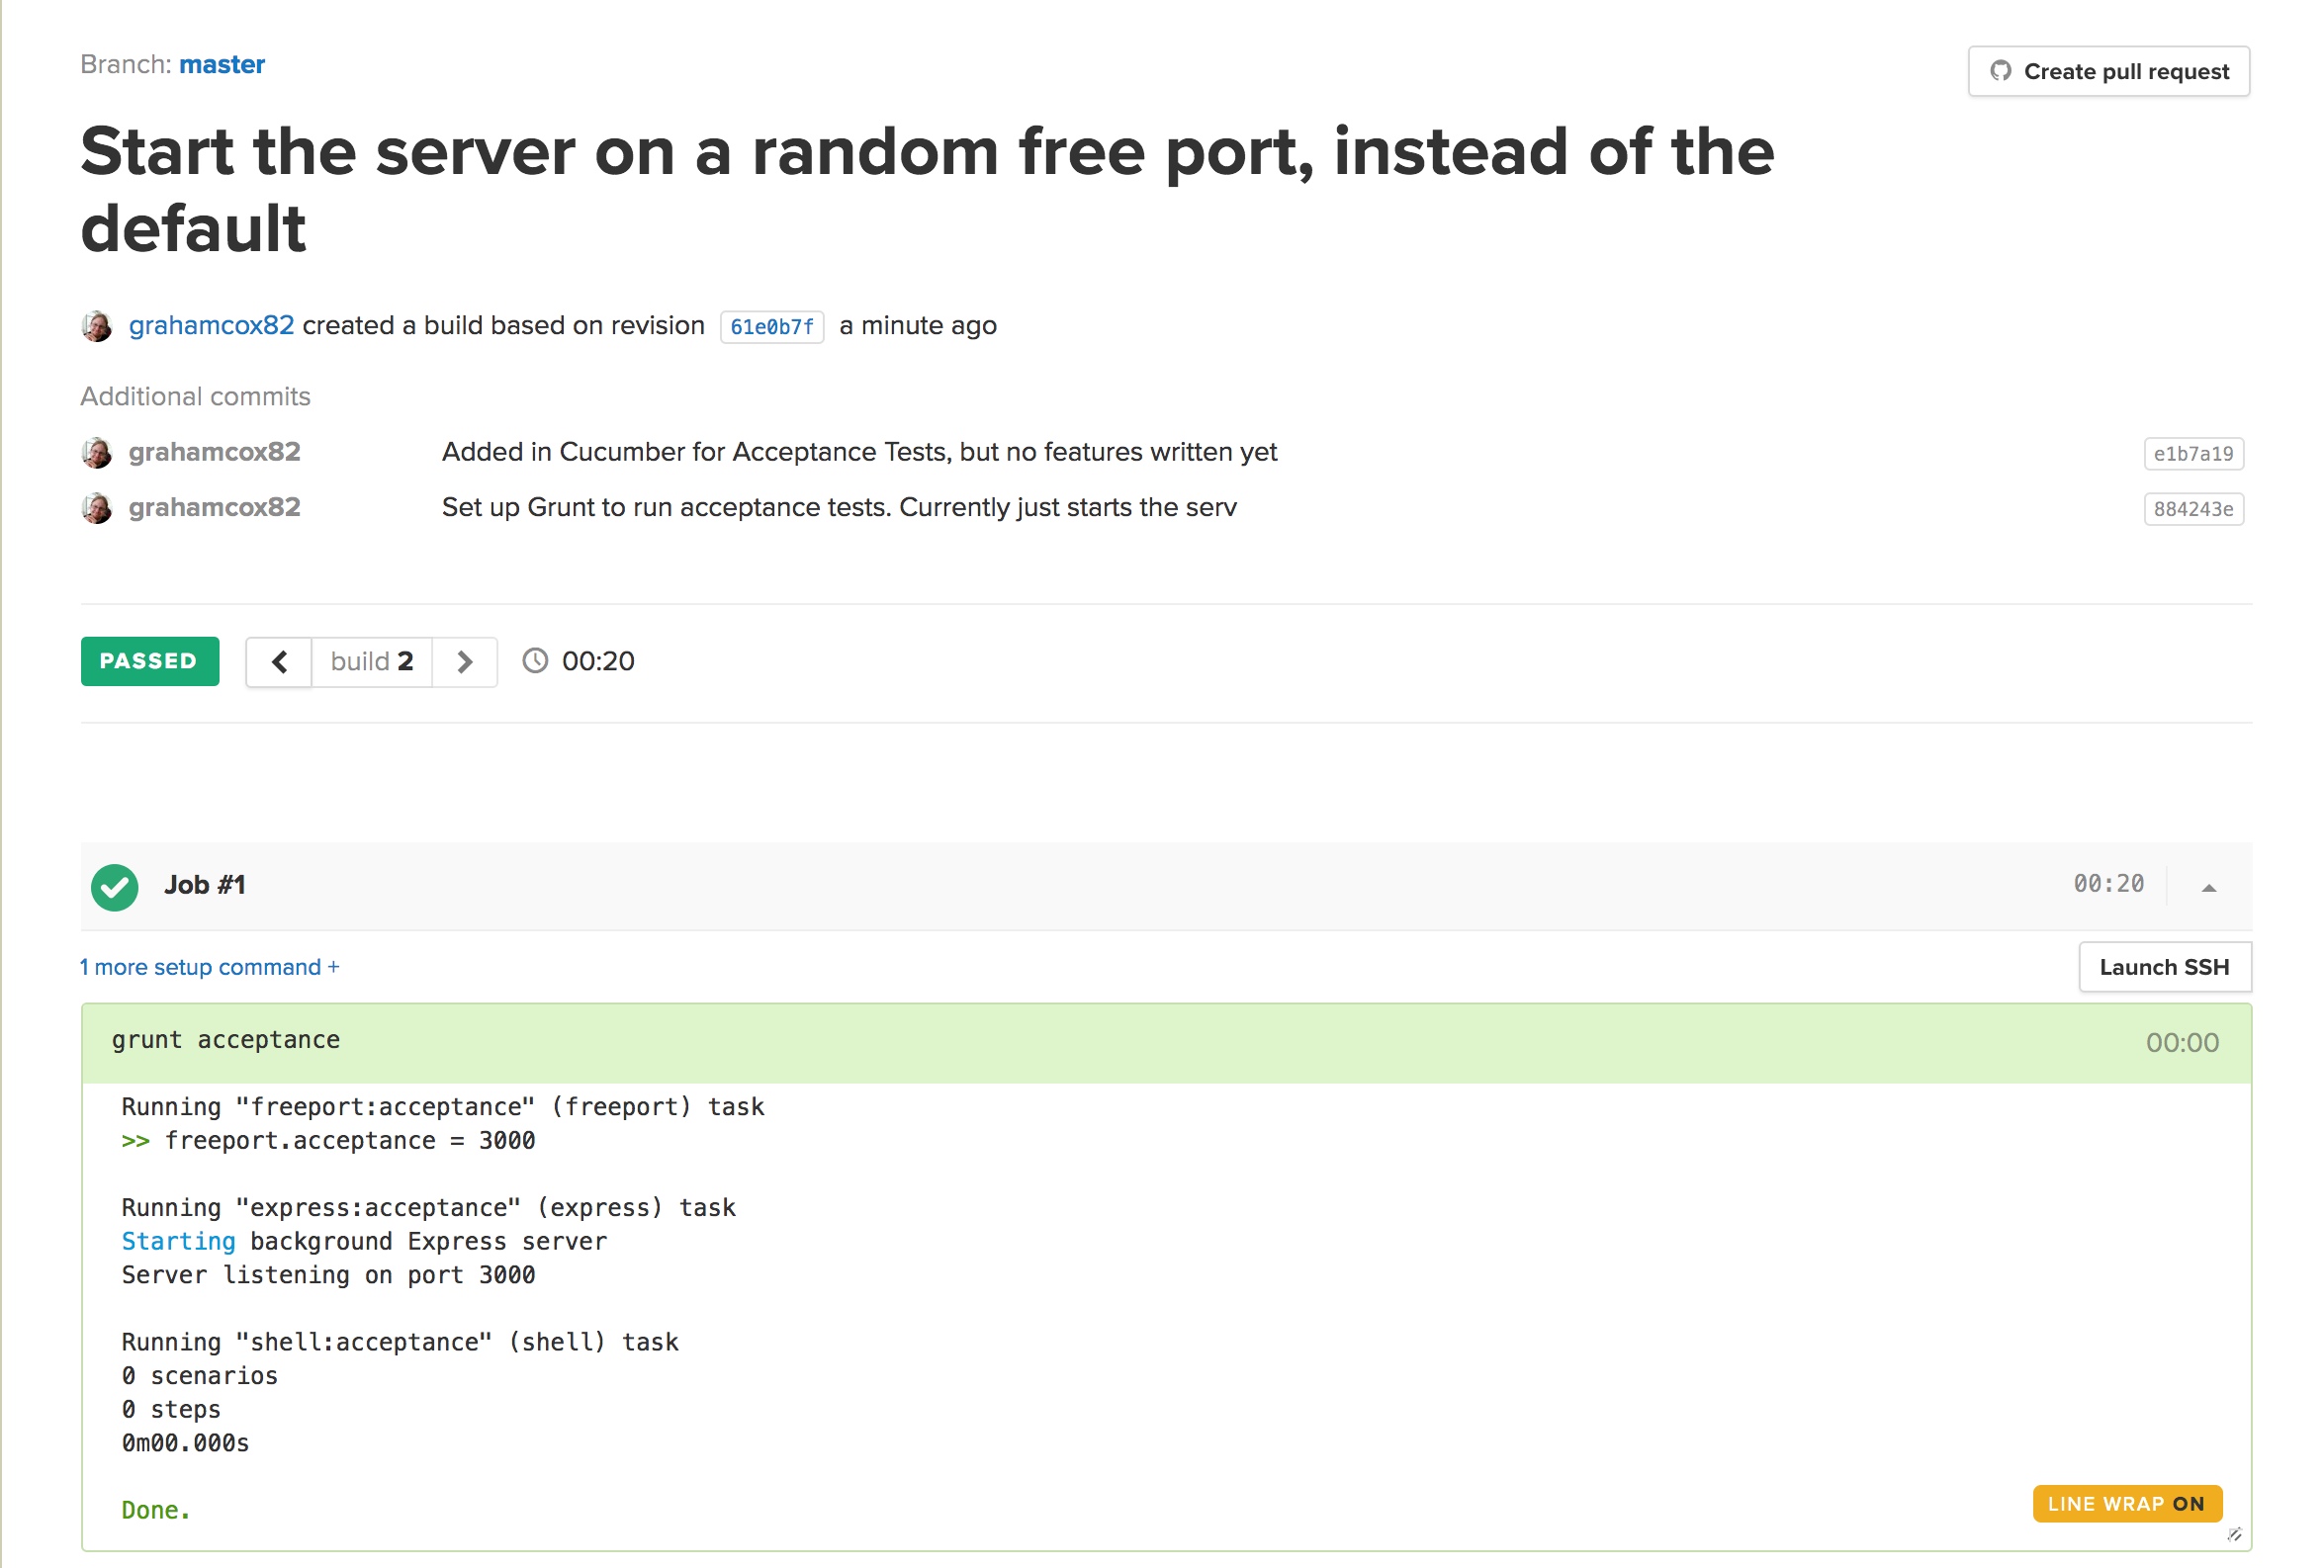
- Save your project and wait for your first build.
Writing Actual Tests
Up to now, we’ve not actually tested anything. Let’s change that by adding in tests for all of the functional behaviour in our application. As we go through, you will note that the tests are always written in a language that is understandable to everybody involved. They will work in terms of our business terminology, and not in technical terms. There will be no mention of JSON, or HTTP, or anything like that. This is deliberate, and is one of the big benefits of using Cucumber in this manner.
Get a Simple Resource
Our first test is going to be our basis for most of the others. This will be retrieving a single, simple resource that needs no authentication. For this we will be using the /api/insecure endpoint in our example application.
Firstly, we want to write our test feature. The goal here is to test our API works correctly, but phrased in a way that is accessible to all members of the product development process and not only developers. This includes QA, Product Analysts, Upper Management, and so on. This means that we want to express the test in plain English and not using very specific technical terms such as JSON blobs where possible.
For this resource, our Feature will look as follows:
Feature: Requesting an Insecure Resource
  Scenario: Request the Insecure Resource
    When I retrieve the Insecure Resource
    Then I get an OK response
    And the Insecure Resource has details:
    | Answer | 42   |
    | Name   | Graham |
We have simple and readable English definitions of everything that is going on. At the same time, they maps perfectly on to our API definition. We understand that the “Insecure Resource” means the resource returned by /api/insecure, because that’s what the resource is defined as in the documentation. We understand that the resource will return fields that can be referred to as “Answer” and “Name” because, again, that’s what the documentation tells us. We could give this test to QA, Product, or indeed anyone and they would understand what it means.
This doesn’t tell us whether the resource is Plain JSON, HAL, XML, Protocol Buffers, or any of a variety of other ways of describing the data. This is because, at this level of describing the test, we simply don’t care. What is important from reading this file is the data returned, not the specific way that the bytes appear in the response. This is because we are testing the functionality of the API. It can be assumed that the specific details are correct, and the actual implementation of the tests will depend on those specifics. This means that if we did change the API to use XML instead of JSON then the test would start to fail, not because the functional requirements were different but because it responded in an unexpected way.
Contrast this to the more technical version:
Feature: Requesting an Insecure Resource
  Scenario: Request the Insecure Resource
    When I make a "GET" request to "/api/insecure"
    Then I get a "200" response
    And the response is:
    """
      {
        "answer": 42,
        "name": "Graham"
      }
    """
This is perfectly accurate as a test. It is also unreadable by people who don’t understand HTTP or JSON, and it is likely to break if we decide to change the API structure.
You can draw direct corollaries between this and well-structured UI tests, where you describe the functional requirements and not the UI components. A good UI test would talk about UI concepts, rather than specific widgets on the screen. This is exactly the same — we talk about API concepts and not about specific JSON structures.
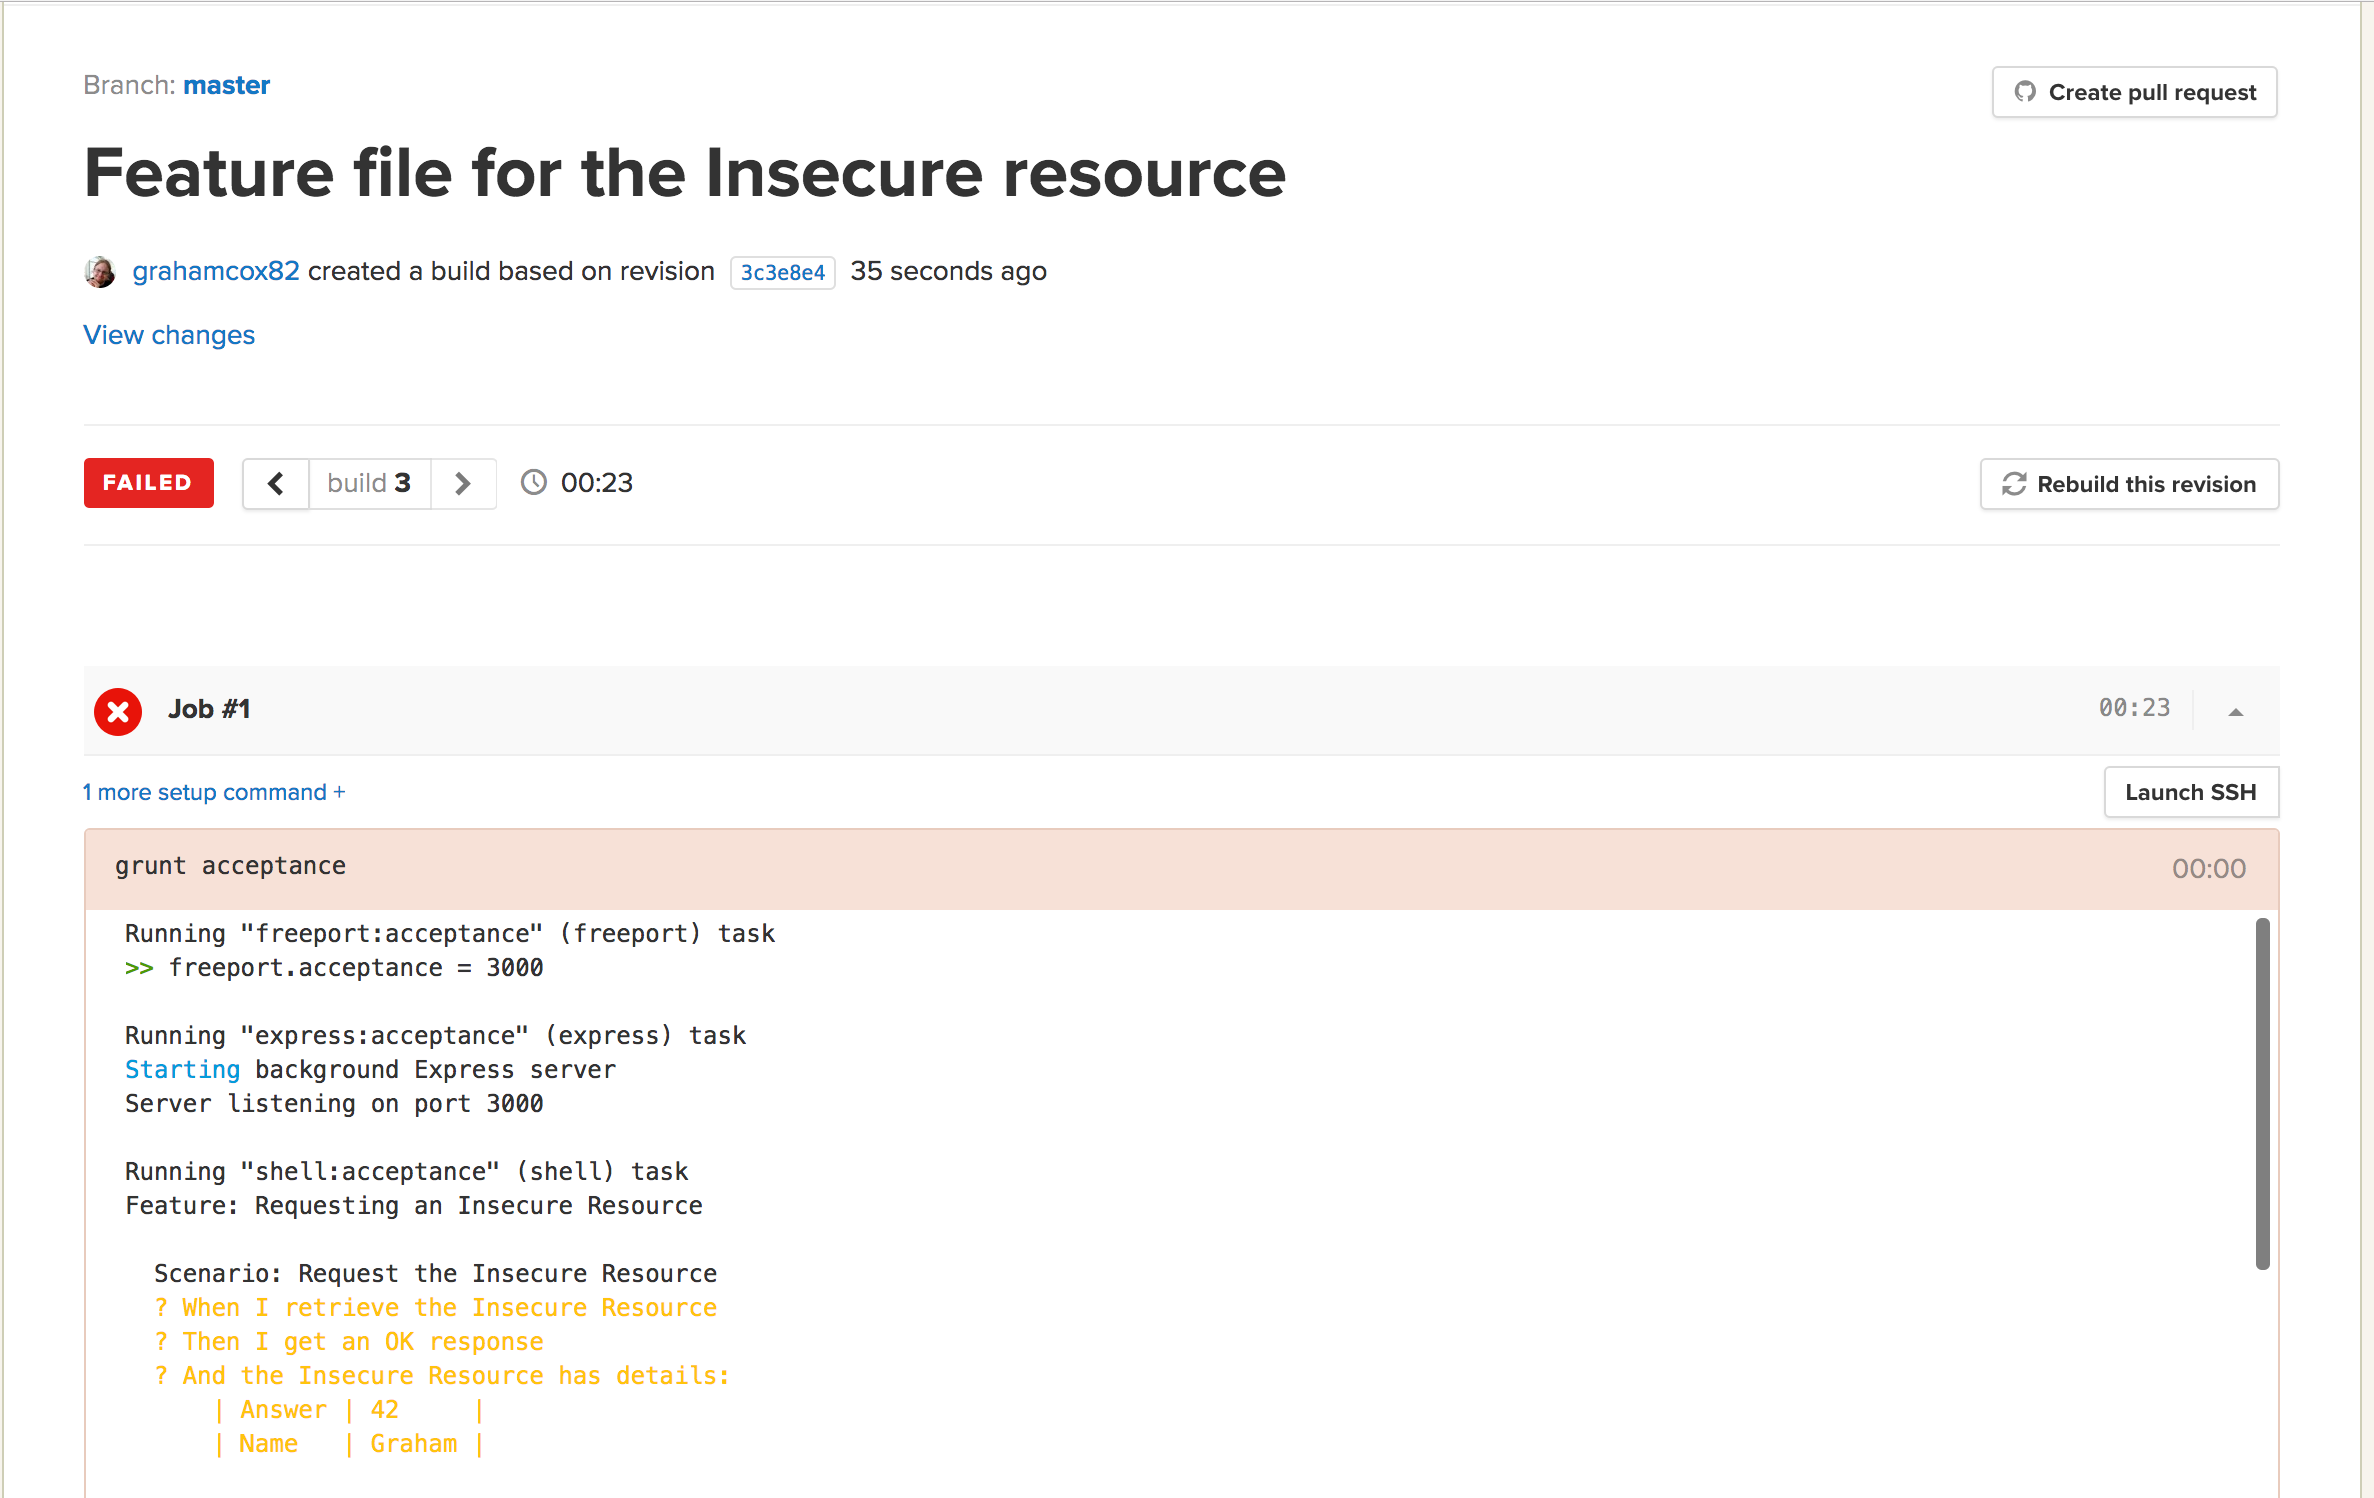
Of course, this doesn’t work yet as can be seen from the test results. We need to actually implement these steps. This means we need support for:
- Making requests to the API,
- Asserting that the response status is what we expected, and
- Asserting that the payload is what we expected.
Making requests to the API can be done as follows:
// requester.js
const fetch = require('node-fetch');
const buildUrl = require('build-url');

// The port number that the Server is listening on
const port = process.env.PORT;

// The Base URL to the server, before our request-specific path is added
const baseUrl = 'http://localhost:' + port;

// The last response that we received
let lastResponse;

// Perform a GET request to the server
function get(url) {
  const realUrl = buildUrl(baseUrl, {
    path: url
  });

  lastResponse = fetch(realUrl)
    .then((res) => {
      // Our response object allows us to decode the body as a JSON
      // object, so let's do that
      return res.json().then((body) => {
        // We only care about the status code, headers and body
        return {
          status: res.status,
          headers: res.headers.raw(),
          body: body
        };
      });
    });

  return lastResponse;
}

// Get the last response that we received
function getLastResponse() {
  return lastResponse;
}

module.exports = {
  get: get,
  getLastResponse: getLastResponse
};
This module gives us a very simple, self-contained way to make HTTP Requests to our API and get access to the response. Our step definitions simply need to call get or getLastResponse as appropriate to interact with the API.
As such, our first step will be like this:
const defineSupportCode = require('cucumber').defineSupportCode;
const requester = require('./requester');
defineSupportCode(function ({ When }) {
  When('I retrieve the Insecure Resource', function() {
    return requester.get('api/insecure');
  });
});
That’s all we need. We make a request to /api/insecure because what’s what the API is defined as being. We then return the promise so that this step fails if the request itself has a catastrophic failure, e.g. the server isn’t available.
Now, we want to check that the request came back successfully. For this, we will use a step that looks like the following:
const defineSupportCode = require('cucumber').defineSupportCode;
const httpStatusCodes = require('http-status-codes');
const expect = require('unexpected');
const requester = require('./requester');

defineSupportCode(function ({ Then }) {
  Then(/^I get an? (.+) response$/, function (statusName) {
    // Convert the provided name into the code, treating it as English
    // This means, for example, "Bad Request" => "BAD_REQUEST" => 400
    const statusCode =
      httpStatusCodes[statusName.toUpperCase().replace(' ', '_')];

    return requester.getLastResponse()
      .then((response) => {
        expect(response.status, 'to equal', statusCode);
      });
  });
});
This makes use of the http-status-codes module to allow us to easily translate an English status code name into the code that is returned on the HTTP Request. Note that we’re doing some string manipulation so that the Feature can be written in better English. This allows us to use, for example, “Bad Request” instead of “BAD_REQUEST” or “400”.
Finally, we want to check that the returned payload has the correct values in it. In our Gherkin, we provide this by a data table of English names for the data we want to check compared to the expected value. We want to compare all of these to the actual values returned in the JSON response, but obviously using correct paths instead of the English field names. For this, we are going to make use of the “jsonpath” module, and a simple lookup table:
const defineSupportCode = require('cucumber').defineSupportCode;
const jsonpath = require('jsonpath');
const expect = require('unexpected');
const requester = require('./requester');

const RESPONSE_PATHS = {
  'Answer': '$.answer',
  'Name': '$.name'
};

defineSupportCode(function ({ Then }) {
  Then('the Insecure Resource has details:', function(data) {
    return requester.getLastResponse().then((response) => {
      const expected = data.rowsHash();

      Object.keys(expected)
        // Check that the name we are looking up is present in our mapping
        // This helps future-proof things, but just ignoring unknown names
        .filter(key => RESPONSE_PATHS.hasOwnProperty(key))
        .forEach(key => {
          const expectedValue = expected[key];
          const path = RESPONSE_PATHS[key];
          // Using jsonpath, get the value from the body to compare against
          // This must be in String form, since the data table is all strings
          const value = jsonpath.value(response.body, path).toString();
          expect(value, 'to equal', expectedValue);
        });
    });
  });
});
For this example, we convert everything in the response into a string before the comparison. In reality you might choose to do something more complex such as providing a means to convert the expected values into the correct data type instead.
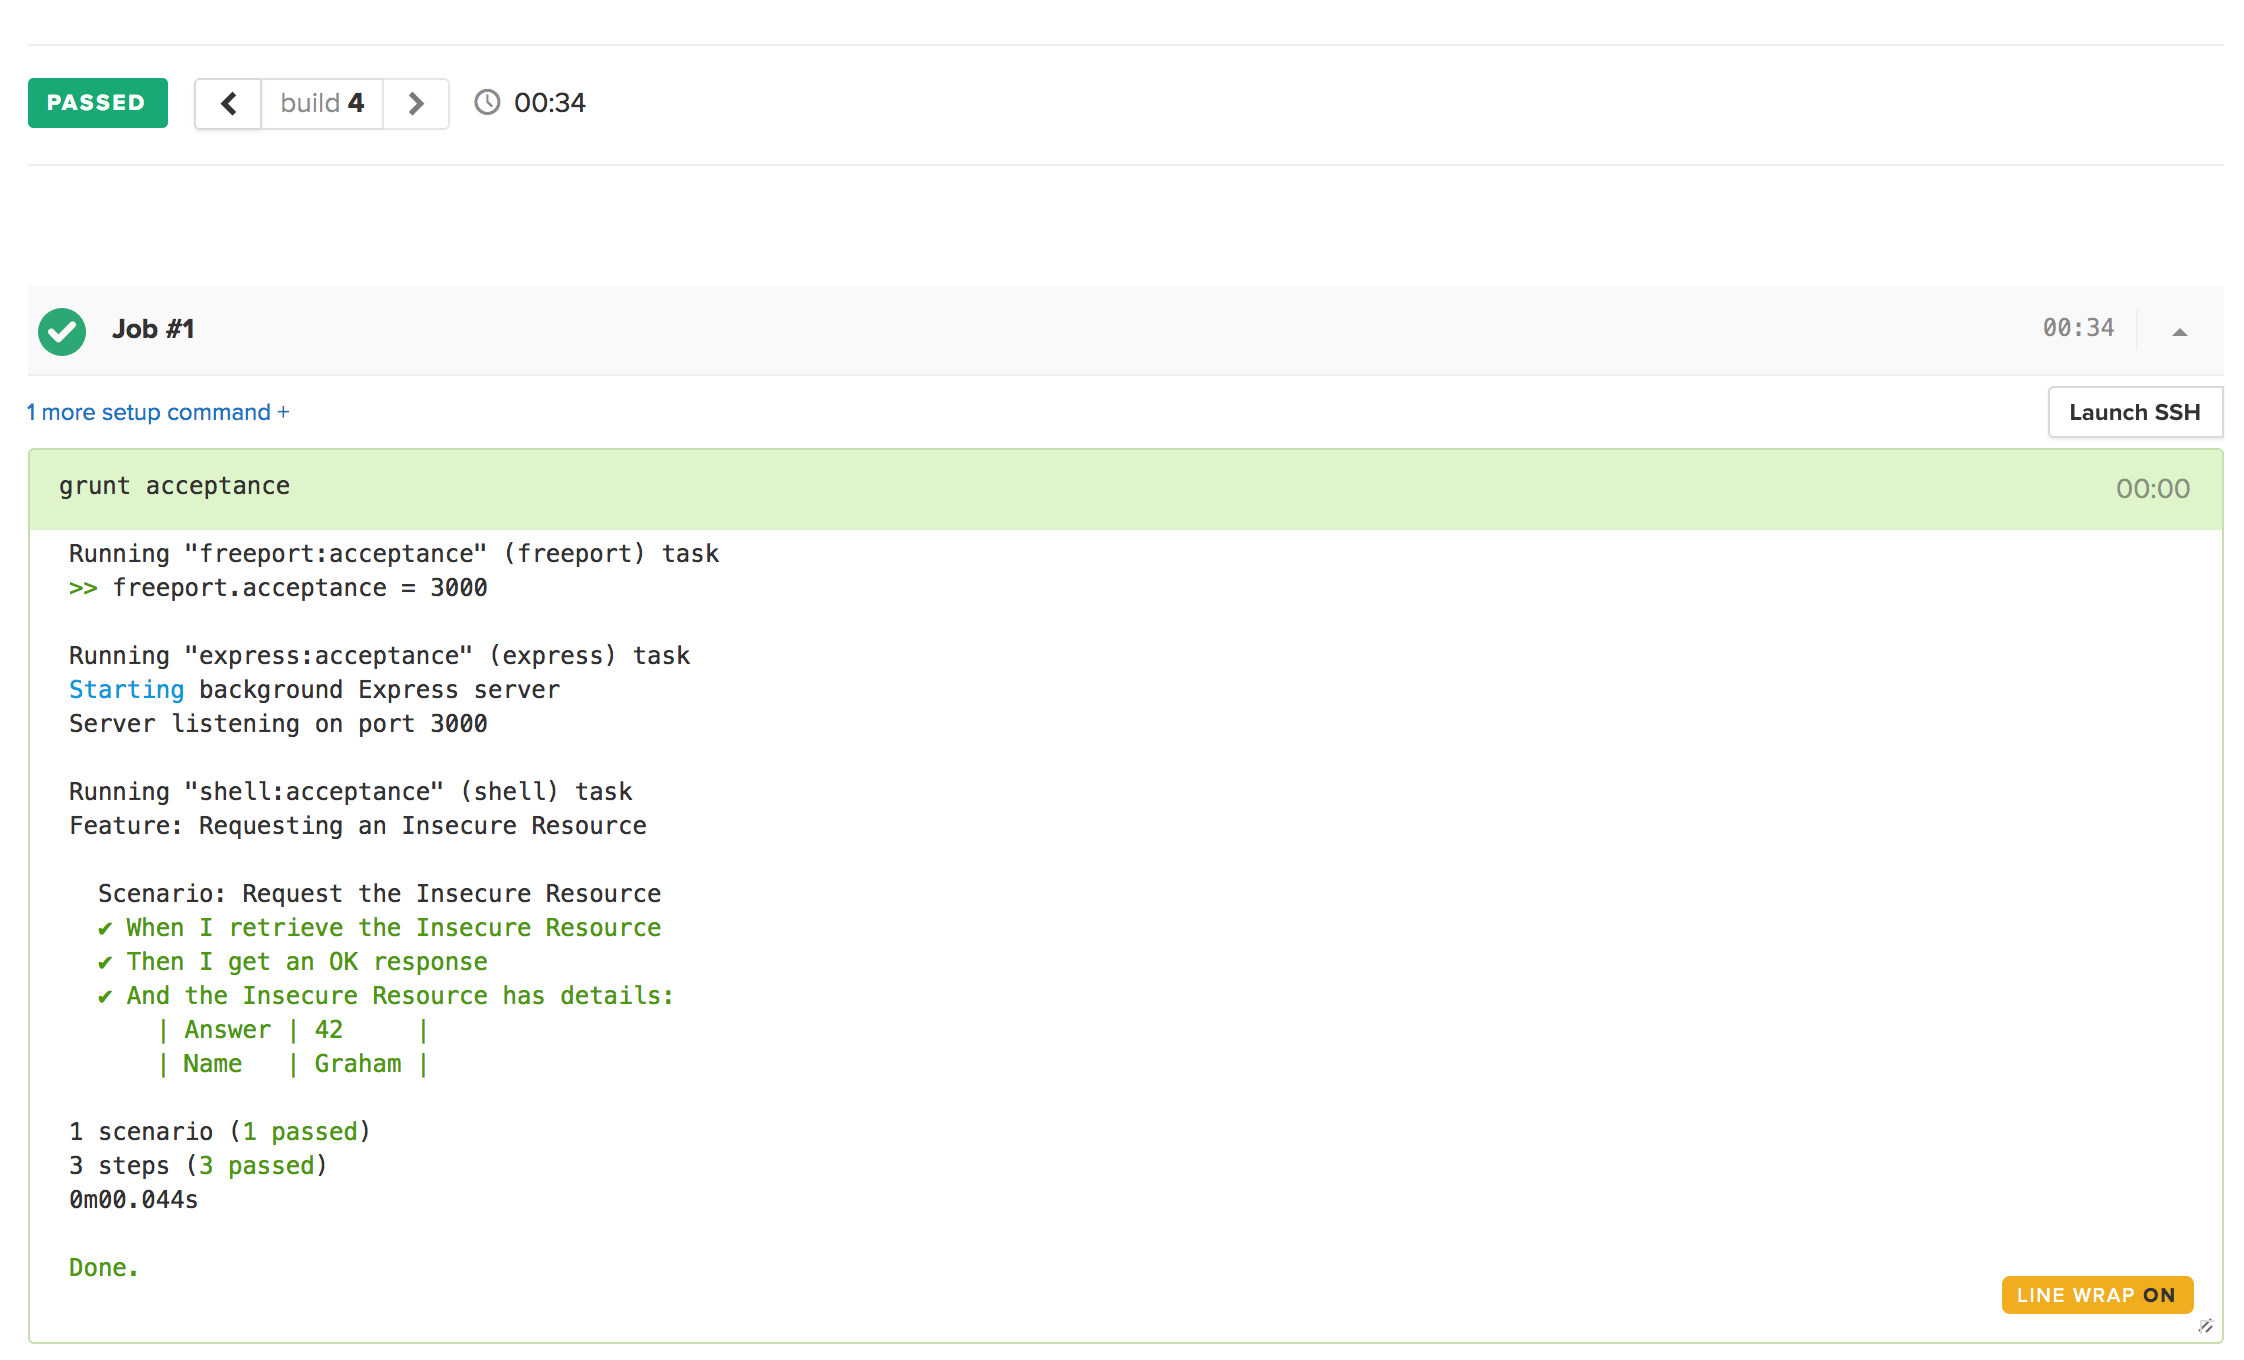
Executing this, we now see that we have a successful build that clearly describes that this endpoint works correctly.
Get a Secured Resource when the User is Unauthenticated
At this point, we have got the ability to request resources and assert that we get back what we expected. Now, let’s try a different resource, the one in need of authentication.
For this one, our feature will look like:
Feature: Requesting a Secure Resource
  Scenario: Request the Secure Resource when not authenticated
    When I retrieve the Secure Resource
    Then I get an Unauthorized response
We will be re-using one of the earlier steps, and writing one very simple new one here. Our new step is needed to access the resource in question, and is almost identical to the one we wrote before:
const defineSupportCode = require('cucumber').defineSupportCode;
const requester = require('./requester');

defineSupportCode(function ({ When }) {
  When('I retrieve the Secure Resource', function() {
    return requester.get('api/secure');
  });
});
We also need to make a slight tweak to the logic that makes HTTP Requests. This is a side effect of how Passport.js returns failures – you get a text response instead of a JSON one, and our current requester assumes that you are getting JSON back.
We can fix this by changing the get method to read as follows:
// Perform a GET request to the server
function get(url) {
  const realUrl = buildUrl(baseUrl, {
    path: url
  });

  lastResponse = fetch(realUrl)
    .then((res) => {
      let bodyPromise;
      // Check the Content Type, and only treat the response as JSON if it
      // really is.
      const contentType = res.headers.get('content-type') || '';
      if (contentType.indexOf('application/json') >= 0) {
        bodyPromise = res.json();
      } else {
        bodyPromise = res.text();
      }

      return bodyPromise.then((body) => {
        return {
          status: res.status,
          headers: res.headers.raw(),
          body: body
        };
      });
    });

  return lastResponse;
}
That’s all we needed to do in order to complete this test.

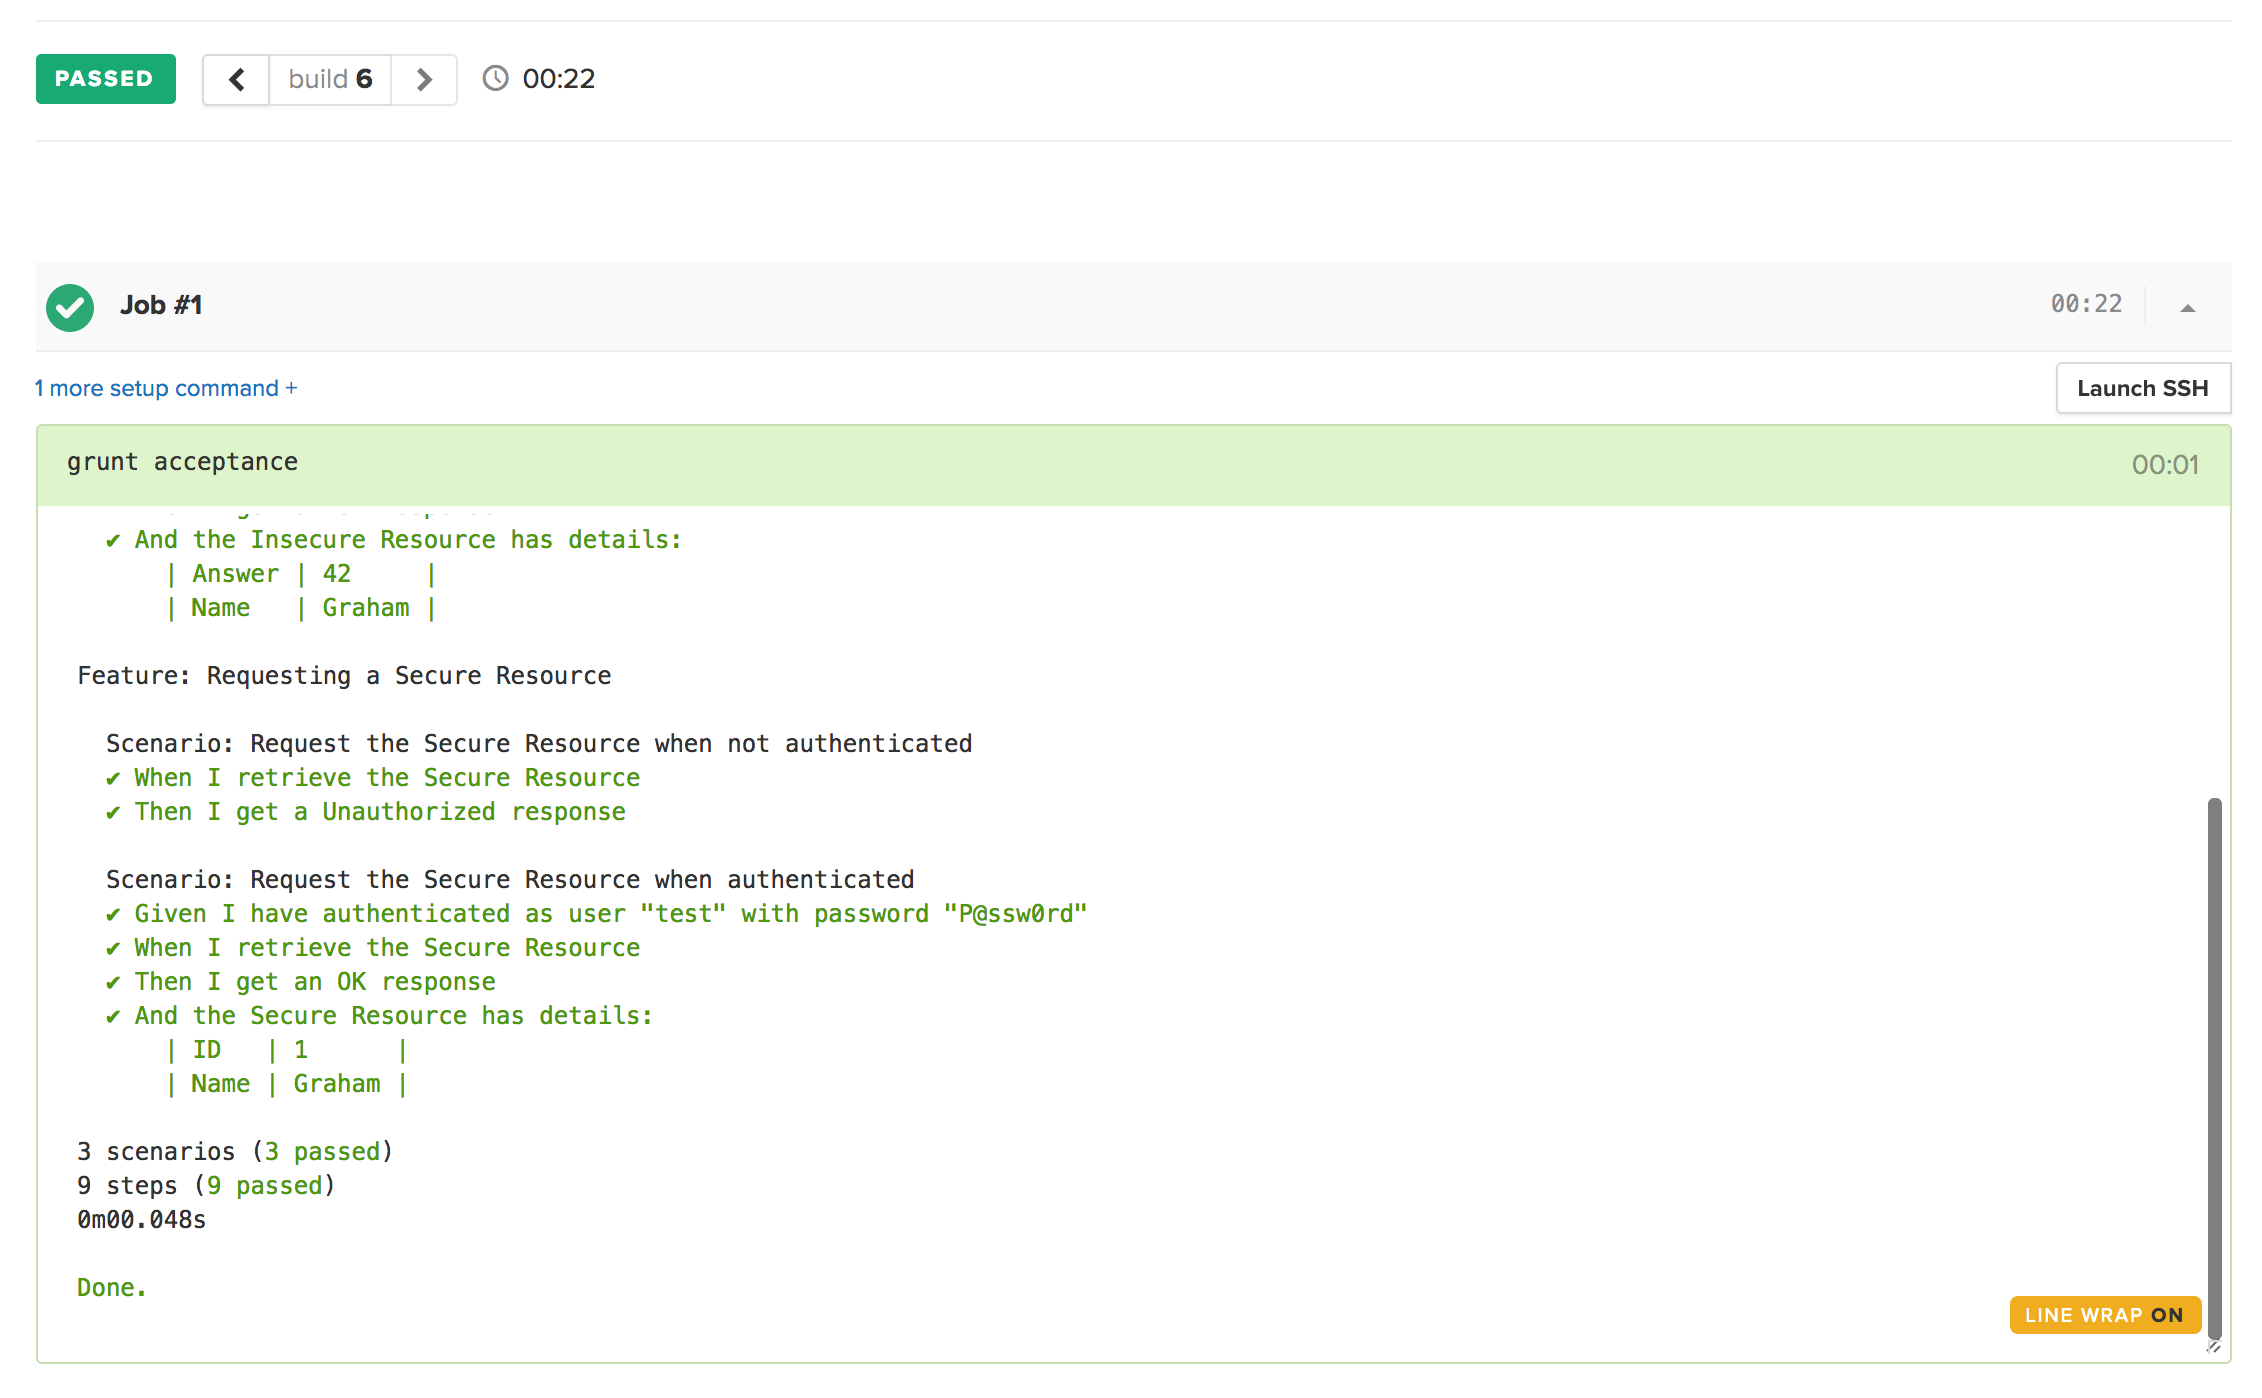
This test gives us the ability to prove that you must be authenticated in order to access the secured resource, or else you will get a failure. Once again, it’s very readable by everyone involved in the project.
Authenticate and Get a Secured Resource
Next, we want to actually be able to authenticate and access secured resources correctly. The system we are testing uses Access Tokens in order to access secured resources, and HTTP Basic Auth in order to get an access token. Your project might well be using OAuth, or OpenID Connect, or a myriad of other ways to authenticate. The details will vary in those cases, but the basic idea is the same. First you need to tell the tests that you are authenticating, and then you need to update the means to make HTTP requests use these details.
For this test, our scenario will look as follows:
  Scenario: Request the Secure Resource when authenticated
    Given I have authenticated as user "test" with password "P@ssw0rd"
    When I retrieve the Secure Resource
    Then I get an OK response
    And the Secure Resource has details:
      | ID   | 1    |
      | Name | Graham |
We immediately start out with a new step, telling the system that it needs to authenticate with the given credentials. The next steps are familiar – requesting the Secure Resource and then ensuring that the response is what we expected. Differently to the previous test, the fact that we have an earlier step to authenticate means that we expect a different response from the exact same request.
Note that the new step for authenticating is a “Given” rather than a “When”. This is because the test itself is still to retrieve the secured resource, but a pre-condition of this is being already logged in.
In order to make all of this work, we need to make more changes to our requester. We need to add the following two methods:
// The access token to use
let accessToken;

// Authenticate as the given user
function authenticate(user, pass) {
  const realUrl = buildUrl(baseUrl, {
    path: 'api/auth'
  });

  const headers = {
    // Generate the correct HTTP Basic Authorization header for the request
    authorization: 'Basic ' + new Buffer(user + ':' + pass).toString('base64')
  };

  return fetch(realUrl, { headers: headers })
    // Convert the response to JSON
    .then((res) => res.json())
    // Extract the Access Token
    .then((body) => body['access_token'])
    // And store it for later use
    .then((token) => {
      accessToken = token;
      return token;
    });
}

// Clear the authentication token stored
function clearAuthentication() {
  accessToken = null;
}
Then, we’ll update our get method as follows:
  const headers = {};
  if (accessToken) {
    // If we have stored an Access Token then add it to the request
    headers.authorization = 'Bearer ' + accessToken;
  }

  lastResponse = fetch(realUrl, { headers: headers })
We then need some new step definitions. One step is our new “Given”, to authenticate when we need to. The other is actually a “Before” hook, to ensure that we start all tests with the access token cleared. This helps to ensure that there is no bleed-over between tests.
const defineSupportCode = require('cucumber').defineSupportCode;
const requester = require('./requester');

defineSupportCode(function ({ Before, Given }) {
  Before(function() {
    requester.clearAuthentication();
  });

  Given('I have authenticated as user {stringInDoubleQuotes} with password {stringInDoubleQuotes}',
    function(username, password) {
      return requester.authenticate(username, password);
    });
});
The only other thing we need to do is a step to verify that the returned payload is what we expected. This will be virtually identical to the earlier one for the insecure resource.
Yet again, we’ve got a very readable, easy to understand test script that tells us exactly what the system should do, and yet that we can run and prove that it works correctly.
Get a List of Resources
Now that we’ve got the ability to retrieve and match individual resources, we want to do the same for entire lists. This means that we need to match to some pagination details, and then to a collection of individual resources.
In our example, we have a resource that acts like this. It has two top-level fields “offset” and “total” that will be used for pagination, and then an array of objects that each contain an “id” and “name” property. In order to test this, our scenario will read as follows:
Scenario: Request the List Resource
  When I retrieve the List Resource
  Then I get an OK response
  And the List Response has pagination details:
    | Offset    | 0   |
    | Total Count | 100 |
  And the List Response has records:
    | ID | Name  |
    | 1  | One   |
    | 2  | Two   |
    | 3  | Three |
    | 4  | Four  |
    | 5  | Five  |
Here, we have a new type of step again. Our final step is given a data table that represents many records, and each record matches a different entry in the response list. We can ensure not only that we have the correct number of records, but that each individual record has the correct values.
Our step definition for this will look as follows:
const RESOURCE_PATHS = {
  'ID': '$.id',
  'Name': '$.name'
};

Then('the List Response has records:', function (data) {
  return requester.getLastResponse().then((response) => {
    const expected = data.hashes();

    // First, assert that the actual data in the response is the correct length
    expect(response.body.data, 'to have length', expected.length);

    // Then assert each individual record as normal
    expected.forEach((expectedRecord, index) => {
      Object.keys(expectedRecord)
        .filter(key => RESOURCE_PATHS.hasOwnProperty(key))
        .forEach(key => {
          const expectedValue = expectedRecord[key];
          const path = RESOURCE_PATHS[key];
          const value =
            jsonpath.value(response.body.data[index], path).toString();
          expect(value, 'to equal', expectedValue);
        });
    });
  });
});
Very similar to earlier ones, but instead of checking the entire response we assume that the response contains a data element which is itself a list and then check each individual entry in that list against subsequence rows in our data table.
Update Resource and Check for Updates
Finally, we’re going to test something that makes a change to the system. This will be done by making a POST to the /api/insecure endpoint, including a body that allows us to update the resource. On success, this will return the new resource and update the stored data so that future GET requests to /api/insecure will return the new data.
Before anything else, let’s take a look at scenarios. We have two different scenarios this time, both working almost exactly the same. The difference is that one asserts on the response we receive from our POST and the other re-requests the resource and asserts that it has changed. These are different scenarios because they test different facets of the functionality. This way, if one fails and not the other we immediately know where the problem is.
  Scenario: Update the Insecure Resource
    When I update the Insecure Resource to have name "Fred"
    Then I get an OK response
    And the Insecure Resource has details:
      | Answer | 42   |
      | Name   | Fred |

  Scenario: Update the Insecure Resource and check it is saved
    When I update the Insecure Resource to have name "Fred"
    And I retrieve the Insecure Resource
    Then I get an OK response
    And the Insecure Resource has details:
      | Answer | 42   |
      | Name   | Fred |
The only difference is the second one includes the line:
And I retrieve the Insecure Resource
Otherwise they are identical. They are also remarkably similar to our original scenario that checks this resource, which is of little surprise.
Now, we need to update our requester to be able to make POST requests. It will look as follows:
// Perform a POST request to the server
function post(url, body) {
  const realUrl = buildUrl(baseUrl, {
    path: url
  });

  const headers = {};
  // We always need a Content Type for the body to be processed correctly
  headers['content-type'] = 'application/json';
  if (accessToken) {
    headers.authorization = 'Bearer ' + accessToken;
  }

  lastResponse = fetch(realUrl, {
    method: 'POST',
    headers: headers,
    // The body is provided as a String to fetch, but we want to send
    // JSON so produce a JSON string of our payload
    body: JSON.stringify(body)
  }).then((res) => {
      let bodyPromise;
      const contentType = res.headers.get('content-type') || '';
      if (contentType.indexOf('application/json') >= 0) {
        bodyPromise = res.json();
      } else {
        bodyPromise = res.text();
      }

      return bodyPromise.then((body) => {
        return {
          status: res.status,
          headers: res.headers.raw(),
          body: body
        };
      });
    });

  return lastResponse;
}
This method works almost exactly the same as our get() method, but accepts a payload to send as well.
We then want to plug this in. Our step will look as follows:
  When('I update the Insecure Resource to have name {stringInDoubleQuotes}',
    function (newName) {
      return requester.post('api/insecure', { name: newName });
    });
If we were doing more complex updates we could take a data table again, but for now this works well enough.
In theory, that’s everything we need. We can run these, and it should work just fine.
There is one problem though. Depending on the order the scenarios are run, we’ve got an issue. If the scenario “Request the Insecure Resource” gets run after either of these new ones, it will fail. This is because we have shared state in the server that is being mutated. The easiest way to handle this is to ensure that the server state is set up before each test.
In our example application, the state is so simple that we can do a trivial reset. We even have an endpoint to support this. In reality, you might be working directly with manipulating your data store, or calling your APIs to create and delete data. The way that you achieve this really depends on your needs, but it is important that something is done so that you don’t have interdependent tests.
We are going to simply add a Before handler that will call the server to reset the data. This looks as follows:
  Before(function() {
    return requester.post('api/reset');
  });
That will be triggered before every single test regardless, and will ensure that the server is in a pristine state for each one. We can now run the scenarios in any order and it will work fine.
Conclusion
Writing good, well structured API level tests is hard. Cucumber can be a fantastic method to not only reduce the complexity of these tests, but to ensure that they are understandable by all levels of the project team. This can be vitally important so that everybody involved knows that the project does exactly what it is meant to, and understands what is going on.
Writing hard-to-read tests that contain very low level details is an easy mistake to make, and one that will prove costly in time when new people — either new developers with no experience on the project, or else non-developers who need to understand what is happening get involved. Writing tests that are understandable and meaningful is a challenge, but with practice it becomes obvious what the benefits to the entire organisation are.
If you have any questions or comments, feel free to leave them in the comment section below. Happy testing!
P.S. Would you like to learn how to build sustainable Rails apps and ship more often? We’ve recently published an ebook covering just that — “Rails Testing Handbook”. Learn more and download a free copy.