Introduction
No matter in what language you’re developing, there’s likely to be a range of testing frameworks available. The same goes for Go — you can either use go test or one of the third-party packages such as Ginkgo, Goblin, and GoConvey.
All of these are powerful testing frameworks to use when developing software applications with Go. Each has their pros and cons. However, there is another framework, which is not as established as the ones mentioned above, though it is becoming increasingly popular — it’s called Godog. This tutorial will help you get started with Godog, even if you have only a modest background with both test-driven development (TDD) and behaviour-driven development (BDD).
What is Godog
To quote the Godog repository:
Godog is an open source behavior-driven development framework for the Go programming language.
Unlike other frameworks, Godog doesn’t integrate with go test. Instead, it builds all package source files separately and then runs the test files to test the application behavior described in the BDD feature files.
What is BDD
If you’re not familiar with the BDD, this slightly paraphrased quote from The Beginner’s Guide to BDD does an excellent job of describing it:
Behaviour Driven Development (BDD) is an approach to ensure software development meets business goals. It’s accomplished by using a set of processes and tools that aid collaboration between technical and non-technical teams. At its heart is clear communication between business and technical teams, ensuring all development projects are focused on delivering what the organization needs while meeting requirements of users.
Alternatively, Marko provides a quite comprehensive introduction right here in the Semaphore Community, where he starts off by saying:
Behavior-driven development (BDD) is about minimizing the feedback loop. It is a logical step forward in the evolution of the practice of software development.
BDD commonly uses a DSL (domain-specific language) called Gherkin for writing what it calls feature files. A feature describes a particular aspect of a functionality.
An in-depth explanation of Gherkin is outside the scope of this article, so, if you’re not as familiar with it as you’d like to be, check out this overview.
Take the following feature file, which I borrowed from the Behat official documentation.
Feature: Product basket
  In order to buy products
  As a customer
  I need to be able to put interesting products into a basket

  Rules:
  - VAT is 20%
  - Delivery for basket under £10 is £3
  - Delivery for basket over £10 is £2

  Scenario: Buying two products over £10
    Given there is a "Sith Lord Lightsaber", which costs £10
    And there is a "Jedi Lightsaber", which costs £5
    When I add the "Sith Lord Lightsaber" to the basket
    And I add the "Jedi Lightsaber" to the basket
    Then I should have 2 products in the basket
    And the overall basket price should be £20
This feature describes an aspect of the functionality of a typical e-commerce shopping basket. When implemented, a customer should be able to add several products from an existing product list to a shopping basket.
When they’ve done that, they should be able to see both how many products they’ve added and the basket’s total price, which includes both VAT and shipping costs.
This feature is written in such a way that both developers and non-developers alike should be able to know what to expect. We only included one scenario, but more could have been written to flesh out the requirements in greater depth.
With this feature and scenario in mind, let’s first install Godog, and then get a working understanding of it by seeing how to use it to implement software which will fulfill this feature.
Installing Godog
Godog, like most libraries for Go, can be installed using the go get command.
go get github.com/DATA-DOG/godog/cmd/godog
Writing Tests in Godog
With Godog installed, we next need to store the above feature in a feature file, which we’ll name basket.feature. Then, from the terminal in the same directory, we’ll run godog basket.feature.
This reads the feature file and scans the current directory looking for _test.go files. These files contain the test code that evaluates whether the feature has been implemented, as well as if it’s been implemented correctly.
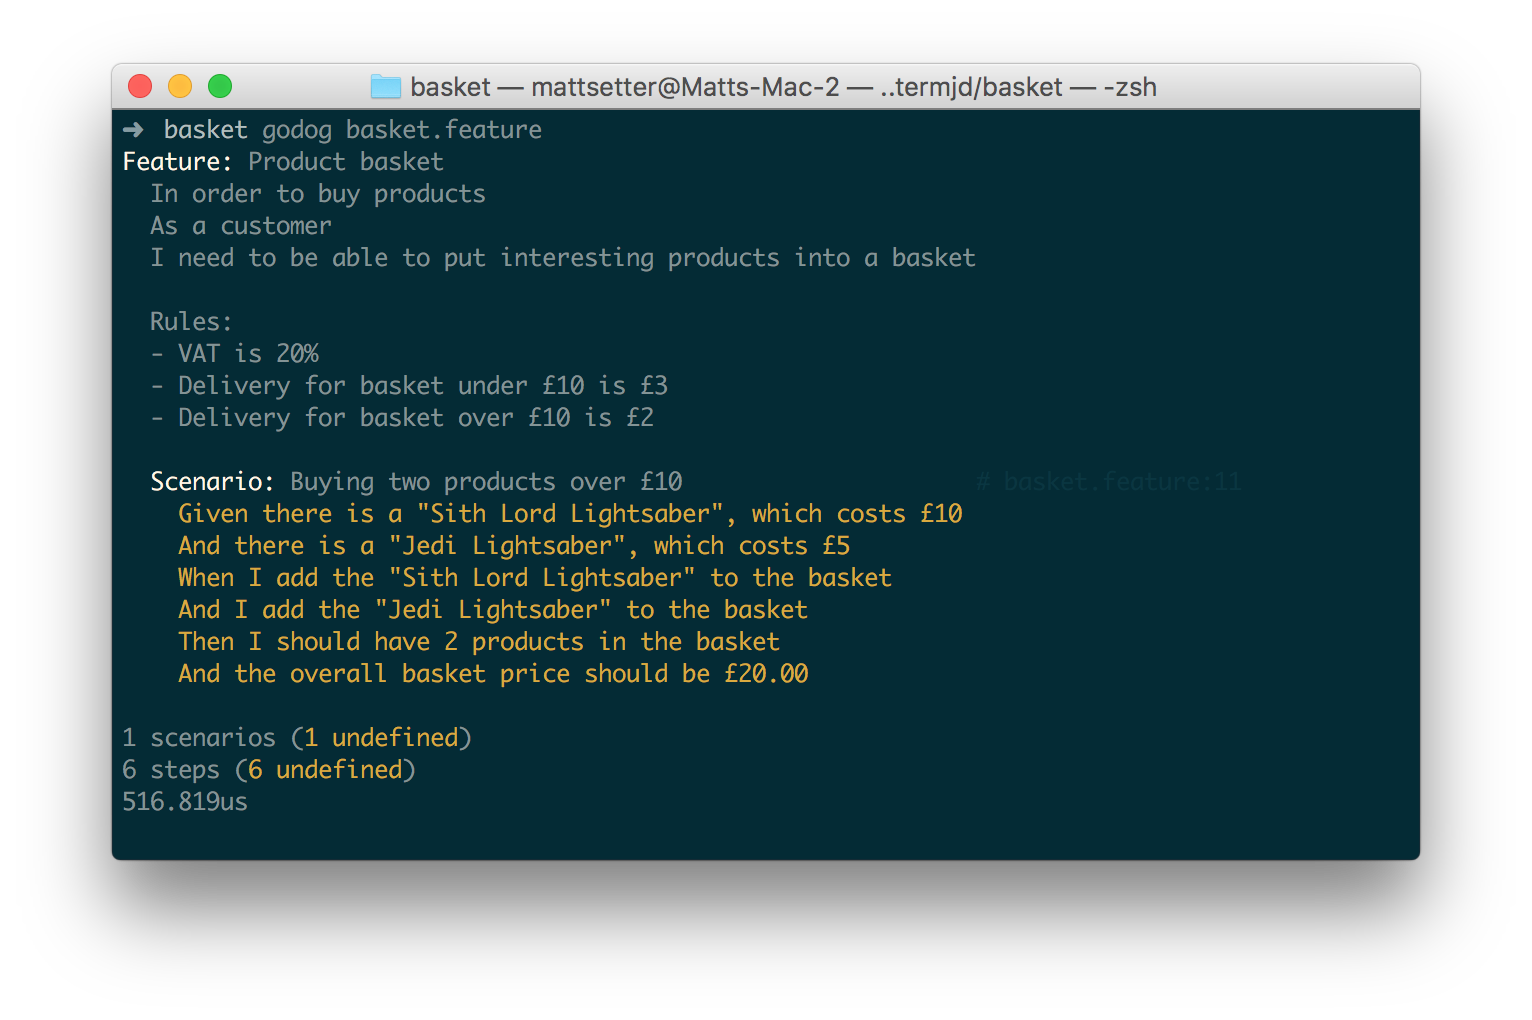
Since we’ve just written the feature, there will be neither tests nor implementing code. We’ll see the contents of the feature file, along with two additional sections; these are the number of scenarios and steps, along with dummy code for all steps which it cannot find.
In the screenshot above, you can see that there are six steps which make up the scenario and that all of them are currently undefined.
This makes sense at this point. In the screenshot below, you can see that for each of the undefined steps, Godog has created dummy functions for testing each step in the scenario.
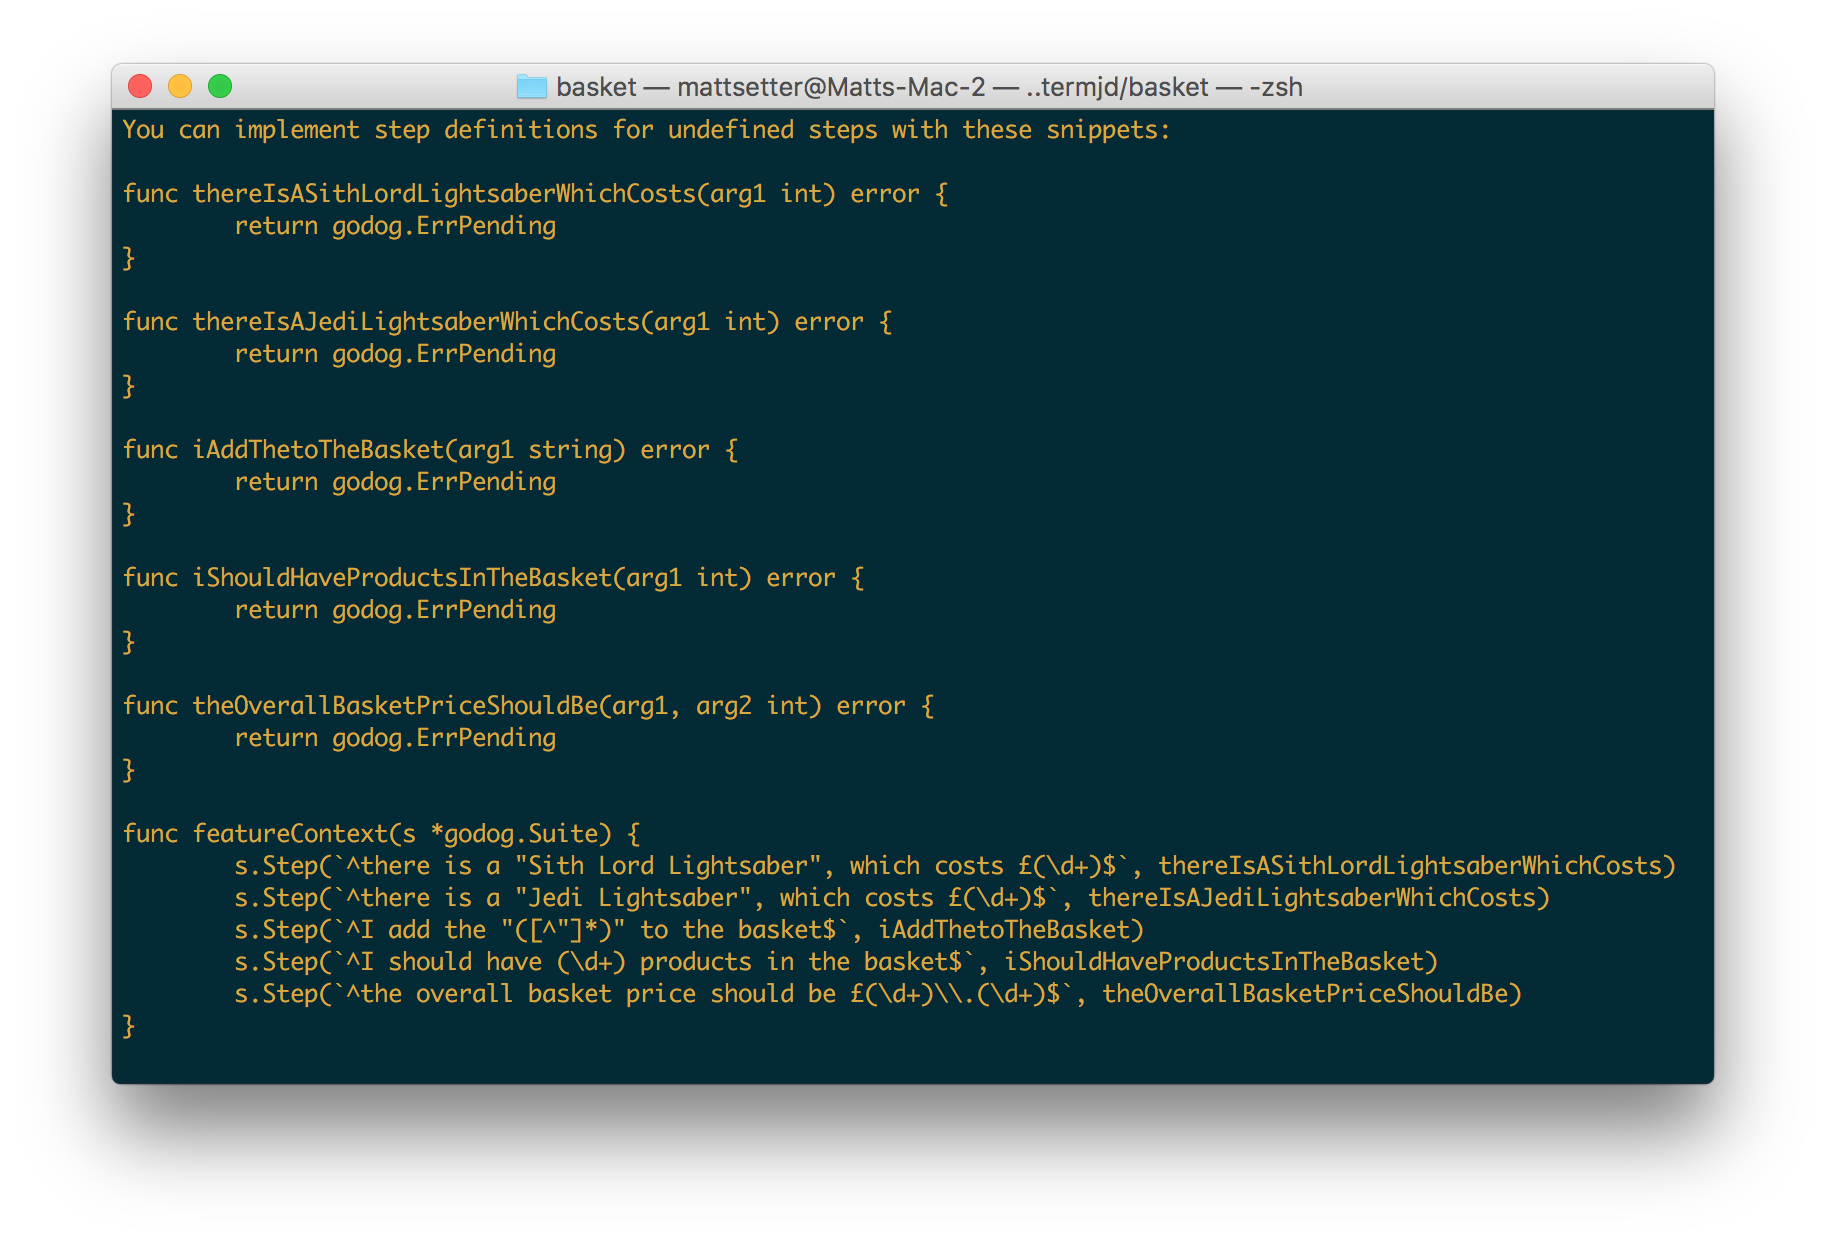
Let’s use the sample test code to create our test file, which we’ll call basket_test.go, prefixed with the boilerplate code included below.
package main

import "github.com/DATA-DOG/godog"
Examining the Generated Test Code
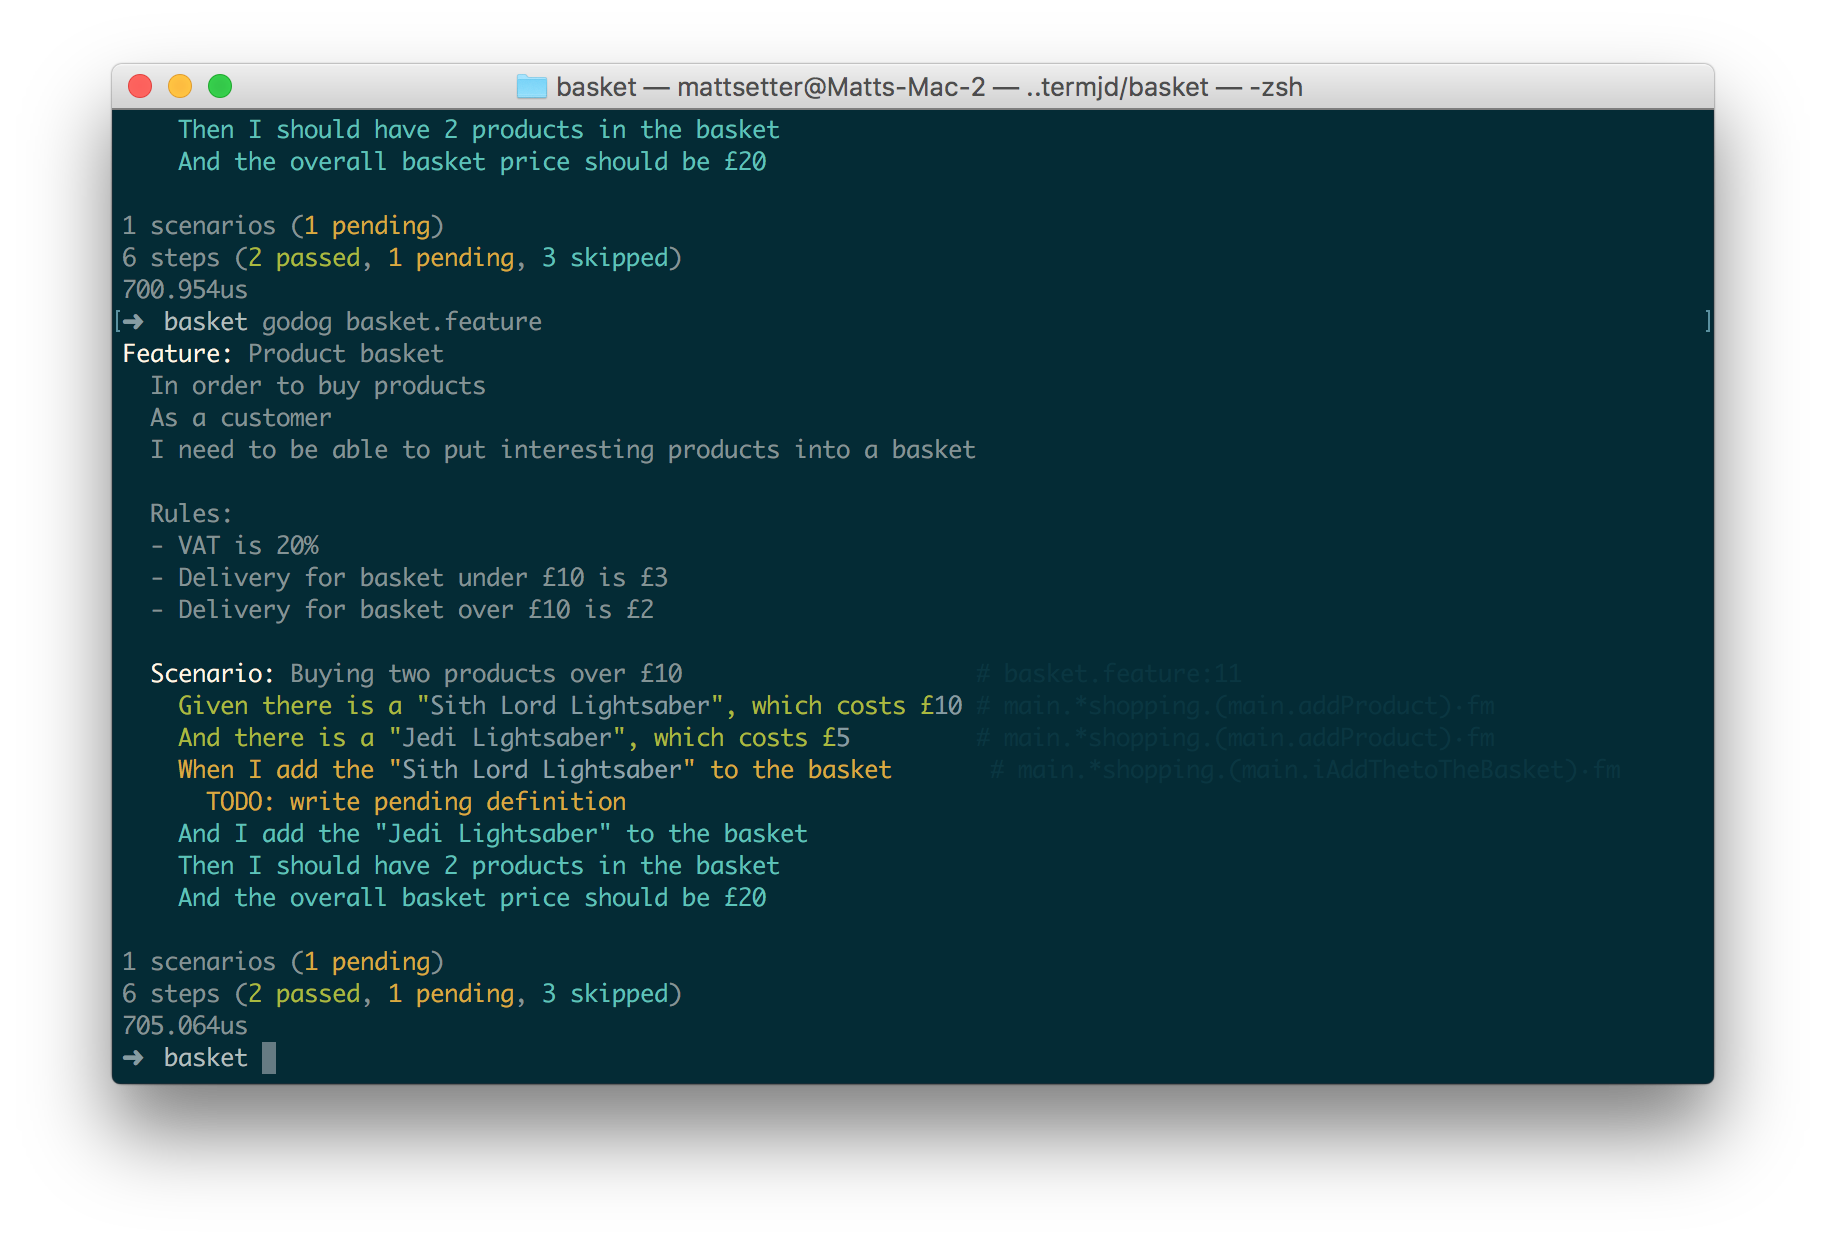
We can now run the godog basket.feature again, and see that the status changes. We still have one pending scenario, but instead of 6 pending steps, we have one pending and five skipped. The reason for that is that there is now code in place for the steps, which we can now start to fill out.
Notice that the generated code has created several functions based on the feature file’s scenario steps. Godog did an excellent job of creating functions with meaningful names and determining whether they should accept parameters or not.
The last function, featureContext, is the most important one. This function has two purposes — it allows us to store context across test suites and calls each test step. This is where we’ll initialize variables and objects which our code will test, as well as perform any setup and teardown during the testing lifecycle.
After taking a quick look at the generated code, you’ll notice that, while helpful, the generated code is quite generic. The function names very closely match the scenario used to generate them, and they have a rather generic function signature with just one argument per function, all called arg1.
This is acceptable at the outset. However, if we want to test different or more sophisticated scenarios, this approach is not going to work. This isn’t a bug, Godog just has limited scope to generate test code for us, based on the feature file provided.
Refactoring the Generated Code
We need to take the auto-generated code and start reorganizing it to make it more flexible. Before we can do that, we need to consider how we’re going to solve the task at hand.
If you take another look at the feature and the scenario again, you’ll see that we have two core constructs — a shelf and a basket. The shelf will store any products we have available for sale. The basket will contain the products that the customer wants to buy.
type shopping struct {}
Let’s introduce those, and provide some greater context to our tests in the process. To do so, we’ll add a new struct, called shopping, in basket_test.go, which you can see above.
Then, we need to instantiate a new instance of it in featureContext, so that it’s accessible. We’ll do that by adding sb := &shopping{} as the first line of featureContext.
As we’ll be using this object throughout the tests, it makes sense to convert the test functions to methods on the shopping struct. The result will look like the following:
type shopping struct { }

func (sh *shopping) thereIsASithLordLightsaberWhichCosts(arg1 int) error {
  return godog.ErrPending
}

func (sh *shopping) thereIsAJediLightsaberWhichCosts(arg1 int) error {
  return godog.ErrPending
}

func (sh *shopping) iAddThetoTheBasket(arg1 string) error {
  return godog.ErrPending
}

func (sh *shopping) iShouldHaveProductsInTheBasket(arg1 int) error {
  return godog.ErrPending
}

func (sh *shopping) theOverallBasketPriceShouldBe(arg1 int) error {
  return godog.ErrPending
}

func featureContext(s *godog.Suite) {
  sh := &shopping{}

  s.Step(^there is a "Sith Lord Lightsaber", which costs £(\d+)$, sh.thereIsASithLordLightsaberWhichCosts)
  s.Step(^there is a "Jedi Lightsaber", which costs £(\d+)$, sh.thereIsAJediLightsaberWhichCosts)
  s.Step(^I add the "([^"]*)" to the basket$, sh.iAddThetoTheBasket)
  s.Step(^I should have (\d+) products in the basket$, sh.iShouldHaveProductsInTheBasket)
  s.Step(^the overall basket price should be £(\d+)$, sh.theOverallBasketPriceShouldBe) }
If you run godog basket.feature, you’ll notice that nothing’s changed. We still have one pending scenario, with one pending and five skipped steps. Now, let’s continue reorganizing.
Revising the First Two Steps
Looking at the first two steps, Given and And, you’ll notice that they’re, in effect, indicating that we have two products with a given name and price, available for sale. We can combine the first two methods into one, called addProduct, which adds a product to the Shelf. It will look as follows:
func (sb *shoppingBasket) addProduct(productName string, price float64) (err error) {
  sb.shelf.AddProduct(product, price) return
}
The method takes a string, called productName, and an integer called price. This works nicely with how the step is set up, because each contains a product name and a product price. However, this isn’t going to work as is.
We need to add an instance of the yet-to-be-defined Shelf object to the shopping struct. Then, we need to update the details of the first step. To do this, add shelf *Shelf, to the shopping struct, and replace the first two steps in featureContext with the following:
s.Step(^there is a "([a-zA-Z\s]+)", which costs £(\d+)$, sb.addProduct)
We can now use addProduct for the first two steps in the first scenario, or for multiple steps across multiple scenarios. The first regex will match the product name, and the second regex will match the price.
There are some limitations here — the product name needs to be quoted, and the price needs to be in pounds, but we don’t have to worry about that for the time being.
Running Godog again will show that Shelf is undefined, which is to be expected. So, now we need to start fleshing out Shelf to give it the functionality we need. To do this, create a new file, called shelf.go which contains the following code:
package main

// NewShelf instantiates a new Shelf object
func NewShelf() *Shelf {
  return &Shelf{
    products: make(map[string]float64),
  }
}

// Shelf stores a list of products which are available for purchase type Shelf
struct {
  products map[string]float64
}
Shelf contains a map called products, which will store a list of product names and prices. As products is a map, we need a constructor to initialize it. That is why we have created the NewShelf function.
Next, we need to call the NewShelf method in the featureContext method, to ensure that the shopping’s Shelf variable is properly initialized. We can do this by referencing one of the hook methods, BeforeScenario, as follows:
s.BeforeScenario(func(interface{}) {
  sh.shelf = NewShelf()
})
Godog has a number of hooks which allow you to interact with the tests at different points in the testing lifecycle. These include:
- BeforeScenario: runs before a scenario is tested,
- BeforeStep: runs before each step,
- AfterStep: runs after each step, and
- BeforeSuite: runs before a suite of scenarios is run.
With this in place, if we run Godog again, we’ll get another error:
godog.go:31: sh.addProduct undefined (type *shopping has no field or method
addProduct)`.
Now we’re ready to define our first function, AddProduct. Here’s what it looks like:
func (s *Shelf) AddProduct(productName string, price float64) {
  s.products[productName] = price
}
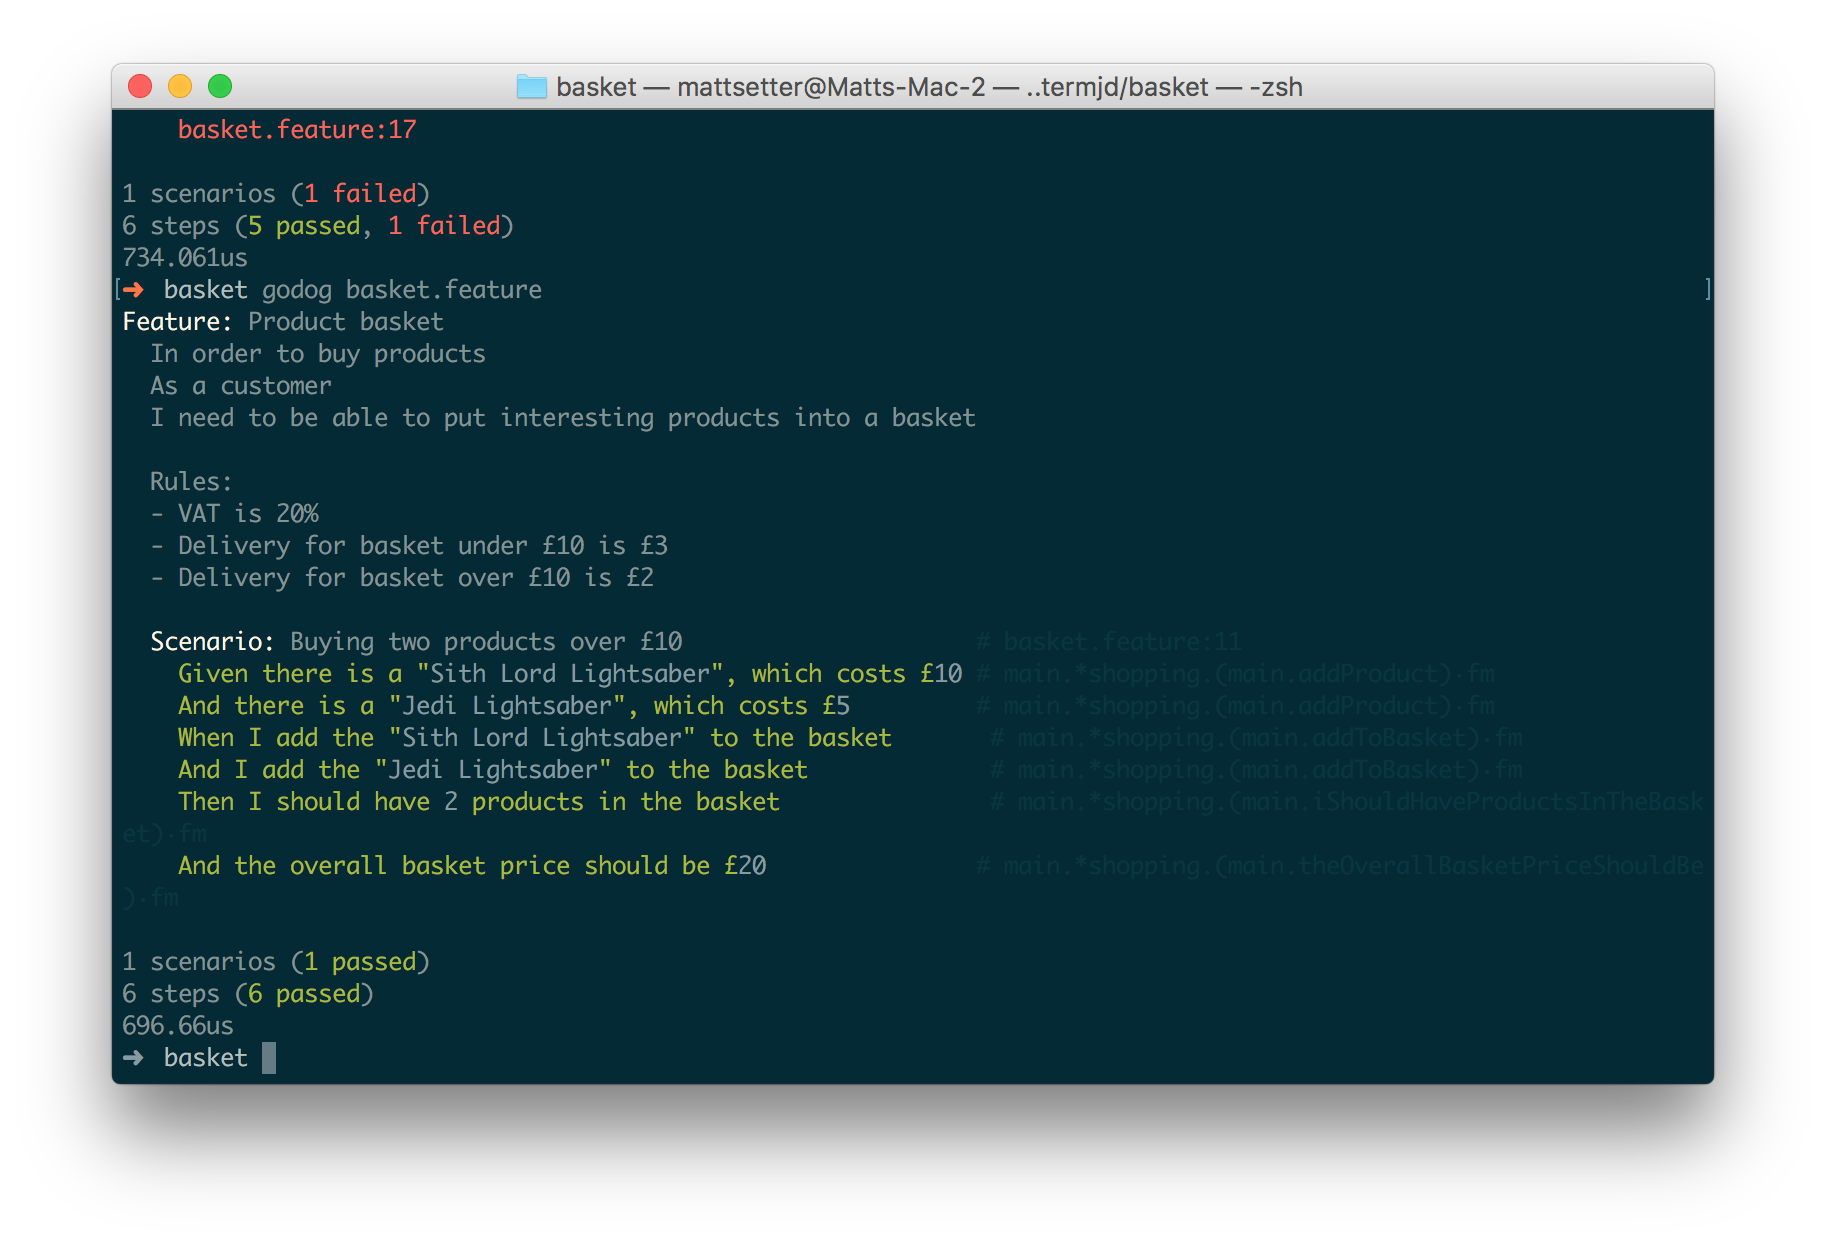
It takes productName and price and adds them to the Shelf’s products map. When we run Godog again, we’ll now see that two tests are passing, one is pending, and three are skipped. We’ll also see that the colors in the step summary match the ones in the list. An example is available in the screenshot below. This visual change makes it rather intuitive to keep track of progress.
Refactoring the Second Two Steps
The changes to the next two steps are quite similar to the first two. Instead of adding products to the Shelf, we’re adding them to the Basket. For the sake of simplicity, the approach we’ll take will be almost identical to the one which we’ve just taken.
We’ll replace the next two functions with one, update the call to s.Step with that function and an improved regular expression, and flesh out Basket enough to support said functionality. Stepping through each one, shoppingBasket will be updated as follows:
type shoppingBasket struct { basket *Basket shelf *Shelf }
We’ll replace the next two steps with the following function:
func (sh *shopping) addToBasket(productName string) (err error) {
  sh.basket.AddItem(productName, sh.shelf.GetProductPrice(productName))
  return
}
Finally, we’ll replace the calls to the previous step functions, with two calls to our new function, as follows:
s.Step(^I add the "([^"]*)" to the basket$, sh.addToBasket)
Running Godog again will show that Basket’s AddItem method and Shelf’s GetProductPrice method aren’t defined. As before, this is to be expected. Let’s define those now. Firstly, we’ll provide an initial implementation of Basket in a new file, called basket.go, which looks as follows:
package main

func NewBasket() *Basket {
  return &Basket{
    products: make(map[string]float64),
  }
}

type Basket struct {
  products map[string]float64
}
As with Shelf, Basket has a variable called products which is a map of string keys with float64 values. It has a constructor too, this time called NewBasket, which initializes products. To ensure it’s properly initialized, we need to update BeforeScenario as follows:
s.BeforeScenario(func(interface{}) {
  sh.shelf = NewShelf()
  sh.basket = NewBasket()
})
Now let’s define the two new functions, starting with GetProductPrice, which you can see below.
func (s *Shelf) GetProductPrice(productName string) float64 {
  return s.products[productName]
}
Here we pass the product’s name to the function, and then search in Shelf’s product’s map for the same function. It returns its value, if found. This is a basic implementation, as it performs no error handling, if the product’s name cannot be found. This is acceptable in the first scenario. Now, let’s define Basket’s AddItem method.
func (b *Basket) AddItem(productName string, price float64) {
  b.products[productName] = price
}
This one is almost identical to Shelf’s AddProduct method. It takes the product’s name and price and adds them to Basket’s products map. With these two defined, we can now run Godog again and see that we’re down to 1 pending and 1 skipped test.
Refactoring the Final Two Steps
For the final two steps, we’ll leave the calls to the step functions as they are, as they don’t need to be changed. We do need to flesh out the step functions. Starting with iShouldHaveProductsInTheBasket, we’ll update it as follows:
func (sb *shoppingBasket) iShouldHaveProductsInTheBasket(productCount int) error {
  if sb.basket.GetBasketSize() != productCount {
    return fmt.Errorf(
      "expected %d products but there are %d",
      sb.basket.GetBasketSize(),
      productCount,
    )
  }

  return nil
}
We’ve replaced the generic arg1 with a more specific productCount parameter. Next, we made a call to the GetBasketSize() function on Basket and checked if it’s the same as productCount. If not, then we return an error string saying that there’s a difference and what it is. If there isn’t a difference, we exit successfully, by returning nil. So let’s define GetBasketSize on Basket.
func (b *Basket) GetBasketSize() int {
  return len(b.products)
}
GetBasketSize will return an int, which we’ll retrieve by calling Go’s len function and passing in Basket’s product map. Now we’re down to the last step function, theOverallBasketPriceShouldBe.
func (sb *shoppingBasket) theOverallBasketPriceShouldBe(basketTotal float64) error {
  if sb.basket.GetBasketTotal() != basketTotal {
    return fmt.Errorf(
      "expected basket total to be %.2f but it is %.2f",
      basketTotal,
      sb.basket.GetBasketTotal(),
    )
  }

  return nil
}
Similar to GetBasketSize, I’ve replaced arg1 with a more meaningful basketTotal argument, which is a float64. The function calls a new GetBasketTotal method, which will return the total of all the products in the basket, along with the total VAT and shipping price, and compare that to the value of basketTotal.
If the two aren’t the same, then an error message is returned, showing the difference between the actual and expected values. If they’re the same, it returns nil. Let’s now define that function.
func (b *Basket) GetBasketTotal() float64 {
  basketTotal := 0.00
  shippingPrice := 0.00

  for _, value := range b.products {
    basketTotal += value
  }

  basketTotal = basketTotal * 1.2

  if basketTotal <= 10 {
    shippingPrice = 3
  } else {
    shippingPrice = 2
  }

  return basketTotal + shippingPrice
}
We’ll first define two variables, basketTotal and shippingPrice, both initialized to 0.00. We’ll then iterate over basket’s products and sum up the value of the products which it contains. With the base total calculated, we then add the VAT of 20%.
We then calculate the shipping based on whether the basket total is £10 or more, and return the basket total with shipping included. Running our test suite, as we can see in the image below, shows that the implementation matches our expectations.
Testing the Code Using Semaphore
With the feature, test code, and application code completed, at least for the first iteration, we’ll run our tests to confirm that everything is working. We’ll use Semaphore, a hosted continuous integration and deployment tool, to automatically build and test our code after every commit. To do this, the code will need to be in a repository on either GitHub or Bitbucket.
After logging into your Semaphore account, you will need to create a new project, and link it to the repository with your code.
Next, you’ll need to make a few minor changes to the default setup Semaphore creates after analyzing the repository in the Setup section of “Your Build Settings”. Click on “Project Settings”, and then on “Edit Thread”. Remove go get -t -d -v ./..., add go get -t -d -v github.com/DATA-DOG/godog/cmd/godog, and remove the configuration step starting with go build. The “Language” and “Go version” settings can be left as they are. You can see an example of the changes required in the screenshot below.

Save the changes, and then wait for a new build to start. These settings will ensure that Godog is available and used as part of the build, instead of go test, which is the default.
Within a few seconds, a new build should begin. Since there aren’t too many tests involved, it shouldn’t take more than about 10 – 15 seconds for the build to complete.
Conclusion
By working through this post, you should have gotten a good understanding of Godog. We saw how we can use it to write tests and code, which can then be built upon and refactored to meet our specific testing needs.
Godog is straightforward to use for building reliable software using the BDD approach. It provides a range of information on how may tests have passed, failed or are yet to be implemented using different colors and specific numbers. If you have any questions or comments, feel free to post them below.
Hello Author, thanks for such a brief explanation. But at some point, I got an error and hard to escape, could I get the source codes?
regards.