Introduction
One of the reasons behind the popularity of Go is its testing story. Go comes with a lightweight test framework that makes it trivial to write different kinds of tests.
In this tutorial, you will learn how to perform integration testing with Go. We will create a sample application, which will make use of another microservice written in Go. The integration tests will test the interaction between the application and the microservice.
Goals
By the end of this tutorial, you will:
- Understand the utility of Docker in testing,
- Learn how to test the interaction between two applications, and
- Know how to incorporate integration testing in your build process using Semaphore.
Prerequisites
For this tutorial, you will need:
- Docker installed on your machine and
- Go installed on your machine.
Using Docker in Testing
This section will discuss the benefits of using Docker for integration tests.
Brief Introduction to Docker
Docker lets us package an application along with its dependencies in a single deployable unit. While this is great for deploying apps in production, it is also useful during testing.
Why Use Docker During Testing?
Docker offers a pre-configured, predictable and repeatable environment for applications to run in. The same features that make Docker invaluable during deployment also come in handy during testing.
It is common for developers in a single team to use disparate operating systems. Even if their operating systems are the same, it’s possible for their development setup to differ. Using Docker in testing eliminates an entire class of errors that could arise due to this situation.
Understanding the Composite Application
In this tutorial, we’ll build a composite application that consists of two separate applications. This section will explain how this application works.
Introduction to the Application Functionality
The application we’ll use is a simple web server that makes use of an authentication service. The web server and the authentication service are implemented as two different Go applications that interact using the HTTP protocol. We’ll implement integration tests to validate the interaction between these two parts of the application.
Note: In this tutorial, we used the Gin framework to handle HTTP requests. You can use any framework (or none at all) for your application.
Application 1 (Web Application) Explanation
Application 1 is a public web application. This application exposes API end points that can be accessed from web, mobile and command line applications. This application is responsible for two things:
- Defining and handling HTTP end points and
- Authenticating requests against the authentication service (which will be our second application).
Apart from the /login and /logout requests, this application should handle all requests in the following manner:
- Check if the user is authenticated (against the authentication service),
- Serve the content if the user is authenticated, and
- Return an error if the user is not authenticated.
Since the web application uses the authentication service to authenticate users, it doesn’t have to worry about things such as the user state.
Application 2 (Authentication Service) Explanation
Application 2 is an authentication service which performs the following tasks:
- Logs a user in if provided with the correct username and password,
- Authenticates a user request if provided with a valid username and token pair, and
- Logs a user out if provided with a valid username and token pair.
In production, the authentication service would typically interact with a database to perform a username/password validation. Additionally, it might also use another service like Redis or Memcached to store user sessions.
For the purpose of this tutorial, we’ll hard-code the list of valid users and store the user sessions within the application itself.
Understanding the Interface Between the Two Applications
To understand the interface between the web application and the authentication service, let’s consider the following three types of requests:
- A
/loginrequest, - A
/logoutrequest, and - Any other request.
The login Request
In a /login request, the web application expects to receive two values: username and password. It then makes its own request to the authentication service at the /login end point, forwarding these two values.
The authentication service validates the username/password pair. If the validation is successful, it generates a token and stores the username/token pair to authenticate future requests from the same user. It returns this token to the web application. In case of a validation failure, the service responds with an error.
If the authentication service responds with a session token, the web application sets the username and token in cookies for use with future requests. It also returns the token in its response to the original request. The requester can then rely on the cookies for future authentication.
A /logout Request
In a /logout request, the web application expects to receive two values from cookies: username and token. It then makes its own request to the authentication service at the /logout end point, forwarding these two values.
The authentication service checks whether this is a valid username/token pair. If it is, it removes the username/token pair from its list of authenticated users and responds with a successful status. If the pair is invalid, the authentication service responds with an authentication error.
Any Other Request
For any other request, the web application would expect at least the username and token values in addition to request specific values. Before serving these requests, the web application will send a request to the /authenticate end point of the authentication service.
If the service indicates that authentication was successful, the web application will serve the request. If the service fails to authenticate the username/token pair, the web application will respond with an authentication error.
Note: This flow is applicable only to those requests which require authentication. For any request that doesn’t require authentication, there wouldn’t be any need to interact with the authentication service.
Setting Up Application 1 (Web Application)
Application 1 is a web server that exposes API end points that can be consumed by a web, mobile, desktop or a command line application. This section will walk you through the files that make up this application.
Final Directory Structure
Upon completion, the directory structure of the web application will look as follows this:
web-server
├── auth.go
├── main.go
└── web_test.go
The files for this application can be found in this Github repository. You can clone this directly using the following command
git clone https://github.com/demo-apps/semaphore-web-server.git web-server
Application Files Contents
The web application consists of three files:
main.go,auth.go, andweb_test.go.
1. main.go
The main.go file contains the definition of the HTTP routes and their respective handlers. The contents of this file are as follows:
// main.go (web-server)

package main

import (
	"net/http"

	"github.com/gin-gonic/gin"
)

var auth = authService{Base: "http://localhost:8001"}

func main() {
	gin.SetMode(gin.ReleaseMode)
	s := gin.Default()

	s.POST("/login", login)
	s.GET("/logout", logout)
	s.GET("/protected-content", serveProtectedContent)

	s.Run(":8000")
}

// Handler for the login request
func login(c *gin.Context) {
	// Obtain the POSTed username and password values
	username := c.PostForm("username")
	password := c.PostForm("password")

	if response := auth.Login(username, password); response.Token != "" {
		// If authentication succeeds set the cookies and
		// respond with an HTTP success
		// status and include the token in the response
		c.SetCookie("username", username, 3600, "", "", false, true)
		c.SetCookie("token", response.Token, 3600, "", "", false, true)

		c.JSON(http.StatusOK, response)
	} else {
		// Respond with an HTTP error if authentication fails
		c.AbortWithStatus(http.StatusUnauthorized)
	}
}

// Handler for the logout request
func logout(c *gin.Context) {
	// Obtain the username and token from the cookies
	username, err1 := c.Cookie("username")
	token, err2 := c.Cookie("token")

	if err1 == nil && err2 == nil && auth.Logout(username, token) {
		// Clear the cookies and
		// respond with an HTTP success status
		c.SetCookie("username", "", -1, "", "", false, true)
		c.SetCookie("token", "", -1, "", "", false, true)

		c.JSON(http.StatusOK, nil)
	} else {
		// Respond with an HTTP error
		c.AbortWithStatus(http.StatusUnauthorized)
	}

}

// Handler to serve the protected content
func serveProtectedContent(c *gin.Context) {
	// Obtain the username and token from the cookies
	username, err1 := c.Cookie("username")
	token, err2 := c.Cookie("token")

	if err1 == nil && err2 == nil && auth.Authenticate(username, token) {
		// Respond with an HTTP success status and include the
		// content in the response

		c.JSON(http.StatusOK, gin.H{"content": "This should be visible to authenticated users only."})
	} else {
		// Respond with an HTTP error
		c.AbortWithStatus(http.StatusUnauthorized)
	}
}
2. auth.go
The auth.go file contains the code that interacts with the authentication service. It is this code that we will be testing in our integration tests. The contents of this file are as follows:
// auth.go (api-server)

package main

import (
	"bytes"
	"encoding/json"
	"io/ioutil"
	"net/http"
	"net/url"
	"strconv"
)

type authService struct {
	Base string
}

type loginResponse struct {
	Token string json:"token"
}

func (a *authService) Login(username, password string) loginResponse {
	// Send a login request with the username and password
	_, body, err := post(a.Base+"/login", map[string]string{
		"username": username,
		"password": password,
	})
	lr := loginResponse{}
	if err != nil {
		return lr
	}
	json.Unmarshal(body, &lr)

	return lr
}

func (a *authService) Authenticate(username, token string) bool {
	// Send an authentication request with the username and token
	status, _, _ := post(a.Base+"/authenticate", map[string]string{
		"username": username,
		"token":    token,
	})
	if status == http.StatusOK {
		return true
	}
	return false
}

func (a *authService) Logout(username, token string) bool {
	// Send a logout request with the username and token
	status, _, _ := post(a.Base+"/logout", map[string]string{
		"username": username,
		"token":    token,
	})
	if status == http.StatusOK {
		return true
	}
	return false
}

// Helper function to perform POST requests against the auth server
func post(postURL string, keyValuePairs map[string]string) (int, []byte, error) {
	// Create a form to post with the key value pairs that have been
	// passed in
	form := url.Values{}
	for k, v := range keyValuePairs {
		form.Add(k, v)
	}

	// Create an HTTP Request to post the values
	req, _ := http.NewRequest("POST", postURL, bytes.NewBufferString(form.Encode()))
	req.Header.Add("Content-Type", "application/x-www-form-urlencoded")
	req.Header.Add("Content-Length", strconv.Itoa(len(form.Encode())))

	client := &http.Client{}
	resp, err := client.Do(req)
	if err != nil {
		return -1, nil, err
	}
	defer resp.Body.Close()

	body, err := ioutil.ReadAll(resp.Body)
	if err != nil {
		return resp.StatusCode, nil, err
	}

	return resp.StatusCode, body, nil
}
3. web_test.go
The web_test.go file contains the integration tests for this application. The contents of this file are as follows:
// web_test.go (web-server)

// +build integration

package main

import "testing"

var a = authService{Base: "http://localhost:8001"}

// User should not be able to login with a wrong username/password
func TestWrongUsernamePassword(t *testing.T) {
	if a.Login("user1", "wrongpassword").Token != "" {
		t.Fail()
	}
}

// User should be able to login with the right username/password
func TestCorrectUsernamePassword(t *testing.T) {
	if a.Login("user1", "pass1").Token == "" {
		t.Fail()
	}
}

// A user's request should be rejected if the user does not
// have a valid session token
func TestInvalidUserRequestAuthentication(t *testing.T) {
	username := "user1"
	lr := a.Login(username, "wrongpassword")
	if a.Authenticate(username, lr.Token) {
		t.Fail()
	}
}

// A user's request should be successfully authenticated if the user
// has a valid session token
func TestUserRequestAuthentication(t *testing.T) {
	username := "user1"
	lr := a.Login(username, "pass1")
	if !a.Authenticate(username, lr.Token) {
		t.Fail()
	}
}

// A user's request should be rejected the user has logged out
func TestUserRequestAuthenticationAfterLoggingOut(t *testing.T) {
	username := "user1"
	// Login
	lr := a.Login(username, "pass1")

	// Test that the user is logged out successfully
	if !a.Logout(username, lr.Token) {
		t.Fail()
	}

	//The user's request after logging out should be rejected
	if a.Authenticate(username, lr.Token) {
		t.Fail()
	}
}
Setting Up Application 2 (Authentication Service)
Application 2 is an authentication service that authenticates users, and can be consumed by any other application using the HTTP protocol. This section will walk you through the files that make up the authentication service.
Final Directory Structure
Upon completion, the directory structure of the authentication application will look as follows:
auth-server
├── Dockerfile
└── main.go
The files for this application can be found in this Github repository. You can clone this directly using the following command:
git clone https://github.com/demo-apps/semaphore-auth-server.git auth-server
Application Files’ Contents
The code for the authentication service is present in the main.go file. The contents of this file are as follows:
// main.go (auth-server)

package main

import (
	"math/rand"
	"net/http"
	"strconv"

	"github.com/gin-gonic/gin"
)

type user struct {
	Username string json:"username"
	Password string json:"password"
	Token    string json:"token"
}

// This map will store the username/token key value pairs
var users = make(map[string]string)

// We are using a list of predefined users. In a production application,
// users will most likely be authenticated directly against a database
var seedUsers = []user{
	user{
		Username: "user1",
		Password: "pass1",
	},
	user{
		Username: "user2",
		Password: "pass2",
	},
	user{
		Username: "user3",
		Password: "pass3",
	},
}

func main() {
	gin.SetMode(gin.ReleaseMode)
	s := gin.Default()

	s.POST("/login", login)
	s.POST("/authenticate", authenticate)
	s.POST("/logout", logout)

	s.Run(":8001")
}

func login(c *gin.Context) {
	// Obtain the POSTed username and password values
	username := c.PostForm("username")
	password := c.PostForm("password")

	if token := validateUser(username, password); token == "" {
		// Respond with an HTTP error if authentication fails
		c.AbortWithStatus(http.StatusUnauthorized)
	} else {
		// If authentication succeeds, add the username and its token
		// to the users map for later reference
		// Respond with an HTTP success status and include the token
		// in the response
		users[username] = token
		c.JSON(http.StatusOK, gin.H{"token": token})
	}
}

func authenticate(c *gin.Context) {
	// Obtain the POSTed username and token values
	username := c.PostForm("username")
	token := c.PostForm("token")

	if v, ok := users[username]; ok && v == token {
		// If the username/token pair is found in the users map,
		// respond with an HTTP success status
		c.JSON(http.StatusOK, nil)
	} else {
		// If the username/token pair is not found in the users map,
		// respond with an HTTP error
		c.AbortWithStatus(http.StatusUnauthorized)
	}
}

func logout(c *gin.Context) {
	// Obtain the POSTed username and token values
	username := c.PostForm("username")
	token := c.PostForm("token")

	if v, ok := users[username]; ok && v == token {
		// If the username/token pair is found in the users map,
		// remove this username from the users map
		// and respond with an HTTP success status
		delete(users, username)
		c.JSON(http.StatusOK, nil)
	} else {
		// If the username/token pair is not found in the users map,
		// respond with an HTTP error
		c.AbortWithStatus(http.StatusUnauthorized)
	}
}

func generateSessionToken() string {
	// We're using a random 16 character string as the session token
	// This is NOT a secure way of generating session tokens
	// DO NOT USE THIS IN PRODUCTION
	return strconv.FormatInt(rand.Int63(), 16)
}

func validateUser(username, password string) string {
	// Validate the username/password against the seed values defined above
	// In a production application,
	// users will most likely be authenticated directly against a database
	for _, u := range seedUsers {
		if username == u.Username {
			if u.Password == password {
				return generateSessionToken()
			}
			return ""
		}
	}
	return ""
}
Configuration File Contents
As we’ll be running the authentication service in a Docker container, we need to create a Dockerfile as follows:
FROM debian:8

# create the directory where the application will reside
RUN mkdir /auth-server

# copy the application files needed for production (in this case, only the binary)
ADD AuthServer /auth-server/AuthServer

# set the working directory to the application directory
WORKDIR /auth-server

# expose the application on port 8001.
# This should be the same as in the port used in the application
EXPOSE 8001

# set the entry point of the container to the application executable
ENTRYPOINT /auth-server/AuthServer
Note that, even though we are building our container on a Debian base, you should use a base that most closely reflects your production environment.
Setting Up Integration Testing
Now that we understand both web and authentication components of our application, let’s take a look at how we can test the interaction between these two applications. This section will explain:
- Which parts require integration testing,
- How we can implement these integration tests, and
- How we can incorporate these integration tests in our build process.
Explanation of the Tests
As can be seen in the application files, it is the auth.go file in the web application that contains the code, that interacts with the authentication service. This means that the integration tests must focus on testing the following methods:
- Login (
func (a *authService) Login(username, password string) loginResponse), - Authenticate (
func (a *authService) Authenticate(username, token string) bool), and - Logout (
func (a *authService) Logout(username, token string) bool).
In addition to simply testing these functions, we also need to test a functionality that combines the use of these functions.
The web_test.go file contains the integration tests that test whether the web application’s interaction with the authentication service is as expected. Before we look into the tests in details, we need to set our project up to properly process integration tests.
When we run the go test command, test functions from all the test files, i.e. files in the current package whose names end with _test.go, are executed. This is great for unit tests but we might not want this behavior with integration tests for various reasons.
To ensure that integration tests run only when explicitly asked to, we need to tag the relevant test file. Notice line 3 of the web_test.go file:
// +build integration
This line tags this test file and indicates that go should pick this file up only when supplied with the integration tag. In practice, this means that go will test the functions in this file only when explicitly asked to. This can be done using the following command:
go test -tags integration
Executing this command will test all the test files which are tagged with the integration keyword.
The web_test.go file contains the following tests:
- TestWrongUsernamePassword,
- TestCorrectUsernamePassword,
- TestInvalidUserRequestAuthentication,
- TestUserRequestAuthentication, and
- TestUserRequestAuthenticationAfterLoggingOut.
Let’s take a look at what each of this test does.
1. TestWrongUsernamePassword
This function expects the authentication service to return a blank token, an indication of failed authentication, when supplied with the wrong username and password.
2. TestCorrectUsernamePassword
This function expects the authentication service to return a valid token, an indication of successful authentication, when supplied with the right username and password.
3. TestInvalidUserRequestAuthentication
This function first performs a login against the authentication service with the wrong username and password. It then tests whether an authentication request using this username and the returned token should fail.
4. TestUserRequestAuthentication
This function first performs a login against the authentication service with the correct username and password. It then tests whether an authentication request using this username and the returned token should succeed.
5. TestUserRequestAuthenticationAfterLoggingOut
This function first performs a login request against the authentication service with the correct username and password. It then uses the returned token to perform a logout request. The function checks that the logout request executes successfully. After a successful logout, the function tries to authenticate against the authentication service using the same username and token. Finally, the function tests that this authentication request fails, which is the expected result as the user has logged out.
Once this is set up, you can run the following command, in the directory of the web application, to perform the integration test:
go test -v -tags integration
If the test finishes without any failures, you should see something similar to the following:
=== RUN   TestWrongUsernamePassword
--- PASS: TestWrongUsernamePassword (0.00s)
=== RUN   TestCorrectUsernamePassword
--- PASS: TestCorrectUsernamePassword (0.00s)
=== RUN   TestInvalidUserRequestAuthentication
--- PASS: TestInvalidUserRequestAuthentication (0.00s)
=== RUN   TestUserRequestAuthentication
--- PASS: TestUserRequestAuthentication (0.00s)
=== RUN   TestUserRequestAuthenticationAfterLoggingOut
--- PASS: TestUserRequestAuthenticationAfterLoggingOut (0.00s)
PASS
ok  	_/some_directory_on_your_machine/web-server	0.009s
Note: For all these tests to work, the authentication service should be running. This setup assumes that the authentication service is running on port 8001. Should that change for you, be sure to update the main.go and the web_test.go files in the web application accordingly.
Setting up Semaphore to Automatically Test After a Push
Semaphore makes it trivial to automatically build and test your code as soon as you push it to your repository. Here’s how to add your GitHub or Bitbucket project and set up a Golang project on Semaphore.
The default configuration for a Go project takes care of the following:
- Fetching the dependencies,
- Building the project, and
- Running the tests (without any special tags).
Once you’ve completed this process, you’ll be able to see the status of the latest builds and tests on your Semaphore dashboard. After this is done, we need to modify the setup to do the following:
- Set Semaphore to use Docker,
- Run the authentication service in Docker during the build process, and
- Run the integration tests during the build process.
1. Set Semaphore to use Docker
By default, new projects on Semaphore use the Ubuntu 14.04 LTS v1604 platform. This platform doesn’t come with Docker. Since we are interested in using Docker, we need to change the platform settings in Semaphore to use the Ubuntu 14.04 LTS v1604 (beta with Docker support) platform.
2. Run the authentication service in Docker during the build process
After logging in, visit Semaphore’s homepage. You should see a list of your projects similar to the following:
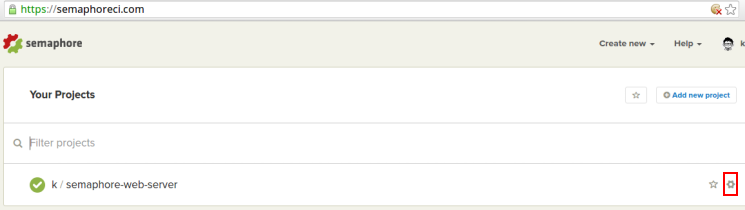
On this page, click on the Settings link highlighted in the above image. This will take you to the settings page of your project.

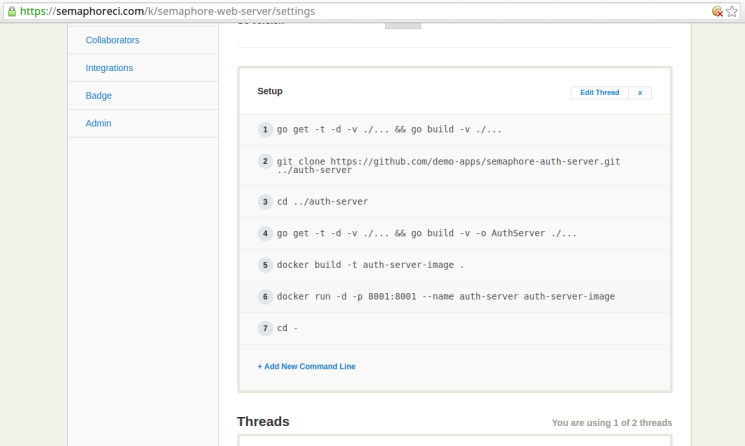
On this page, click on the Edit Thread link of the Setup section highlighted in the image below:
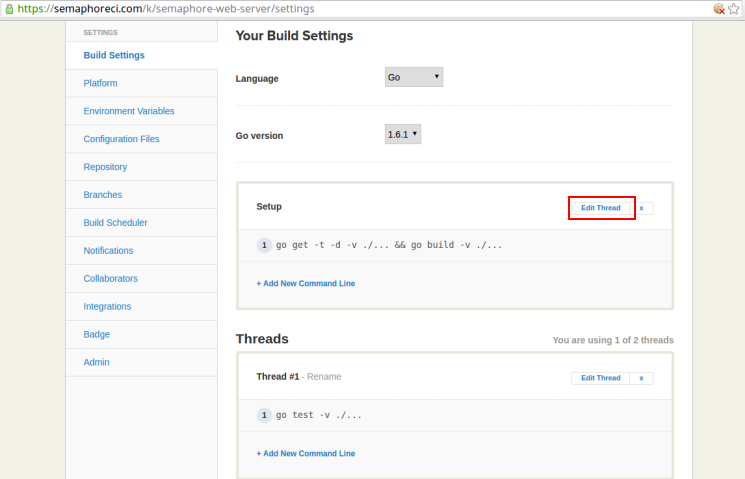
This should make the setup commands editable as follows:
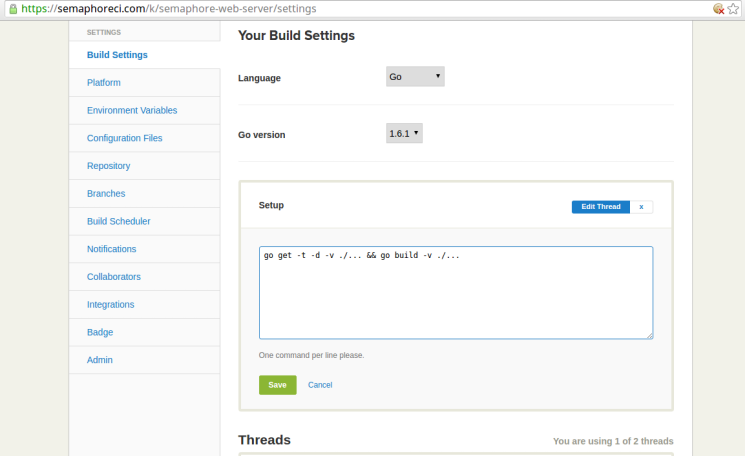
Edit this section to contain the following (we’ll soon see what each command does):
go get -t -d -v ./... && go build -v ./...
git clone https://github.com/demo-apps/semaphore-auth-server.git ../auth-server
cd ../auth-server
go get -t -d -v ./... && go build -v -o AuthServer ./...
docker build -t auth-server-image .
docker run -d -p 8001:8001 --name auth-server auth-server-image
cd -
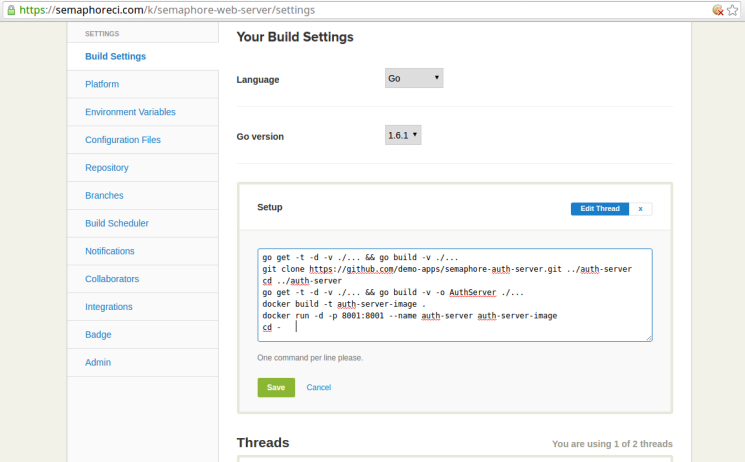
After entering the commands, click on the Save button to save these commands.
Let’s take a look at what each of these commands does.
Command 1 (go get -t -d -v ./... && go build -v ./...) fetches the application dependencies and builds the project.
Command 2 (git clone https://github.com/demo-apps/semaphore-auth-server.git ../auth-server) clones the repository containing the source files of the authentication service. These files are put in the auth-server directory which is located in the parent directory of the main web project.
Command 3 (cd ../auth-server) changes into the auth-server directory.
Command 4 (go get -t -d -v ./... && go build -v -o AuthServer ./...) fetches the dependencies of the authentication service and builds the project. The resulting executable binary is named AuthServer.
Command 5 (docker build -t auth-server-image .) builds a Docker image named auth-server-image based on the Dockerfile in the auth-server directory.
Command 6 (docker run -d -p 8001:8001 --name auth-server auth-server-image) starts a Docker container based on the image created by the previous command. It exposes the application on post 8001.
Command 7 (cd -) changes back to the directory containing the files for the web application.
These commands set up the build server so that it has the authentication service up and running in a Docker container. At this point, the integration tests can be executed against this service.
3. Run the integration tests during the build process
On the project settings page, click on the Edit Thread link of the first thread under the Threads section, as highlighted below:
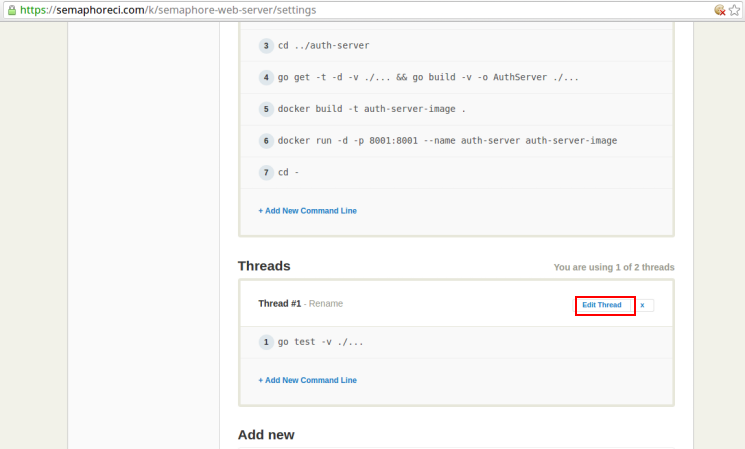
This should make the setup commands editable as follows:

Edit this section to contain the following (we’ll soon see what each command does):
go test -v ./...
go test -v -tags integration ./...
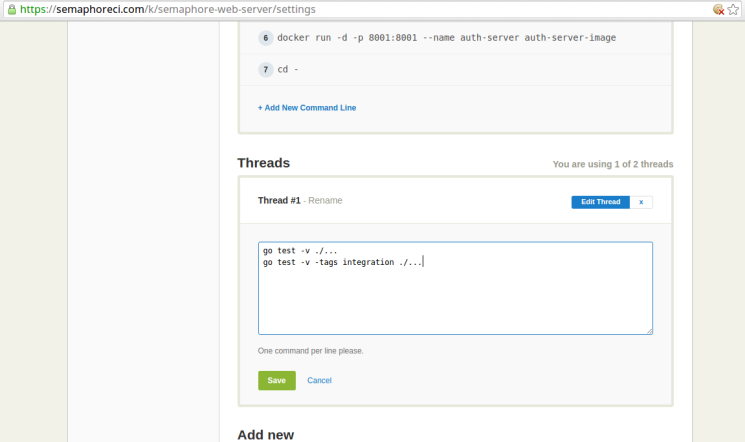
After entering the commands, to click on the Save button to save these commands.
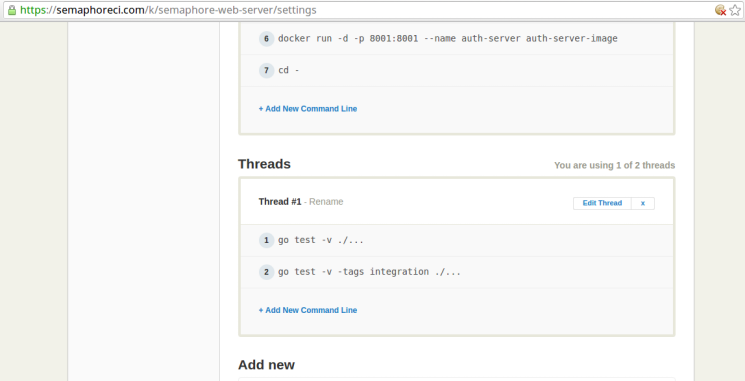
Let’s take a look at what each of these commands does.
Command 1 (go test -v ./...) runs the unit tests in the project. While this particular project doesn’t have unit tests for the purpose of succinctness, a real project is very likely to have those.
Command 2 (go test -v -tags integration ./...) runs the integration tests in the project. Specifically, this command runs all the test functions in the test files that have been tagged with the integration keyword.
After completing this setup, your project will now build and run all the tests automatically, as soon as you push new code into the project repository. Semaphore has a lot of options, that let you customize how and when certain build processes are run. For instance, you can schedule a build process to run at a specific time, or you can manually run the build processes should your project require that.
Next Steps
Once you’ve integrated testing in your build process, the next logical step would be to automate the deployment of your applications. You can learn how to do this in our tutorial about building and deploying Go web applications with Docker.
Conclusion
In this tutorial, we tested the interaction between two applications using integration tests. We also saw how Semaphore makes it trivial to incorporate integration tests in the build process.
You should now be ready to use Docker in your integration tests to ensure consistent results. If you have any questions, feel free to post them in the comments below.
P.S. Want to continuously deliver your applications made with Docker? Check out Semaphore’s Docker support.