Introduction
PHPUnit is one of the oldest and most well-known unit testing packages for PHP. It is primarily designed for unit testing, which means testing your code in the smallest components possible, but it is also incredibly flexible and can be used for a lot more than just unit testing.
PHPUnit includes a lot of simple and flexible assertions that allow you to easily test your code, which works really well when you are testing specific components. It does mean, however, that testing more advanced code such as controllers and form submission validation can be a lot more complicated.
To help make things easier for developers, the Laravel PHP framework includes a collection of application test helpers, which allow you to write very simple PHPUnit tests to test complex parts of your application.
The purpose of this tutorial is to introduce you to the basics of PHPUnit testing, using both the default PHPUnit assertions and the Laravel test helpers. The aim is for you to be confident in writing basic tests for your applications by the end of the tutorial.
Prerequisites
This tutorial assumes that you are already familiar with Laravel and know how to run commands within the application directory (such as php artisan commands). We will be creating a couple of basic example classes to learn how the different testing tools work, and as such, it is recommended that you create a fresh application for this tutorial.
If you have the Laravel installer set up, you can create a new test application by running:
$ laravel new phpunit-testsAlternatively, you can create a new application by using Composer directly:
$ composer create-project laravel/laravel --prefer-dist phpunit-testsOther installation options can also be found in the Laravel documentation.
Creating a New Test
The first step when using PHPUnit is to create a new test class. The convention for test classes is that they are stored within ./tests/ in your application directory. Inside this folder, each test class is named as <name>Test.php. This format allows PHPUnit to find each test class—it will ignore anything that does not end in Test.php.
In a new Laravel application, you will notice two files in the ./tests/ directory:
Feature/ExampleTest.phpandUnit/ExampleTest.php: TheExampleTest.phpis an example test class that includes a basic test case using the application testing helpers – ignore it for now.TestCase.php: TheTestCase.phpfile is a bootstrap file for setting up the Laravel environment within our tests. This allows us to use Laravel facades in tests and provides the framework for the testing helpers, which we will look at shortly.
To create a new test class, we can either create a new file manually or run the helpful Artisan make:test command provided by Laravel.
In order to create a test class called BasicTest, we just need to run this artisan command:
$ cd phpunit-test
$ php artisan make:test BasicTest
Laravel will create a basic test class that looks like this:
<?php
# test/Feature/BasicTest.php

namespace Tests\Feature;

use Illuminate\Foundation\Testing\RefreshDatabase;
use Illuminate\Foundation\Testing\WithFaker;
use Tests\TestCase;

class BasicTest extends TestCase
{
    /**
     * A basic feature test example.
     *
     * @return void
     */
    public function testExample()
    {
        $response = $this->get('/');

        $response->assertStatus(200);
    }
}
The most important thing to notice here is the test prefix on the method name. Like the Test suffix for class names, this test prefix tells PHPUnit what methods to run when testing. If you forget the test prefix, then PHPUnit will ignore the method.
Before we run our test suite for the first time, it is worth pointing out the default phpunit.xml file that Laravel provides. PHPUnit will automatically look for a file named phpunit.xml or phpunit.xml.dist in the current directory when it is run. This is where you configure the specific options for your tests.
There is a lot of information within this file, however, the most important section, for now, is the testsuite directory definition:
<?xml version="1.0" encoding="UTF-8"?>

. . .

    <testsuites>
        <testsuite name="Unit">
            <directory suffix="Test.php">./tests/Unit</directory>
        </testsuite>

        <testsuite name="Feature">
            <directory suffix="Test.php">./tests/Feature</directory>
        </testsuite>
    </testsuites>

. . .

</phpunit>
This tells PHPUnit to run the tests it finds in the ./tests/Unit and ./tests/Feature directories, which, as we have previously learned, are the convention for storing tests.
Now that we have created a base test, and are aware of the PHPUnit configuration, it is time to run our tests for the first time.
You can run your PHPUnit tests by running the phpunit command:
$ ./vendor/bin/phpunitYou should see something similar to this as the output:
PHPUnit 8.5.2 by Sebastian Bergmann and contributors.

...                                                     3 / 3 (100%)

Time: 91 ms, Memory: 16.00 MB

OK (3 tests, 3 assertions)
Now that we have a working PHPUnit setup, it is time to move onto writing a basic test.
Writing a Basic Test
To help cover the basic assertions that PHPUnit provides, we will first create a basic class that provides some simple functionality.
Create a new file in your ./app/ directory called Box.php, and copy this example class:
<?php
# app/Box.php

namespace App;

class Box
{
    /**
     * @var array
     */
    protected $items = [];

    /**
     * Construct the box with the given items.
     *
     * @param array $items
     */
    public function __construct($items = [])
    {
        $this->items = $items;
    }

    /**
     * Check if the specified item is in the box.
     *
     * @param string $item
     * @return bool
     */
    public function has($item)
    {
        return in_array($item, $this->items);
    }

    /**
     * Remove an item from the box, or null if the box is empty.
     *
     * @return string
     */
    public function takeOne()
    {
        return array_shift($this->items);
    }

    /**
     * Retrieve all items from the box that start with the specified letter.
     *
     * @param string $letter
     * @return array
     */
    public function startsWith($letter)
    {
        return array_filter($this->items, function ($item) use ($letter) {
            return stripos($item, $letter) === 0;
        });
    }
}
Next, open your ./tests/Feature/BasicTest.php class (that we created earlier), and remove the testExample method that was created by default. You should be left with an empty class.
We will now use seven of the basic PHPUnit assertions to write tests for our Box class. There are many assertions available, but the most common are:
assertTrue()assertFalse()assertEquals()assertNull()assertContains()assertCount()assertEmpty()assertStatus()
assertTrue() and assertFalse()
assertTrue() and assertFalse() allow you to assert that a value is equated to either true or false. This means they are perfect for testing methods that return boolean values. In our Box class, we have a method called has($item), which returns true or false when the specified item is in the box or not.
To write a test for this in PHPUnit, we can do the following:
<?php
# test/Feature/BasicTest.php

# Import Box class
use App\Box;

. . .

 # Test function for Box class
 public function testBoxContents()
 {
     $box = new Box(['toy']);
     $this->assertTrue($box->has('toy'));
     $this->assertFalse($box->has('ball'));
 }
Note how we only pass a single parameter into the assertTrue() and assertFalse() methods, and it is the output of the has($item) method.
If you run the ./vendor/bin/phpunit command now, you will notice the output includes:
OK (3 tests, 4 assertions)This means our tests have passed.
If you swap the assertFalse() for assertTrue() and run the phpunit command again, the output will look like this:
PHPUnit 8.5.2 by Sebastian Bergmann and contributors.

.F.                                                                 3 / 3 (100%)

Time: 86 ms, Memory: 16.00 MB

There was 1 failure:

1) Tests\Feature\BasicTest::testBoxContents
Failed asserting that false is true.

/home/tom/r/start-phpunit/phpunit-tests/tests/Feature/BasicTest.php:29

FAILURES!
Tests: 3, Assertions: 4, Failures: 1.
This tells us that the assertion on line 29 failed to assert that a false value was true as we switched the assertFalse() for assertTrue().
Swap it back, and re-run PHPUnit. The tests should again pass, as we have fixed the broken test.
assertEquals() and assertNull()
Next, we will look at assertEquals(), and assertNull().
assertEquals() is used to compare the actual value of the variable to the expected value. We want to use it to check if the value of the takeOne() function is an item that is currently in the box. As the takeOne() method returns a null value when the box is empty, we can use assertNull() to check for that too.
Unlike assertTrue(), assertFalse(), and assertNull(), assertEquals() takes two parameters. The first being the expected value, and the second being the actual value.
We can implement these assertions in our class as follows:
<?php
# tests/Feature/BasicTest.php

. . .

    public function testTakeOneFromTheBox()
    {
        $box = new Box(['torch']);
        $this->assertEquals('torch', $box->takeOne());

        // Null, now the box is empty
        $this->assertNull($box->takeOne());
    }

. . .
Run the phpunit command, and you should see:
OK (4 tests, 6 assertions)assertContains(), assertCount(), and assertEmpty()
Finally, we have three assertions that work with arrays, which we can use to check the startsWith($item) method in our Box class. assertContains() asserts that an expected value exists within the provided array, assertCount() asserts the number of items in the array matches the specified amount, and assertEmpty() asserts that the provided array is empty.
We can implement tests for these like this:
<?php
# tests/Feature/BasicTest.php

. . .

    public function testStartsWithALetter()
    {
        $box = new Box(['toy', 'torch', 'ball', 'cat', 'tissue']);

        $results = $box->startsWith('t');

        $this->assertCount(3, $results);
        $this->assertContains('toy', $results);
        $this->assertContains('torch', $results);
        $this->assertContains('tissue', $results);

        // Empty array if passed even
        $this->assertEmpty($box->startsWith('s'));
    }

. . .
Save and run your tests again:
OK (5 tests, 11 assertions)Congratulations, you have just fully tested the Box class using seven of the basic PHPUnit assertions. You can do a lot with these simple assertions, and most of the other, more complex, assertions that are available still follow the same usage pattern.
Testing Your Application
Unit testing each component in your application works in a lot of situations and should definitely be part of your development process, however, it isn’t all the testing you need to do. When you are building an application that includes complex views, navigation, and forms, you will want to test these components too. This is where Laravel’s test helpers make things just as easy as unit testing simple components.
We previously created a new test file and we skipped the ./tests/Feature/ExampleTest.php file. Open it now, and it should look something like this:
<?php
# tests/Feature/ExampleTest.php

namespace Tests\Feature;

use Illuminate\Foundation\Testing\RefreshDatabase;
use Tests\TestCase;

class ExampleTest extends TestCase
{
    /**
     * A basic test example.
     *
     * @return void
     */
    public function testBasicTest()
    {
        $response = $this->get('/');

        $response->assertStatus(200);
    }
}
We can see the test in this case, it is very simple. Without any prior knowledge of how the test helpers work, we can assume it means something like this:
- when I visit
/(webroot) - I should get an HTTP status code 200 (OK)
If you open your web browser to our application:
$ php artisan serveNavigate to http://localhost:8000. You should see a splash screen with “Laravel” on the webroot. Given that this test has been passing PHPUnit, it is safe to say that our translation of this example test is correct.
This test is ensuring that the web page rendered at the / path returns successfully. A simple check like this may not seem like much, but if there is critical information your website needs to display, a simple test like this may prevent you from deploying a broken application if a change somewhere else causes the page to no longer display the right information.
assertSee() and assertDontSee()
Let’s write our own test now, and take it one step further.
Edit the routes file located at routes/web.php. Add the following route below the Welcome route:
<?php
# routes/web.php

. . .

Route::get('/alpha', function () {
    return view('alpha');
});
For the sake of this tutorial, we will go for a Greek alphabet themed route.
Next, create the view template at ./resources/views/alpha.blade.php, and save some basic HTML with the Alpha keyword:
<!DOCTYPE html>
<html lang="{{ str_replace('_', '-', app()->getLocale()) }}">
    <head>
        <meta charset="utf-8">
        <meta name="viewport" content="width=device-width, initial-scale=1">
        <title>Alpha</title>
    </head>
    <body>
        <h1>This is the Alpha page</h1>
    </body>
</html>
Now open it in your browser to ensure it is working as expected with: php artisan serve. Go to http://localhost:8000/alpha, and it should display a friendly “This is the Alpha page.” message.
Now that we have the template, we will create a new test. Run the make:test command:
$ php artisan make:test AlphaTestThen edit the test, using the example test as a guide, but we also want to ensure that our “alpha” page does not mention “beta”. To do this, we can use the assertDontSee() assertion, which does the opposite of assertSee().
This means we can do a simple test, replace the testExample function in test/Feature/AlphaTest.php with this one:
<?php
# test/Feature/AlphaTest.php

. . .

    public function testExample()
    {
        $response = $this->get('/alpha');

        $response->assertStatus(200);
        $response->assertSee('Alpha');
        $response->assertDontSee('Beta');
    }

. . .
Save it and run PHPUnit (./vendor/bin/phpunit), and it should all pass, with the status line looking something like this:
OK (7 tests, 17 assertions)Writing Tests First
A great thing about tests is that you can use the Test-Driven Development (TDD) approach, and write your tests first. After writing your tests, you run them and see that they fail, then you write the code that satisfies the tests to make everything pass again. So, let’s do that for the next page.
First, make a BetaTest class using the make:test artisan command:
$ php artisan make:test BetaTestNext, update the test case so it is checking the /beta route for “Beta”. Edit test/Feature/BetaTest.php:
<?php
# tests/Feature/BetaTest.php

. . .

    public function testExample()
    {
        $response = $this->get('/beta');

        $response->assertStatus(200);

        $response->assertSee('Beta');
        $response->assertDontSee('Alpha');
    }

. . .
Now, run the test using ./vendor/bin/phpunit. The result should be a slightly unfriendly error message, that looks like this:
$ ./vendor/bin/phpunit
PHPUnit 8.5.2 by Sebastian Bergmann and contributors.

.....F.                                                             7 / 7 (100%)

Time: 206 ms, Memory: 18.00 MB

There was 1 failure:

1) Tests\Feature\BetaTest::testExample
Expected status code 200 but received 404.
Failed asserting that false is true.

/home/tom/r/start-phpunit/phpunit-tests/vendor/laravel/framework/src/Illuminate/Foundation/Testing/TestResponse.php:185
/home/tom/r/start-phpunit/phpunit-tests/tests/Feature/BetaTest.php:20

FAILURES!
Tests: 7, Assertions: 14, Failures: 1.
We now have an expectation for a missing route. Let’s create it.
First, edit the ./routes/web.php file to create the new /beta route:
<?php
# routes/web.php

. . .

Route::get('/beta', function () {
    return view('beta');
});

. . .
Next, create the view template at ./resources/views/beta.blade.php:
<!DOCTYPE html>
<html lang="{{ str_replace('_', '-', app()->getLocale()) }}">
    <head>
        <meta charset="utf-8">
        <meta name="viewport" content="width=device-width, initial-scale=1">
        <title>Beta</title>
    </head>
    <body>
        <h1>This is the Beta page</h1>
    </body>
</html>
Now, run PHPUnit again, and the result should be back to green.
$ ./vendor/bin/phpunit
PHPUnit 8.5.2 by Sebastian Bergmann and contributors.

.......                                                             7 / 7 (100%)

Time: 101 ms, Memory: 18.00 MB

OK (7 tests, 16 assertions)
We have now implemented our new page using Test Driven Development by writing the test first.
Laravel Dusk
Laravel Dusk is a browser testing toolset that was introduced in Laravel 5.4. It allows us to run tests directly in a Google Chrome browser, making our tests more real and reliable.
With Dusk we can simulate user interactions, click on links, make assertions, and execute JavaScript among many other things.
As mentioned before, Dusk uses Google Chrome, so you’ll need to make sure you have it installed first (Chromium may not work). Alternatively, you can use other browsers with Selenium.
Install the Dusk components:
$ composer require --dev laravel/dusk
$ php artisan dusk:install
This will install all the required components, including a Google ChromeDriver and an example test at test/Browser/ExampleTest.php.
Next, we need to start the application, preferably on a different port, so it doesn’t conflict with our development environment. Create a Dusk-only environment file:
$ cp .env .env.dusk.localOpen the new file .env.dusk.local and change the port number, for example, we’ll use port 8010:
# .env.dusk.local

. . .

APP_URL=http://localhost:8010

. . .
Start the application on the same port:
$ php artisan serve --port=8010 &Run the example test:
$ php artisan dusk

PHPUnit 8.5.2 by Sebastian Bergmann and contributors.

.                                                                   1 / 1 (100%)

Time: 554 ms, Memory: 16.00 MB

OK (1 test, 1 assertion)
clickLink() and assertPathIs()
Dusk also provides a helper to allow the test to click a link that exists on the page (clickLink()), as well as a way to check what the resulting page is (assertPathIs()).
Let’s use these two helpers to implement links between the Alpha and Beta pages.
First, let’s create new Browser-only tests:
$ php artisan dusk:make AlphaTest
$ php artisan dusk:make BetaTest
Open test/Browser/AlphaTest.php and replace the testExample method with this one:
<?php
# test/Browser/AlphaTest.php

. . .

    public function testExample()
    {
        $this->browse(function (Browser $browser) {
            $browser->visit('/alpha')
                    ->assertSee('Alpha')
                    ->clickLink('Next')
                    ->assertPathIs('/beta');
        });
    }

. . .
The new test will click the ‘Next’ link found on the “alpha” page to go to the “beta” page.
You can run the test suite now, but as expected it will fail as we haven’t updated our HTML yet.
Next, we will update the test/Browser/BetaTest.php to do similar:
<?php
# test/Browser/BetaTest.php

. . .

    public function testExample()
    {
        $this->browse(function (Browser $browser) {
            $browser->visit('/beta')
                    ->assertSee('Beta')
                    ->clickLink('Previous')
                    ->assertPathIs('/alpha');
        });
    }

. . .
Next, let’s update our HTML templates to add Next and Previous links.
Edit resources/views/alpha.blade.php:
<!DOCTYPE html>
<html lang="{{ str_replace('_', '-', app()->getLocale()) }}">
    <head>
        <meta charset="utf-8">
        <meta name="viewport" content="width=device-width, initial-scale=1">
        <title>Alpha</title>
    </head>
    <body>
        <h1>This is the Alpha page</h1>
        <a href="/beta">Next</a>
    </body>
</html>
Then edit resources/views/beta.blade.php:
<!DOCTYPE html>
<html lang="{{ str_replace('_', '-', app()->getLocale()) }}">
    <head>
        <meta charset="utf-8">
        <meta name="viewport" content="width=device-width, initial-scale=1">
        <title>Beta</title>
    </head>
    <body>
        <h1>This is the Beta page</h1>
        <a href="/alpha">Previous</a>
    </body>
</html>
Save the files and run Dusk again:
$ php artisan dusk
PHPUnit 8.5.2 by Sebastian Bergmann and contributors.

...                                                      3 / 3 (100%)

Time: 1.45 seconds, Memory: 18.00 MB

OK (3 tests, 5 assertions)
We have now tested our new pages, including the Next/Previous links between them.
Read More: 7 Continuous Integration Tools for PHP Laravel Developers
Continuous Integration for PHPUnit on Semaphore
Testing is a daily part of every developer’s routine. Continuous Integration (CI) is a software development practice in which test the application on every change. Teams that use CI can merge changes into the main branch several times a day, reducing the chance of conflicts and improving software quality.
We can add Semaphore CI/CD to our project in just a few minutes. We’ll only need:
- GitHub: A GitHub account for the code.
- Semaphore: A Semaphore account. You can get it for free using the TRY it Free button on the top-right corner.
- Git: Git to push the code to GitHub.
NB: to help your testing efforts, Semaphore has Test Reports. This feature allows you to see which tests have failed, find skipped tests and see the slowest tests in your test suite. Read more about the feature.
Push Code to GitHub
The first thing to do it to upload our examples to GitHub:
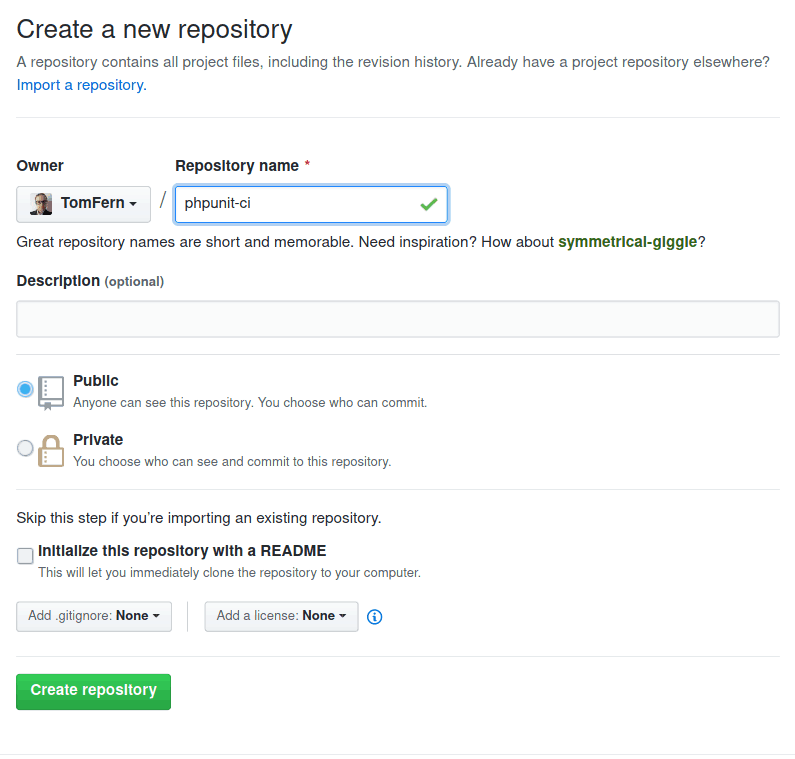
- Create a new repository on GitHub.
- Leave all the options unchecked. Click on the Create Repository button:
- Copy the URL of your new repository:
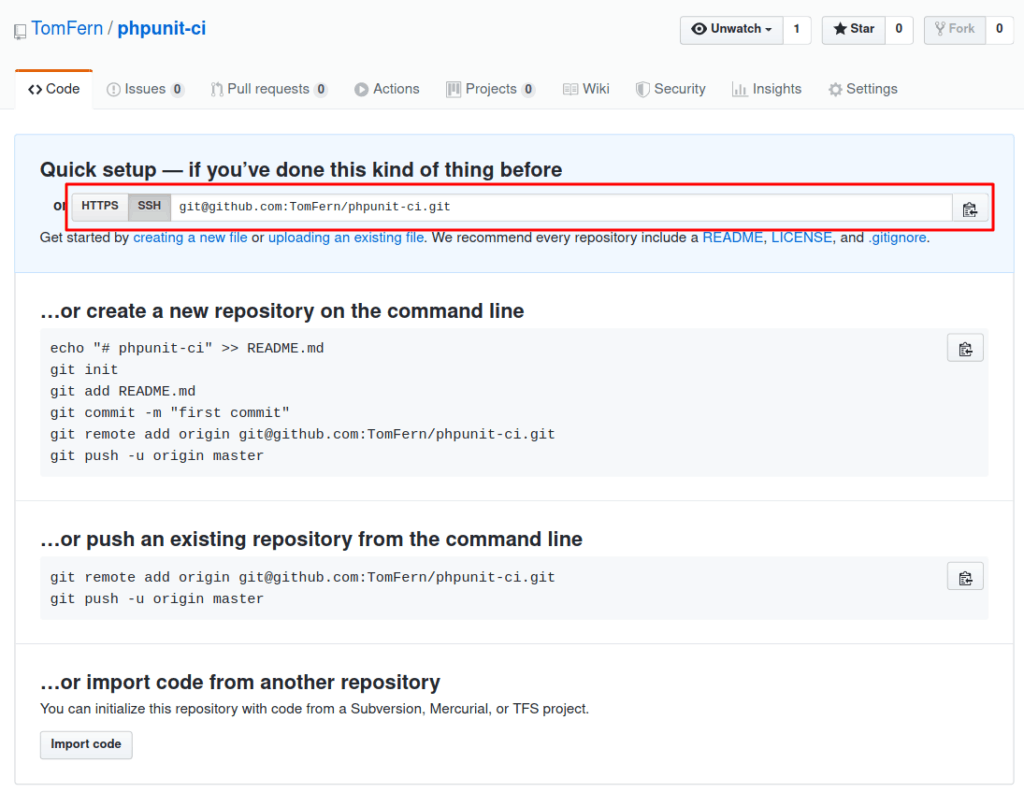
- Push your code to GitHub:
$ git init
$ git remote add origin YOUR_REPOSITORY_URL
$ git add -A
$ git add --force .env.dusk.local
$ git commit -m "initial commit"
$ git push origin master
Create a CI Pipeline
A pipeline represents a series of processes that operate on our code. Each time the code is updated, each time a commit happens or a branch merged, the code enters the pipeline and is submitted to a series of tests. A good CI pipeline will provide a short feedback cycle that helps to weed out errors faster.
To create a pipeline for the project:
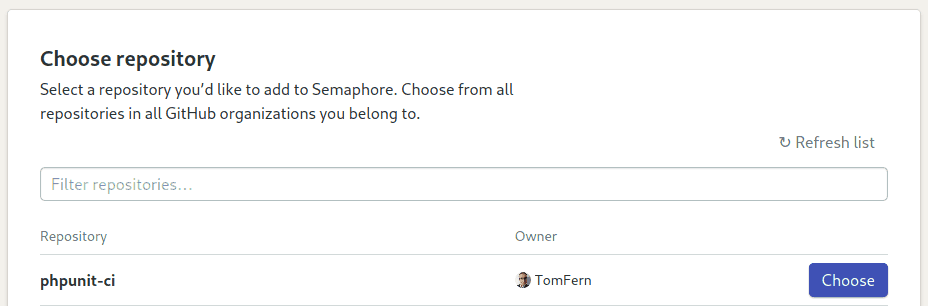
- In Semaphore, use the + (plus sign) button next to Projects to add the repository:

- Find your repository and click on Choose:
- Select the Laravel starter workflow:
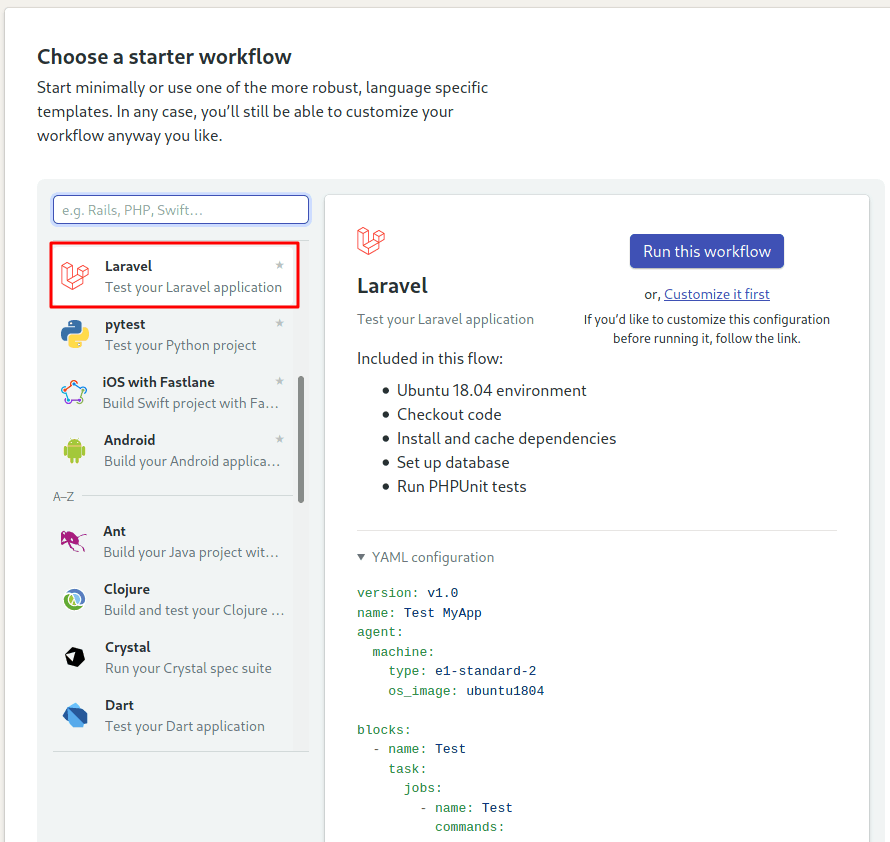
- Click on Customize it first. We need to make a few tweaks in the pipeline before it runs.
We get the Workflow Builder screen, we can always open it using the Edit Workflow button on the top-right corner:
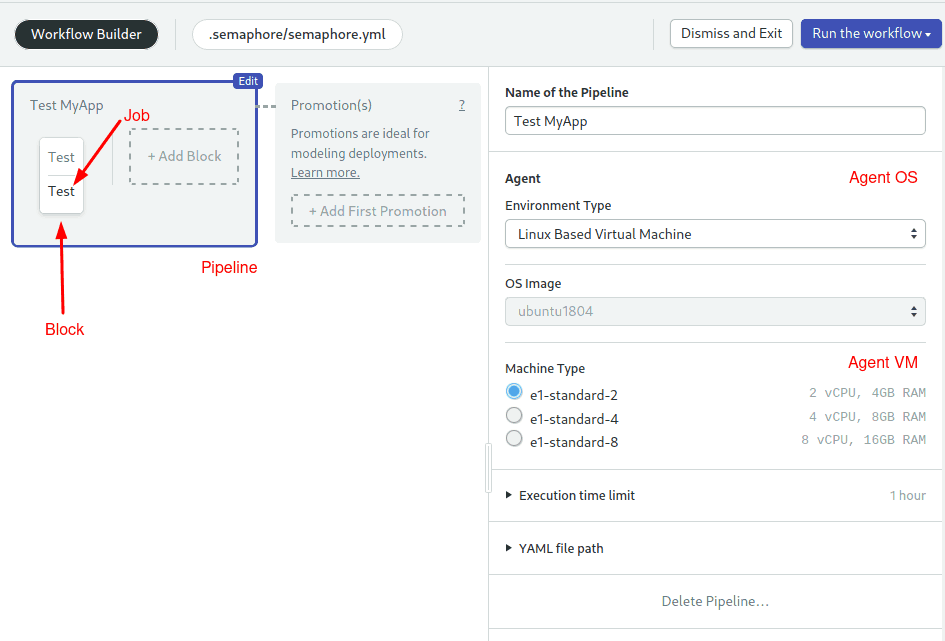
- Pipeline: A pipeline has a specific objective, e.g. build. Pipelines are made of blocks that are executed from left to right.
- Agent: The agent is the virtual machine that powers the pipeline. We have three machine types to choose from. The machine runs an optimized Ubuntu 18.04 image with build tools for many languages.
- Block: blocks group jobs with a similar purpose. Jobs in a block are executed in parallel and have similar commands and configurations. Once all jobs in a block complete, the next block begins.
- Job: jobs define the commands that do the work. They inherit their configuration from their parent block.
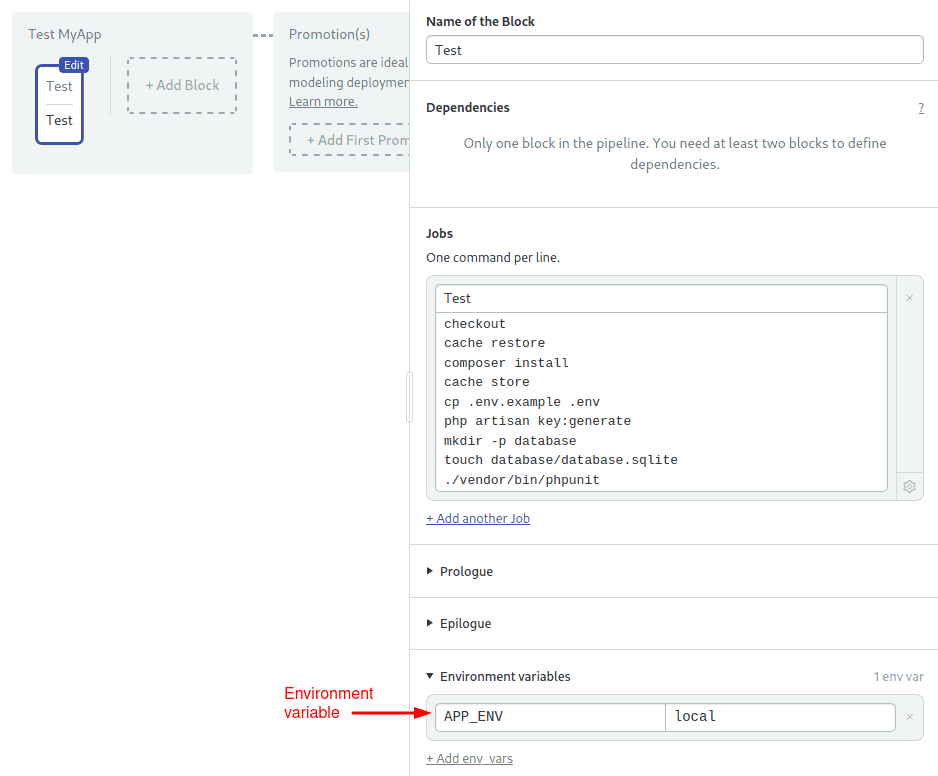
Let’s finish up setting up the initial pipeline:
- Click on the Test block.
- Open the Environment Variables section, add the following variable using the +Add env_var link:
APP_ENV = local. We need to clearly state that this is not a production environment, otherwise Dusk will refuse to run.
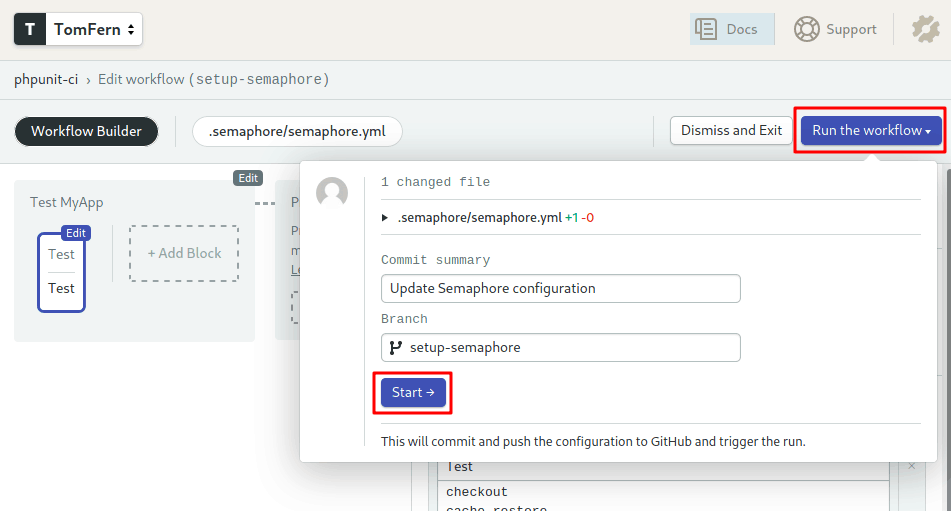
- Click on Run the Workflow and then Start:
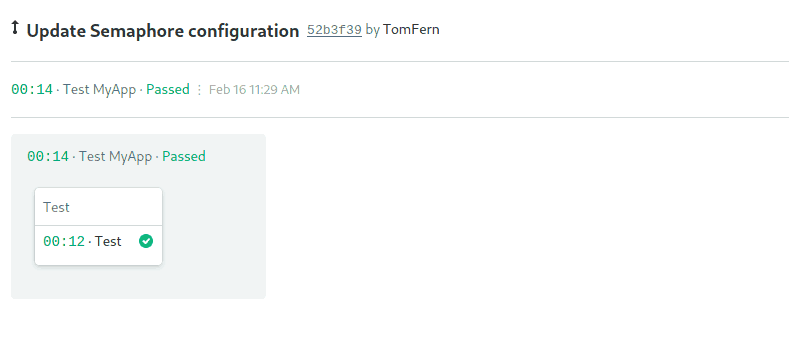
The pipeline starts immediately:
Optimizing the Pipeline
The started pipeline can be further optimized by:
- Storing the composer modules in the cache, so they don’t have to be downloaded every time.
- Separating the install and test steps into two blocks.
- Running the Laravel Dusk browser tests.
Let’s modify the pipeline to run faster. Using parallel testing, we’ll use this opportunity speed up the pipeline by running two tests at the same time:
- Use the Edit Workflow button to open the workflow builder again.
- Click on the test block and rename it to “Install”
- Rename the job to “Composer”
- Replace the commands in the job with the following:
sem-version php 7.4
checkout
cache restore
composer install
npm install
cache store
We’re using some of the many Semaphore toolbox commands:
- checkout: this is a Semaphore built-in command that clones the GitHub repository into the CI environment.
- sem-version: activates a particular version for a language. Semaphore supports most current PHP versions.
- cache: To speed up jobs, Semaphore provides the cache tool. You can run
storeandrestoreto your preserve downloaded modules in Semaphore’s cache. The cache automatically figures out which files and directories should be stored.
Now we can re-add the test block:
- Use the +Add Block dotted line button to create a new block.
- Set the name of the block to “Test”
- Open the Environment Variable section and add the variable:
APP_ENV = local - Open the Prologue section. The prologue is executed before each job in the block. Type the following commands:
sem-version php 7.4
checkout
cache restore
cp .env.example .env
php artisan key:generate
mkdir -p database
touch database/database.sqlite- Set the name of the job to “phpunit”
- Type the following commands in the job:
./vendor/bin/phpunit- Click on Add job to create a new job in the Test block. Set its name to “dusk”.
- Type the following commands in the dusk job. We need to install the Chrome Web Driver that matches the version of Google Chrome in Semaphore, which currently is version 79:
php artisan dusk:chrome-driver 79
php artisan serve --env=.env.dusk.local --port=8010 &
php artisan dusk- Use Run the Workflow and then Start to try the new pipeline:
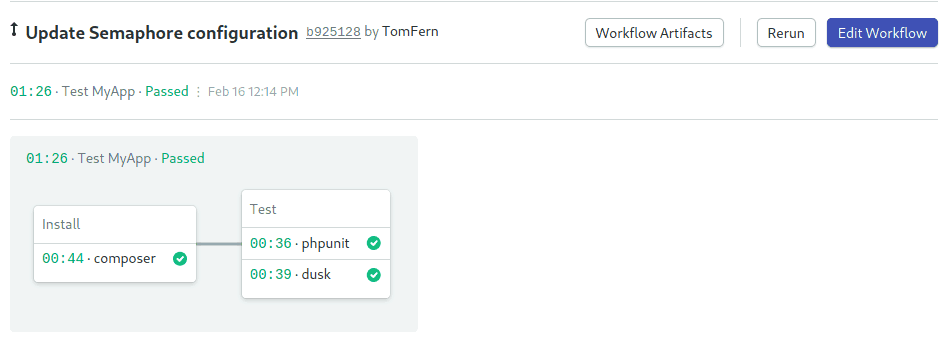
This optimized pipeline is a solid foundation for your Laravel projects.
Next Reads
Don’t miss these great tutorials on PHP, Laravel and Continuous Integration:
- 7 Continuous Integration Tools for PHP Laravel Developers
- Dockerizing a PHP Application
- Semapore PHP support page
Conclusion
You should notice a common theme across all of the tests that we have written in this tutorial: they are all incredibly simple. This is one of the benefits of learning how to use the basic test assertions and helpers, and trying to use them as much as possible. The simpler you can write your tests, the easier your tests will be to understand and maintain.
Once you have mastered the PHPUnit assertions we have covered in this tutorial, you can find a lot more in the PHPUnit documentation. They all follow the same basic pattern, but you will find that you keep coming back to the basic assertions for most of your tests.
Laravel’s test helpers are a fantastic compliment to the PHPUnit assertions, and make testing your application templates easy. That said, it is important to recognize that, as part of our tests, we only checked the critical information – not the entire page. This keeps the tests simple, and allows the page content to change as the application changes. If the critical content still exists, the test still passes, and everyone is happy.