Introduction
Gulp is a command-line task runner for Node.js. Gulp let us automate processes and run repetitive tasks with ease.
What makes Gulp different from other task runners is that it uses Node streams; piping output from one task as an input to the next. It only needs to read a file once, then process it through multiple tasks, and finally write the output file. This results in faster builds because there is no need to create and read intermediary files on the hard drive.
The goal of this tutorial is to introduce Gulp and see it in action. We will make a quick project to demonstrate how tasks work, and how to create an integrated workflow.
You will learn:
- How to set up an automated workflow.
- How to compile SASS into CSS.
- Convert templates into static HTML.
- Run tests on the code.
- Watch for changes in your files and act on it.
- Automatically reload the page in the browser after changes.
- Set up Continuous Integration (CI) for your JavaScript project.
By the end of the tutorial, you will be able to apply Gulp to your own project, customize it and be more efficient.
Here’s a brief overview of the steps to get you started:
- Install Node.js and Gulp.
- Create an Express project.
- Install NPM modules.
- Create
gulpfile.js. - Load plugins and create tasks.
- Run tasks from the command line.
Prerequisites
Gulp is a command-line tool, so you should be familiar with working in the terminal. In order to use Gulp, you need to have Node.js installed on your system.
We will use Sass and EJS templates, but having deep knowledge of them isn’t required.
Setting up the Environment
Before we can create and run our first task, we need to have something to work on. Create a starter application using express-generator:
$ npx express-generator -v ejs --git gulp-project
$ cd gulp-project
$ npm install
Create a GitHub repository for the project:
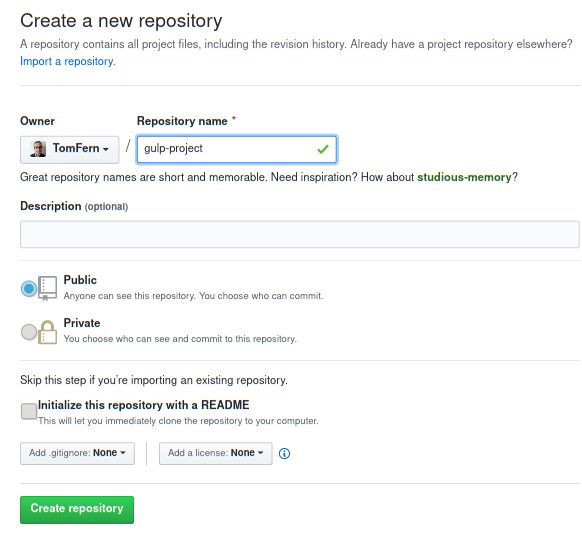
- Head over to GitHub and login or sign up.
- Create a new empty repository, we can call it “gulp-project”:
- Copy repository URL as shown:
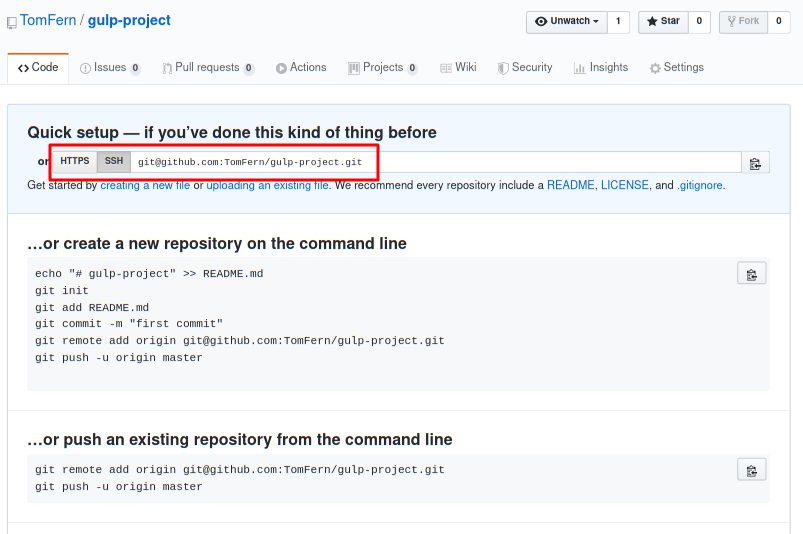
- Make an initial push:
$ git init
$ git remote add origin YOUR_REPO_URL
$ git add -A
$ git commit -m "initial commit"
$ git push origin master
Project Structure
Our project has the following structure:
.
├── app.js
├── bin
│   └── www
├── package.json
├── public
│   ├── images
│   ├── javascripts
│   └── stylesheets
│       └── style.css
├── routes
│   ├── index.js
│   └── users.js
└── views
    ├── error.ejs
    └── index.ejs
The goal is to create an automated workflow so we want to make tasks that:
- Compile CSS files from other sources such as Sass.
- Generate HTML for static pages.
- Test the application code.
- Analyze the code with a linter.
- Start and automatically reload the application on changes.
Note that Express has the capability of plugging into templating engines by itself, but Gulp gives us more flexibility and can do a lot more thanks to the hundreds of plugins available.
Gulp Installation
To use Gulp, you need to install it as a global module first through NPM:
$ sudo npm install -g gulp-cliNow we need to download Gulp and its plugins to our project:
$ npm install --save-dev gulpWriting the First Gulp Task
All Gulp configuration goes in a file called gulpfile.js located at the root of the project. The pattern for writing tasks is that you first load a plugin you’re about to use and then define a task that is based on that plugin.
Gulp is very plugin driven; if you want to accomplish something, you need to know which plugin to use. Usually, a single plugin has a single purpose, and all the plugins are just regular JavaScript.
First, we load the Gulp functions we’ll need usingrequire:
const { src, dest } = require("gulp");- src: reads files and directories and creates a stream of data for further processing. Src function supports globbing and filters to better select files.
- dest: takes a directory and writes the contents of the incoming stream as files. Dest by default overwrites existing files.
Now we can write our first task. A basic form of a task looks like this:
function mytask(callback) {
   // task body
   callback();
}

exports.mytask = mytask;
Functions in Gulp are regular JavaScript functions that take a callback function. We’ll write the code that does the work inside the function. To mark its completion (either success or failure), we use the callback.
To mark successful completion call cb without arguments:
cb()On error, call the callback with an Error instance:
cb(new Error('Something bad has happened'));Exported functions are directly callable from the command line:
$ gulp mytaskYou may have seen other tutorials showing the older syntax:
gulp.task('name', function() {
	//implementation of the task
});
This syntax works but Gulp devs recommend using the newer syntax I showed earlier.
We will create a simple task to get familiar with basic methods. To copy files, we only need to use the src and dest functions:
function copy(cb) {
    src('routes/*.js')
        .pipe(dest('copies'));
    cb();
}

exports.copy = copy;
This is how it works:
srcreads JavaScript files fromroutes/and passes its contents into the pipeline,pipewill take output of the previous command as pipe it as an input for the next,destwrites the output of previous commands to thecopies/directory.
To run the task open the terminal, navigate to the root of the project and run gulp command and task name as a parameter, like this:
$ gulp copyYou should now have a copy of index.js and users.js in your copies folder.
You can also pass arrays, or use globs with src and dest:
folder/*.html– will match all the HTML files infolder.root/**/*.html– will match all the HTML files in all the folders fromrootto its children.['**/*.js', '!node_modules/']– will find recursively*.jsfiles except those in thenode_modulesdirectory.
Using the First Plugin
Gulp relies on the plugins to do almost everything, so we need to learn how to use them. The first plugin we’ll try is the Sass preprocessor: gulp-sass.
Let’s create a simple Sass file:
$ mkdir sassCreate a sample Sass file called sass/style.scss:
$font-stack:    Helvetica, sans-serif;
$primary-color: #333;

body {
  font: 100% $font-stack;
  color: $primary-color;
}
Now we will create a task to process the sass/style.scss which can be then used in our HTML file.
To do this just follow the established pattern:
- Install the plugin:
$ npm install --save-dev gulp-sass- Load it the gulpfile.js:
const sass = require('gulp-sass');- And write the task body in gulpfile.js:
function generateCSS(cb) {
    src('./sass/**/*.scss')
        .pipe(sass().on('error', sass.logError))
        .pipe(dest('public/stylesheets'));
    cb();
}

exports.css = generateCSS;
Here we piped all *.scss files to the sass function and finally to the public/stylesheets directory. Visit the official Sass reference for more information about output styles, and the plugin page for some other options.
Now we can run our css task:
$ gulp cssWe should now have a new public/stylesheets/style.css waiting for us.
Templates
To process Ejs templates we have the gulp-ejs plugin:
$ npm install --save-dev gulp-ejs gulp-renameThe related code on gulpfile.js is:
const ejs = require("gulp-ejs");
const rename = require("gulp-rename");


function generateHTML(cb) {
    src("./views/index.ejs")
        .pipe(ejs({
            title: "Hello Semaphore!",
        }))
        .pipe(rename({
            extname: ".html"
        }))
        .pipe(dest("public"));
    cb();
}

exports.html = generateHTML;
Here’s how it works:
- Read
*.ejsfiles fromviews/. - Pipe them into
gulp-ejsreplacing variables for the values we supply to get pure HTML. - Pipe the files into gulp-rename to change the file extension.
- Pipe everything into the
public/directory.
We can run the task with:
$ gulp htmlLinting the Code
Another interesting Gulp plugin is gulp-eslint; it runs static code analysis and reports the errors.
Install the plugin:
$ npm install --save-dev gulp-eslintAnd write the lint task; gulp-eslint provides a failAfterError() function to force Gulp to stop and exit with error.
const eslint = require("gulp-eslint");

function runLinter(cb) {
    return src(['**/*.js', '!node_modules/**'])
        .pipe(eslint())
        .pipe(eslint.format())
        .pipe(eslint.failAfterError())
        .on('end', function() {
            cb();
        });
}

exports.lint = runLinter;
Notice that Gulp streams emit events that we can capture with the .on keyword.
We have to supply a configuration to Eslint or it’ll fail. Create a file called .eslintrc.json in your project root:
{
    "parserOptions": {
        "ecmaVersion": 6,
        "sourceType": "module",
        "ecmaFeatures": {
            "jsx": true
        }
    },
    "rules": {
        "semi": "error"
    }
}
Try the task:
$ gulp lintTesting With Mocha
Let us go a little bit further with testing by installing the gulp-mocha plugin:
$ npm install --save-dev gulp-mocha gulp-data mocha supertestMocha is a popular test framework that runs on Node and on browsers. We can run our tests as part of the Gulp pipeline.
Learn more about testing here: Getting Started with Node.js and Mocha
Time to write some tests. We’ll use the *.test.js pattern to identify test files; create a file called app.test.js to test the Express application:
const app = require('./app');
const request = require('supertest');

describe('test', function() {

    let server = null;

    beforeEach(function(done) {
        server = app.listen(0, function(err) {
            if(err) { return done(err); }
            done();
        });
    });

    afterEach(function() {
        server.close();
    });

    it('Status code should be 200', function(done) {
        request(app)
            .get('/')
            .expect(200, done);
    });

    it('Test /users response', function(done) {
        request(app)
            .get('/users')
            .expect(200)
            .expect('respond with a resource', done);
    });

});
To finalize, we only need to write the Gulp task:
const mocha = require("gulp-mocha");

function runTests(cb) {
    return src(['**/*.test.js'])
        .pipe(mocha())
        .on('error', function() {
            cb(new Error('Test failed'));
        })
        .on('end', function() {
            cb();
        });
}
exports.test = runTests;
In this example, we capture the error event with .on('error') and call the callback with an Error instance. With return we ensure that Gulp captures the error and exits with failure.
Try the tests with:
$ gulp testWatching for File Changes
Our next goal is to automatically do all the processing tasks when a change happens in the code. We accomplish this with watch method; it comes as a standard part of the Gulp so there is no need for loading a new module. We have, however, to import the keyword in gulpfile.js:
const { src, dest, watch, parallel } = require("gulp");Note that I have also imported the parallel function, I’ll come back to it in a bit.
watch takes as arguments:
- Files to be watched.
- Callback to be triggered after the change.
So we can define a task like this:
function watchFiles(cb) {
    watch('views/**.ejs', generateHTML);
    watch('sass/**.scss', generateCSS);
    watch([ '**/*.js', '!node_modules/**'], parallel(runLinter, runTests));
}

exports.watch = watchFiles;- Templates: every time a file in
views/withejsextension is changed,generateHTMLis called. - Sass: the same thing happens with
scssfiles in thesass/ directory. - Tests: triggers every time a JavaScript file outside
node_modules/is modified. We’re using theparallel()function we imported at the beginning to start both functions concurrently. Gulp also provides aseries()function to call functions one after the other.
The watch task will continue running until stopped:
$ gulp watchNow try making a change to the sass/style.scss and saving it; Gulp will automatically compile it into CSS.
Creating Server for Live Reload
Our final task is to set up live reload on the browser. After that, we can integrate all the tasks into an efficient workflow.
First, install the Browsersync module:
$ npm install --save-dev browser-syncAnd add the following task to gulpfile.js:
const sync = require("browser-sync").create();

function browserSync(cb) {
    sync.init({
        server: {
            baseDir: "./public"
        }
    });

    watch('views/**.ejs', generateHTML);
    watch('sass/**.scss', generateCSS);
    watch("./public/**.html").on('change', sync.reload);
}

exports.sync = browserSync;
The task starts a local server for the static files located on public/ and installs watchers for Sass and templates as we did earlier.
To complete the setup, change the generateCSS function so it notifies Browsersync about changes in CSS:
function generateCSS(cb) {
    src('./sass/**/*.scss')
        .pipe(sass().on('error', sass.logError))
        .pipe(dest('public/stylesheets'))
        .pipe(sync.stream());
    cb();
}
Let’s try it out. Browsersync will open a browser window:
$ gulp sync

[12:28:47] Using gulpfile ~/r/gulp-project/gulpfile.js
[12:28:47] Starting 'sync'...
[Browsersync] Access URLs:
 -------------------------------------
       Local: http://localhost:3000
    External: http://192.168.0.14:3000
 -------------------------------------
          UI: http://localhost:3001
 UI External: http://localhost:3001
 -------------------------------------
[Browsersync] Serving files from: ./public
If you modify sass/style.scss you should see a message like this:
[Browsersync] 1 file changed (styles.css)
[12:29:11] Starting 'generateCSS'...
[12:29:11] Finished 'generateCSS' after 6.05 ms
Go back to the browser to find that the page has reloaded with the new style. Making a change to any of the templates on views/ will have the same effect.
Add a Default Task
To complete the Gulp setup we should define a default task.
First, import the series function from gulp:
const { src, dest, watch, parallel, series } = require("gulp");Then export a default object. We can combine series and parallel to build a complete pipeline:
exports.default = series(runLinter,parallel(generateCSS,generateHTML),runTests);Running gulp by itself will execute the default task:
$ gulp
[12:51:38] Using gulpfile $PWD/gulpfile.js
[12:51:38] Starting 'default'...
[12:51:38] Starting 'runLinter'...
[12:51:38] Finished 'runLinter' after 148 ms
[12:51:38] Starting 'generateCSS'...
[12:51:38] Starting 'generateHTML'...
[12:51:38] Finished 'generateCSS' after 3.56 ms
[12:51:38] Finished 'generateHTML' after 5.83 ms
[12:51:38] Starting 'runTests'...


  test
GET / 200 5.233 ms - 243
    ✓ Status code should be 200
GET /users 200 3.004 ms - 23
    ✓ Test /users response

  gulp-ejs
    ✓ should expose ejs global object
    ✓ should work with no suplied data
    ✓ should render ejs template
    ✓ should throw error when syntax is incorrect
    ✓ should support passing data with gulp-data
    ✓ should render async ejs template


  8 passing (61ms)

[12:51:40] Finished 'runTests' after 1.69 s
[12:51:40] Finished 'default' after 1.85 s
We can also get a list of available tasks with --tasks:
$ gulp --tasks

[12:50:51] Tasks for ~/r/gulp-project/gulpfile.js
[12:50:51] ├── css
[12:50:51] ├── html
[12:50:51] ├── lint
[12:50:51] ├── test
[12:50:51] ├── watch
[12:50:51] ├── sync
[12:50:51] └─┬ default
[12:50:51]   └─┬ <series>
[12:50:51]     ├── runLinter
[12:50:51]     ├─┬ <parallel>
[12:50:51]     │ ├── generateCSS
[12:50:51]     │ └── generateHTML
[12:50:51]     └── runTests
The complete gulpfile.js should look like this:
const { src, dest, watch, parallel, series } = require("gulp");

const sass = require('gulp-sass');
const ejs = require("gulp-ejs");
const rename = require("gulp-rename");
const eslint = require("gulp-eslint");
const mocha = require("gulp-mocha");
const sync = require("browser-sync").create();


function generateCSS(cb) {
    src('./sass/**/*.scss')
        .pipe(sass().on('error', sass.logError))
        .pipe(dest('public/stylesheets'))
        .pipe(sync.stream());
    cb();
}


function generateHTML(cb) {
    src("./views/index.ejs")
        .pipe(ejs({
            title: "Hello Semaphore CI!",
        }))
        .pipe(rename({
            extname: ".html"
        }))
        .pipe(dest("public"));
    cb();
}


function runLinter(cb) {
    return src(['**/*.js', '!node_modules/**'])
        .pipe(eslint())
        .pipe(eslint.format())
        .pipe(eslint.failAfterError())
        .on('end', function() {
            cb();
        });
}


function runTests(cb) {
    return src(['**/*.test.js'])
        .pipe(mocha())
        .on('error', function() {
            cb(new Error('Test failed'));
        })
        .on('end', function() {
            cb();
        });
}


function watchFiles(cb) {
    watch('views/**.ejs', generateHTML);
    watch('sass/**.scss', generateCSS);
    watch([ '**/*.js', '!node_modules/**'], parallel(runLinter, runTests));
}


function browserSync(cb) {
    sync.init({
        server: {
            baseDir: "./public"
        }
    });

    watch('views/**.ejs', generateHTML);
    watch('sass/**.scss', generateCSS);
    watch("./public/**.html").on('change', sync.reload);
}


exports.css = generateCSS;
exports.html = generateHTML;
exports.lint = runLinter;
exports.test = runTests;
exports.watch = watchFiles;
exports.sync = browserSync;

exports.default = series(runLinter,parallel(generateCSS,generateHTML),runTests);
Continuous Integration With Semaphore
Continuous Integration (CI) is the perfect complement for Gulp. CI runs our Gulp tasks in a clean, fast environment and gives us immediate feedback when something goes wrong.
You can run your Gulp tasks on Semaphore for free in 5 minutes:
- Push all your changes to GitHub:
$ git add package*.json gulpfile.js sass app.test.js .eslintrc.json
$ git commit -m "add gulp tasks"
$ git push origin master- Go to Semaphore and sign up using the Sign up with GitHub button.
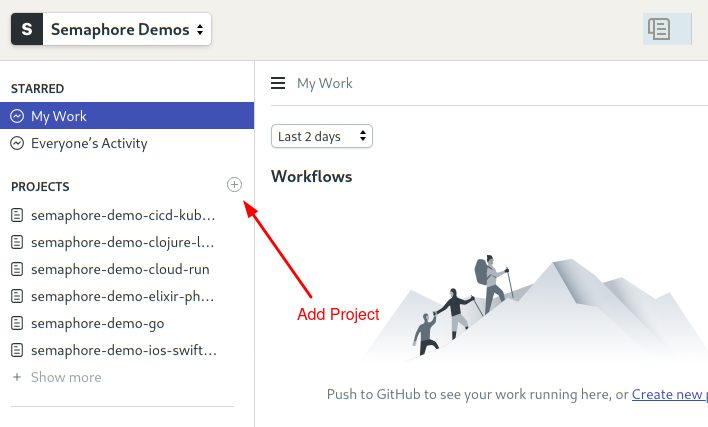
- Once logged in, use the + (plus sign) button next to Projects to create a new project:
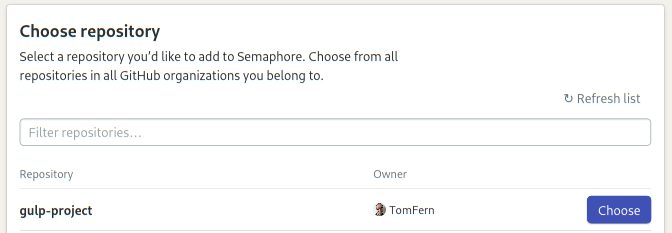
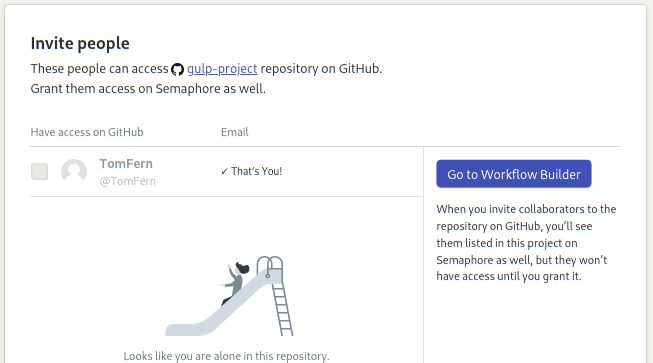
- Find your project repository and click on Choose:
- Click on Go to Workflow Builder to continue:
- Select the Node.js starter workflow and click on Customize it first:

Configure Initial Workflow
At this point, you should be seeing the Workflow Builder:
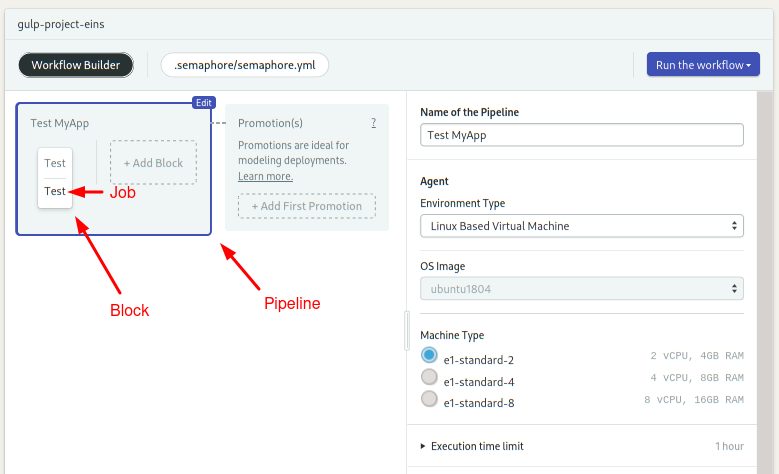
- Pipeline: Pipelines are made of blocks that are executed from left to right.
- Agent: The agent is the virtual machine that powers the pipeline. We have several machine types to choose from; the entry-level machine is perfect for our needs.
- Block: a block is a group of jobs with a common purpose and similar config. Once all jobs in a block complete, the next block starts.
- Job: jobs define the commands that do the work. They inherit their configuration from their parent block. Jobs in a block run in parallel. If any job fails, the pipeline stops with an error.
We have to make a small modification to make the pipeline work in our project:
- Click on the Test block.
- Replace the last two npm lines:
npm run build --if-present
npm test- With:
npm install -g gulp
gulp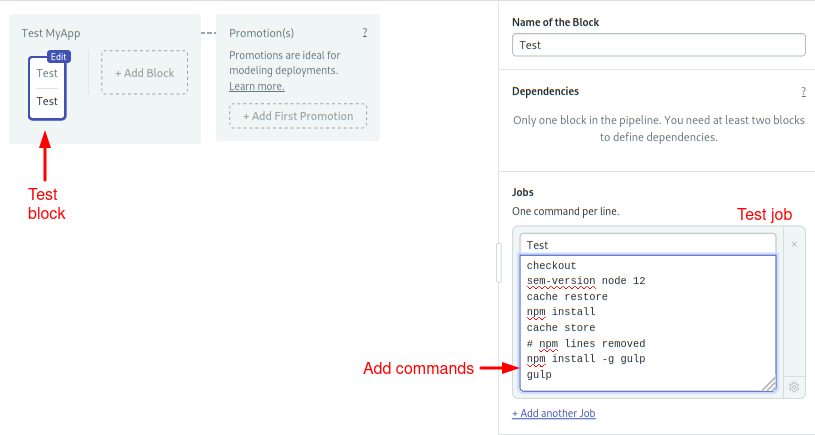
- Click on Run the Workflow and Start:
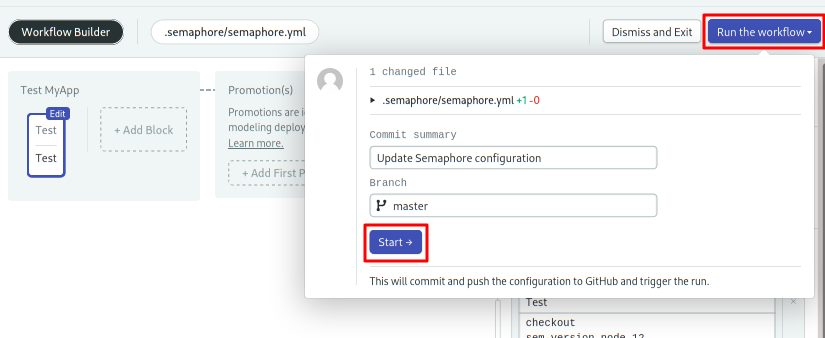
In a few seconds, Semaphore should have completed all the Gulp default tasks:
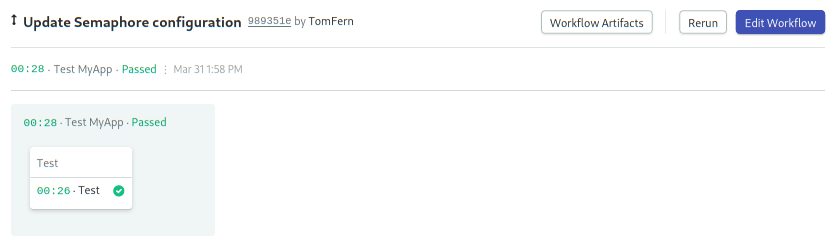
Our starter workflow features the most common tools in Semaphore’s toolbox:
- checkout: the checkout command clones the correct revision of the GitHub repository and changes the directory.
- sem-version: with sem-version, we can switch the active version of a language. Semaphore fully supports many languages, including JavaScript and Node.JS.
- cache: the cache is your project file storage. Cache is smart enough to figure out which files have to be stored and retrieved. In our project, cache will store the
node_modules/directory.
Scaling the Workflow
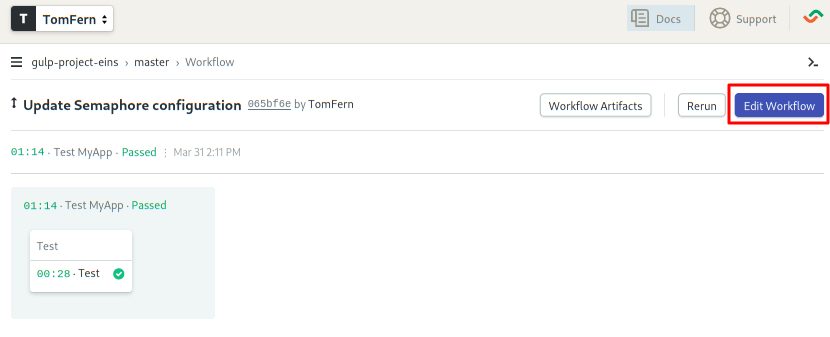
We can optimize the pipeline with just a few tweaks:
- Click on Edit Workflow to open the Workflow Builder again:
- Click on the Test block and rename it to “Install”
- Remove the last two Gulp lines we added in the last section:
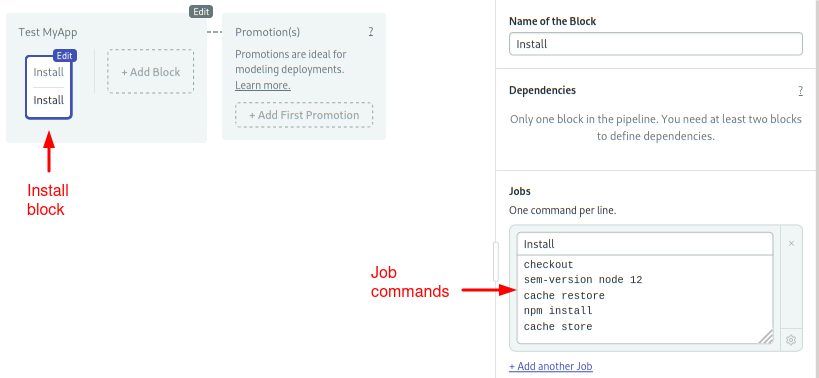
- Click on +Add Block to create a new block.
- Name the block “Gulp”
- Open the Prologue section and type the following commands:
checkout
sem-version node 12
cache restore- Type the following commands in the job box:
npm install -g gulp
gulp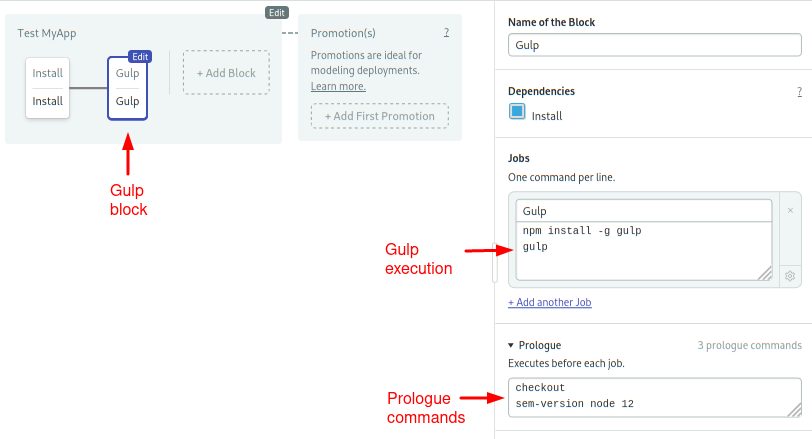
- Click on Run the Workflow and Start.
The new pipeline is ready to use:

Final Words
Gulp can be used to automatize a great number of menial tasks that are common during development. You should be able to use the final gulpfile.js as a basis for your project, with some slight modification, and you can find a plug-in for your particular need.
What makes Gulp different from Grunt for example, is the approach of piping of input and output which may result in faster execution depending on your code, and preference of code over convention, which can make configuration files easier to read and understand.
You can visit these links to learn more about Gulp:
More JavaScript tutorials: