Introduction
Testing is one of the ways to ensure the quality of our application, and it comes in many forms. The best known and the most popular among developers is unit testing. However, depending on what, how, and when we are testing, there are other options, e.g. integration, regression, load, acceptance testing, system, end- to-end, and functional tests. It can be tricky to differentiate between them; the web is full of questions such as “What is the difference between XXX and YYY testing?”, and the answers are sometimes inconsistent. This tutorial will focus on end-to-end testing of web applications (often referred to as functional testing).
We’ll learn how to use Elixir to create tests that will validate our web application from the end user’s perspective. We can test either simple scenarios (e.g. clicking on the plus button should increment amount of items in the shopping cart) as well as the whole flow (e.g. registration). With such tests in place, the testers don’t have to waste their time checking the same parts of our application over and over for any regression errors, so they can concentrate on more important tasks.
How Does It Work?
Since our tests should mimic a real user’s behavior, we need a mechanism to perform the actions that a real user does, e.g. click on a button, fill in a form, wait for an action to complete, etc. We can accomplish this by using a technique called browser automation. One of the tools we can use for this is Selenium WebDriver. It exposes a common API which allows us to control a web browser via its native automation mechanisms. WebDriver protocol is so popular that W3C is working to make it an internet standard, so there are implementations for most modern browsers (e.g. Chrome, Firefox, Edge). Another lightweight alternative, which we’ll use in this tutorial, is the headless browser, PhantomJS, with its WebDriver implementation – GhostDriver.
If you are still not sure what WebDriver is or how it works, there is a good thread on quora explaining it using the taxi analogy.
Prerequisites
To follow this tutorial, you need to know the basics of Elixir and have the following components installed:
- Elixir with Phoenix,
- PhantomJS, and
- npm from Node.js (for Brunch integration).
This tutorial was tested with Elixir 1.3.4, Phoenix 1.2.1, PhantomJS 2.1.1 and npm 4.1.1.
Introducing Hound
Hound is an Elixir library which allows us to perform browser automation and write end-to-end tests for web applications. Under the hood, it communicates with the selected WebDriver through its HTTP-JSON API. It supports Selenium WebDriver, ChromeDriver, and PhantomJS — GhostDriver, which we’ll be using.
Hound can be used as a part of ExUnit tests, or as a standalone component, like any other utility library. Let’s start with an example of the latter usage. We’ll create a simple utility function which prints our IP address.
First, create a new project with mix:
mix new hound_playground
Add Hound to the dependencies listed in mix.exs and include it in the startup applications:
def application do
  [applications: [:logger, :hound]]
end

defp deps do
  [{:hound, "~> 1.0"}]
end
Also, you need to configure Hound to use the correct WebDriver (in this case, GhostDriver from PhantomJS), by adding the following line to config/config.exs:
config :hound, driver: "phantomjs"
To get our IP address, we’ll use http://icanhazip.com, there are other similar pages, but most of them return lots of unwanted content. For the sake of this example, we won’t be parsing HTML results — we’ll just show the raw data.
To do that, edit lib/hound_playground.ex and change its contents to:
defmodule HoundPlayground do
  # enables Hound helpers inside our module, e.g. navigate_to/1
  use Hound.Helpers

  def fetch_ip do
    # starts Hound session. Required before we can do anything
    Hound.start_session

    # visit the website which shows the visitor's IP
    navigate_to "http://icanhazip.com"

    # display its raw source
    IO.inspect page_source()

    # cleanup
    Hound.end_session
  end
end
As you can see, thanks to use Hound.Helpers we can use functions such as navigate_to/1 directly, as if they were defined inside our module. Internally, Hound helpers are grouped into modules. For instance, navigate_to/1 is defined in Hound.Helpers.Navigation module along with other navigational helpers such as refresh_page/0. page_source/0 comes from Hound.Helpers.Page module, the same module in which element finders are defined. For a complete reference, please check Hound documentation.
Time to run the example. First, start phantomjs in WebDriver mode:
phantomjs --wd
Fetch the dependencies and run iex, loading mix project:
mix deps.get
iex -S mix
While in iex, we can run our function. Your output should look similar to the following:
iex(1)> HoundPlayground.fetch_ip
"<html><head></head><body><pre style=\"word-wrap: break-word; white-space: pre-wrap;\">83.84.85.86\n</pre></body></html>"
:ok
Our results are not the most impressive, but should give you an example of what working with Hound looks like — we’re inside a session and use a set of helpers for interacting with the “invisible” browser. These helpers can be thought of as a Domain Specific Language for browser interactions.
Testing with Hound
For a more realistic example, we’ll use Hound to test a small Phoenix application, which is a basic Phoenix template with a few additions.
You can clone it, or download it if you don’t have git, from the following URL: https://github.com/iskeld/hound_playground.
git clone https://github.com/iskeld/hound_playground.git
cd hound_playground/
As in the previous example, add Hound to your existing dependencies in mix.exs:
defp deps do
  [{:phoenix, "~> 1.2.1"},
  {:phoenix_pubsub, "~> 1.0"},
  {:phoenix_html, "~> 2.6"},
  {:phoenix_live_reload, "~> 1.0", only: :dev},
  {:gettext, "~> 0.11"},
  {:cowboy, "~> 1.0"},
  # our new dependency
  {:hound, "~> 1.0"}]
end
Instead of including it in applications array, add the call to ensure_all_started/2 at the beginning of test/test_helper.exs (before ExUnit.start) to ensure Hound is running during the tests:
Application.ensure_all_started(:hound)
ExUnit.start
Set up Hound to use Phantom’s web driver by adding the following line (before import_config) to config/config.exs:
config :hound, driver: "phantomjs"
Since we’ll be testing an actual site, we need to run the server during tests. Enable it by changing server value in config/test.exs to true:
config :hound_playground, HoundPlayground.Endpoint,
  http: [port: 4001],
  server: true
To make sure everything works, fetch the dependencies and run the application:
mix deps.get
npm install
mix phoenix.server
If everything goes well, you should be able to visit http://localhost:4000/login. Consult the output of mix phoenix.server if something is not working. This is the page we’ll be testing:
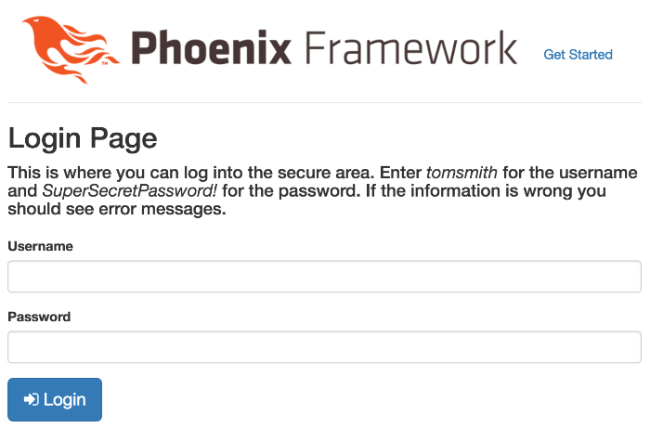
It’s a simple login page, which, after submitting the correct credentials, allows us to access the “secure” area http://localhost:4000/secure. We’ll start by writing a test that checks for invalid usernames; if you enter any value other than tomsmith an error message will be displayed and we will still be on the login page:
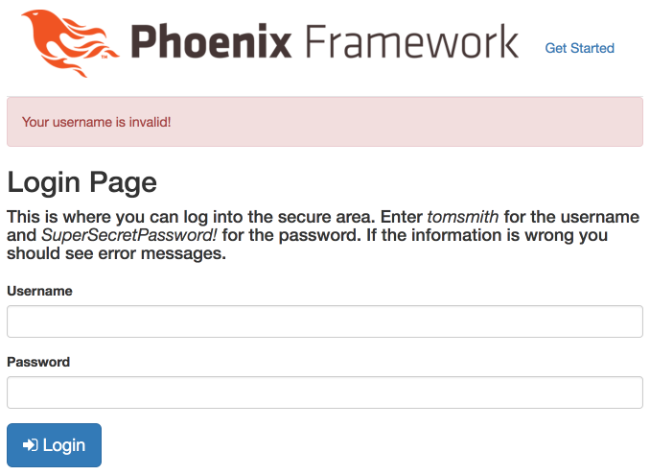
The test can be broken down into the following steps:
- Visiting http://localhost:4000/login,
- Locating the
usernamefield, - Filling it in with a test value (e.g. “John”),
- Locating the submit button,
- Clicking the submit button,
- Locating the error message container,
- Getting its text,
- Checking if the text equals
Your password is invalid!, and - Checking if we’re still on the login page.
Time to implement them all using Hound. Create a file test/e2e/login_test.exs with the following contents:
defmodule HoundPlayground.LoginTest do
  use HoundPlayground.ConnCase
  use Hound.Helpers

  hound_session

  test "invalid username" do
  end
end
First use gives us access to our application’s infrastructure, such as path helpers, etc. The second enables Hound helpers inside the module. The hound_session statement manages the session’s lifecycle for us: it creates and ends a new session for each test, so they don’t interfere. Without it, we would have to use start_session/1 / end_session/1 helpers in each test.
To visit the login page, we need its URL. Having it hardcoded is not a good idea, so create a function to retrieve the login URL using path helpers:
defp login_index do
  login_url(HoundPlayground.Endpoint, :index)
end
Now, we can use it in our test, along with navigate_to/1 from Hound.Helpers.Page:
login_index() |> navigate_to()
While searching for elements, the developer tools might be useful to determine the optimal strategy:
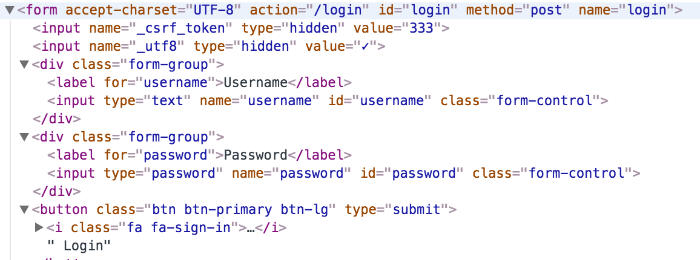
Since we’ll need both the username and submit button, let’s find their parent form first by their ID, and then, using find_within_element/4, retrieve username and the submit button from within the form. Since the submit button doesn’t have an id we’ll use the :class selector:
form = find_element(:id, "login")
username = find_within_element(form, :id, "username")
submit = find_within_element(form, :class, "btn-lg")
Now, fill in the username and click on the button using fill_field/2 and click/1 from Hound.Helpers.Element:
username |> fill_field("john")
submit |> click()
We can’t see this, however, the page should reload and the alert message should be visible. Note: if you want, you can see it using the take_screenshot/1 helper which will take a screenshot and save it to a file. You can just call take_screenshot() without any options and a file will be created.
Since there are two <p> elements, we’re going to search by both tag and css class alert-danger

To do this, use :xpath selector. Aalternatively we can use find_all_elements/3 to find all the paragraphs and then filter its result by css class using has_class?/2:
alert = find_element(:xpath, ~s|//p[contains(@class, 'alert-danger')]|)
# alternative solution:
#   alert = find_all_elements(:tag, "p") |> Enum.find(&(has_class?(&1, "alert-danger")))
To get the alert’s text, we’ll use visible_text/1 helper:
alert_text = visible_text(alert)
With everything in place, we can perform the assertions as follows:
assert alert_text == "Your username is invalid!"
assert current_url() == login_index()
The complete test should look like this:
defmodule HoundPlayground.LoginTest do
  use HoundPlayground.ConnCase
  use Hound.Helpers

  hound_session

  defp login_index do
    login_url(HoundPlayground.Endpoint, :index)
  end

  test "invalid username" do
    login_index() |> navigate_to()

    form = find_element(:id, "login")
    username = find_within_element(form, :id, "username")
    submit = find_within_element(form, :class, "btn-lg")

    username |> fill_field("john")
    submit |> click()

    alert = find_element(:xpath, ~s|//p[contains(@class, 'alert-danger')]|)
    alert_text = visible_text(alert)

    assert alert_text == "Your username is invalid!"
    assert current_url() == login_index()
  end
end
Run mix test to make sure everything works. Remember that PhantomJS (phantomjs --wd) must be running!:
$ mix test
.....

Finished in 0.3 seconds
1 test, 0 failures
Let’s test the remaining scenarios of the login page. First, we can validate the error message shown when username matches but the password doesn’t. There won’t be any new helpers, just an additional element to fill — password:
test "correct username, invalid password" do
  navigate_to(login_index())

  form = find_element(:id, "login")
  username = find_within_element(form, :id, "username")
  password = find_within_element(form, :id, "password")
  submit = find_within_element(form, :class, "btn-lg")

  username |> fill_field("tomsmith")
  password |> fill_field("wrong")
  submit |> click()

  alert = find_element(:xpath, ~s|//p[contains(@class, 'alert-danger')]|)
  alert_text = visible_text(alert)

  assert alert_text == "Your password is invalid!"
  assert current_url() == login_index()
end
We should also ensure that the “secure” area cannot be accessed without logging in. For that, add another helper function:
defp secure_index do
  secure_url(HoundPlayground.Endpoint, :index)
end
The test is simple and self-explanatory:
test "cannot access secure without logging in" do
  navigate_to(secure_index())
  assert current_url() == login_index()
end
To test a successful login, we’ll use the correct credentials, validate the welcome message (i.e. alert-info instead of alert-danger) and the URL:
test "correct username and password" do
  navigate_to(login_index())

  form = find_element(:id, "login")
  username = find_within_element(form, :id, "username")
  password = find_within_element(form, :id, "password")
  submit = find_within_element(form, :class, "btn-lg")

  username |> fill_field("tomsmith")
  password |> fill_field("SuperSecretPassword!")
  submit |> click()

  alert = find_element(:xpath, ~s|//p[contains(@class, 'alert-info')]|)
  alert_text = visible_text(alert)

  assert alert_text == "You logged into a secure area!"
  assert current_url() == secure_index()
end
For the final test, we’ll verify that if the user’s session is deleted, and they are redirected to the login after refreshing the page. Since the session is stored in cookies, we’ll delete them, using delete_cookies/0 and refresh_page/0 helpers:
test "clearing cookies causes logout" do
  navigate_to(login_index())

  form = find_element(:id, "login")
  username = find_within_element(form, :id, "username")
  password = find_within_element(form, :id, "password")
  submit = find_within_element(form, :class, "btn-lg")

  username |> fill_field("tomsmith")
  password |> fill_field("SuperSecretPassword!")
  submit |> click()

  delete_cookies()
  refresh_page()

  assert current_url() == login_index()
end
That was the last test for the login page. Run mix test to make sure all five tests pass:
$ mix test
.....

Finished in 0.8 seconds
5 tests, 0 failures
Hound can also help us to test more dynamic, JavaScript-based applications. We’re going to test a simple chat application which uses Phoenix channels and websockets. Open http://localhost:4000/chat in multiple sessions, tabs or windows, to see how it works:
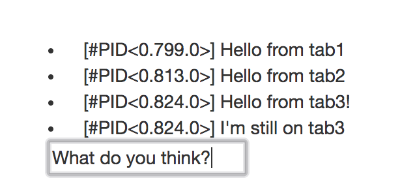
We have <div id="messages"> which acts as a container for messages (<li> elements) and below it, there’s a text field (<input id="chat-input">), which sends text after pressing the Enter key. Note that that each session gets a unique PID which is reflected in messages.
Now, we’ll see how Hound handles multiple sessions and dynamic JavaScript events. Create a new test file, test/e2e/chat_test.exs:
defmodule HoundPlayground.ChatTest do
  use HoundPlayground.ConnCase
  use Hound.Helpers

  hound_session

  test "receive chat from another session" do
  end
end
Let’s define a few helper functions:
defp chat_index do
  chat_url(HoundPlayground.Endpoint, :index)
end

defp parse_message(message) do
  [_match, pid, text] = Regex.run(~r/\[(.*?)\] (.*)/, message)
  %{pid: pid, text: text}
end

defp send_message(message) do
  navigate_to(chat_index())
  chat_input2 = find_element(:id, "chat-input")
  chat_input2 |> fill_field(message)
  send_keys(:enter)
  :timer.sleep(1000)
end
The first one, chat_index/0 is a helper returning URL for our chat page. parse_message/1 extracts pid and message text. Finally, send_message/1 navigates to our chat page, locates the input field and, after filling it with our message, sends the Enter key using send_keys/1 helper. Important: send_keys/1 also supports the “Return” key but, most of the time that’s not what you want. To imitate JavaScript keycode === 13 always use :enter. At the end of send_message/1 there’s a call to :timer.sleep/1. The reason behind this is that there’s no easy way to determine when an asynchronous operation ends, in our case, JS communication through WebSockets. Depending on the system’s speed this might not be necessary, however, it is safer to always wait while doing any kind of asynchronous JS. Hound internal tests use this technique while interacting with JavaScript.
Everything we do with Hound is executed in a session context. Using hound_session Hound always creates a default session named :default inside our test. If we need more than one session, we can use change_session_to/2 helper, passing the session name, and it will be created if doesn’t exist. To go back to the default session, we use change_to_default_session/0. Let’s use these helpers in our test to send two messages from two sessions:
send_message("Hello from session 1")
change_session_to("session2")
send_message("Message from session 2")
change_to_default_session()
Let’s extract the messages visible from the default session, using the find_all_within_element/4 helper to find all <li> elements inside <div>:
messages = find_element(:id, "messages")
[msg1, msg2] = messages
|> find_all_within_element(:tag, "li")
|> Enum.map(&inner_text/1)
|> Enum.map(&parse_message/1)
Now, we can verify that we received the message from session 2 inside the default session and check if they’re in the correct order. To make sure that the message is indeed from another session, we’ll also check if PIDs are different:
assert msg1.text == "Hello from session 1"
assert msg2.text == "Message from session 2"
assert msg1.pid != msg2.pid
Run mix test to make sure if all six tests pass.
The final version of the application, including tests, is available on the branch tests.
Setting up Testing on Semaphore CI
In a real world scenario, all tests, both unit and end-to-end, would be run on a continuous integration server. To complete the tutorial, let’s setup up our project on Semaphore CI. If you don’t have a Semaphore account, you can create one for free.
First, add the source files to git and push them to GitHub or Bitbucket.
After logging into Semaphore, select “Create new” -> “Project”:
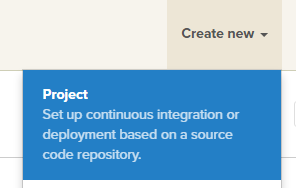
If you haven’t configured your repository host yet, Semaphore will ask you to choose one and configure it.
Now, choose the correct repository:
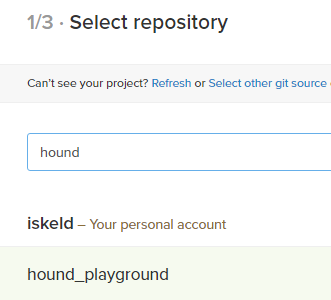
After basic configuration (e.g. selecting the owner), Semaphore will analyze the project and come up with the defaults for Elixir applications:
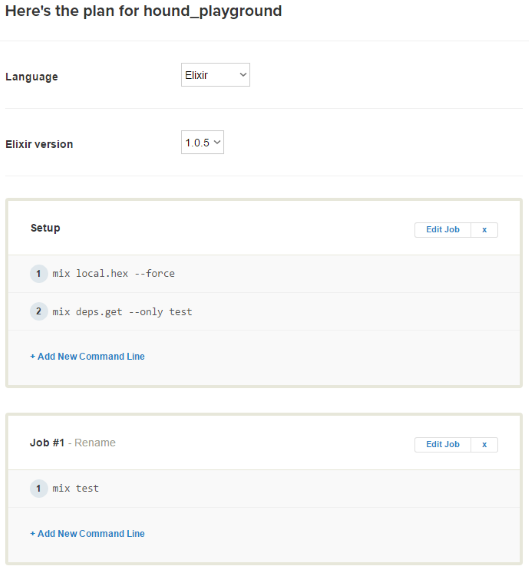
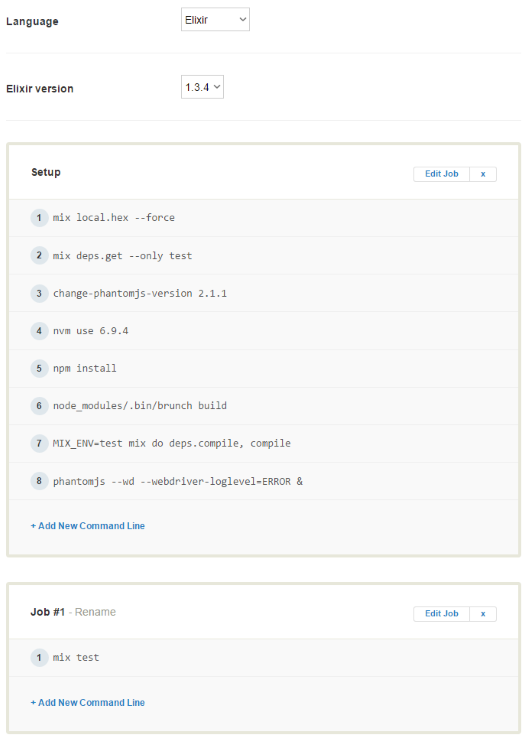
First, change the Elixir version to 1.3.4 and add the following command line steps to “Setup” job:
change-phantomjs-version 2.1.1
nvm use 6.9.4
npm install
node_modules/.bin/brunch build
MIX_ENV=test mix do deps.compile, compile
phantomjs --wd --webdriver-loglevel=ERROR &
The first two lines of these new steps select the newer versions of PhantomJS and Node stack. Next, npm dependencies are installed, brunch project is built, our application is compiled for test environment and finally, PhantomJS is started in WebDriver mode.
The completed project should look as follows:
Click on the “Build with these settings” button and wait for the build to complete and the tests to pass:
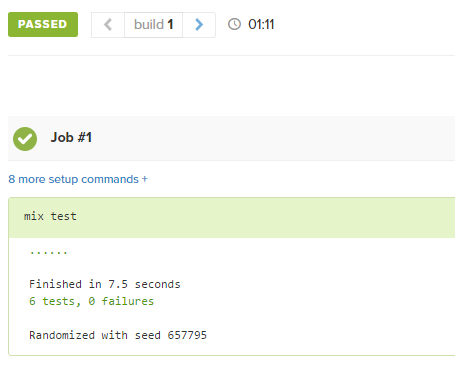
We’ve successfully set up continuous testing of our application. Every time you push new changes to your repository, Semaphore will detect them and automatically run your tests.
Conclusion
After this introduction, you should be able to use Hound either for end-to-end testing web applications or for web scraping. Occasionally, you might find yourself testing some non-standard scenarios. Fortunately, Hound provides other helpers which may suit your needs:
- Executing JavaScript,
- Window manipulation,
- Orientation manipulation,
- Dialog manipulation, and
- Console logs access.
If you don’t like Hound but are still looking for a similar tool in Elixir, you can check Wallaby. It offers similar features but its API is totally different and it only supports PhantomJS, there’s no support for Selenium or ChromeDriver at the time of writing.
While the end-to-end / functional testing is a very useful technique in assuring the quality of your web applications, there are some things to keep in mind while writing the tests. First of all, they have to be maintained, refactored, and kept “clean”, just like the unit tests. Unfortunately, they tend to be more fragile and complicated than the ordinary unit tests, mostly due to the complexities of the web applications interfaces. You should try to write them as generic as possible (e.g. not depending on the whole DOM tree, but rather on classes), but even that won’t always save you from rewriting the tests. Therefore, you don’t usually want full coverage of your web application. It’s best to test the simple and more crucial features (e.g. logging in, adding items to a cart), or the more mature ones, which are not likely to change in the future.
If you have any questions and comments, feel free to leave them in the section below.