This tutorial is the fourth part of our series on test-driving an Ember.js application. Here’s a quick recap of our last tutorial. We first started building out our Ember application using a route plus a template. We then transitioned our work to a component, which is where we’ll start from in this tutorial. We weren’t able to really leverage the power of components in the last tutorial, but we’ll start doing that right away in this tutorial.
If you you would like to take a look at the source code from the previous tutorials, you can easily find the code for the Ember application and the Rails API. With the Ember application, you’ll want to start with the Part3End tag, and with Rails API, you’ll want to start with Part2End. We’ll be modifying both projects in this tutorial, but the tutorial is primarily focused on Ember.
In this tutorial, we’ll start by adding features to our component. This includes the ability to sort the book list, and we’ll also add live filtering/searching of the books. From there, we’ll focus on front-end enhancements,
test-driving our changes with each step. We’ll also finally get to see all of our previous tutorials in action. By the end of this tutorial, we will be able to test out our component live, with some basic styling, and also seed data to help us out.
With the introduction out of the way, let’s continue where we left off.
Adding Sorting
Let’s add some features to our component. We’ll start with the ability to sort our books. Let’s write an integration test to check the ordering:
test('it orders a list of books by title', function(assert){
  var book1 = FactoryGuy.make('book', { title: 'Book 1' });
  var book2 = FactoryGuy.make('book', { title: 'Book 2' });

  this.set('books', [book2, book1]);
  this.set('sortKeys', ['title']);
  this.render(hbs{{book-list books=books sortKeys=sortKeys}});

  assert.equal(this.$('.book').text(), "Book 1Book 2");
});
Here, we create two books and add them to the books collection in reverse order (Book 2, and then Book 1). We then specify that we want to order by title. We’re using a new property that we will create on the component called sortKeys, which will take an array because we might want to sort by more than one field. Then, we render the handlebars template like we did earlier. Finally, we just get the text (which are merely the titles) of the two books on the page. If your test server is running, you’ll instantly get a failure as the result is Book 2Book 1 (the order we inserted the books into the collection).
Now, let’s fix our failing test, first in app/components/book-list.js:
import Ember from 'ember';

export default Ember.Component.extend({
  books: [],
  sortKeys: [],
  sortedBooks: Ember.computed.sort('books', 'sortKeys')
});
There are two new properties here, sortKeys, which we can bind to, and sortedBooks, which will be used to get a list of sorted books. We’ll hop over to our template (app/templates/components/book-list.hbs) to use this new property instead of books.
{{#each sortedBooks as |book|}}
  <div class="book">{{book.title}}</div>
{{/each}}
We don’t need to write a new test to take care of sorting. We’ll just append another assert to our test as follows:
test('it orders a list of books by title', function(assert){
  assert.expect(2);
  ...
  assert.equal(this.$('.book').text(), "Book 1Book 2");

  this.set('sortKeys', ['title:desc']);
  assert.equal(this.$('.book').text(), "Book 2Book 1");
});
Just append :desc to sort by descending.
Adding Filtering
If we’re sorting, we probably want to live filter the list of books as well. As always, we’ll start with a test:
test('it filters a list of books by title', function(assert) {
  var book1 = FactoryGuy.make('book', { title: 'Book 1' });
  var book2 = FactoryGuy.make('book', { title: 'Book 2' });

  this.set('books', [book1, book2]);
  this.set('filter', '1');
  this.render(hbs{{book-list books=books filter=filter}});

  assert.equal(this.$('.book').text(), "Book 1");
});
In our test, we again create two books and assign them to the books property. Next, we add a new property called filter, which will be our trigger to filter our collection. We’re passing a 1 here to go after Book 1. Finally, we test the text of the selector, hoping to get Book 1 back.
Now, for the implementation. Here we can leverage Ember.computed again, using its filter function.
export default Ember.Component.extend({
  ...
  filter: '',
  ...
  filteredBooks: Ember.computed.filter('sortedBooks', function(book) {
    var title = book.get('title').toLowerCase();
    return title.indexOf(this.get('filter')) !== -1;
  }).property('sortedBooks', 'filter')
});
Note the property function. This is a list of things that we need to watch for changes, which will update the filteredBooks property.
Focusing on UI
Up until now, we’ve simply focused on tests and making our tests pass. We haven’t done anything with our front-end. We spun up our server before, and got a “Welcome to Ember” message. Of course, that isn’t what we want. Let’s spend a couple of minutes adding some style and working on the front end.
We’ll use Bootstrap for our styles in order to save time. There are multiple ways of dealing with Bootstrap in Ember, but we’ll take the easy route and use the CDN. In the app/index.html file, add the CDN links, the stylesheet in the head and the Javascript after the assets/vendor.js (because Bootstrap requires jQuery, which is included in our vendor.js file):
<!DOCTYPE html>
<html>
    ...
    {{content-for "head"}}

    <link rel="stylesheet" href="https://maxcdn.bootstrapcdn.com/bootstrap/3.3.6/css/bootstrap.min.css" integrity="sha384-1q8mTJOASx8j1Au+a5WDVnPi2lkFfwwEAa8hDDdjZlpLegxhjVME1fgjWPGmkzs7" crossorigin="anonymous">
    <link rel="stylesheet" href="assets/vendor.css">
    <link rel="stylesheet" href="assets/bookcase.css">

    {{content-for "head-footer"}}
  </head>
  <body>
    {{content-for "body"}}

     <script src="assets/vendor.js"></script>
    <script src="https://maxcdn.bootstrapcdn.com/bootstrap/3.3.6/js/bootstrap.min.js" integrity="sha384-0mSbJDEHialfmuBBQP6A4Qrprq5OVfW37PRR3j5ELqxss1yVqOtnepnHVP9aJ7xS" crossorigin="anonymous"></script>
    <script src="assets/bookcase.js"></script>
  ...
</html>
To see what’s happened, launch the development server with command ember serve in bash, or whatever shell you use. Then, navigate your browser to http://localhost:4200. You’ll be greeted again with “Welcome to Ember,” but this time in a different, bolder font. Let’s change that into a homepage for our Bookcase site. Create a new template called index.hbs, and paste in the following Handlebars code:
<div class="container">
  <div class="jumbotron">
    <h1>Welcome</h1>
    <p>This site is for you book lovers.</p>
    <p>{{#link-to "books" class="btn btn-primary btn-lg" role="button"}}View Books{{/link-to}}</p>
  </div>
</div>
Now, you may have tried clicking on the “View Books” button, only to find out that it doesn’t work. A quick look at the Chrome console shows us the problem:
GET http://localhost:4200/books 404 (Not Found)
That’s similar to the problem that we encountered with our tests before. We put in route code to load our books, but of course in our case we want to point at our API that we created in the last tutorial.
To use our API, we’ll spin up the Rails server and point Ember-CLI at that path. If you’re using a Mac, you can also host the API using Pow. We’ll just use the Rails server for now. Open another terminal window, and change in the API directory. Then, run the command bin/rails s. This will spin up a server listening on port 3000. Now that we have that, stop the Ember-CLI server and relaunch it with the following command.
ember serve --proxy=http://localhost:3000
Refresh your browser, and now you should be able to click on the “View Books” button, and you’re greeted with an empty page. The page is empty because we don’t have any books in our database, nor do we have a way to add them. Let’s fix that.
Adding Seed Data to the API
To save time, we won’t cover adding books in this particular tutorial, but we want to work with our front-end. We can accomplish this using Rails’s seeds.rb file. With this file populated, we can run rake db:seed and insert some books, authors, and publishers. Open up db/seeds.rb in the API project and create some books. Here are a few examples that we added:
crockford = Author.create(name: 'Douglas Crockford')
oreilly = Publisher.create(name: "O'Reilly")
goodparts = Book.create(title: 'JavaScript: The Good Parts',
  isbn: '9780596517748',
  cover: 'http://ecx.images-amazon.com/images/I/518QVtPWA7L._SX379_BO1,204,203,200_.jpg',
  publisher: oreilly)
goodparts.authors << crockford

white = Author.create(name: 'Matthew White')
pragprog = Publisher.create(name: 'Pragmatic Programmers')
ember2 = Book.create(title: 'Deliver Audacious Web Apps with Ember 2',
  isbn: ' 9781680500783',
  cover: 'http://ecx.images-amazon.com/images/I/51RVEzfr-LL._SX415_BO1,204,203,200_.jpg',
  publisher: pragprog)
ember2.authors << white

ruby = Author.create(name: 'Sam Ruby');
thomas = Author.create(name: 'Dave Thomas')
dhh = Author.create(name: 'David Heinemeier Hansson')
rails4 = Book.create(
    title: 'Agile Web Development with Rails 4 (Facets of Ruby)',
    isbn: '9781937785567',
    cover: 'http://ecx.images-amazon.com/images/I/51ETr-3MB1L._SX396_BO1,204,203,200_.jpg',
    publisher: pragprog)
rails4.authors << ruby
rails4.authors << thomas
rails4.authors << dhh
With the seeds.rb file populated, run the command rake db:seed in the API directory. If all goes well, you should be able to spin up the API server again (rails s), go back to your Ember application and you should see three titles on the /books page.
Changing the Book Display
Let’s start with displaying the cover image of the book instead of the title. Head over to app/templates/components/book-list.hbs and change the code to the following:
{{#each filteredBooks as |book|}}
  <div class="book" data-title="{{book.title}}">
    <img src="{{book.cover}}" height="160" />
  </div>
{{/each}}
That’s a little better, but now we have two failing tests. Remember, we were using the text method to get the values of the books and comparing against those. Well, they don’t exist anymore. Because of that, we added a data-title attribute to the book div that we’ll use for our tests. The two failing tests are located in tests/integration/components/book-list-test.js. We’ll correct these in reverse order from the one in which they appear in the file, because the last test is easier to fix.
test('it filters a list of books by title', function(assert) {
  ...
  assert.equal(this.$('.book').data('title'), "Book 1");
});
All that’s needed is changing the last line to look at the data-title attribute and compare it to our text. Now, let’s tackle the other failing test. This is a bit difficult because the data method only returns the first result. Because of this, we’ll have to change our expected assertions to four instead of two, since we have to look at each value independently.
test('it orders a list of books by title', function(assert){
  assert.expect(4);
  ...

  assert.equal(this.$('.book:eq(0)').data('title'), "Book 1");
  assert.equal(this.$('.book:eq(1)').data('title'), "Book 2");

  this.set('sortKeys', ['title:desc']);
  assert.equal(this.$('.book:eq(0)').data('title'), "Book 2");
  assert.equal(this.$('.book:eq(1)').data('title'), "Book 1");
});
Here we’re using the eq method, which lets us select elements by position. In the first set, we’re making sure it’s ordered ascending, and in the second set we’re asserting that the books are ordered descending.
We’re back to green. Now, let’s add a little style to make our list look a little nicer. Open up app/styles/app.css and add the following couple of styles:
.book {
  float: left;
  margin: 20px 10px;
}
.book img {
  -webkit-box-shadow: 7px 7px 7px #333;
  -moz-box-shadow: 7px 7px 7px #333;
  box-shadow: 7px 7px 7px #333;
}
We gave our list of books some depth with CSS’ box-shadow, and now they appear in a line instead of stacked on top of one another.

Adding List Features
For the final thing for this tutorial, we’ll give users the ability to sort and filter the books. We’ve already tested these features using an integration test, but we’ll work with our acceptance test to check the user experience. Open up tests/acceptance/book-list-test.js and add the following test:
test('should filter a list of books', function(assert) {
  TestHelper.handleFindAll('book', {title: 'Book 1'}, {title: 'Book 2'});
  visit('/books');
  fillIn('#filter', '2');

  andThen(function() {
    assert.equal(find('.book').length, 1);
    assert.equal(find('.book').data('title'), 'Book 2');
  });
});
Here, we’re explicitly creating two books with their titles, even though ember-data-factory-guy would have created books with the same title. It’s good to be explicit in your tests so that future devs don’t need to hunt around for “magic values.” Like our other tests, we then visit the books page. Then, we use Ember’s test helper fillIn to fill in something (we’ll add an input) with an ID of filter. Finally, we assert that we only have one book and that its title is “Book 2.”
Now that we wrote a failing test, let’s fix it. We used a Bootstrap Well just to add a little style to our page. This code goes before the {{#each}} that we currently have.
<div class="well">
  <form class="form-inline">
    <div class="form-group">
      {{input type="text" value=filter class="form-control"
                     id="filter" placeholder="Search"}}
    </div>
  </form>
</div>
...
Note the line-breaks in the code snippets are just for display.
Now, let’s finish up with sorting. Back to our acceptance test. We’ll first check to make sure our books are ordered ascending by default. Here’s the test:
test('should sort a list of books ascending by default', function(assert) {
  TestHelper.handleFindAll('book', {title: 'Book 2'}, {title: 'Book 1'});
  visit('/books');

  andThen(function() {
    assert.equal(find('.book:eq(0)').data('title'), 'Book 1');
    assert.equal(find('.book:eq(1)').data('title'), 'Book 2');
  });
});
In our component, we’ll give it a default sortKeys:
export default Ember.Component.extend({
  books: [],
  sortKeys: ['title'],
  filter: '',
...
});
Now, let’s add sorting interaction to the component. Here’s the next acceptance test:
test('should sort a list of books descending when selected', function(assert) {
  TestHelper.handleFindAll('book', {title: 'Book 1'}, {title: 'Book 2'});
  visit('/books');
  click('#descending');

  andThen(function() {
    assert.equal(find('.book:eq(0)').data('title'), 'Book 2');
    assert.equal(find('.book:eq(1)').data('title'), 'Book 1');
  });
});
While we’re at it, let’s add a test for sorting ascending as well, and we’ll fix both tests at once.
test('should sort a list of books ascending when selected', function(assert) {
  TestHelper.handleFindAll('book', {title: 'Book 2'}, {title: 'Book 1'});
  visit('/books');
  click('#descending'); // Sort descending because of the default sort
  click('#ascending');

  andThen(function() {
    assert.equal(find('.book:eq(0)').data('title'), 'Book 1');
    assert.equal(find('.book:eq(1)').data('title'), 'Book 2');
  });
});
With those in place, let’s move on to the UI for these tests. Here is the full code listing for app/templates/components/book-list.hbs:
<div class="well">
  <form class="form-inline">
    <div class="form-group">
      {{input type="text" value=filter class="form-control"
                     id="filter" placeholder="Search"}}
    </div>
    <div class="form-group pull-right">
      <label>Sort By Title:</label>
      <div class="btn-group" data-toggle="buttons">
        <label id="ascending"
                    class="btn btn-primary active" {{action 'sortBy' 'title:asc'}}>
          <input type="radio" name="sort" checked> Ascending
      </label>
      <label id="descending"
                      class="btn btn-primary" {{action 'sortBy' 'title:desc'}}>
        <input type="radio" name="sort"> Descending
      </label>
      </div>
    </div>
  </form>
</div>
{{#each filteredBooks as |book|}}
  <div class="book" data-title="{{book.title}}">
    <img src="{{book.cover}}" height="160" />
  </div>
{{/each}}
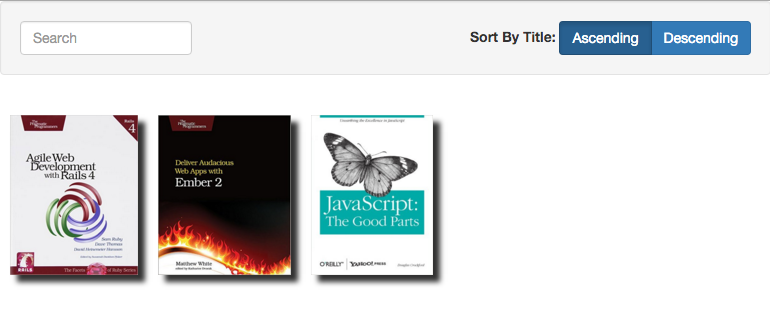
With that change, here is what our new book page looks like:
Conclusion
At this point, we finally have a component that can really stand on its own. We’re able to sort and filter our book collection and, thanks to seed data, we can test these features out using our browser, but we also have our tests.
We encourage you to make your site your own by changing up the styles and making other changes you might think of. You can also come up with some more features for the book-list control. We’d love to hear about your changes in the comments.
If you followed along with the tutorial you probably don’t need it, but you can grab the source code for this tutorial on GitHub. The code is tagged with Part4End, which makes it easy to see what we did between Part 3 and Part 4. The API is also tagged with Part4End to reflect the changes we made in this tutorial.