Introduction
Elm is a functional programming language meant for building reliable web applications. It compiles to JavaScript and is well-known for its helpful compiler that promises no runtime errors.
JavaScript is the de-facto language for building web applications. Today, we are building most of our web application logic in the frontend with JavaScript, and using the server mostly to serve up JSON. While it is simple to get started with JavaScript, the permissive nature of the language allows a lot of potential errors to sneak through undetected. Most invalid JavaScript operations rarely raise errors, but instead result in values such as null or undefined. Cryptic runtime errors such as undefined is not a function are common and often hard to debug, and this is where Elm comes in.
Elm brings all the best features of a compiled functional language such as immutable values, strong static types and a helpful compiler that guides you in writing code that will not crash in the hands of your users to the frontend.
This tutorial will introduce Elm and its ecosystem. We’ll also set up a simple but complete Elm project, along with tests and continuous integration with Semaphore.
Prerequisites and Assumptions
To get the most value from this article, it is assumed that you have:
- Written some JavaScript code
- Installed Node v6 or later
- Installed the Elm Platform
You can download the Elm platform for your specific system here.
Once you’ve installed Elm, you should be able to run
elm --version
and you shold get back a version number (0.18.0 at the time of writing)
The Elm installation also includes some tools commonly used with Elm. These include:
elm-package— the Elm package manager,elm-repl— an interactive REPL to try out Elm code,elm-make— a build tool for Elm. Compiles Elm code to JavaScript, andelm-reactor— an interactive development tool for Elm programs.
Elm Core Concepts
As mentioned earlier, Elm is a language for building web applications. It is compiled to JavaScript so as to be usable in web browsers. The main feature that differentiates Elm from other languages that compile to JavaScript is reliability.
Elm is considered to be more reliable because it answers the following questions:
- Can you be sure that you’re accessing methods on objects that actually exist? For example, when writing code like
tutorial.read(), can you be absolutely certain that thetutorialobject exists before trying to call thereadmethod on it? - When refactoring, can you be sure that you’ve changed all instances of the affected code and that everything will work afterwards?
- Can you find out if you’re calling non-existent functions in your code before shipping it?
Elm is able to make guarantees like these due to its compiler that checks your code and helps you find out about such errors so you can fix them early enough in the development cycle.
What features of Elm make such guarantees possible?
The Compiler
The compiler is responsible for transforming Elm code to JavaScript to make it work in a browser.
The intermediate compilation step enables the compiler to analyze your Elm code and ensure you’ve covered all possible scenarios that could cause runtime errors before the application is run. It ensures that you get to know about all the potential cases that could cause errors for your users, and fix them in the development phase.
The compiler is also well-known for producing helpful error messages that guide you to write correct programs.
For example, let’s take a scenario where we want to concatenate two strings. Elm uses the (++) operator for this and the (+) operator is used for adding numbers. What would happen if we used the wrong operator?
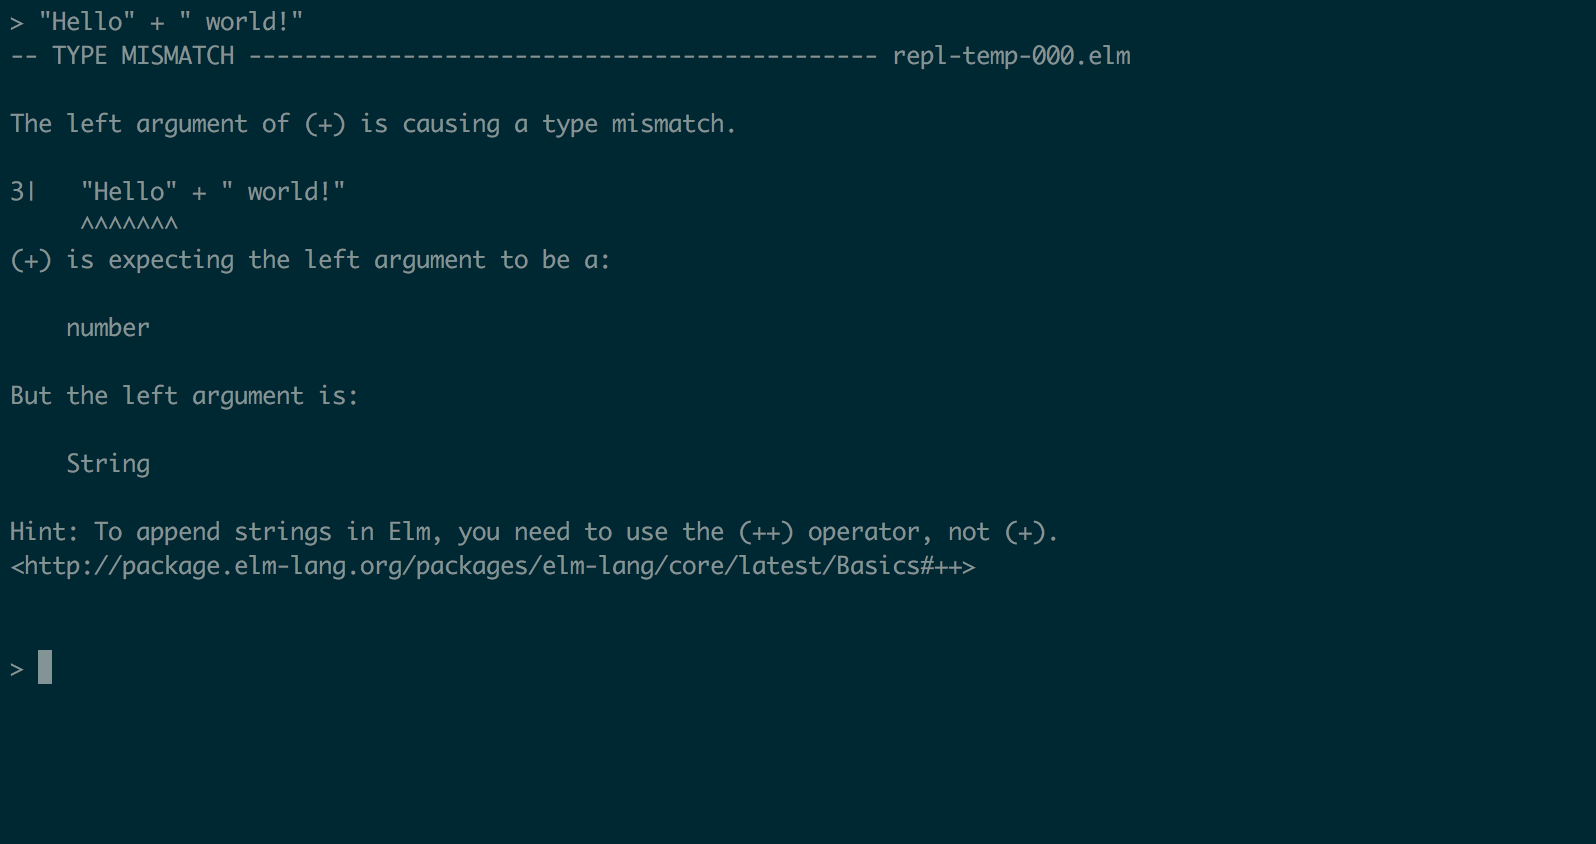
The Elm compiler gives us a useful error message, telling us that the operator we used expects a number, and that it received a string instead. The compiler goes above and beyond and gives an explanation of why the code didn’t work along with suggestions on what we could use instead.
Functional Programming and Immutability
Elm programs are built with functions as the basic unit of abstraction. Everything in Elm is either a function or data. Specifically, Elm uses pure functions that take data as input and produce data computed from the inputs. Given the same inputs, a pure function always produces the same output.
For example, here’s how we could write a function called sum that takes in two numbers, a and b and returns their sum:
sum a b = a + b
You’ll notice that unlike JavaScript, there’s no brackets and curly braces. The Elm docs cover the syntax in more detail.
Elm is also an immutable language, meaning that once a value is declared, it never changes. To update a value, we perform an operation on the existing data using functions and save the result as a new value.
Let’s assume we have a list and we would like to remove the first 2 elements of the list.
Elm provides a List.drop function to achieve this. It takes two arguments: the first argument is the number of elements to remove, and the second is the list itself. This is how we would use it in an elm-repl session.
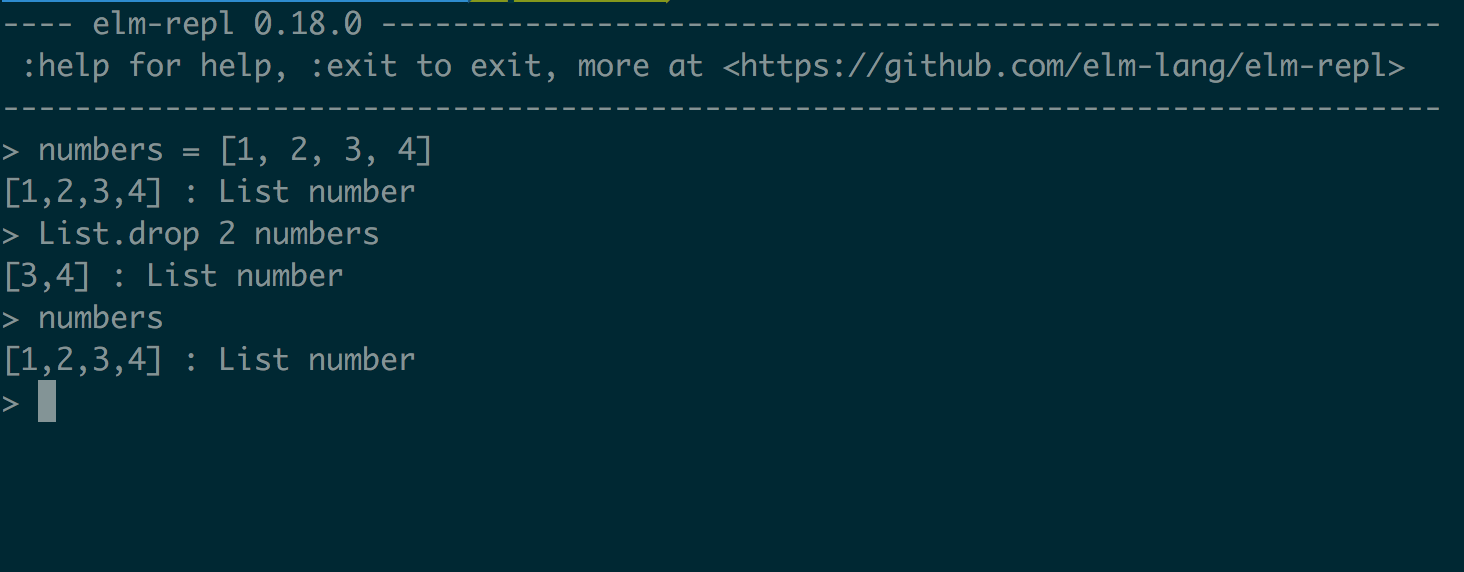
You’ll notice that even after calling the function to drop the first 2 values in the numbers list, the original value of numbers is still unchanged. This is a core concept of the Elm language, where we do not change data in place. Instead, we obtain new values by calling functions that perform some operation on the data and return a new value.
To preserve the value returned from the List.drop function, we would have to save it in a new variable. This is how we would do it:
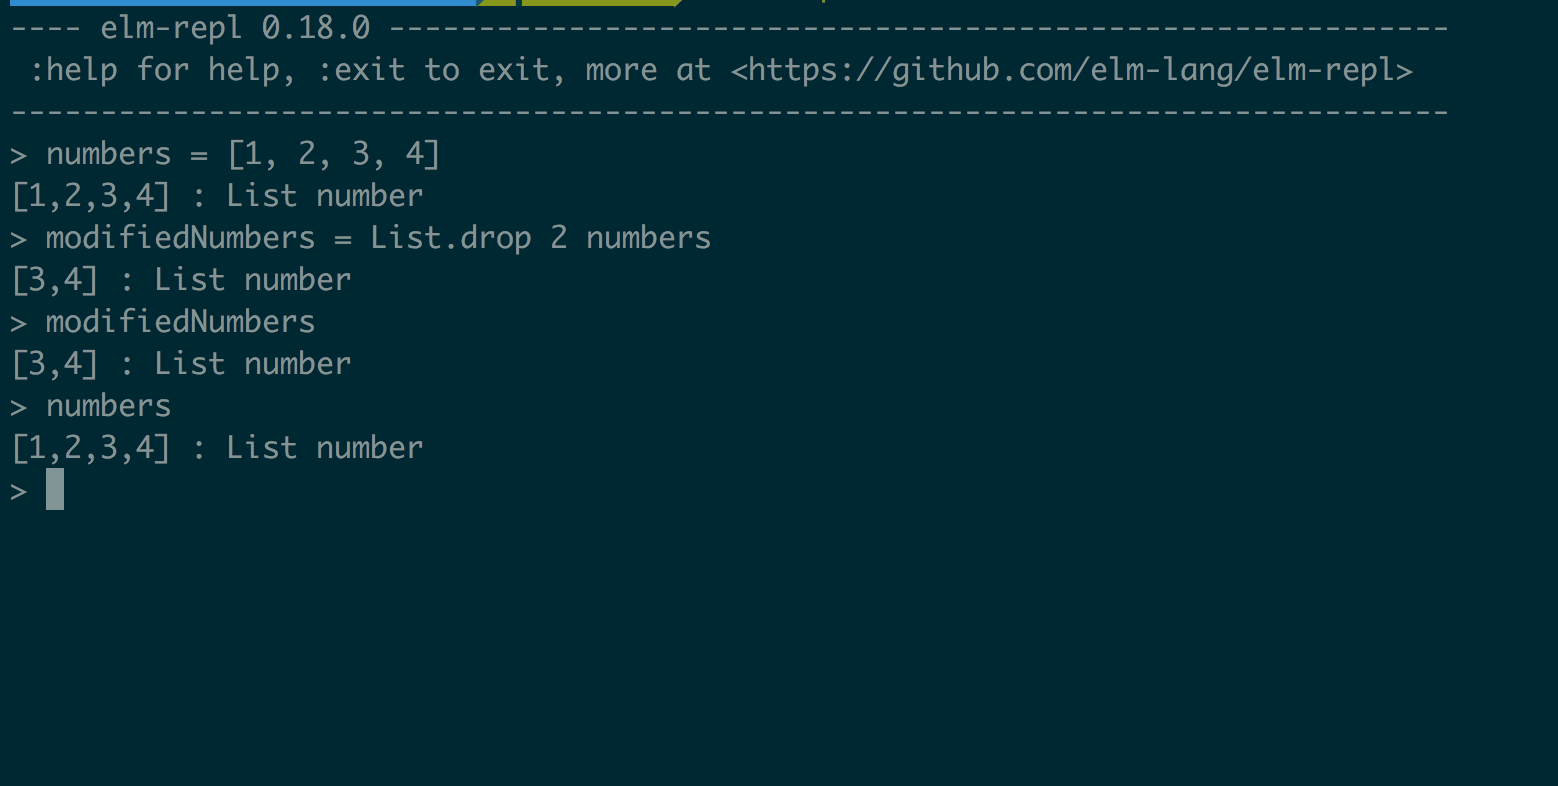
A good effect of this is that we can track how values change in an application over time.
This enables powerful concepts such as time-travel debugging, where we can cycle through history in our application to see how the values have changed over time.
Static Types
Static types are one more way through which Elm is able to give guarantees that your programs will be free of runtime errors once they successfully compile.
Static types enable functions to specify which types of data they take in, and which types of data they produce. If you call such a function with data types that are different from the ones specified, a compile time error is produced.
Revisiting the sum function we created earlier, we can rewrite the function with type annotations.
sum: Int -> Int -> Int
sum a b = a + b
Here, we’re explicitly specifying that the function takes 2 integers and that it’s returning an integer.
Attempting to call the function with two strings, for example, would result in a compilation error. 
Elm is also smart enough to infer data types when they are not provided. If we wrote the function without type info in the elm-repl, this would be the result:
> sum a b = a + b
<function> : number -> number -> number
Elm can infer that the function takes 2 numbers and returns a number. In this case, since we weren’t very specific, the sum function can now infer any number type, i.e. either an Int or a Float, depending on the usage.
While still on the topic of types, the concept of null or undefined does not exist in Elm. These two values are the major cause of unpredictable behaviour in JavaScript. Elm handles potentially missing values using the Maybe type.
Let’s compare and contrast how JavaScript and Elm handle potentially missing values. We will try to get the first element from an empty list/array. Here’s what happens in JavaScript:
let empty = [];
let first = empty[0];
first; // undefined
Surprisingly, the operation succeeds and doesn’t raise an error or give us an indicator that we might be doing something strange. The value we get back is undefined. If you encountered such a case in a large application, it would be very difficult to get the source of the error.
Let’s see how Elm deals with the same case:
first = List.head []
first   --  Nothing : Maybe.Maybe a
The operation also succeeds, but if we look at the returned value, we see that it is Nothing and belongs to the type Maybe.Maybe a. The Maybe type is used to represent a case where a value may or may not exist. It evaluates to one of 2 possible values:
Nothing– This indicates that the data does not exist, like what we just sawJust a– This indicates the data exists. The valueawould contain the returned element. For example, if the list had a number2as the first element, the returned type would beJust 2
It’s interesting to note that Elm has a type specifically for dealing with such instances. This is data that we can expect and handle in our code, and with the help of the compiler, we can be sure that we’ve handled both cases, whether the value exists or not.
case first of
  Just x -> x
  Nothing -> []
This level of type safety is one of the major reasons Elm is able to guarantee that you won’t experience errors like cannot read property 'x' of undefined in your Elm programs, since the compiler ensures you have to cover all edge cases upfront.
It might seem tedious for small examples, but when working with large codebases, such errors become harder to track down and waste lots of developer time when trying to debug and fix them. The Elm compiler helps you find out about them easily and make sure you have a correct application when it compiles, at least with regard to types and their usage.
Elm Design Decisions
In addition to the features described so far, which are inbuilt into the language, Elm also has a prescribed way of doing things. This is what we might call best practices, and will influence the way you write Elm applications.
Let’s explore these design considerations.
The Elm Architecture
The Elm Architecture is the recommended way to structure Elm applications. It enables you to divide your Elm application into three distinct parts:
- Model – This holds the state of your application. Any data that should be available to the application should be stored here.
- Update – This specifies how to update the model
- View – This is the model’s visual representation as HTML
This simple pattern is the basis of almost all Elm apps you will encounter. It provides a common ground for them and it makes it easy to read existing Elm code, since it will most likely be following the same pattern.
Since this is the recommended way of structuring applications, it is inbuilt in the language and requires no extra effort from the developer to implement.
The sample application we’ll create later on will demonstrate this in more detail.
Subscriptions and Commands
We mentioned earlier that everything in Elm is either a function or data. All computations in Elm are done through pure functions operating on data structures.
But how do we deal with stuff that doesn’t fall into these categories? Operations such as making HTTP requests, fetching random values or getting the current time all involve side effects. This means that once you call the same function with the same values, you can’t always expect the same value back.
These operations have some element of unpredictability and Elm’s answer to this is subscriptions and commands.
Assuming we want to perform one of these operations, the way you do this in Elm is issuing a command to the Elm Runtime. A command is an intent to perform a specific action.
When we need to send commands to Elm, we return them from functions, and Elm runtime then takes the command, performs the operation we requested and and finally returns a computed value.
An example of a command to make an HTTP request looks like this:
Http.getString "http://example.com"
The way to get access to the value returned from a command is through a subscription. A subscription is a way to opt in to the results of a command.
Once the Elm runtime executes the command, we are able to tell Elm that it should send us the values produced from a command through a subscription.
For example, for HTTP request we made above, we would need to tell Elm where to send the results once the request is done, so we can handle it. This is done through a subscription. For an HTTP request, the result is either a successful response with the requested data, or an error. We need to specify a way to handle both cases.
This is usually handled in the update section of the Elm architecture. This is what we would need to do in order to handle the HTTP request we made above:
First, we need to specify where the result of the HTTP request should be sent. A subscription is expressed in this way in Elm. The following code says that once the request is done, the results should be sent to NewString.
Http.send NewString (Http.getString "http://example.com")
Next up is the code that actually handles the result:
type Msg
  | NewString (Result Http.Error String)

update : Msg -> Model -> Model
update msg model =
  case msg of
    NewString (Ok newString) ->
      {model | string = newString}

    NewString (Err _) ->
      model
Here, the main concept is that the HTTP request we issued can result in either an HTTP error if the request is unsuccessful, or a string, if the request succeeds. This is captured by the Result Http.Error String type. The Result type is very similar to the Maybe type we saw earlier. The way to interpret this is that the Result may hold either a Http.Error or a String. If the HTTP request failed, the Result will hold an Http.Error and if it succeeds, it will hold a String, which is the data we requested.
In the first case, the request produces a String, which we add to our model. In the failure case, we return the model unmodified.
The Elm Guide covers more usage patterns of how to deal with side effects through Subscriptions and Commands in the Elm Architecture model.
Setting up a Complete Project
Now’s the time to put all this knowledge into practice by writing some Elm code. We will be creating a complete working Elm application through which we can explore how to write Elm code and get familiar with how the Elm architecture works. We will also look at how to test our Elm application. Let’s get started.
We will scaffold our project with a handy tool called elm-new.
To install it, run:
npm install -g elm-new
Once the installation is done, let’s go ahead and use it to bootstrap our project folder. We will use the --beginner flag to create the simplest type of application.
elm new hello-world --beginner
To run the project, run elm-reactor in the project folder:
elm-reactor
This runs the application on http://localhost:8000. Go ahead and open the URL on your favorite browser, and you should see this screen: 
This shows the file contents, but not our application. To do that, click on the src link, then click on Main.elm in the next screen. Finally, you should see a Hello, world!{} message on the screen, and this should confirm that our application is working.
Since we have a minimal working application, let’s define what we want it to do.
We want the final product to display a message and a button. The message should initially be "Hello, world!" and once we click the button, it should change to "Hello, Elm!". Subsequent clicks of the button should switch back and forth between these two messages.
This functionality is enough to help us learn about how the whole Elm architecture works together.
We will be making all our changes in the src/Main.elm file.
The first step will be storing the message in our model. The message will contain wither the string "world" or "Elm".
Our model will be a record (the Elm alternative to objects) with one field called message. The type of the message field will be String. Type aliases help us capture this info accurately.
type alias Model =
    { message : String }
This means that each time we refer to the Model type, we are referring to a record type with a field called message, and this field should always contain a string.
Next, we need to add our message to the initialModel, so that when the application starts, it has a value to display.
initialModel : Model
initialModel =
    { message = "world" }
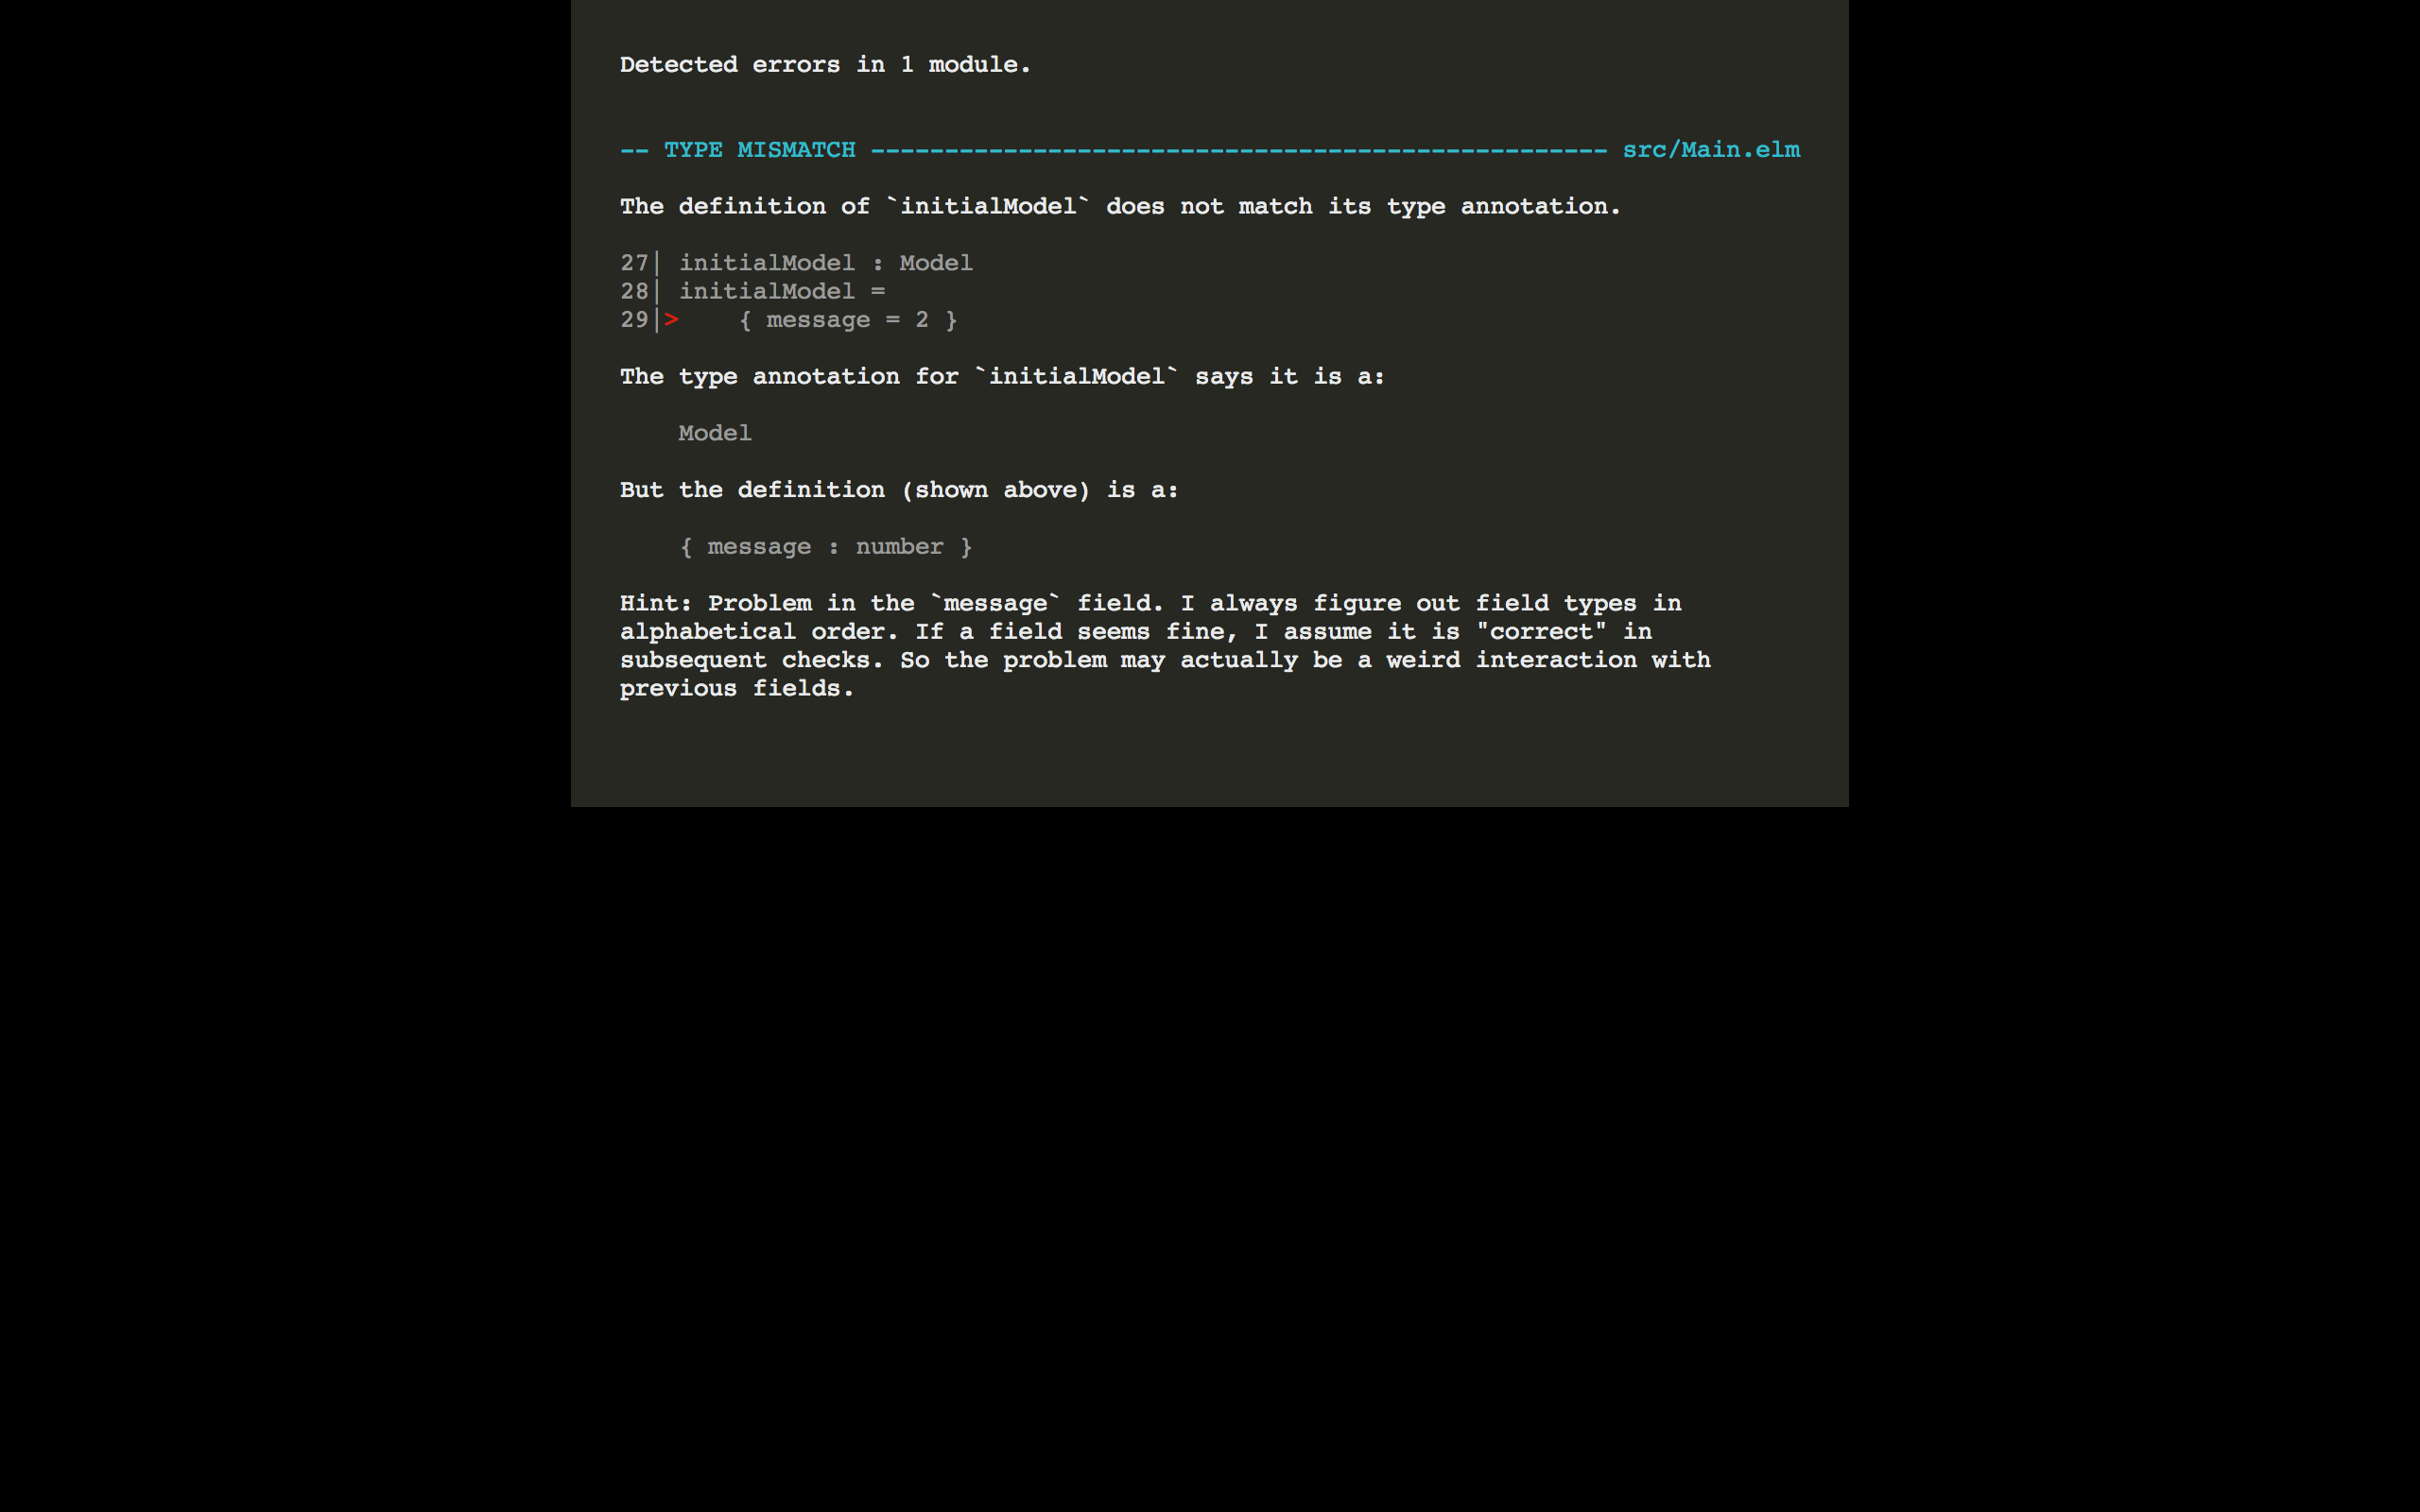
What would happen if we tried setting the message field to something that’s not a string? Let’s find out
initialModel : Model
initialModel =
    { message = 2 }
When you reload the page, you’ll see the Elm compiler kick into action. It’s politely telling you, “Hey, you just told me the message field should be a string, and you’re giving me a number? Are you some kind of liar? What are you going to say next? That Santa isn’t real?”
Static types can come in handy in these types of situations.
With that change, we are done with the model. Onwards to the Update section.
We’ll change the Msg type to capture the message type we’ll send when the button is clicked.
type Msg
    = Switch
Next is the actual update function. It takes in a Msg and the current model and updates our model based on the Msg type it receives.
Its responsibility is to switch the message between "world" and "elm" depending on what is currently in the model. One thing to note is that it produces a new model, rather than mutating the current model. This is the immutability concept we saw in practice earlier.
update : Msg -> Model -> Model
update msg model =
    case msg of
        Switch ->
            if model.message == "world" then
                { model | message = "Elm" }
            else
                { model | message = "world" }
Finally, let’s deal with the view function. Its responsibility is to display what’s currrently in the model as HTML.
view : Model -> Html Msg
view model =
    div []
        [ text ("Hello, " ++ model.message ++ "!")
        , button [ onClick Switch ] [ text "Switch" ]
        ]
The important detail is the text function, which is a function that takes a string, and now displays the message in the model on the screen. We’ve also added a button with an onClick attribute, which sends the Switch message when clicked. When you click the button, you’ll see that the text switched between "Hello, world!" and "Hello, Elm!"
Here’s the final working application: https://ellie-app.com/3n5L4cNs4PNa1/1
Adding Tests
Let’s add a few simple tests that demonstrate how to approach testing Elm code. We will write just enough tests to cover all the three main sections of the Elm Architecture.
Elm has a handy tool called elm-test and that’s what we will use for managing all our testing needs.
npm install -g elm-test
Now, let’s scaffold our tests. We need to run the next command in our project directory.
elm-test init
This will create a tests directory in our project directory, and inside it, you will find two new files:
elm-package.json— this one contains the dependencies required for the tests to run, andExample.elm— this is where we will actually add the tests.
To run the tests, run the elm-test command in the package directory. Right now, our tests don’t have anything substantial. Let’s write some tests.
For the first test, let’s verify that once we have a specific message in the model, that message is rendered in the view.
To be able to query the rendered DOM, we will use the elm-html-test package which is useful when writing expectations about Html values.
To install it, let’s go into the tests folder, then run this command from there:
cd tests
elm-package install eeue56/elm-html-test -y
We need to first import the Main module in order to be able to use it in the tests. We also need to import some helpers from the elm-html-test package.
import Test.Html.Query as Query
import Test.Html.Selector exposing (text)
import Main
We will add the actual tests in the body of the suite function. We will add a describe function that takes in a string, which is a sort of a label for the test. Then, we will add a list of test functions. Here’s the first one:
suite : Test
suite =
    describe "App Tests"
        [ test "Correctly Renders Model Content" <|
            \() ->
                Main.view { message = "Semaphore" }
                    |> Query.fromHtml
                    |> Query.has [ text "Hello, Semaphore!" ]
        ]
For the first test, we pass in a model with a custom message to the Main.view function, which is the view function we wrote earlier, and then ensure that the message we’ve set is rendered in the view.
Running the tests through elm-test should have the tests passing. You need to ensure that you’re running the command from the root directory and not the tests directory.
Next, we will test the update function. The basic functionality is switching messages. Therefore, we need to assert that once the update function receives the Switch message, it changes the message in the model.
The first test needs to capture that, given the initialModel and the Switch message, the update function updates the message in the model to say Elm.
test "updates initialModel message" <|
    \_ ->
        Main.initialModel
            |> Main.update Main.Switch
            |> Expect.equal { message = "Elm" }
The next test needs to cover the reverse case, that given a model with the Elm message, when the update function is called again with the Switch message, we should get back the initialModel
test "switches back to initialModel message" <|
    \_ ->
        { message = "Elm!" }
            |> Main.update Main.Switch
            |> Expect.equal Main.initialModel
The final result should now look like this:
module Example exposing (..)

import Test exposing (..)
import Expect
import Test.Html.Query as Query
import Test.Html.Selector exposing (text)
import Main


suite : Test
suite =
    describe "App Tests"
        [ test "Correctly Renders Model Content" <|
            \() ->
                Main.view { message = "Semaphore" }
                    |> Query.fromHtml
                    |> Query.has [ text "Hello, Semaphore!" ]
        , test "updates initialModel message" <|
            \_ ->
                Main.initialModel
                    |> Main.update Main.Switch
                    |> Expect.equal { message = "Elm" }
        , test "switches back to initialModel message" <|
            \_ ->
                { message = "Elm!" }
                    |> Main.update Main.Switch
                    |> Expect.equal Main.initialModel
        ]
These tests are enough to give us a feel of how to test Elm code and have covered each part of the Elm architecture. We highly recommend going through the elm-test docs for more info on how to write tests.
Continuous Integration with Semaphore
The final step in our Elm journey will be setting up our project to be continually tested each time we make a change.
Before we do that, we need to commit our changes and push them to a GitHub or Bitbucket repository. Once we do that, Semaphore can track any time we add new changes and run our tests.
Next, sign up for a free Semaphore account if you don’t have one already. These are the steps we need to follow to add the project to Semaphore:
- Navigate to your Semaphore dashboard and click the “Add New Project” button:

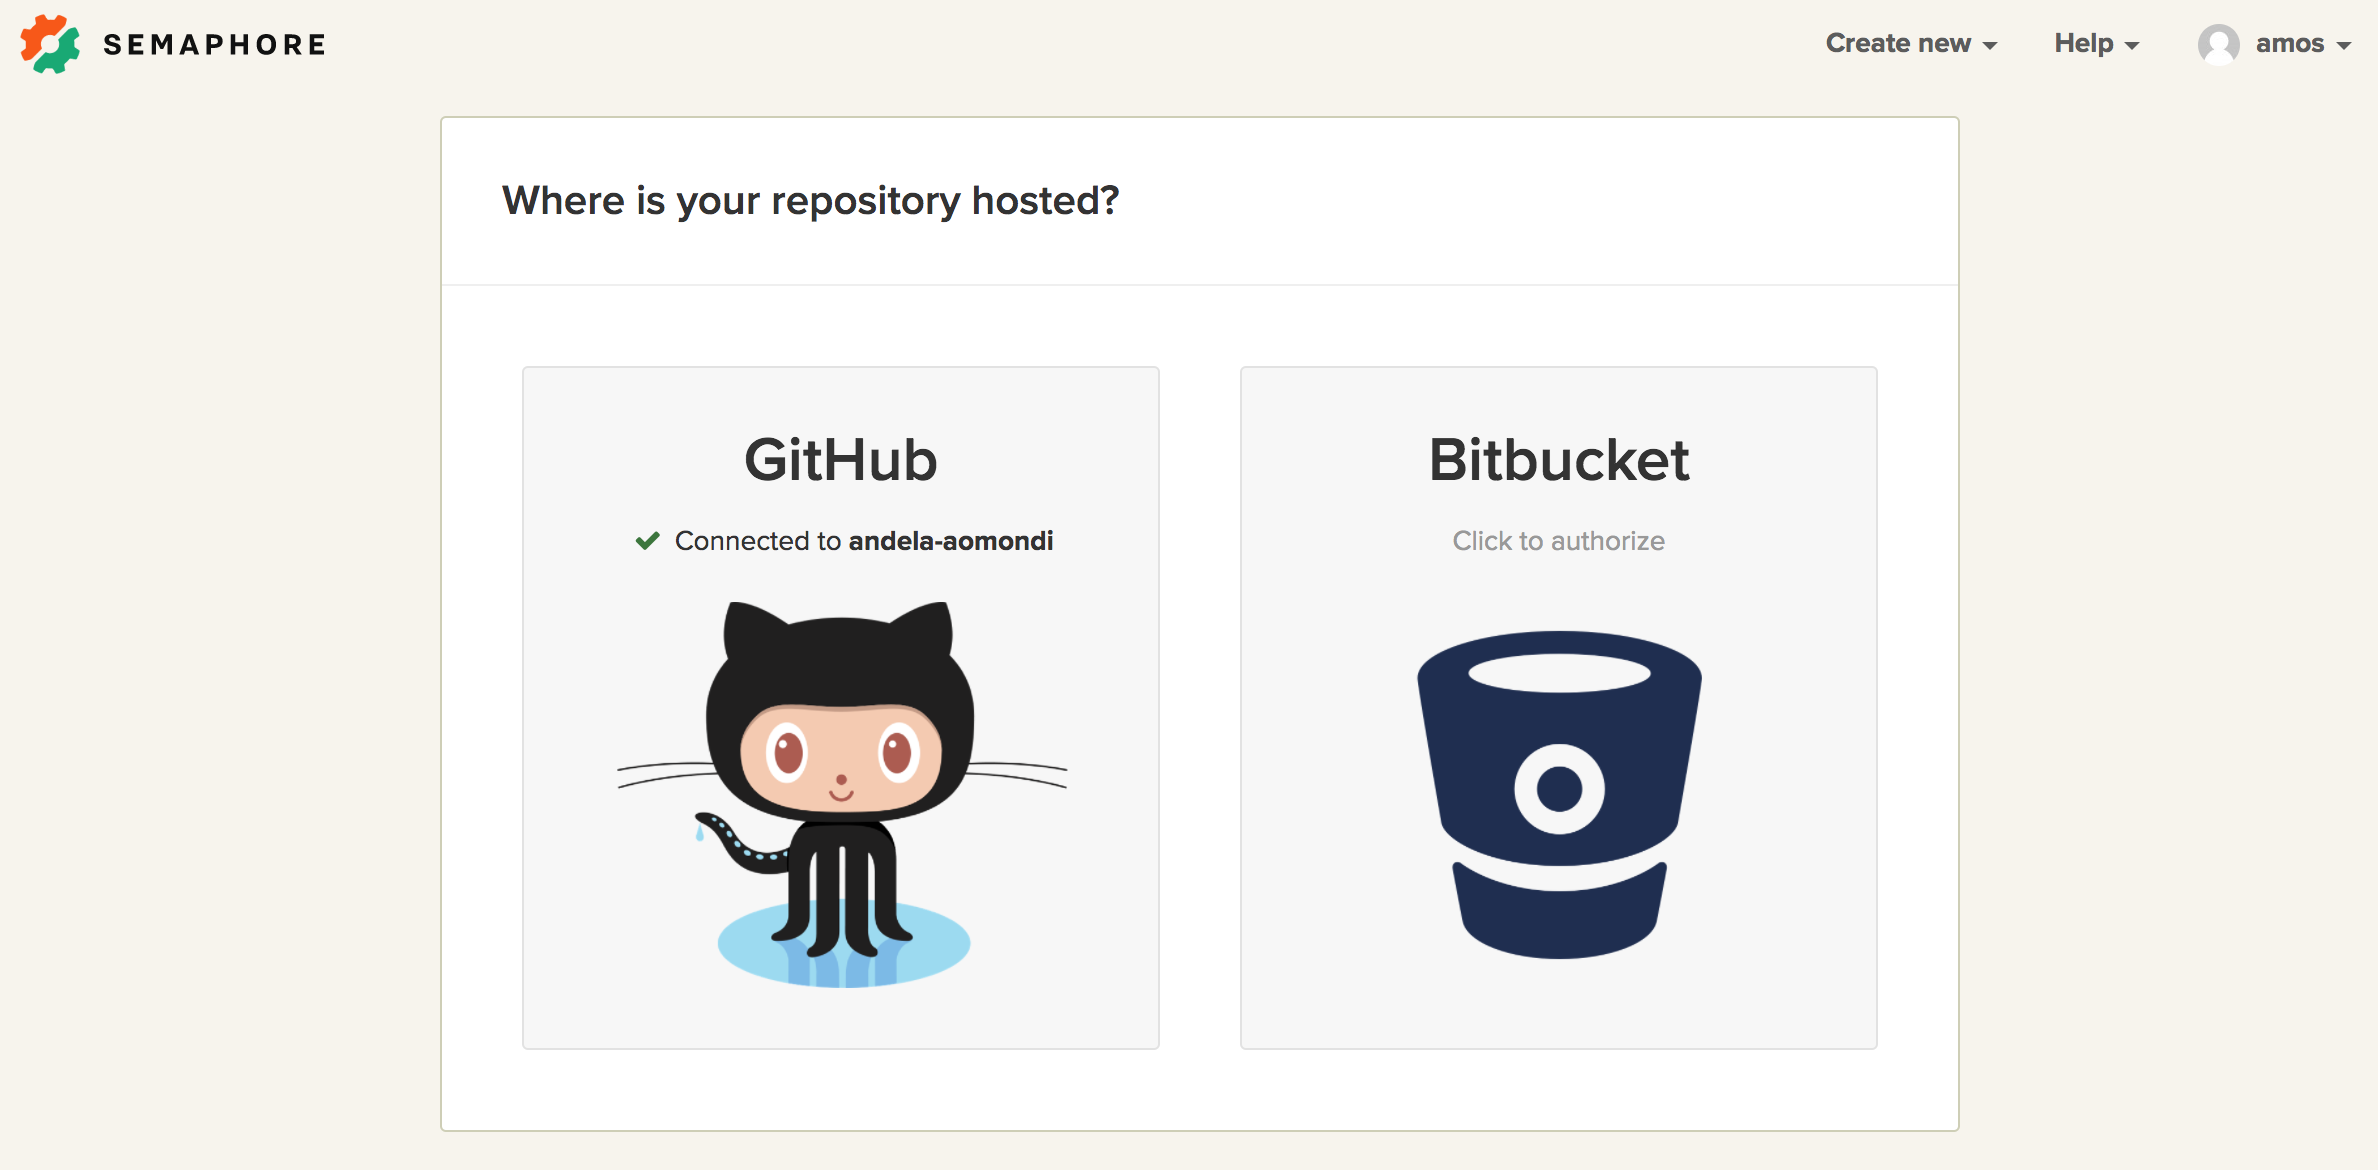
- If you’ve connected both GitHub and Bitbucket, you’ll see a screen where you should select the account where the code is hosted.

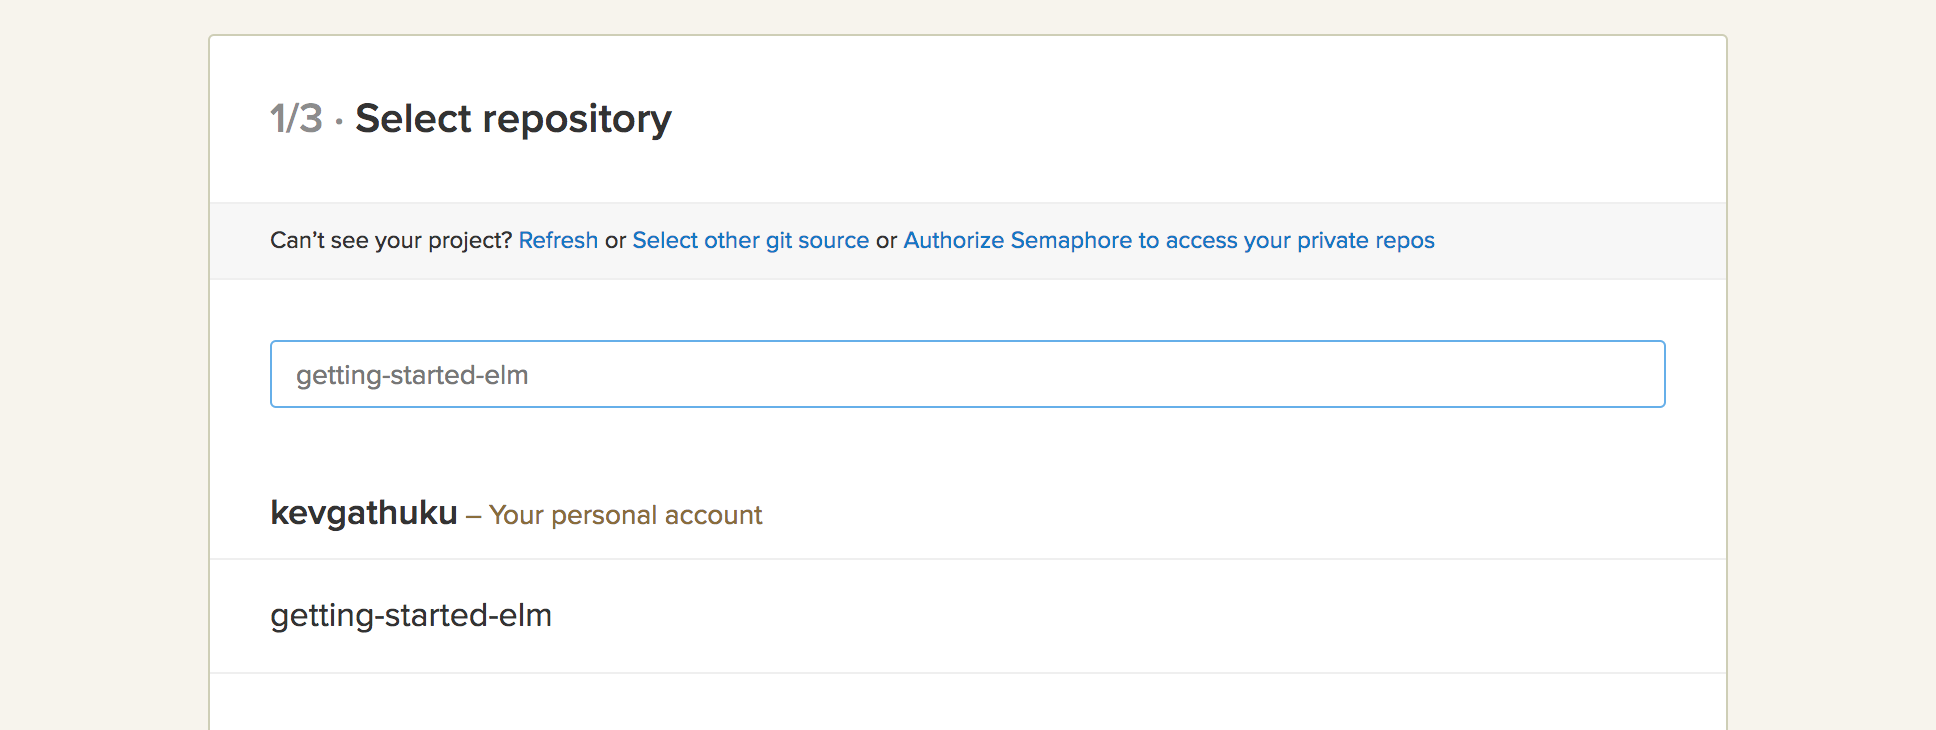
- Select the repository that holds the code you’d like to test:

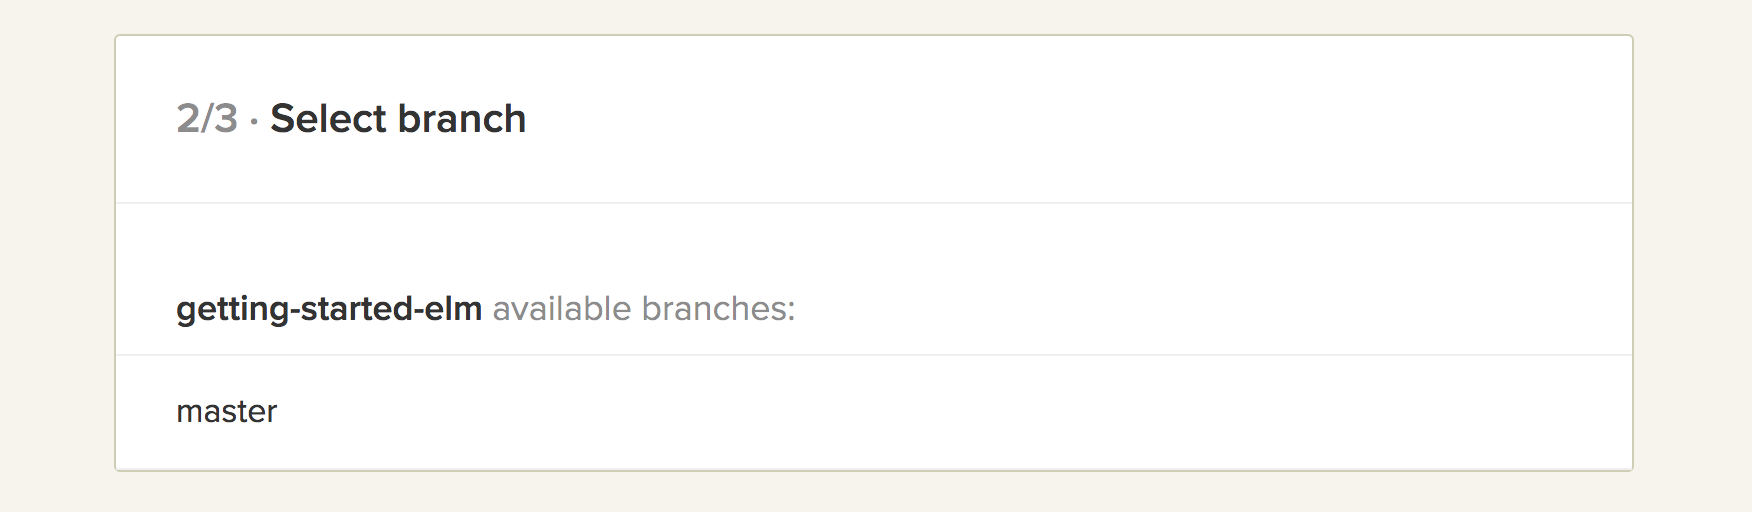
- Select the branch you would like to build. The
masterbranch is usually the default one.
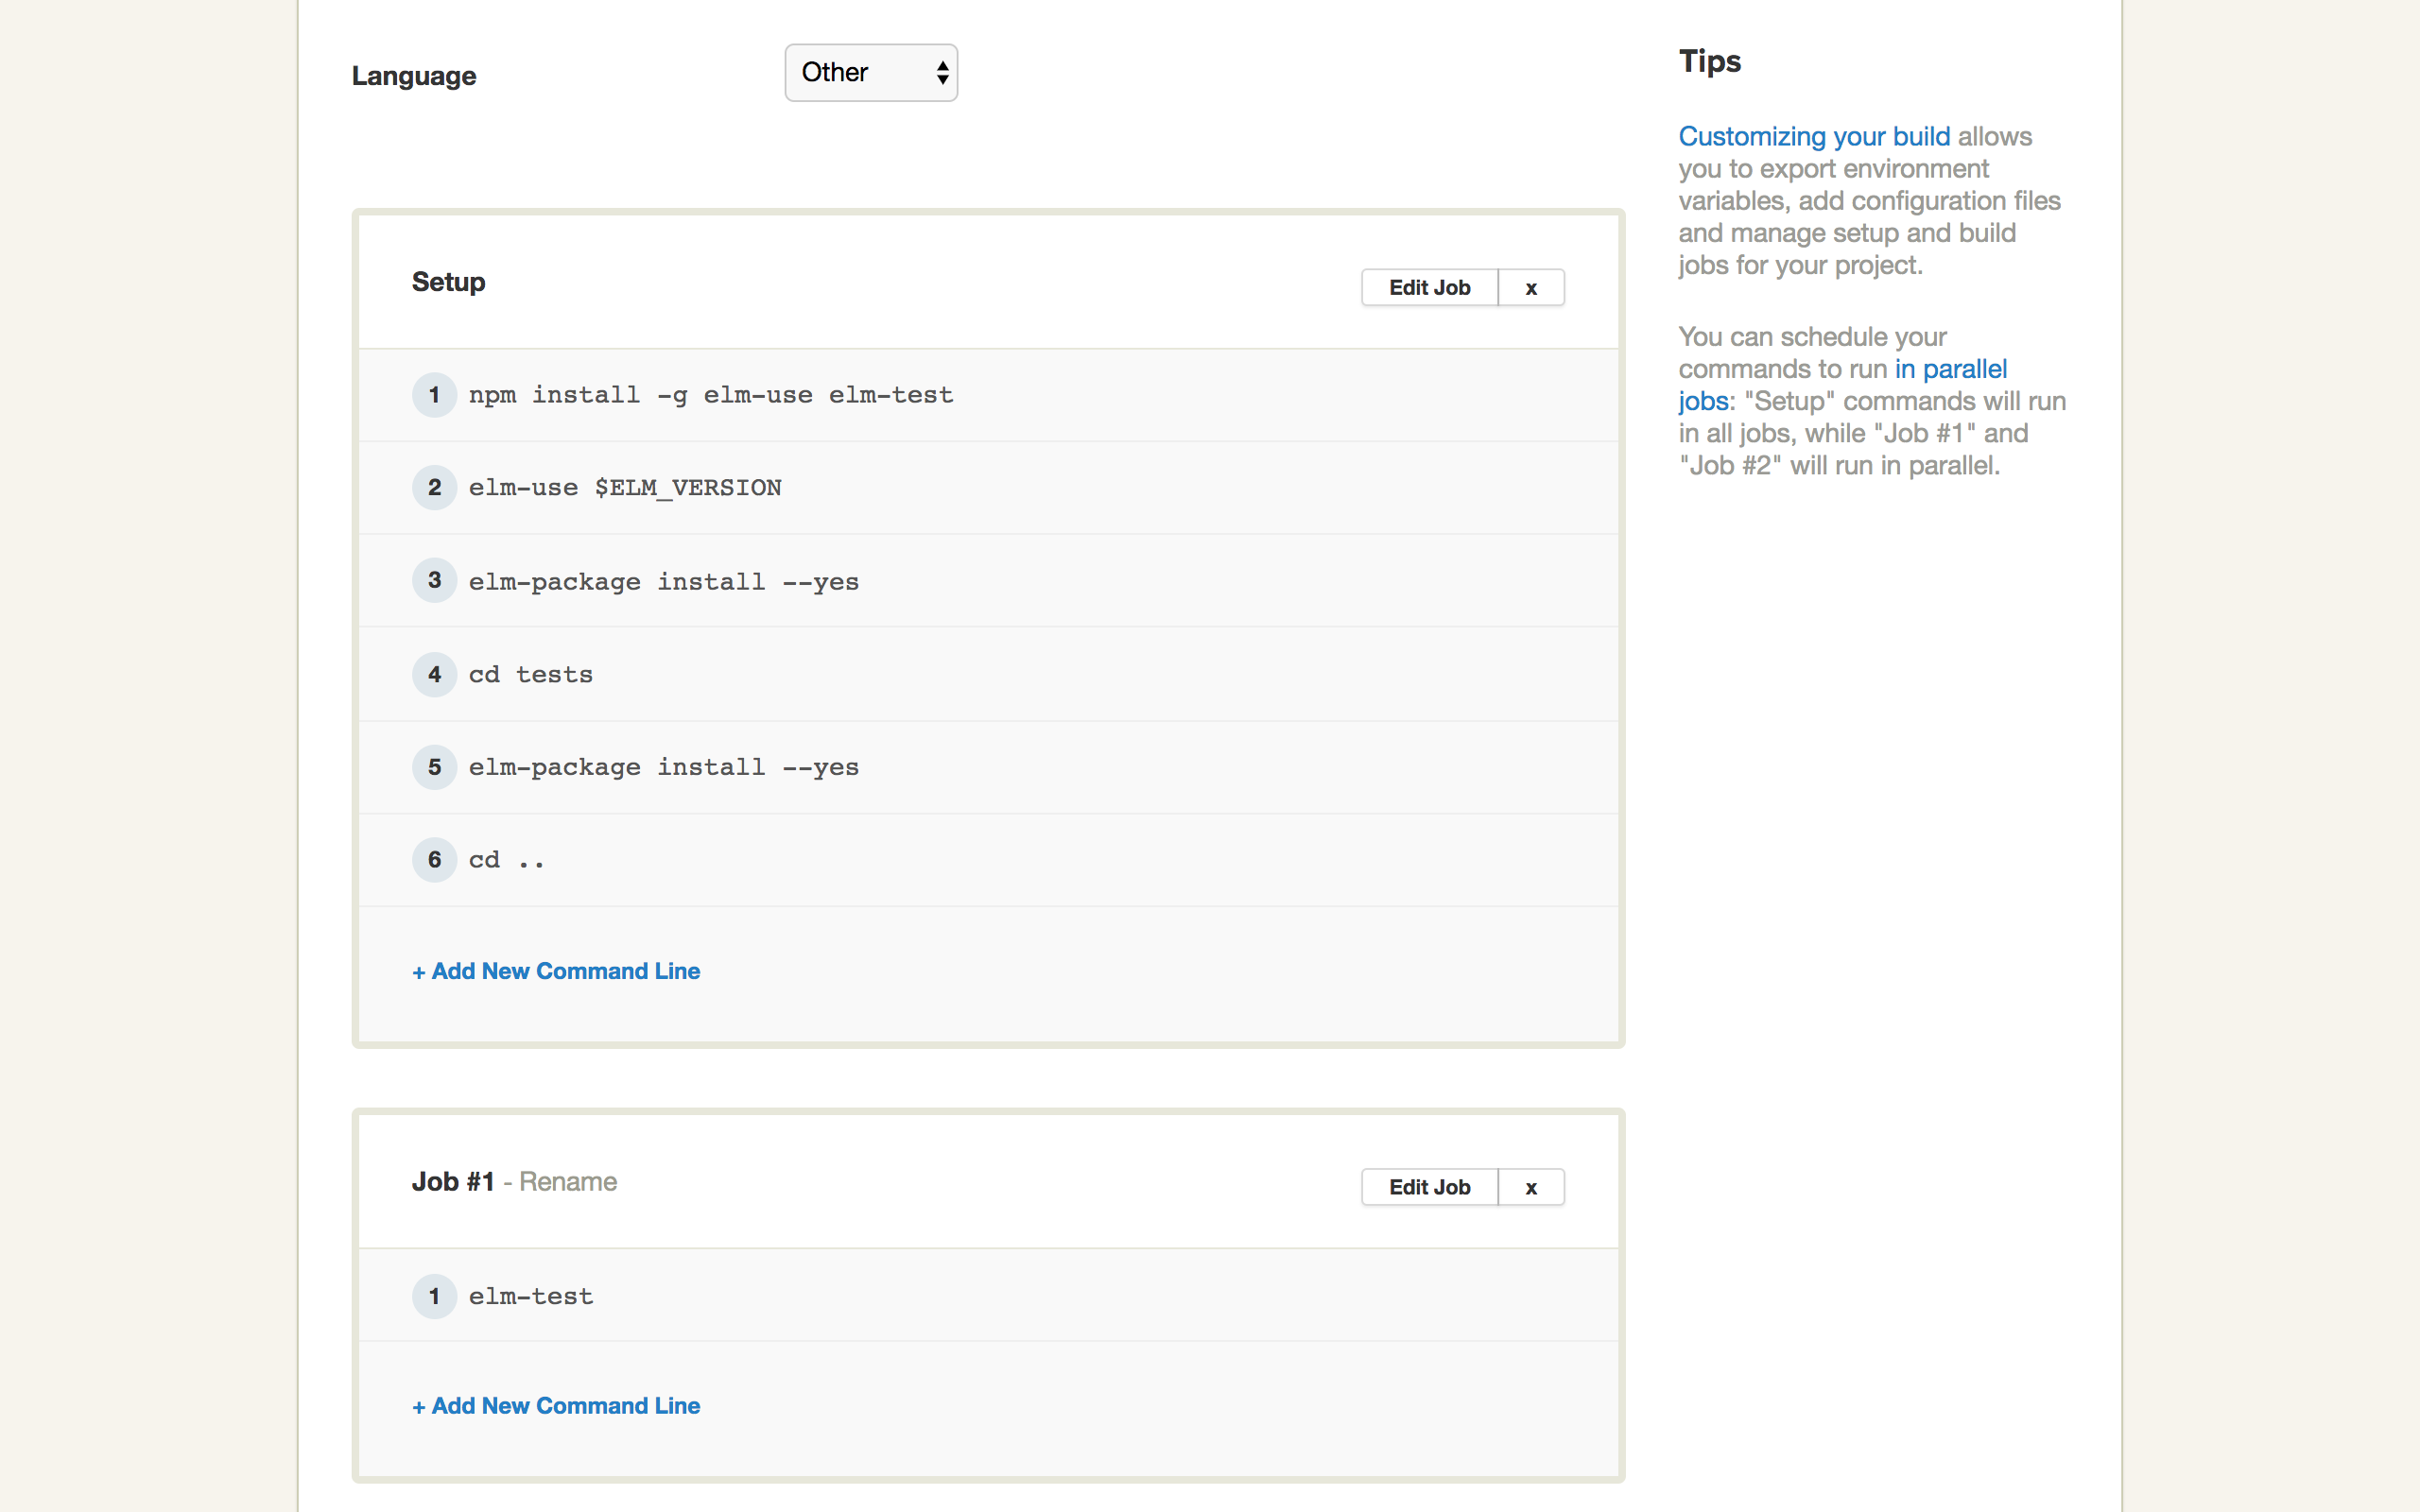
- Configure your project as shown below, then click on
Build With These Settings.
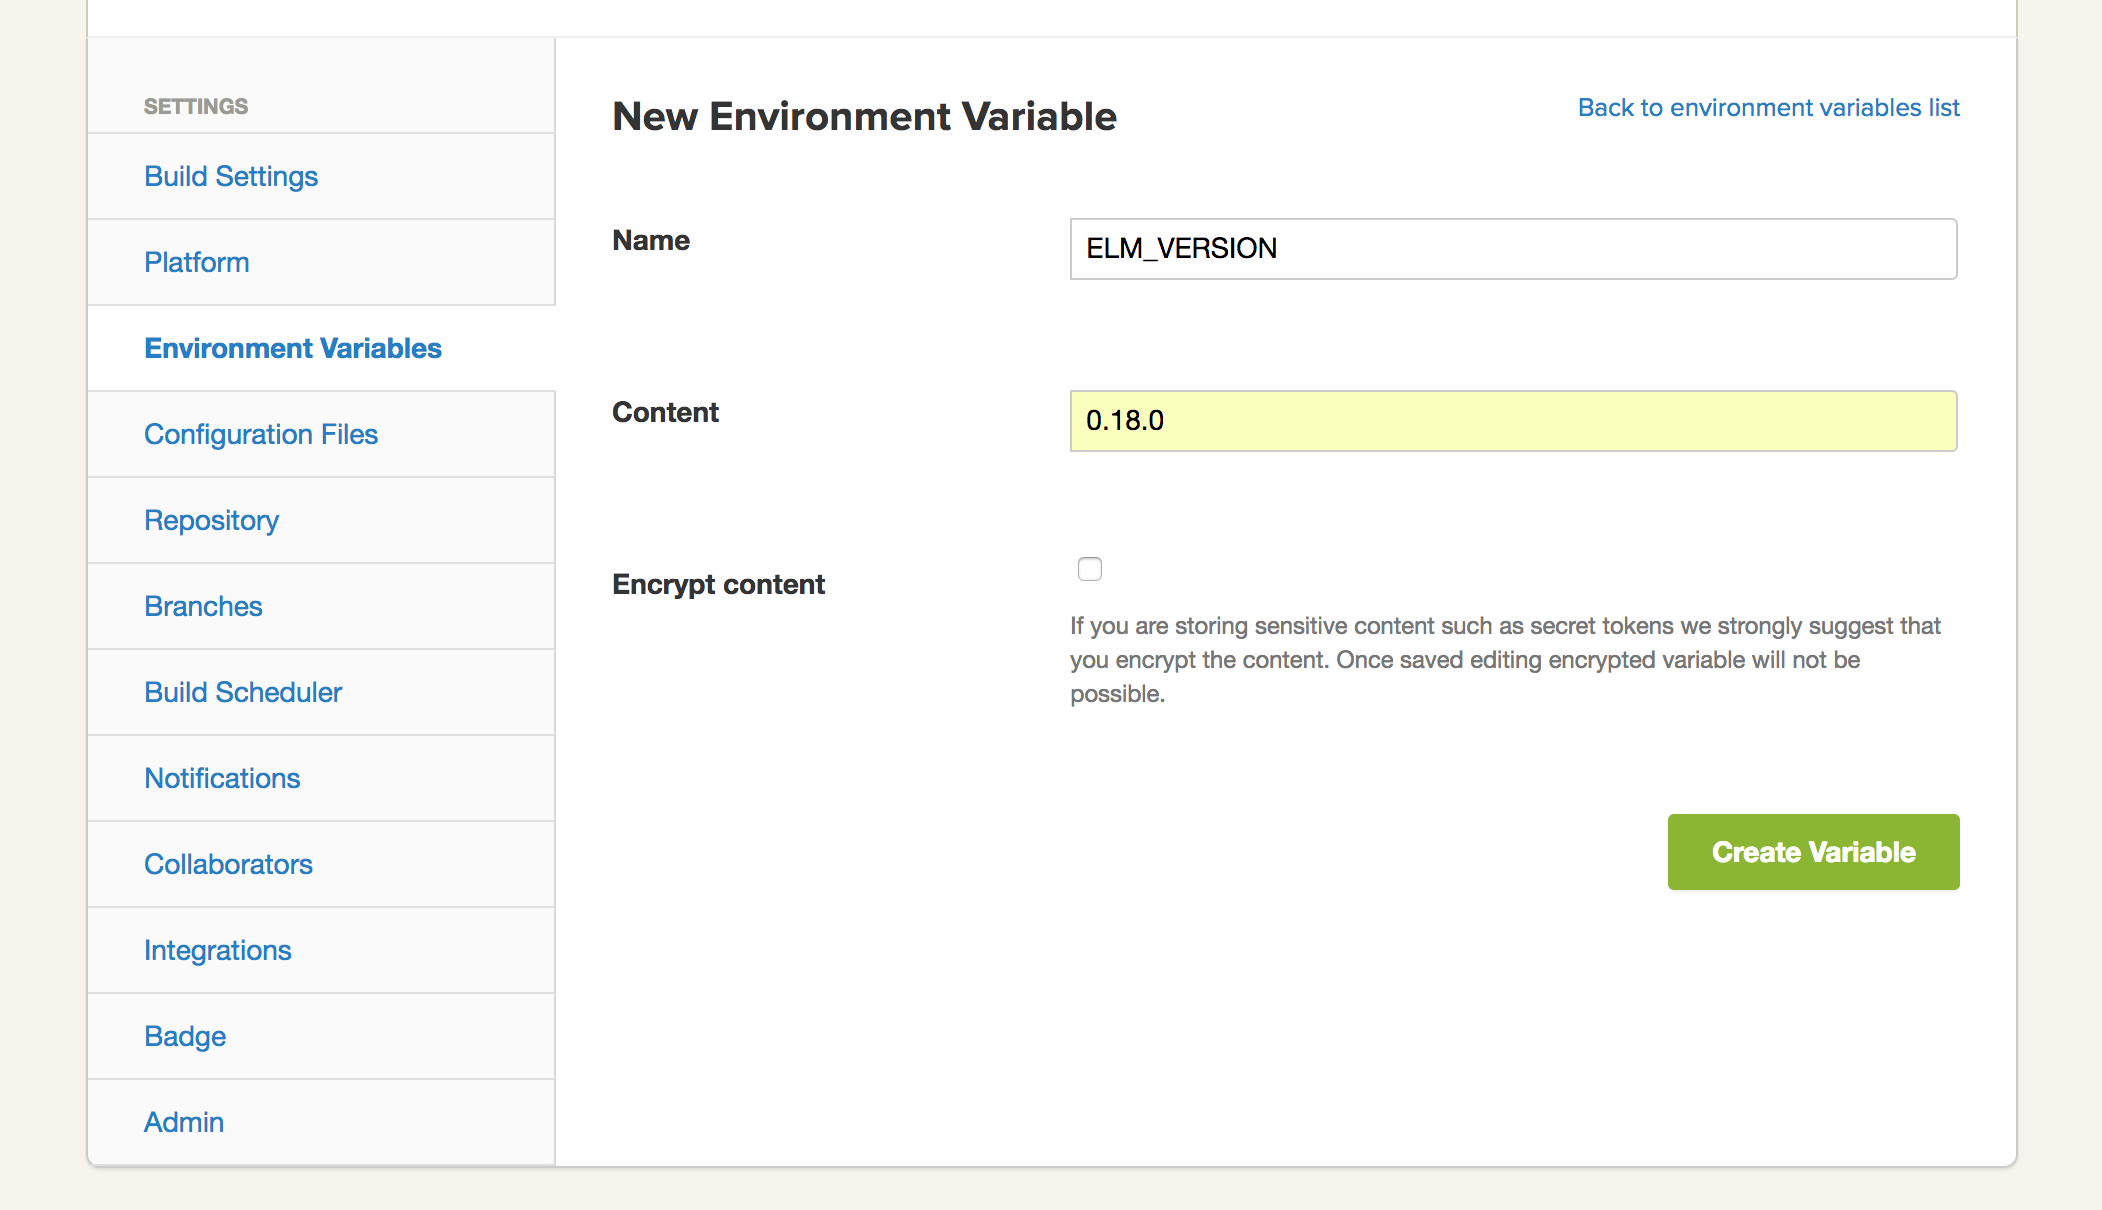
- The final bit is to configure the
ELM_VERSIONenvironment variable. In it, we will specify the version of Elm to install and use. Navigate toProject Settings>Environment Variables, and then click onAdd first Environment Variable. Then, specify it as follows:
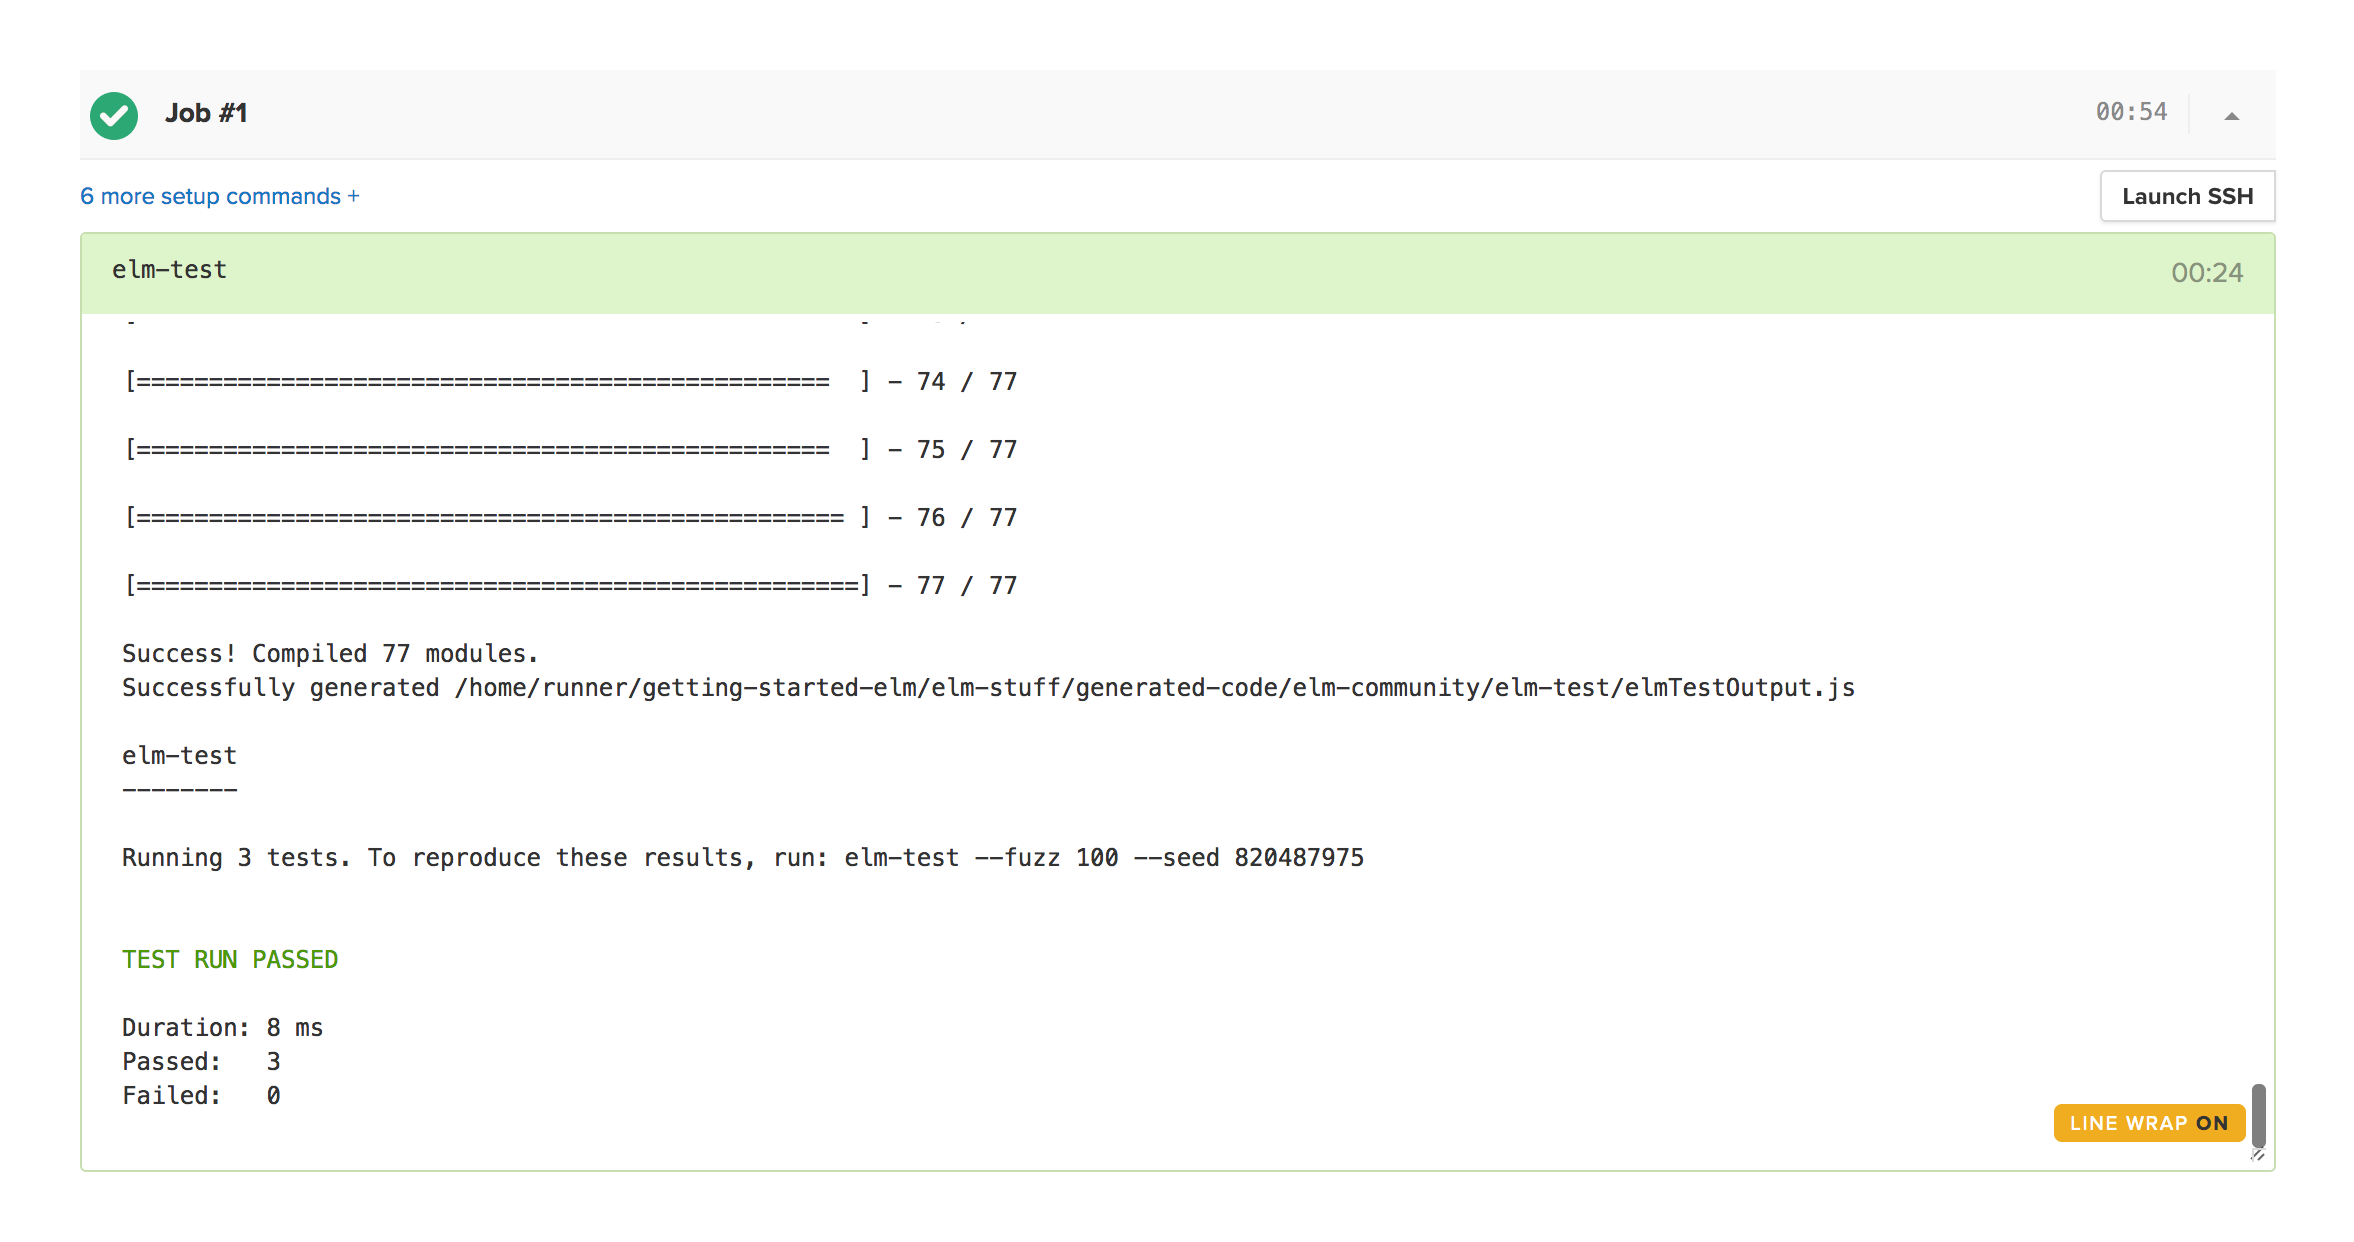
- Once that’s done, navigate to the the first failed build page, and click on
Rebuild last revisionto restart the build with the new environment variable configured.
- When the build is complete, you should see a successful result screen that should look like this:


With a few clicks, we’ve enabled continuous testing on our project. What other tests should we add? Feel free to add new tests and Semaphore will test the new changes and ensure you don’t break anything.
Conclusion
We hope you’ve been able to learn a bit about Elm and use it in a real project reading this tutorial. Hopefully, you can now explore more of Elm and have a solid understanding of the core concepts that you’ll find in most Elm applications.
You can check out the complete code for the example we wrote over on GitHub
Please reach out with any questions or feedback you may have in the comments section below.