Test Driving an Ember Application
Welcome back! If this is the first tutorial on Ember.js you are reading on Semaphore Community, it’s recommended that you first read Part 1, where we laid the groundwork with Ember and created some client-side models.
In this tutorial, we’re taking a little break from Ember and looking at building a simple API that we can use to interact with the client.
While we followed TDD (Test Driven Development) in our last tutorial, in this tutorial we’re going to follow BDD (Behavior Driven Development). These two approaches are similar, but BDD is looking at the problem from a higher level than TDD. Where you write tests in TDD, you write specifications (specs for short) in BDD. Don’t worry if this is new to you, you should be able to pick it up as we go through our examples. You may also want to check out our tutorial on BDD before proceeding.
We’re going to use the latest and greatest (dev version) of Rails 5 to build our API. We are using a prerelease version because there are big changes coming to Rails. In Rails 5, the rails-api gem which used to be standalone will be integrated directly into the Rails core, making it easy to create APIs from Rails. The Rails API has already been merged into the master branch of Rails, so we can make use of it to create our API.
This tutorial assumes you have some experience with Rails, although it should provide enough details to allow you to be able to follow it even if you aren’t that familiar with Rails.
Prerequisites
Before starting with the tutorial, you need to have:
- Git – which you should already have set up from Part 1.
- Ruby – there are a ton of ways to install Ruby. If you’re following along on Windows, you can check out Rails installer. If you’re using Linux or OS X, you can take a look at rvm.
- Bundler RubyGem – once you have Ruby installed, just
gem install bundler, and you’ll be all set to proceed. - Your favorite text editor.
Setting Up Rails
With the prerequisites out of the way, we can clone Rails from the GitHub source:
git clone git://github.com/rails/rails.git
Next, cd into the Rails directory, and run the bundle command. To start a new Rails API project, we need to issue the following command since this version of Rails is a prerelease:
bundle exec railties/exe/rails new ../bookcase_api --api --edge
Note that we’re creating our API in the directory that is one above Rails (../). You may have to specify a different path depending on where you want your API to be created.
The next step is to cd into the bookcase_api directory. The first thing we’ll do is initialize a new git repository. Once you’re in the correct directory, run the following commands to commit the initial version of the application:
git init
git add .
git commit -m 'Initial Rails API app'
Using RSpec for BDD
We’re going to start with specifications and BDD for our API. To do this, we’ll use RSpec, more specifically rspec-rails. RSpec-Rails is just a gem that we can add to our Gemfile in the :development, :test group:
group :development, :test do
  ...
  # Use rspec for BDD
  gem 'rspec-rails', '3.1.0'
end
We’re capped at using v3.1.0 because v3.2 introduced a maximum activesupport version. In order to use RSpec, we will need to install a couple of files. We can do this through the Rails generator:
bin/rails g rspec:install
Note that we’re using bin/rails, which is the alpha version of Rails 5.
Finally, let’s get rid of the test directory in Rails, since we won’t be writing unit tests, but specifications instead. When you commit to Git, your output should look similar to this:
new file:   .rspec
modified:   Gemfile
modified:   Gemfile.lock
new file:   spec/rails_helper.rb
new file:   spec/spec_helper.rb
deleted:    test/controllers/.keep
deleted:    test/fixtures/.keep
deleted:    test/fixtures/files/.keep
deleted:    test/integration/.keep
deleted:    test/mailers/.keep
deleted:    test/models/.keep
deleted:    test/test_helper.rb
Scaffolding
Since we’re going to whip up a quick API, we’ll utilize Rails’ scaffold generator. Since we’ve installed RSpec, it will generate some specifications for us. If you like, you can even “hack” Rails and add your own scaffolding controllers, specs, etc.
Scaffolding works perfectly for the purpose of this tutorial. This series is titled “Test Driving an Ember Application,” so we want to get back to Ember as soon as we can.
Let’s start with the author. Recall that the author just had a name property. We can pass this to the generator, and it will create a model with the properties we specify, a migration to migrate the database, a controller, routes, a serializer, and specs, e.g. for the model, controller or route. All of this can be accomplished using a single command:
bin/rails g scaffold author name
You can see what has been generated by looking at the output:
invoke  active_record
create    db/migrate/20150826005325_create_authors.rb
create    app/models/author.rb
invoke    rspec
create      spec/models/author_spec.rb
invoke  resource_route
 route    resources :authors
create  app/serializers/author_serializer.rb
invoke  scaffold_controller
create    app/controllers/authors_controller.rb
invoke    rspec
create      spec/controllers/authors_controller_spec.rb
create      spec/routing/authors_routing_spec.rb
invoke      rspec
create        spec/requests/authors_spec.rb
There are a lot of new files, but we’ll get back to them later. Right now, let’s migrate our database. Run the following command:
bin/rake db:migrate
Now that our database has been migrated, let’s take a look at the specs that were created for us. They aren’t exactly what we want, which is one of the reasons why you shouldn’t use the out-of-the-box scaffold generator, but they are close. We’ll start with the routing specs (spec/routing/authors_routing_spec.rb). We’re creating an API, but there are specs for the new and edit routes, both of which do not exist in an API since we don’t have forms. Delete those specs.
You should be left with routing specs for index, show, create, update, and destroy. We’re also going to scrap the spec/controllers/authors_controller_spec.rb file. Go ahead and delete it.
Then, run the following in your terminal:
bin/rake
The default rake task will run our specs for us, which is very convenient. You should get the following output: 6 examples, 0 failures.
Like with the Ember application we started working on, we’ll start with the model and model specs, and then we’ll move on to requesting specs.
Developing Rails Models
We’ll start in spec/models/author_spec.rb, adding a failing spec, and then fixing it. BDD is similar to TDD, the difference being we are using specs vs. tests, which are used in TDD.
How can we describe the behavior of an author? Well, it should “respond to” a name attribute. It should also validate the presence of the name and consist of least five characters (you can change this minimum if you want).
We don’t want duplicate authors sneaking into our database, so we’ll also want to ensure the name is unique.
Let’s start writing specs. Before we start, we’re going to use a gem called shoulda-matchers, which will help us test validations. In the Gemfile, add the following to the end of the file:
group :test do
  gem 'shoulda-matchers', require: false
end
Next, in the terminal, run bundle to install the gem.
Finally, add the following to your spec/rails_helper.rb file, right at the top after the other requires:
require 'rspec/rails' # Note: This already exists in the file
require 'shoulda/matchers'
We’re now ready to write up our specs. In order to save time, we’ll spec out the behavior for all four conditions instead of doing one spec at a time. In true BDD fashion, you’d do these one at a time to make sure you have a failing test before proceeding.
RSpec.describe Author, :type => :model do
  it { should respond_to :name } # Note: This will already pass because of our migration
  it { should validate_presence_of :name }
  it { should validate_length_of(:name).is_at_least(5) }
  it { should validate_uniqueness_of :name }
end
Running rake again, you should have three failing specs, or, to be more specific, 7 examples, 3 failures. Let’s fix those three failures. Hop over to the app/models/author.rb file. We’ll add the validations that we need in here. We can describe all three in one single line as follows:
class Author < ActiveRecord::Base
  validates :name, presence: true, uniqueness: true, length: { minimum: 5 }
end
Run bin/rake again. Our author model specs are now passing. We have two other models to do, publisher and book. We’ll leave that exercise for later. For now, let’s skip these and take a look at the request specs.
Declaring the JSON API
Before we get started, we need to think about the JSON format we’re going to use for Ember-Data. In the next tutorial, we’ll be upgrading to Ember-Data 2.0. The default adapter in Ember-Data 2.0 is the JSON API adapter. If you aren’t familiar with JSON API, you should check it out. It’s still JSON, but it’s optimized to handle metadata and errors, both of which are important in applications.
In order to change the format of the JSON serializer in Rails, we’ll create an initializer and tweak the settings for the Active Model Serializers.
First, let’s create a new file: config/initializers/ams_json_serializer.rb. In this file, we’ll make the changes needed to use the JSON API. Here are the file contents:
api_mime_types = %W(
  application/vnd.api+json
  text/x-json
  application/json
)

Mime::Type.unregister :json
Mime::Type.register 'application/json', :json, api_mime_types

ActiveModel::Serializer.config.adapter = ActiveModel::Serializer::Adapter::JsonApi
The first part of the file, the MIME types, is needed to allow Ember-Data to communicate with the API as it sends the content type as application/vnd.api+json. The last line tells the Active Model Serializer to use the JSON API format.
Writing Request Specs
You’re probably wondering why we deleted and are skipping controller tests. This is because our controller logic isn’t complex and what we really want to test with an API is the request/response vs. individual controller actions. Our API needs integration testing as if we were fully testing the rendering of a web page, but, of course, in our case we’re looking at JSON in and out vs. HTML.
We’re going to make use of another RubyGem. This one is called factory_girl. Factory_girl will allow us to create a factory for our objects to make it easy to create objects on the fly. Add gem 'factory_girl_rails' to your Gemfile under the :development, :test group as follows:
group :development, :test do
  ...
  # Use factory_girl for creating factories
  gem 'factory_girl_rails'
end
Then, run bundle from your terminal to install factory_girl_rails.
The last step is to create a factory. Create a new directory called factories in the spec directory, and create a new file in there called authors.rb. It should look like this:
FactoryGirl.define do
  factory :author do
    name 'Damien White'
  end
end
This will allow us to create a new author. The default name if we don’t specify one is Damien White.
Request Specs: GET /authors
Now we can get into our tests. Open spec/requests/authors_spec.rb, and add the following spec to test /authors. Your file should look like this:
 require 'rails_helper'

 RSpec.describe "Authors", :type => :request do
   describe "GET /authors" do
     it "returns all the authors" do
       FactoryGirl.create :author, name: 'John Doe'
       FactoryGirl.create :author, name: 'Damien White'

       get '/authors'

       expect(response.status).to eq 200

       body = JSON.parse(response.body)
       author_names = body['data'].map{|author| author['attributes']['name'] }
       expect(author_names).to match_array(['John Doe', 'Damien White'])
     end
   end
end
Let’s take a look at what’s going on in this spec. First, we created two authors using FactoryGirl. Next, we made a request to get /authors, just like you would with a web browser. Finally, we parsed out the author names from the JSON, which looks like this:
 {
   "data": [
     {
       "id": "1",
       "type": "authors",
       "attributes": {
         "name": "John Doe"
       }
     },
     {
       "id": "2",
       "type": "authors",
       "attributes": {
         "name": "Damien White"
       }
     }
   ]
 }
Remember, this is the JSON API format.
If you now run rake, you’ll see that we have 10 passing tests again. This is because the scaffolding created all the actions in our controller to handle our spec. This is not exactly done in a BDD fashion. However, these specs can be used to describe the behavior of manually created controllers in a BDD fashion.
Request Specs: GET /authors/1
The next action we need to test is getting a single author, or the path /authors/:id. The spec will be very similar to the one we just wrote, so we’ll just present you with the spec code (still located in spec/requests/authors_spec.rb)
RSpec.describe "Authors", :type => :request do
  ...
  describe "GET /authors/:id" do
    it "returns the specified author" do
      FactoryGirl.create :author, name: 'John Doe', id: 1

      get '/authors/1'

      expect(response.status).to eq 200

      body = JSON.parse(response.body)
      author_name = body['data']['attributes']['name']
      expect(author_name) == 'John Doe'
    end
  end
end
The only real difference with this spec is the get and the way we access the author name.
Request Specs: POST /authors
This spec is going to be a bit trickier, since we need to build the JSON that is going to represent the tutorial. Thankfully, our object is small so that it won’t be too complicated. Still, you should remember that the JSON that we pass to the server needs to be formatted as JSON API. With that said, let’s move on to the spec code:
describe "POST /authors" do
  it "creates the specified author" do
    author = {
      data: {
        type: "authors",
        attributes: {
          name: "John Doe"
        }
      }
    }

    post '/authors',
      params: author.to_json,
      headers: { 'Content-Type': 'application/vnd.api+json' }

    expect(response.status).to eq 201

    body = JSON.parse(response.body)

    author_name = body['data']['attributes']['name']
    expect(author_name) == 'John Doe'
  end
end
Notice that we have created the JSON API representation of an author. We then sent the tutorial to the server. We checked that we got an HTTP 201 status code back from the server, meaning the asset has been created. Finally, we checked the name of the author for the returned object.
Next, we’ll run bin/rake to run the spec, and we will get a failing spec. The action has already been created from the scaffold generator, so that’s not the issue here. Let’s look at the failure:
Failure/Error: post '/authors',
ActionController::ParameterMissing:
   param is missing or the value is empty: author
So, the failure has to do with the parameters. It looks like Rails’ strong parameters could be causing an issue. What exactly did the the scaffold generator create for us?
def author_params
  params.require(:author).permit(:name)
end
This would be fine if we were using straight JSON, but since we’re using JSON API, our parameters need to be a bit different. The correct way to parse them is as follows:
def author_params
  params.require(:data)
        .require(:attributes)
        .permit(:name)
end
What we’re saying here is that we require a data attribute and an attributes attribute. Finally, we permit the attributes required for the model, which in the author’s case is just name. If we un bin/rake again, our spec will pass.
Request Specs: PUT /authors/:id
Updating an author is going to look a lot like our last spec. In the process of updating the spec, we’ll be passing along an id in the payload and via the URL. Here’s the updated spec:
describe "PUT /authors/:id" do
  it "updates the specified author" do
    FactoryGirl.create :author, name: 'John Doe', id: 1

    author = {
      data: {
        type: "authors",
        id: 1,
        attributes: {
          name: "Damien White"
        }
      }
    }

    put '/authors/1',
      params: author.to_json,
      headers: { 'Content-Type': 'application/vnd.api+json' }

    expect(response.status).to eq 200

    body = JSON.parse(response.body)

    author_name = body['data']['attributes']['name']
    expect(author_name) == 'Damien White'
  end
end
First, we created an author using Factory Girl with the name John Doe. Then we PUT the updated JSON through to the server. Finally, we checked the response.status and verified that the author’s name changed to Damien White.
Request Specs: DELETE /authors/:id
We’re at our last request spec, an HTTP DELETE. This spec should be pretty simple, as it doesn’t have any return value other than the response.status of 204. HTTP 204 indicates that the server processed our request and isn’t returning any data. Let’s take a look at the spec:
describe "DELETE /authors/:id" do
  it "deletes the specified author" do
    FactoryGirl.create :author, name: 'John Doe', id: 1

    delete '/authors/1'

    expect(response.status).to eq 204
  end
end
We created an author like we’ve previously done in other specs, DELETEd the author and finally verified the response.status.
One Last Thing
Before creating the rest of the models/controllers/routes (either manually, or via scaffolding), we need to discuss the relationship between a book and authors.
This will require a special association in Rails called has_many through. It simply means that we’ll be creating an object that encompasses the relationship between a book and an author. From the database side of things, it’s just a join table that will contain the book.id and the author.id, although we can (and will) have other properties stored on this model. This will allow us to have a many to many relationship, because an author may have written many books and a book may have multiple authors. We’ll call the intermediary model a publication. Our association is probably best explained by a graphic:
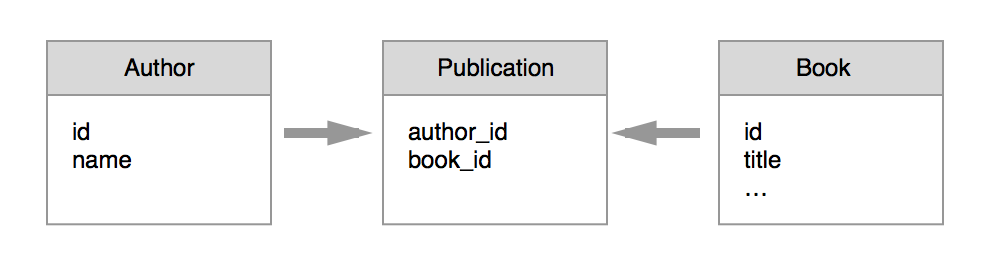
We don’t need scaffolding for the publication, but we do need a model. After you have created a book model, you can run the following generator to create the publication model:
rails g model Publication book:references author:references
Then to wire up the models, we’ll start by adding the following to the author model:
has_many :publications
has_many :books, through: :publications
Finally, we’ll add the inverse to the book model:
has_many :publications
has_many :authors, through: :publications
Now we’re able to access author.books or author.publications, and book.authors or book.publications.
You can use a Shoulda matcher to spec out a have_many thorough relationship for the author:
it { should have_many(:books).through(:publications) }
For the book model, you can use:
it { should have_many(:authors).through(:publications) }
Conclusion
In this tutorial, we have successfully written specs for a model and full request specs for the API. There are two other models, publisher and book, that we still need to spec out, but we’re not going to go over these, since you now have enough knowledge to be able to take care of them on your own.
If you want to cheat, you can head over to the GitHub repository for the API and snag the latest version of master. Going forward, you’ll need to have the full API so that we can access it from the front end. See you in the next tutorial, where we will be moving back to Ember.