In this article on Unit Testing in Swift, we covered how to get started with unit testing, using examples written for testing a single unit of code. In your journey as an iOS developer, however, you’ll want to test user interfaces as well. UI tests interact with your app, similar to how your user does. In this article, we’ll look at how you can test these types of scenarios. We’ll write tests for navigating through an app and interacting with elements on the screen.
In this introductory article about UI testing, we’ll cover the following:
- Adding a UITesting target
- Understanding XCUIElement
- Writing your first UI test
- Writing a second UI test
- Recording a UI test
- Taking screenshots
- Automating UI testing using fastlane and Semaphore
Let’s get started!
What is UI Testing?
As the name suggests, UI testing is all about testing the user interface and interacting with the elements on the screen using tests. This will help you ensure and validate that the UI part of the app works as expected, and to spot any regressions due to changes in UI-related code.
Apple provides us with a native framework called XCTest for UI testing. It relies on the data that accessibility technology uses to interact with the screen. Working with these data is similar to writing unit tests. You create UI test classes by subclassing XCTestCase and adding your UI test methods. Using this method, you write code to interact with elements and use assertions to validate the expected result.
Adding a UITesting Target
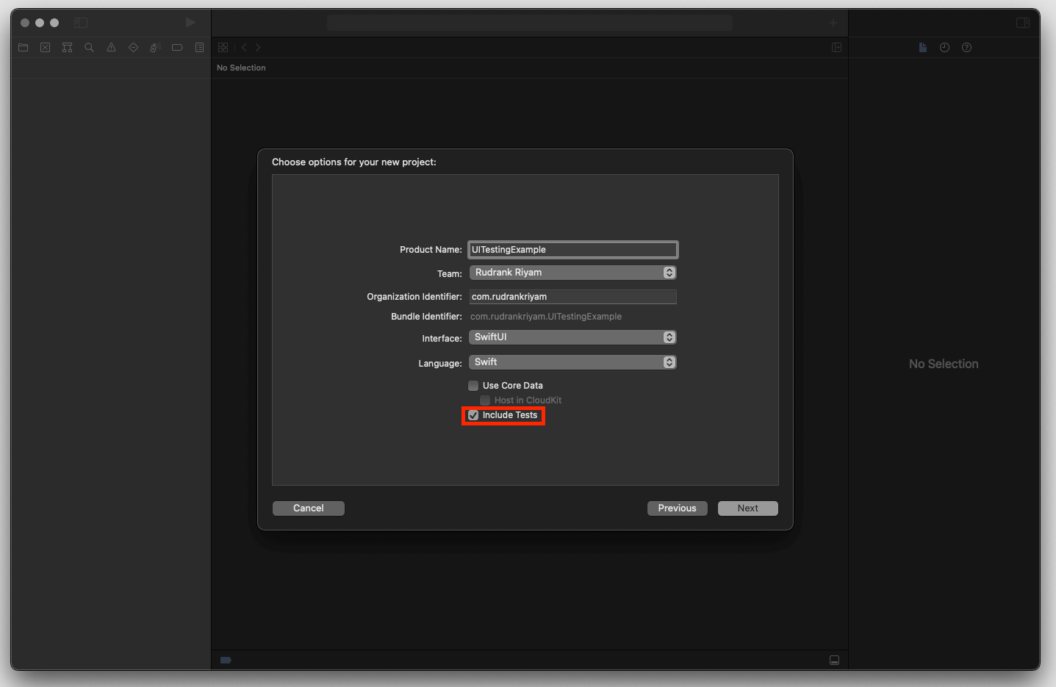
Whenever you create a new project, you have the option to check Include Tests. This includes both Unit Tests and UI Tests.
If you already have a project, you can add a UI Testing Bundle to it as well. Go to File > New > Target. Then, search for UI Testing Bundle.
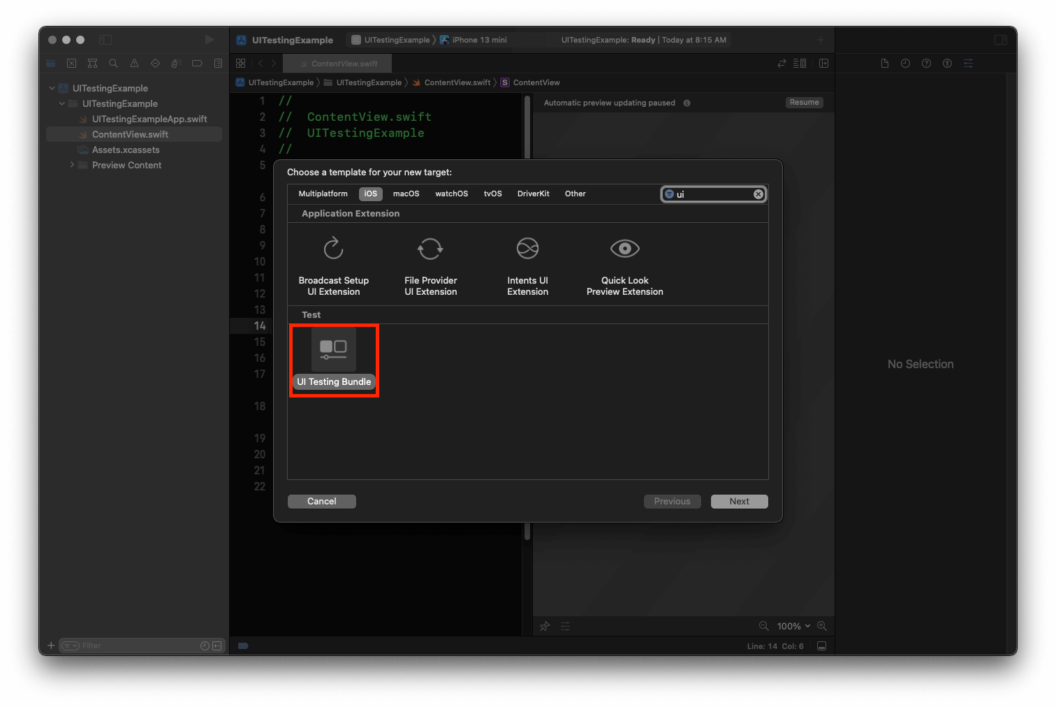
Select Unit Testing Bundle and then click Next.

Creating a new UI test target for your project consists of two files with a default template. One is for regular UI tests and the other for launch tests. The former consists of two methods for the lifecycle of the test case:
setUpWithError() – before each test method in a test case, you can reset the state and throw errors. The state can be the orientation or the color scheme. For example, to set the orientation for each test method:
XCUIDevice.shared.orientation = .landscapeRightAs UI tests take time, it is usually best to stop immediately when a failure occurs. Also, the flow of the steps in a UI test is sequential. If one of them fails, there’s no need to run the others. You can do this by setting the continueAfterFailure to false in the setUpWithError() method.
tearDownWithError() – before each test method in a test case ends, you can perform a cleanup and throw errors into this instance method.
Next, the template has testExample() that contains an instance of XCUIApplication. We’ll learn about it in the next section.
Understanding XCUIElement
The implementation of UI tests is based on three major classes:
- XCUIElement
- XCUIApplication
- XCUIElementQuery
XCUIElement is the base class that is a UI element in an application that provides you with functionality for gestural interactions on iOS and mouse and keyboard interactions on macOS. The common methods are tap(), click(), and various methods related to swipe gestures. To determine if a particular element exists within the app’s current UI hierarchy, use the exists instance property.
XCUIApplication is a subclass of XCUIElement that helps you launch, monitor, and terminate your app in a UI test.
You can create an instance in your test class and then call launch() on it in the setUpWithError() method.
class UITestingExampleUITests: XCTestCase {
  let app = XCUIApplication()

  override func setUpWithError() throws {
    continueAfterFailure = false
    app.launch()
  }
}
To query the UI elements on the current screen, use the XCUIElementQuery class. You can query the element by its accessibility identifier or use a predicate. There are many elements that you can query, like static texts and buttons. Here is a list of ready-made queries for your reference.
Now that you know of the fundamentals, it’s time to write your first UI test!
Writing Your First UI Test
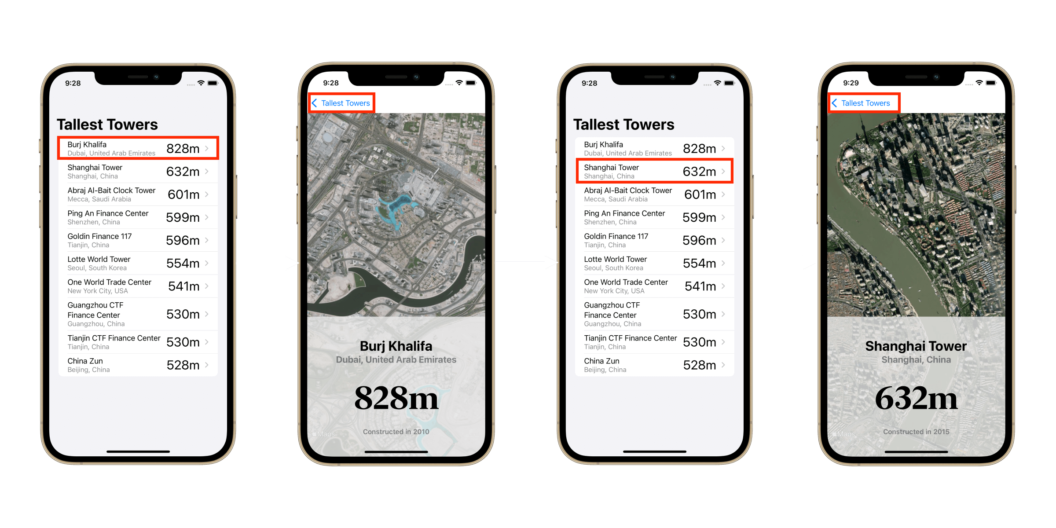
For this example, we’ll test TallestTowers, an app that displays the tallest towers worldwide and information about them. You can download the project here.
In the TallestTowers project, we see a list of the tallest towers. We want to test the navigation by navigating into detailed view and then going back to main view. To do so, we tap on one of the rows in the list, display that particular tower’s details, then tap on the back button; we can then repeat this with another tower label.
When writing a test, prefix the method with the word “test” so that Xcode understands that it is a testable function. Let’s create a method testNavigation():
func testNavigation() {
  // 1
  let burjKhalifaPredicate = NSPredicate(format: "label beginswith 'Burj Khalifa'")

  // 2
  app.tables.buttons.element(matching: burjKhalifaPredicate).tap()

  // 3
  app.navigationBars.buttons["Tallest Towers"].tap()

  // 4
  let shanghaiTowerPredicate = NSPredicate(format: "label beginswith 'China'")
  app.tables.buttons.element(matching: shanghaiTowerPredicate).tap()
  app.navigationBars.buttons["Tallest Towers"].tap()
}
Here’s what the code is doing:
- Use
NSPredicateto query the label that begins withBurj Khalifa. - From the instance of
XCUIApplication(), query the table elements, buttons, find the element matching the predicate, and then tap on that element. This pushes the screen to detailed view. - From the instance of
XCUIApplication(), query the navigation bars, find the button matching “Tallest Towers”, and then tap on the back button. This pops the screen back to main list view. - Starting again from main view, repeat the process with another element.
Run the test by clicking on the play button along the test function line. Congratulations! You’ve written your first UI test.
Let’s write another.
Writing Another UI Test
This test asserts if the elements in the details exist and match the parent element.
func testTowerDetailView() {
  // 1
  let chinaZunPredicate = NSPredicate(format: "label beginswith 'China Zun'")
  app.tables.buttons.element(matching: chinaZunPredicate).tap()

  // 2
  XCTAssert(app.staticTexts["China Zun"].exists)
  XCTAssert(app.staticTexts["Beijing, China"].exists)
  XCTAssert(app.staticTexts["528m"].exists)
  XCTAssert(app.staticTexts["Constructed in"].exists)
  XCTAssert(app.staticTexts["2018"].exists)
}
Figuring out the test:
- Query the label beginning with
China ZunusingNSPredicate. Then, we tap the element matching the label. - After tapping the element, it navigates to the detailed view of the China Zun tower. We write a few asserting statements to check if the given detailed static texts exist on this screen or not.
Tips for naming
Whenever you are writing a UI test, follow these best practices:
- Prefix the method with the word “test” so that Xcode understands that it is a testable function. Also, be sure to write long method names.
- Be specific. If a single test fails among many, the name should be enough to give you an idea of what failed. For example, if
testTowerDetailView()fails, you know it is related to the navigation flow going from the main screen to the detailed one.
Recording a UI Test
Xcode provides you with the option to record interactions with the screen and automatically transforms them into relevant XCUIElementQuery and XCUIElement instances and their methods. Then, you can add your assertions for the expected outcome.
When you’re ready to test, go to a test class and place the cursor inside the test method to record the interaction. From the debug bar, click the Record UI Test button.
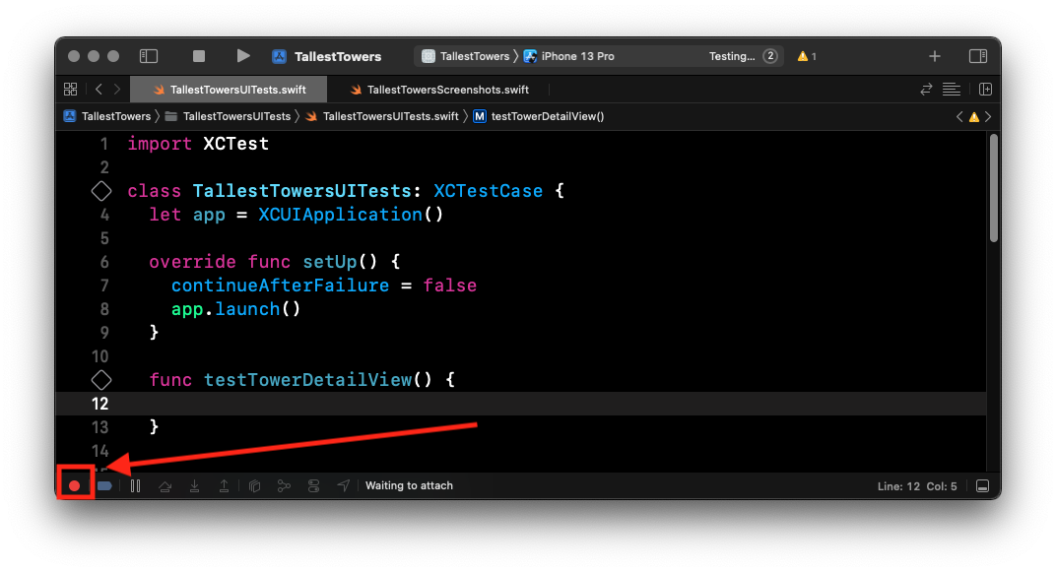
Xcode will launch the app and run it. You can interact with the element on-screen and perform a sequence of interactions for any UI test. Whenever you interact with an element, Xcode writes the corresponding code for it into your method. To stop recording, click the Record UI Test button again.
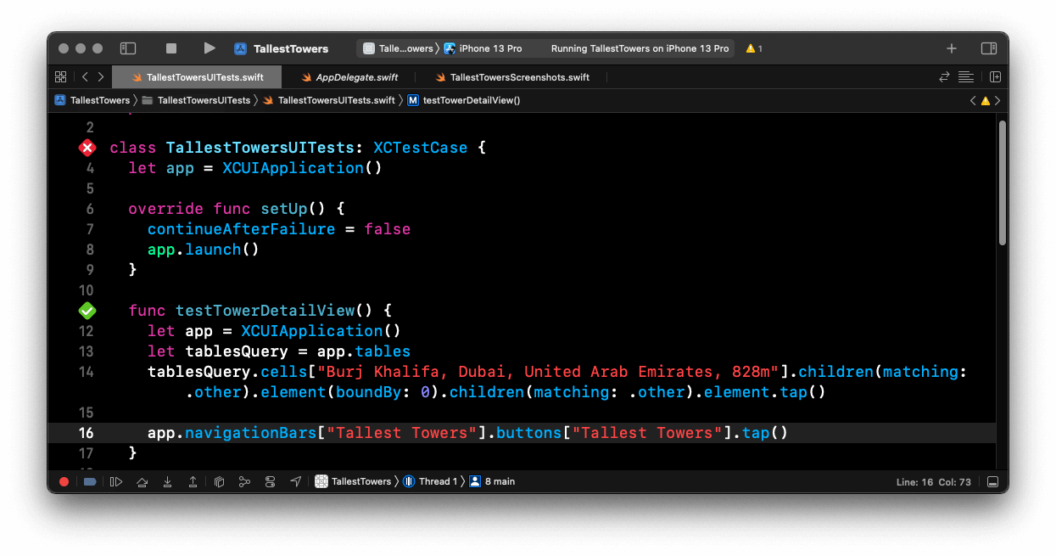
Finally, add the assertions you want for the selected UI test.
func testTowerDetailView() {
  let app = XCUIApplication()
  let tablesQuery = app.tables
  tablesQuery.cells["Burj Khalifa, Dubai, United Arab Emirates, 828m"].children(matching: .other).element(boundBy: 0).children(matching: .other).element.tap()

  XCTAssert(app.staticTexts["Burj Khalifa"].exists)
  XCTAssert(app.staticTexts["Dubai, United Arab Emirates"].exists)
  XCTAssert(app.staticTexts["828m"].exists)
  XCTAssert(app.staticTexts["Constructed in"].exists)
  XCTAssert(app.staticTexts["2010"].exists)
}
Taking Screenshots with fastlane
App Store Connect requires screenshots for various devices, and if you manually capture screenshots, it is time-consuming, cumbersome, and prone to errors. Due to frequent app releases, this process gets repetitive. The pain gets worse when you localize screenshots for different languages.
The good thing is that you can automate this process. fastlane provides us with a snapshot feature that allows you to capture hundreds of screenshots in multiple languages.
To get started, run the following command in your project folder:
fastlane snapshot initThis will create a SnapshotHelper.swift file in your project folder. Add this file to the UI Test target. Then, add a new Xcode scheme for the UI Test target if it isn’t already there. Edit the scheme, click the “Build” sidebar, and enable the checkbox under the “Run” column. Finally, enable the Shared box of the newly created scheme.
To create a screenshot of the test method, call the snapshot() method:
func testTakeScreenshots() {
  let app = XCUIApplication()
  setupSnapshot(app)
  app.launch()

  snapshot("01-ListOfTowers")

  let burjKhalifaPredicate = NSPredicate(format: "label beginswith 'Burj Khalifa'")
  app.tables.buttons.element(matching: burjKhalifaPredicate).tap()

  snapshot("02-TowerDetail")
}
The code above launches the app and takes a screenshot of the main screen. Then, it queries the label starting with Burj Khalifa and taps the element that navigates it to the next screen. Finally, we call the snapshot() method again to take a screenshot of the detailed view.
To take the desired screenshots, run the following command in the terminal:
fastlane snapshotYou can learn more about uploading screenshots to the App Store here.
Automating UI Testing in CI with fastlane and Semaphore
To automate the testing process, we’ll use fastlane, which simplifies deployment. We’ve already seen how fastlane helps to automate the process of taking screenshots, and it can help us here too.
There are various methods of installing fastlane, and we’ll use Homebrew here. Open the terminal and run the following command:
brew install fastlaneChange the directory to the project and run:
fastlane initNow, open the Fastfile located in the project folder and add the following lines to it:
lane :tests do
  run_tests(scheme: "TallestTowers")
end
Finally, to run the tests, execute the following command in the terminal:
fastlane testsTo automate the process with continuous integration, use Semaphore. Refer to this article on setting Semaphore up: Build, Test, & Deploy an iOS App with CI/CD.
Conclusion
It’s hard to focus on writing tests when there’s a deadline approaching, but it is beneficial in the long run. Writing UI tests ensures that you maintain the integrity of crucial UI flows in your app. When adding a new feature or refactoring code, tests helps you spot any regressions beforehand and speed up your development process over time.
Also, it’s a good idea to set aside some time to configure CI/CD for your apps. This lets you focus on delivering a great user experience instead of manually testing the app’s user interface for every release.
Go now and write UI tests with confidence!
Have questions about this tutorial? Want to share your experiences with unit testing? Reach out to us on Twitter here: @semaphoreci