Serverless is one of those concepts that in hindsight seems obvious and makes you wonder why no one came up with it earlier.
At its core, it involves breaking up the application into smaller functions, called lambdas, and distributing them in the cloud. Lambdas, by their very nature, scale; this is because they are only run when needed, with resources allocated on-demand. Also, since there are no wasted resources, they tend to be cheaper to run than a full-fledged server or even a container.
Servers also rear their ugly heads during project development. Apps must be tested somewhere—too often a spare machine running some musty integration product. Once more, we find the same answer to the questions of upkeep and scaling: use a serverless continuous integration and delivery platform.
In this article, we will use two fantastic platforms to test and deploy an application: ZEIT Now to build and host it and Semaphore to drive continuous integration and delivery pipelines.
In ZEIT Now, there are no servers to manage and no containers to build. It integrates nicely with any workflow and plays well with CI/CD platforms. With instant, automatic deployments, ZEIT Now is a perfect fit for our microservice app.
In this article, we will learn to use Semaphore to continuously test and deploy our application to ZEIT Now.
Meet the Application
During this post, we will work with the Semaphore Demo app. Step by step, we’ll see how to get it online and how to make part of a continuous delivery process.
The project has a single API Endpoint that simply replies Hello World! to all requests. APIs are the way applications communicate with each other over the web, so mastering them is crucial.
The main file is located at api/hello.js. This is the function that
sends the hello message:
module.exports = (request, response) => {
	response.status(200).send('Hello World!');
};
Strictly speaking, this is the whole application. You could deploy this file and call it a day. We’ll see that ZEIT Now does a lot of work for us. However, the developer’s life calls for two more things: a development environment and some kind of testing.
Setting Up Your Dev Environment
Before advancing further, you may need to install some tools on your machine. You should check if you have installed the Node.js and npm bundle:
$ node -v
$ npm -v
If you need to install them, instructions can be found at the Node.js website. I recommend that you install the 10.16.3 version for its Long Term Support.
To work with the code, you will also need Git. Check if you already have it installed:
$ git --versionTo run the application in your machine, install the Now CLI:
$ npm install now -gLastly, it’s a good idea to get curl, the Swiss army knife of networking.
Testing Lambdas
Testing is vital in any development, not only to find bugs but also to
validate that the code exactly does what we want. As an example, the
demo includes a script in the test directory that validates the
response from the function.
Perhaps the main downside of using lambdas is that it makes testing more challenging. This is unavoidable since the cloud platform does so much for us. Nevertheless, we’ll use Semaphore CI along with some libraries to simulate as best as possible how the function behaves once deployed.
For testing, we’ll use Node.js and two libraries:
- Express: Express is a framework designed for building websites and APIs. Its popularity has made it an integral part of web development. Unlike other frameworks, Express doesn’t force us to adopt any particular design pattern. Instead, it only provides the bare minimum functionality, which can be extended with middleware.
- Jest: a testing framework. Jest scans the project files and executes the tests scripts.
Fork and Run the Demo
To get your own copy of the project, fork the repository on GitHub:
- Create a GitHub account.
- Go to the Semaphore Demo and click on the Fork button on the top right side.
- Get your repository URL by clicking on Clone or download
- Clone the repository to your machine:
git clone https://github.com/ …
You can get the app built with:
$ npm installTo run the test script:
$ npm test

> semaphore-demo-zeit-now@1.0.0 test /home/tom/r/semaphore-demo-zeit-now
> NODE_ENV=test PORT=3000 jest --coverage --bail

 PASS  test/api.test.js
  GET /api/hello
    ✓ respond with "Hello World!" (20ms)

  console.log test/api.test.js:10
    Server running on port 3000.

----------|----------|----------|----------|----------|-------------------|
File      |  % Stmts | % Branch |  % Funcs |  % Lines | Uncovered Line #s |
----------|----------|----------|----------|----------|-------------------|
All files |      100 |      100 |      100 |      100 |                   |
 hello.js |      100 |      100 |      100 |      100 |                   |
----------|----------|----------|----------|----------|-------------------|
Test Suites: 1 passed, 1 total
Tests:       1 passed, 1 total
Snapshots:   0 total
Time:        1.143s
Ran all test suites.
Jest prints the result of each script. In the end, Jest prints a coverage report which tells us whether any part of the code was not executed.
No problems found? So far, so good.
The only thing left to do is to get the app started. The Now CLI can run lambdas directly in your machine:
$ now dev
> Now CLI 16.1.2 dev (beta) — https://zeit.co/feedback/dev
> Ready! Available at http://0.0.0.0:3000
You can view the response from your server either with curl or by opening your browser and going to http://127.0.0.1:3000.
$ curl -w "\n" http://0.0.0.0:3000/api/hello
Hello World!
You got it working? Way to go!
About ZEIT Now
Serverless takes many forms. Some developers write lambdas, others choose an all-in-one solution platform. We could pick among one of the many serverless frameworks that have appeared in recent years—most of them require some degree of re-training and have the risk of vendor lock-in. ZEIT Now deployments, however, are seamless. ZEIT does not ask us to learn a new framework to be serverless. We can deploy our existing applications without modifications.
Internally, Now Lambdas work on top of AWS Lambdas; ZEIT Now also supports other cloud providers (for caching and routing). As we’ll see next, we won’t have to configure or set up any service in AWS to run our application.
Apps in ZEIT Now are immutable, meaning they cannot be changed once deployed. Each newly published version gets a unique deployment URL. As it turns out, this clever approach allows us to roll back to any previous version at any time.
ZEIT Now addresses follow this format:
https://APP_NAME.USERNAME.now.sh: Public-facing URL that points to the latest version.https://APP_NAME-UUID.now.sh: Deployment URL. UUID is a unique, automatically generated string for each release.
Deploy From Your Machine
Enough theory. Time to get this app online:
- Sign up in ZEIT Now.
- Connect your machine with ZEIT Now and follow the on-screen instructions:
$ now loginTry deploying the staging site:
$ now deploy -n semaphore-demo-zeit-now-staging

> Deploying ~/r/semaphore-demo-zeit-now under YOUR_NAME
> Using project semaphore-demo-zeit-now-staging
> https://semaphore-demo-zeit-now-staging-cf88t6oz1.now.sh [v2] [2s]
> Ready! Deployed to https://semaphore-demo-zeit-now-staging.YOUR_NAME.now.sh [in clipboard] [34s]
Now does all the heavy lifting:
- Uploads the code to ZEIT Now.
- Downloads packages, builds and deploys the app.
- Assigns deployment and public URLs.
Check out your new server. The ZEIT Now dashboard shows all deployments:

What’s All the Buzz About Continuous Integration
At this point in the post, you may be asking: I got the app online all right, aren’t we done yet? Not by a long shot, the best part is yet to come. Think about all the things we did to get to this point. The first time it is always exciting and fun, but doing it over, again and again, will get old fast. Wouldn’t it be great if we could automate away all of it? This is precisely the problem that continuous integration (CI) and continuous delivery (CD) solve. CI/CD takes care of all the testing, building, and deploying. And they do it as a reproducible, battle-hardened process.
CI/CD is even more vital when working on a team. Lots of hands code faster but have a higher chance of introducing conflicts. The surest way to mitigate this is by building and testing the app as frequently as possible. Then, once everything is working, we can make high-quality releases faster.
About Semaphore
Older continuous integration and delivery platforms, like the stand-alone version of Jenkins, encumber developers an infrastructure to manage. In Semaphore there is no back-end to maintain, no servers to install, or any Java versions to troubleshoot. We only define pipelines in a clean, easy-to-read format and do as many Git pushes as needed. Semaphore will silently provision everything to drive the pipeline, at any scale.
Before we can use Semaphore, you’ll have to sign up and add the project:
- Go to https//semaphoreci.com and sign up with your GitHub credentials by clicking on Try for FREE on the top-right corner.
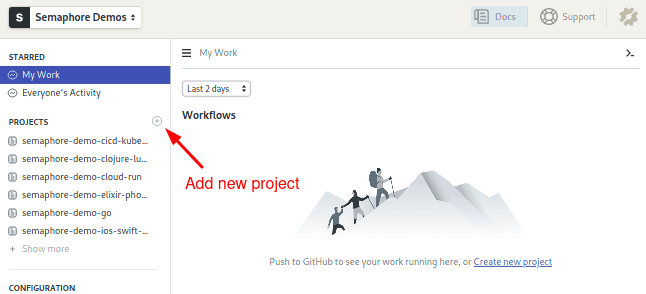
- Click on the + (plus) sign next to Projects:
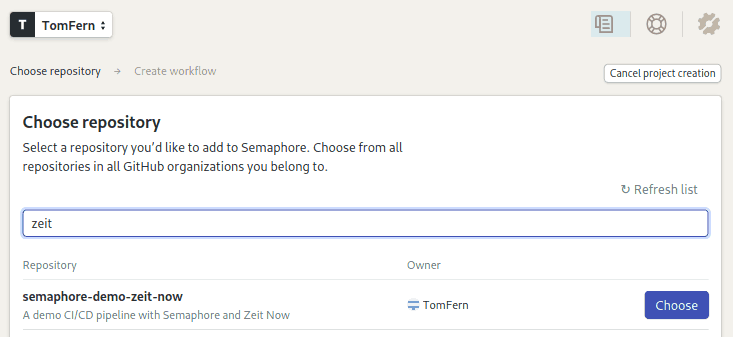
- Search your GitHub repository in the list and click on Choose:
- Choose: I will use the existing configuration
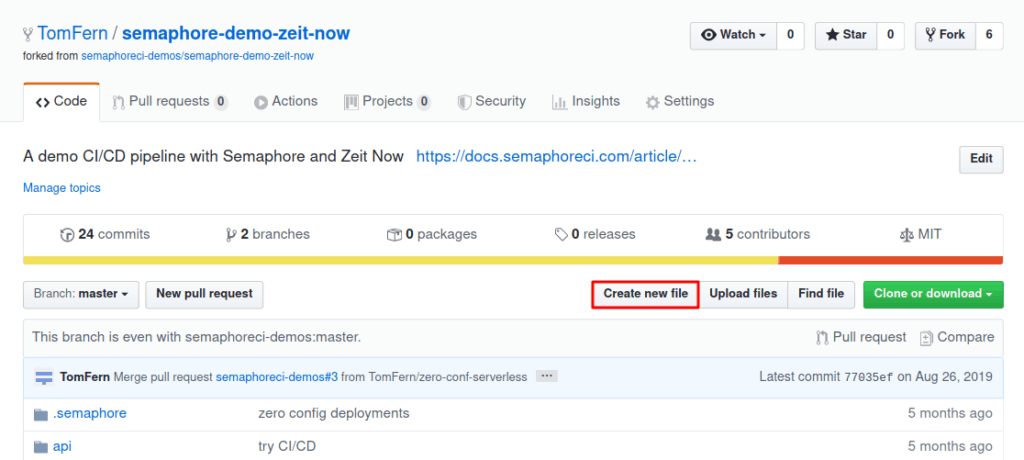
Semaphore will pick up the existing configuration once you make a modification in the repository. For example, creating an empty file will trigger the CI/CD process automatically:
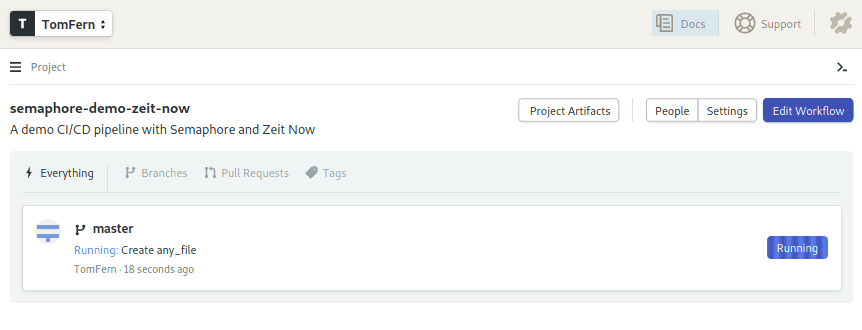
Type any new name and Commit the change.
When you go back to Semaphore, you should see that the workflow has already started:
Let’s pause for a bit to examine how the CI pipeline works:
- Click on the Edit workflow button near the top-right corner.
- The Workflow Builder will show the existing configuration.
- Click on the CI Pipeline to view its properties:

A pipeline fulfills a particular objective, such as building and testing, or deploying. In Semaphore, a pipeline determines the execution order, the flow goes from left to right.
A Semaphore pipeline has:
- Name: a descriptive name, for instance: “Build and test” or “Deploy to Production”.
- Agent: Semaphore offers several machine types with different specs. The combination of machine and operating system is defined under agent property. Semaphore provides an Ubuntu 18.04 image that is just right for our needs:
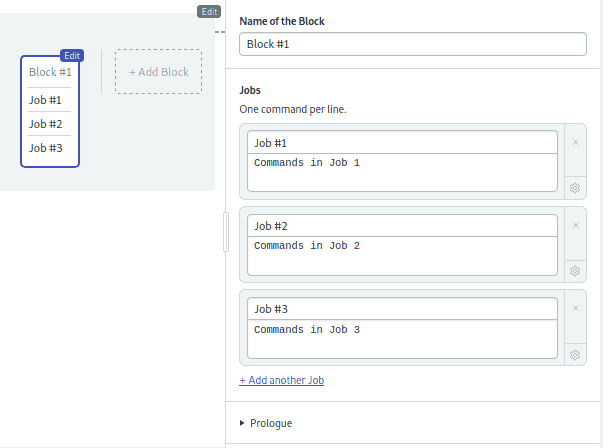
- Blocks and Jobs: Blocks and jobs define what to do at each step of the pipeline. Each block can have many jobs. Jobs contain the list of commands to execute. Within a block, jobs run concurrently; each one runs in a fully isolated virtual machine. Once all jobs in a block are done, the next block begins.
This is how a block with three jobs looks like:
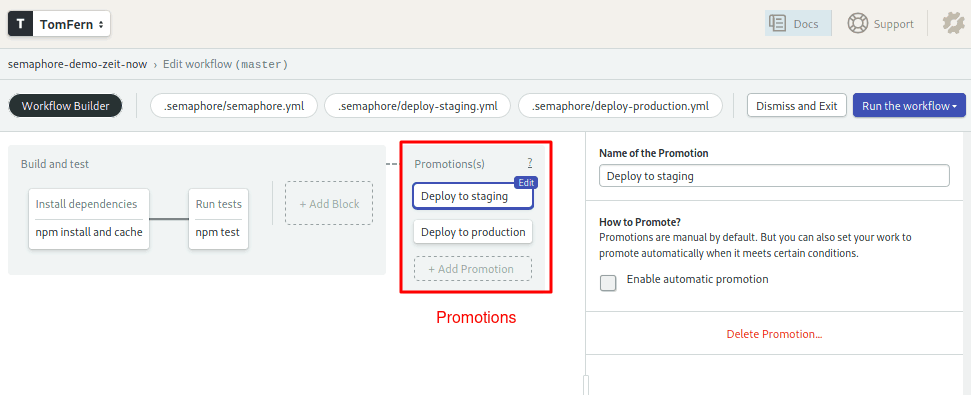
- Promotions: Promotions chain pipelines together to build complex workflows. Since they can be triggered by user-defined conditions, they can be used to gracefully manage failures or to make a release when the pipeline runs successfully:
Continuous Integration Pipeline
In this section, we’ll review how the Continuous Integration pipeline works. The CI pipeline builds and tests the code in the Semaphore environment.
Open the pipeline file located at .semaphore/semaphore.yml. We’ve already learned about the agent so we’ll skip ahead to the first block.
Block 1: Install Dependencies
Click on the first block on the CI Pipeline, the one called “Install dependencies”:
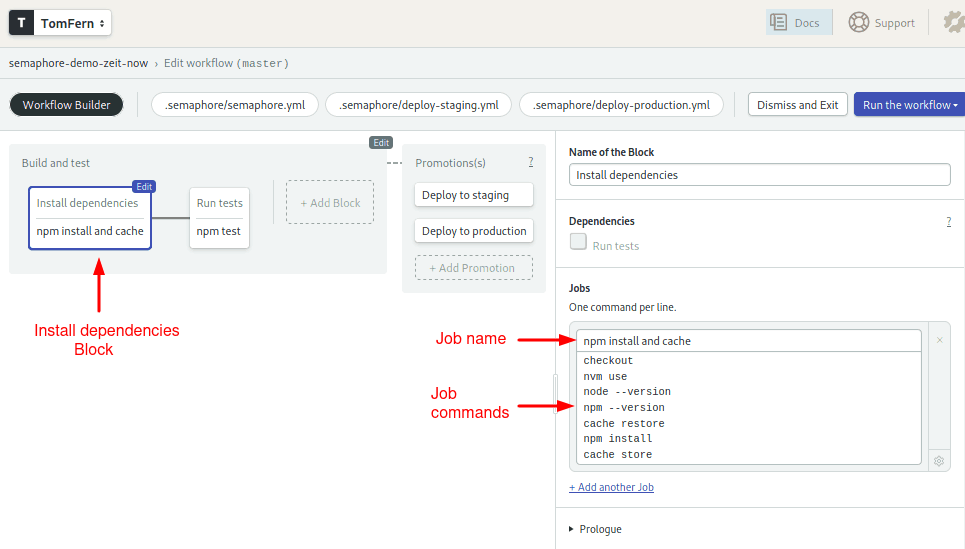
The job downloads and installs all the required packages:
- Checkout clones the code from GitHub.
- Node npm and nvm are used to set the Node.JS version and install the packages.
- Cache is used to share node modules between jobs. The cache is smart enough to determine which files need to be stored and retrieved.
Block 2: Testing
Since each job lives in an isolated environment, the second block must repeat some of the commands and get the node_modules from the cache:
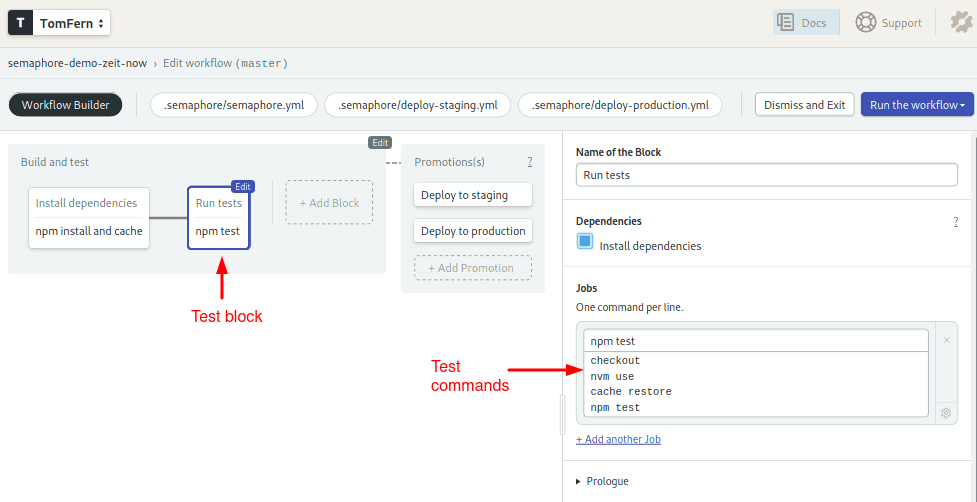
The job executes npm test, which is just a convenient way of starting Jest.
Promotions
Two promotions branch out of the CI pipeline:
- Deploy to production: automatically started once all tests are green for the master branch.
- Deploy to staging: can be manually initiated from a Semaphore workflow on any branch.
Putting it All Together
Now that we have all the pieces of the puzzle in place, you will see for yourself the power and convenience of CI/CD.
A Shared Secret
To connect Semaphore and ZEIT Now, we need to get a token:
- Log in on your ZEIT Now account
- Go to Settings
- Go to the Tokens tab.
- Click on the Create button.
- Enter a name for the token, maybe something descriptive like “semaphore-zeit-now”.
The token, being private information, does not belong in the repository. Semaphore has a secure mechanism to handle secrets:
- Go to your Semaphore account.
- On the left navigation bar, under Configuration, click on Secrets.
- Hit the Create New Secret button.
- Create the secret, as shown below:

Continuous Delivery Pipeline
We have two almost identical Continuous Delivery pipelines: staging and production. They only differ in their URLs.
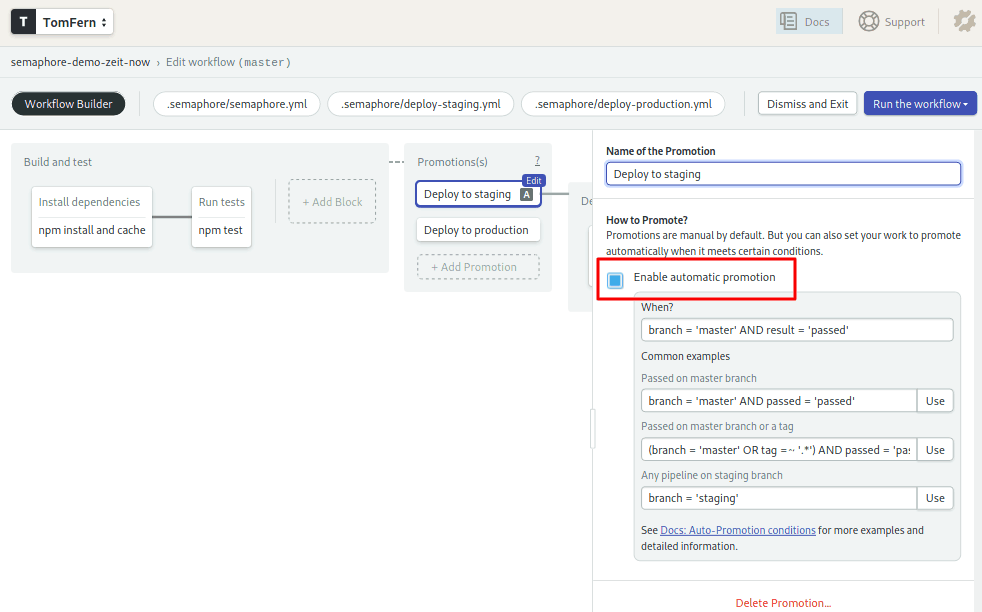
Click on one of the “Deploy to staging” and check the Enable automatic promotion option. This will trigger a deployment to staging when all previous jobs pass without errors:
The deployment itself couldn’t be easier:
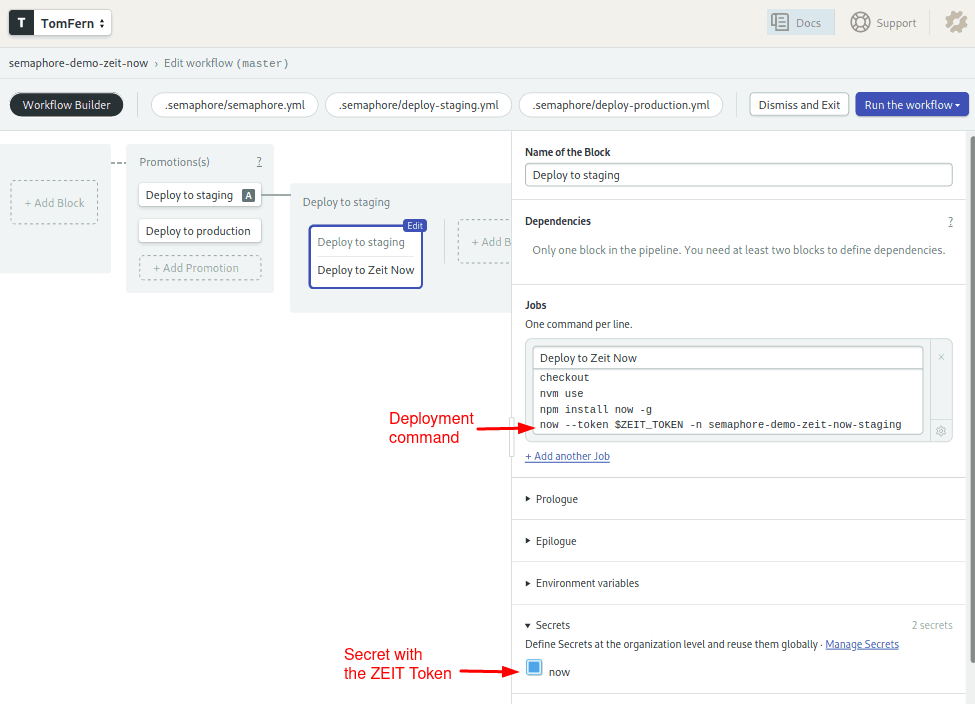
- The token is decrypted and imported as the
$ZEIT_TOKENvariable. - The
nowutility is installed. Nowdoes the deployment.
Start the pipeline
This is where all our hard work pays off:
- Click on Run the Workflow.
- Click on Start. In a few seconds, you should have your lambda function deployed to staging.
- If all goes well, click on the Promote button under “Deploy to production” to create the production site:
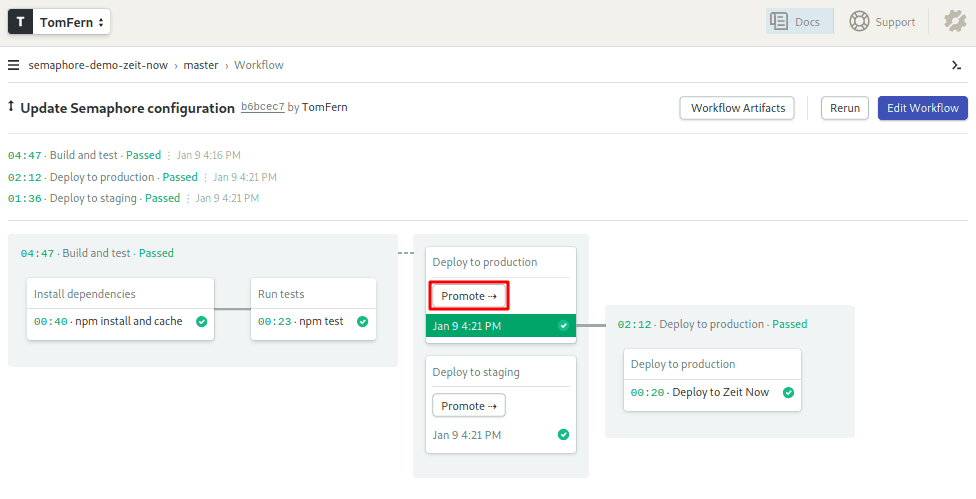
Once all the blocks are done, you should have both sites online. Try the APIs:
$ curl -w "\n" https://semaphore-demo-zeit-now-staging.YOUR_NAME.now.sh/api/hello
Hello World!

$ curl -w "\n" https://semaphore-demo-zeit-now.YOUR_NAME.now.sh/api/hello
Hello World!
You Did It!
Nice work! Once you taste the power of serverless architecture and CI/CD, you will want to use it in all your projects. I hope that what you learned today helps you to build better and smarter.
If this article got you interested in serverless, you should check these links: