Writing more maintainable, well-tested, and optimized code has always been something that brings the best out of the human brain. But distributing your apps isn’t something that requires much creativity. It’s a repetitive process that requires precise attention–an ideal case for machines to handle. CI/CD gives us the ability to ship your apps with confidence and peace of mind. If done right, CI/CD can increase the development & distribution pace manyfold.
This blog post is a continuation of our journey to establish a rock-solid CI/CD pipeline for React Native apps. In our previous posts, we dived deep into Testing for React Native Apps and CD for RN apps (iOS) using Fastlane & Semaphore. Here we will discuss steps to build and ship React Native Android apps using Fastlane & Semaphore. Our journey today consists of the following steps:
- Setting up Fastlane for React Native Apps
- Creating CI workflows for a RN app with Semaphore
- Distributing RN Android Apps with Semaphore
We have a demo react native app with everything configured, so you can jump in immediately.
Setting up Fastlane
Fastlane has been around for a long time now. If you’re not familiar with it, it’s an open-source build tool backed by engineers at Google. It aims to simplify the build process for mobile applications. Fastlane automates several tedious build tasks, such as incrementing build numbers, taking screenshots, and pushing builds to distribution platforms (e.g. Play Store, App Store, Firebase). Fastlane’s plugin ecosystem allows developers to perform huge tasks with simple commands.
The recommended way to install Fastlane is via Ruby Bundler for any OS. Once you have Ruby installed, a single command will install Fastlane on your machine.
sudo gem install fastlane # Make sure ruby is already installed
Adding Fastlane to Android
Since Fastlane works with native apps, we will navigate to our project’s android/ directory to initialize it. The following command will initialize Fastlane for Android in RN apps.
cd android; fastlane initFastlane automatically detects the project’s platform; Android in our case. It will ask you for the bundle id of the app. To automatically upload builds and metadata to Google Play, Fastlane needs a service account json secret file. It uses the supply action to automate Google play distribution. Here is how you can set up a service account for android apps. Once the JSON key is verified, it will prompt a download of the existing metadata of your app.
After the process completes, the android directory will have Fastlane & AppFile files in the fastlane/ directory. The AppFile will have a path to the app’s JSON key & bundle id, while the Fastlane file is where the magic happens.
To begin with, it will appear as shown below, but we can customize this file to brew up some additional goodness.
default_platform(:android)

platform :android do
 desc "Runs all the tests"
 lane :test do
   gradle(task: "test")
 end

 desc "Submit a new Beta Build to Firebase"
 lane :beta do
   gradle(task: "clean assembleRelease")
   firebase
 end

 desc "Deploy a new version to the Google Play"
 lane :deploy do
   gradle(task: "clean assembleRelease")
   upload_to_play_store
 end
To test our integration, let’s add a simple build task. Here is how it will look:
lane :build do |options|
   gradle(task: "assembleRelease")
 end
Sweet and simple! Let’s build via Fastlane to verify using a simple bash command:
fastlane buildIf the build completes successfully 🎉, that means that you have added Fastlane to your app! Cheers 🥂 to writing many exciting lanes.
Bringing Fastlane to React Native
At this point, we only have Fastlane in the android directory of our app. Now, let’s bring it to the root of our application. Sounds simple, right? It is! Just move the android/Fastlane directory to the root of your project and add build tasks in scripts in package.json.
{
  ...
  "scripts": {
    ...
    "fastlane-build-android": "bundle exec fastlane android build"
  },
  ...
}
After moving the fastlane file, we have to update our lanes and add a project directory to tell fastlane where the project resides. If you already have a fastlane directory in the app’s root, all you need to do is merge both new and old Fastlane & Appfile files. Ensure that you’re keeping both platforms intact in the merged file.
✅ Done!
The Fastlane build setup on your machine is complete. You can now add some cool and useful plugins and actions to enhance your workflows.
React Native CI with Semaphore
CI is usually divided into two parts, one that enforces architecture and code practice on developers’ machines via pre-commit tasks. Another is done in the CI cloud to ensure apps’ architecture remains intact across commits from multiple developers. Here we will perform our cloud CI with Semaphore, enterprise-grade CI/CD pipelines as a service with industry-leading performance. The best part about Semaphore, besides its blazing fast speed, is the wide range of configured images tailor-made for the most optimized build time. According to some curated stats, for every $1 invested in Semaphore, engineers gain $41 in reclaimed productivity.
Setting up the Semaphore App
First, let’s Signup for a Semaphore account; you can import our Github repository as a project in your organization. Semaphore will start listening to all push & pull request events in your Github repos. If you have never used Semaphore before, follow the Getting Started Guide to walk you through all the initial steps and basic concepts. Once the repository is imported into Semaphore, it’s time to set up your workflows.
Adding a CI workflow for our React Native app
Semaphore CI offers out-of-the-box templates for several applications–including Android & React Native apps. These templates can give you an excellent baseline to start. You can also edit them according to your needs, or opt to start with a custom file. Here we will begin by adding a pipeline ourselves to understand flows.
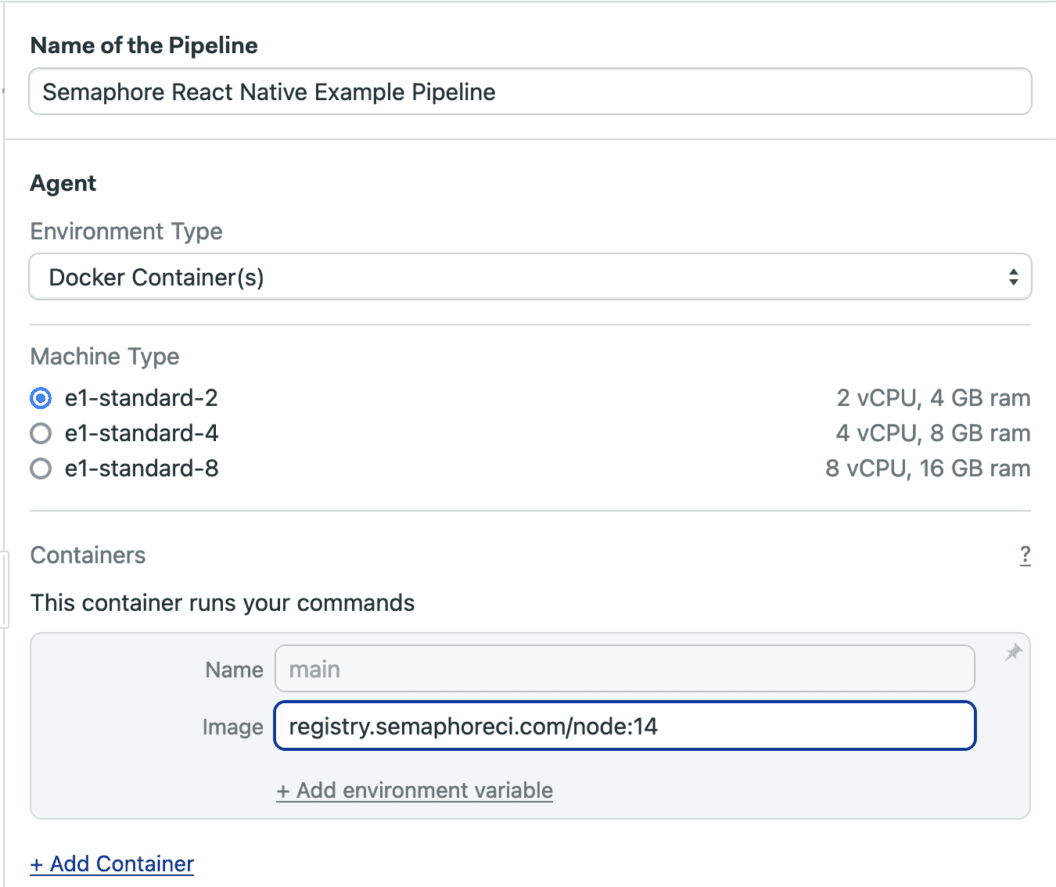
Defining our CI workflow
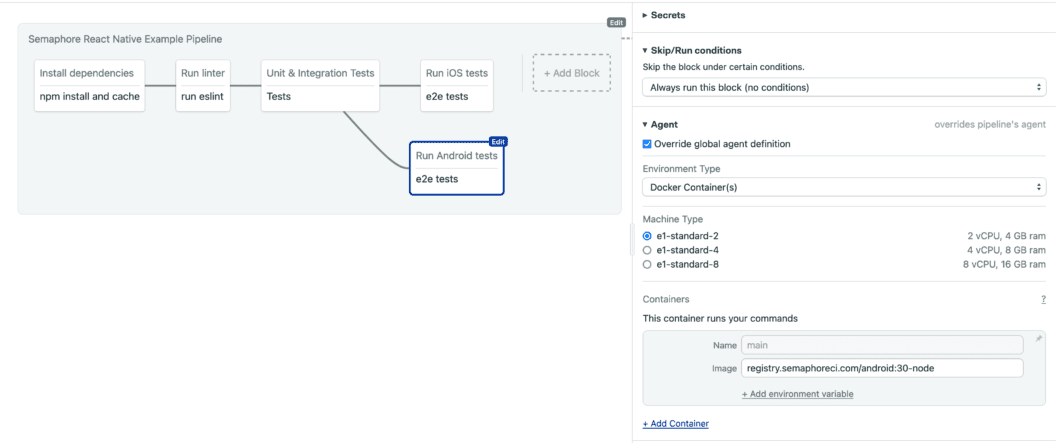
The first step in creating a CI workflow is to select an environment for its execution. With Semaphore, you can work with the environment of your choice; Linux VMs, MacOS VMs, and Docker Containers are all available. Another unique aspect is that you can use different agents for each workflow and block. Here, we will leverage the node VM for running our linter, unit tests, and integration tests. We will use Android & iOS agents for e2e tests and builds. The following images will be used:
Our CI workflow will use Node v14, while the e2e testing block for Android will use Android:30-node. Here is how our workflow will look:
Installing dependencies
Once initial setting and agent selection are made for our CI workflow, it’s time to create our first block to install our app’s dependencies. Here is how our block’s code looks:
checkout
cache restore
npm install
cache store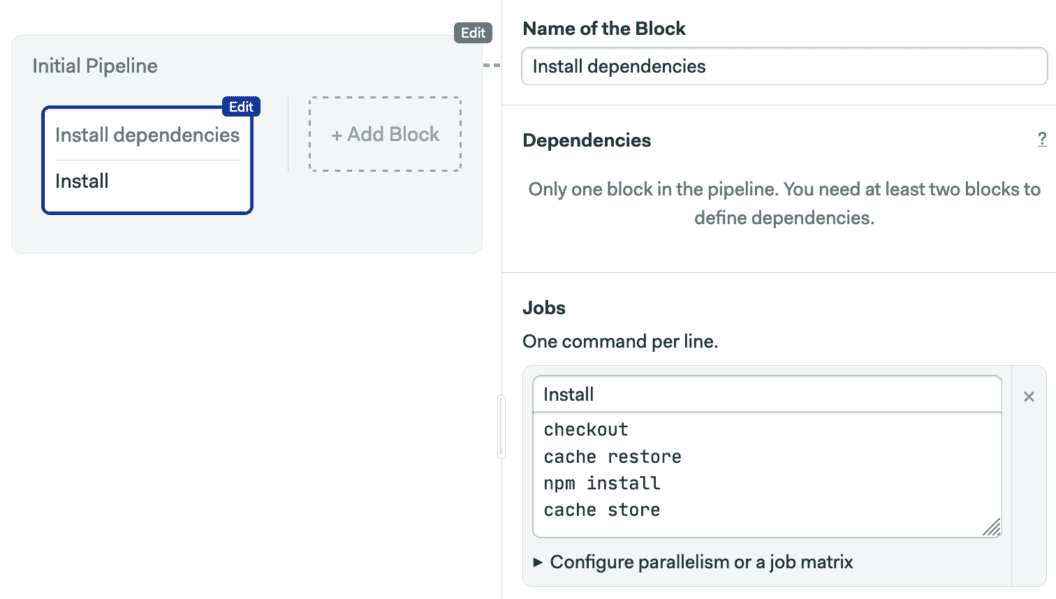
Linting
For large-scale apps, testing everything can be an expensive task. Linters and other pre-test tasks ensure that tests are executed only when code quality checks are intact. Here is how our lint block will look:
checkout
cache restore
npm run lint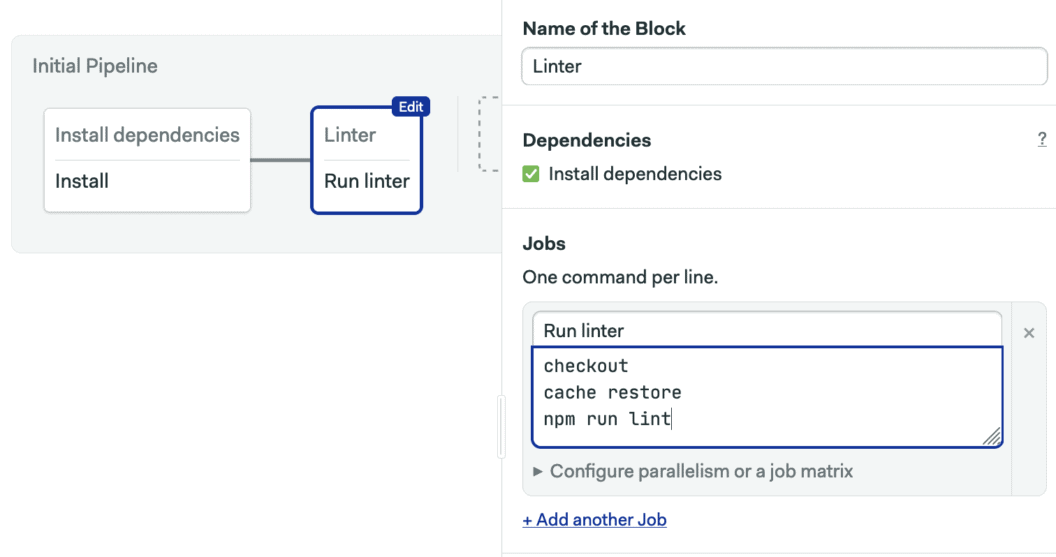
Testing
It’s now time for some real action, so let’s leverage the powerful features of Semaphore. We’re going to add two kinds of tests to our sample app; one runs in headless mode in the JS environment (Unit & Integration), and the other is our e2e test block that requires a simulator to execute. As discussed earlier, we will leverage different agents for our e2e testing blocks.
Here is our unit & integration test block:
cache restore
npm test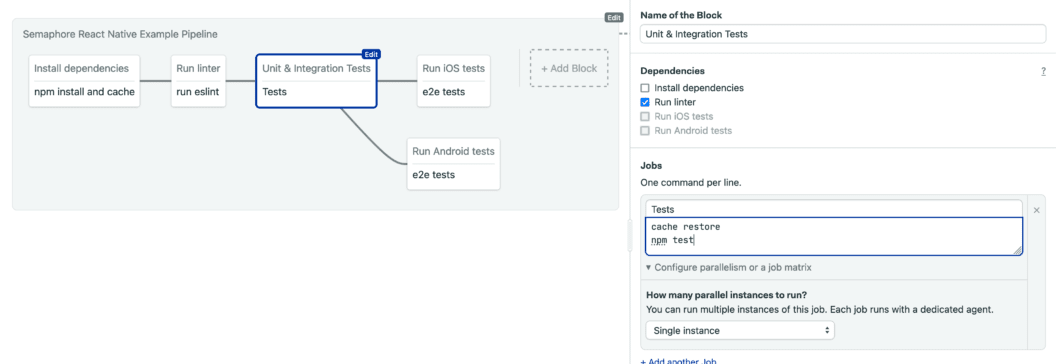
Here is our E2E test block for Android:
cache restore
npm run detox-clean-and-build-cache
npm run detox-android-build-release
npm run detox-android-test-release
artifact push workflow android/app/build/outputs/apk/release/app-release.apk
As discussed earlier, for E2E tests, we will override the default agent for the workflow. Here is how it looks:
🚀 this wraps up the CI part of our pipeline.
Distributing a RN app with Semaphore
Distribution is not a simple matter for large-scale mobile apps. We have A/B testing ongoing, different configurations for QA and development environments, and a litany of complexities. Let’s create a CD workflow to ensure we are covered on all fronts.
Semaphore allows us to break our pipelines into workflows to enable scalability. Since we have completed our CI workflow, let’s dive into the CD part now. We can use different agents for each action or platform here, like for our CI workflow.
Adding promotion steps with Semaphore
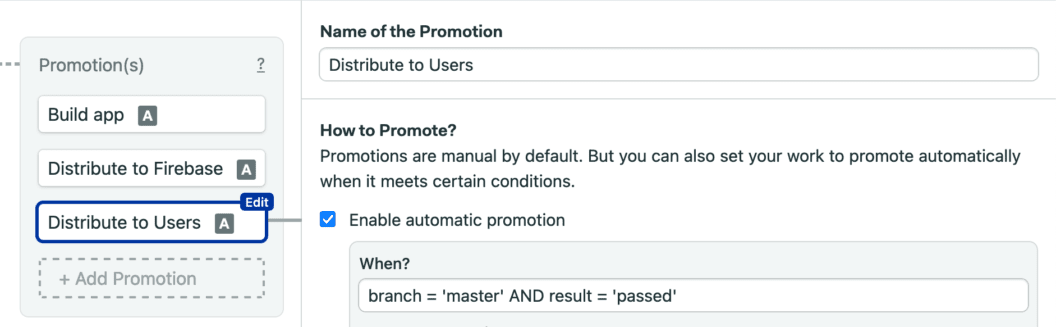
Semaphore handles CD via promotion workflow. Here is how we can add promotion workflow to our app.
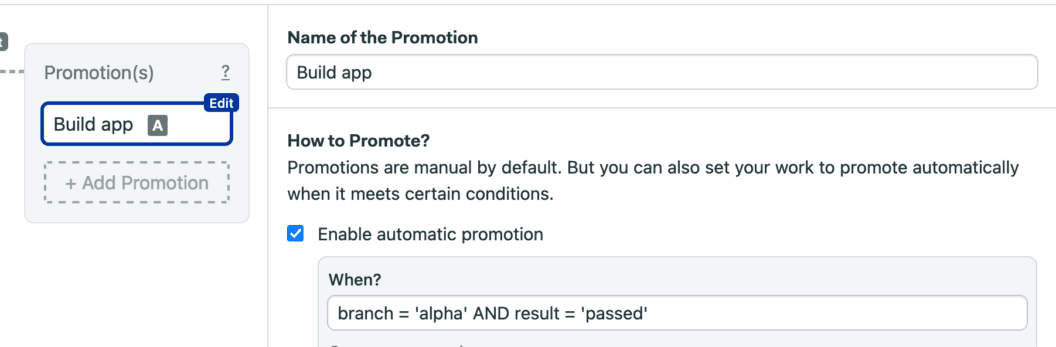
We have divided our distribution into three parts.
- For the alpha branch, the build is made available via Semaphore.
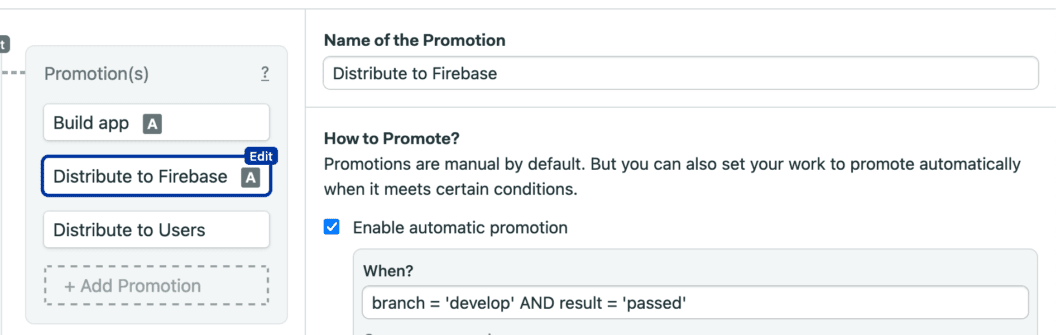
- For the develop branch, it’s distributed via firebase.
- For the master, it’s uploaded to Play Store.
Our first build task will keep artifacts on the Semaphore platform; here is how it will look:

Ship Via Firebase
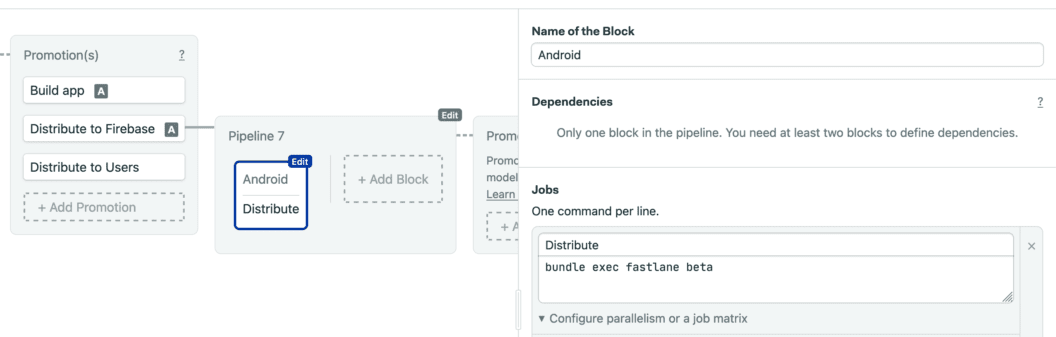
At the start of the post, we created a Fastlane lane for building & distributing our app on Firebase & Play Store. In this action, we will leverage a develop lane; here is how it looks:
Here is how the action will look:
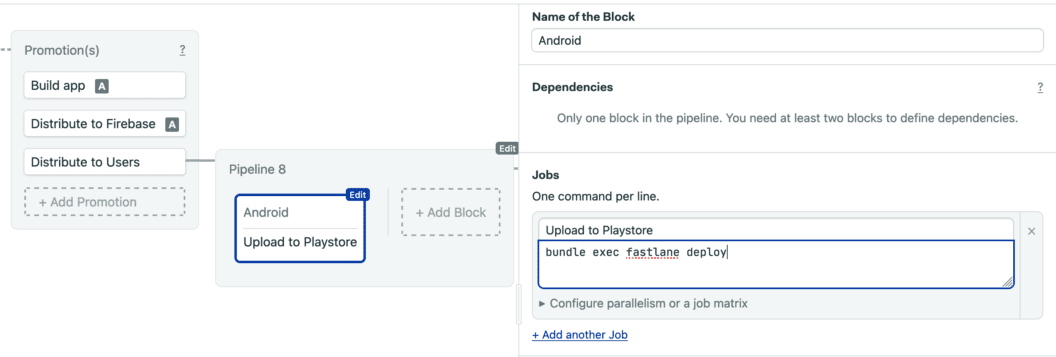
Deploy to Play Store
Here we will leverage Fastlane’s deploy lane. Here is how our block will look:
So, yes! We have done it. Now, we can just press the merge button and go home without worrying about the distribution of apps.
Summarizing
Some things suit the human brain well; shipping apps after every PR isn’t one of them. Having a solid CI/CD pipeline in place can save tons of resources and give you the confidence required to move fast. Using Semaphore is super easy way to manage your CI/CD workflows, which execute at great speed. Our research concluded that for every $1 invested in Semaphore, engineers gain $41 in reclaimed productivity.