Kubernetes Ingress is a critical concept to understand if you truly want to know Kubernetes. In this article, I will explain what Kubernetes Ingress is, why we use Kubernetes Ingress, and its benefits. Finally, we will look at a hands-on approach to getting started with Kubernetes Ingress.
Without further ado, let’s get right into it.
What is Kubernetes Ingress?
From the Kubernetes Docs, it says that Ingress is:
An API object that manages external access to the services in a cluster, typically HTTP.
The definition here is spot on. As stated earlier, Ingress is an API object that manages external access to services in a Kubernetes cluster. Using ingress gives us the ability to access our services in our Kubernetes cluster.
It is an alternative to using the Service object in Kubernetes. It is more secure because there are no ports exposed externally for the user to use for accessing our application.
There are two key components to understand when it comes to implementing Ingress in a cluster. They are:
- Ingress Object
- Ingress Controller
Ingress Object: an Ingress Object is a resource that defines the rules for routing external traffic to services within the cluster. It defines the routing rules which handle how external requests get routed to internal services.
Request protocols (HTTP and HTTPS) are also defined when creating your ingress object. An Ingress Object is basically the manifest file for creating an Ingress resource in a Kubernetes cluster.
Here is an example of what an Ingress Object looks like:
apiVersion: networking.k8s.io/v1
kind: Ingress
metadata:
  name: ingress-object
spec:
  rules:
  - host: mydomain.com
    http:
      paths:
      - path: /app1
        pathType: Prefix
        backend:
          service:
            name: app1-service
            port:
              name: http
      - path: /app2
        pathType: Prefix
        backend:
          service:
            name: app2-service
            port:
              name: http
In this example, we gave our ingress object the name ingress-object.
We can also see that under the rules, we have some things defined, such as:
- host: the host holds a valid domain name to which our requests will be routed.
- http: http defines the paths, services and ports we are mapping any other request with any specified paths defined in the paths parameter.
Note: this can also be an https protocol if you have SSL configured in your Kubernetes Cluster.
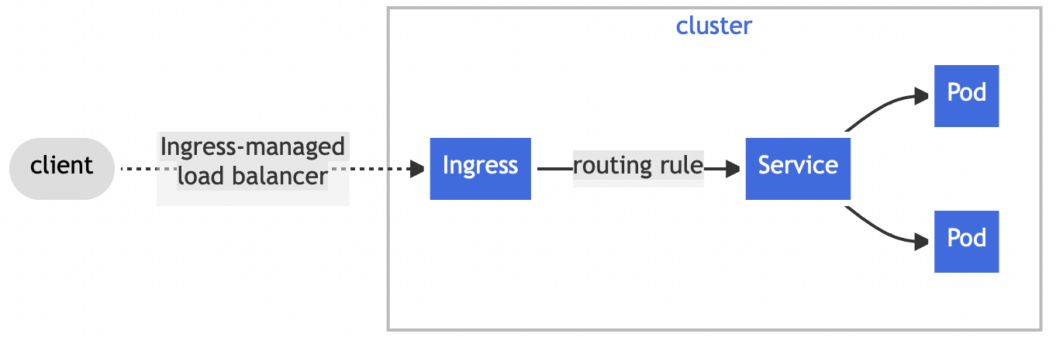
Ingress Controller: An Ingress Controller is a significant component of a Kubernetes Cluster.
It serves as the gateway for incoming requests from outside the cluster. The Ingress Controller can also perform a variety of tasks such as Load Balancing, authentication and authorization, etc.
Some examples of Ingress controllers include Nginx, Traefik, etc.
Why should you use Kubernetes Ingress?
Ingress is a secure solution that helps us access any service we have in our Kubernetes cluster. Now, the question is how is Ingress more secure than a Service when exposing your application to the outside world?
Ingress is more secure than a Service because it does not expose any ports when you want to allow external traffic into your cluster. For instance, when you have a simple flask application running in your cluster, and you want to expose the application via a service. One of the many ways to do this is to have a service of the type NodePort and expose a specific port on your cluster node.
Alternatively, if you use an Ingress to expose your application, all you have to do is to set up a routing rule to map any incoming request to the service connected to your application. When using Ingress, we still have to use services, but the difference is that now our services will not have the type NodePort exposing any ports to the outside world. The type of service we will have will be a service with the type ClusterIP. This way, we are only allowing internal network connection between all the services within our cluster, making it more secure.
Benefits of Kubernetes Ingress
There are some benefits that come with using Ingress, some of which include:
- Improved cluster security
- Better traffic routing
- Improved Load Balancing
- Automatic Scaling
Getting started with Kubernetes Ingress
In this section, we will look at how to get started with Kubernetes Ingress.
This is going to be a tutorial, and in this tutorial, we will go through the following sections:
- Setting up an Ingress Controller in Minikube
- Understanding Routing in Ingress
Prerequisites
To follow this tutorial, you will have to meet the following requirements:
Setting up an Ingress Controller in Minikube
For this tutorial, we will be using the Nginx Ingress Controller.
Firstly, we need to make sure that we have Minikube up and running.
We can start up Minikube with this command:
minikube startAfter starting up Minikube, we need to install the Nginx controller. To do that, enter this command:
minikube addons enable ingress We can make sure that the Nginx controller has been installed successfully by listing out the namespaces we have in our cluster with this command:
kubectl get namespaceingress-nginx will show up as one of the namespaces on Minikube.
Understanding routing in Ingress
Now that we have installed our Nginx ingress controller, let us look at how we can create an ingress object and use it to configure our routing rules.
Firstly, we need to create pods and services with which we are going to define routing rules for our ingress object.
We will create a backend pod and backend service. The backend pod will be a flask server, while the backend service will be a service of the type ClusterIP, pointing to the backend pod.
To create our backend pod, we need to create a backend.yml file and add this piece of code to it.
apiVersion: apps/v1
kind: Deployment
metadata:
  name: backend
spec:
  selector:
    matchLabels:
      app: backend
  template:
    metadata:
      labels:
        app: backend
    spec:
      containers:
      - name: backend
        image: callspadeoz123/flask-docker:latest
        resources:
          limits:
            memory: "128Mi"
            cpu: "200m"
        ports:
        - containerPort: 5000
For the backend service, create a file called backend-svc.yml and add this code to it:
apiVersion: v1
kind: Service
metadata:
  name: backend-svc
spec:
  selector:
    app: backend
  type: ClusterIP
  ports:
  - port: 5000
    targetPort: 5000
Next, we need to deploy both the deployment and the service in our Minikube cluster.
We can do that with this command:
kubectl apply -f backend.yml
kubectl apply -f backend-svc.yml
We can check to see if our pod and service are up and running with this command:
kubectl get pod

kubectl get service
After confirming that both our service and pod are up and running, we can now create our ingress object.
To create our ingress object, create a file called ingress.yml (this file can be called anything you want as long as it’s a yml file) and add this block of code:
apiVersion: networking.k8s.io/v1
kind: Ingress
metadata:
  name: my-ingress
  labels:
    name: my-ingress
spec:
  rules:
  - host: flask-server.com
    http:
      paths:
      - pathType: Prefix
        path: "/"
        backend:
          service:
            name: backend-svc
            port:
              number: 5000
As you can see in the spec scalar, there is another scalar under it called rules.
The rules scalar hold other important scalars such as:
- host: the host is the domain name that must be a valid domain that the ingress can use to route external requests from.
- protocol(http/https): the protocol can either http or https. In this case, we are using http.
- path: the path is the path to the domain name we add to our browser
- pathType: the pathType denotes the type of path we are adding to the host.
- backend: the backend defines the service and port the request should be routed to internally.
Next, we need to apply our ingress.yml file like so:
kubectl apply -f ingress.ymlIf we look closely, we can see that the name of our host is flask-server.com, but this is not a registered domain on the internet. We can make it work on our local machine with a bit of effort.
To register a domain name on our local machine, we need to map the IP address of the server to any name we want.
The IP address of our ingress server can be obtained by running this command:
kubectl get ingressNote: After applying our ingress manifest, it will take some time (about a minute) for it to initialize an IP address for us to use.
We should get an output like this:
NAME         CLASS   HOSTS              ADDRESS          PORTS   AGE
my-ingress   nginx   flask-server.com   192.168.59.100   80      102m
Note: your IP will be different.
Now, to map the IP address to the hostname, open the hosts file located in your etc directory for editing, like so:
sudo nano /etc/hostsWithin the file, add the hostname and IP address like this:
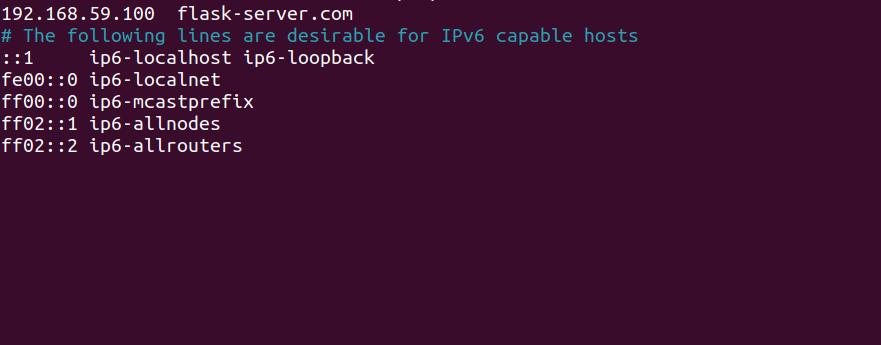
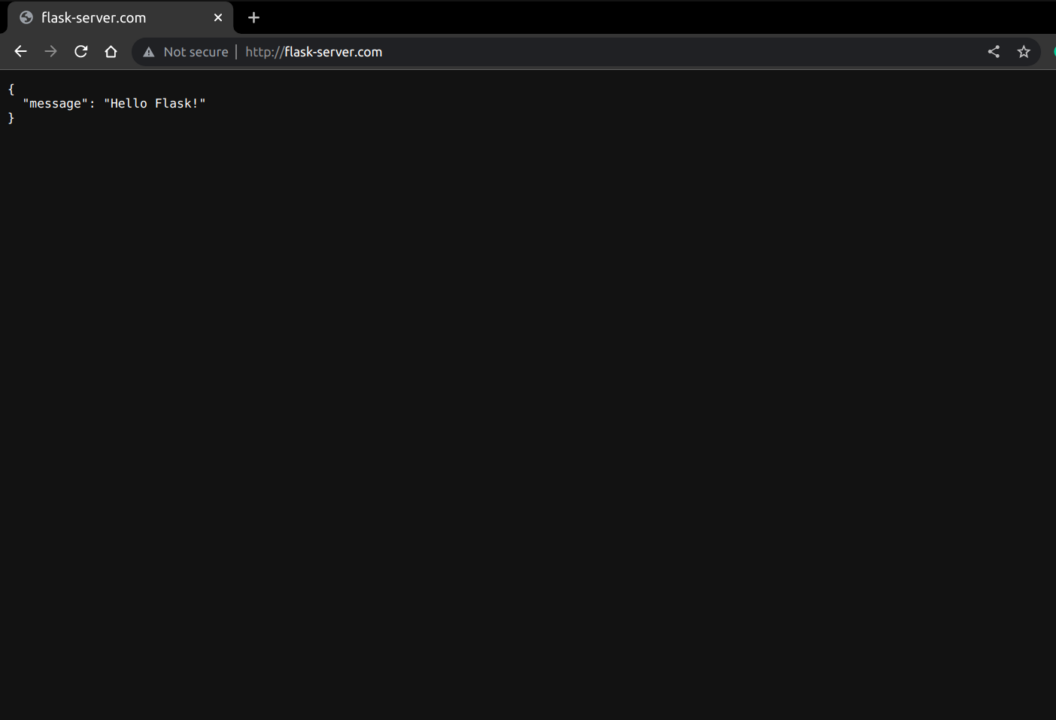
Now that we have configured our host, we can visit the host in our web browser, and we should see our flask app up and running.
We can also have more routes to our ingress object:
apiVersion: networking.k8s.io/v1
kind: Ingress
metadata:
  name: my-ingress
  labels:
    name: my-ingress
spec:
  rules:
  - host: flask-server.com
    http:
      paths:
      - pathType: Prefix
        path: "/"
        backend:
          service:
            name: backend-svc
            port:
              number: 5000
      - pathType: Prefix
        path: "/path"
        backend:
          service:
            name: serviceName
            port:
              number: servicePort
Conclusion
If you found Kubernetes Ingress a confusing topic, I hope I helped demystify and simplify it for you. It’s a tricky concept to understand at first, but when you get the hang of it, and constantly practice building more with it, it becomes very easy to use.
We also looked at some of the benefits of using Ingress, including: load balancing, routing management, easy scalability, etc.
I hope you found this article helpful and informative. Stick around for more DevOps content!