A long time ago, in a job far, far away, I was tasked with switching our old-school LAMP stacks over to Kubernetes. My boss at the time, always starry-eyed for new technologies, announced the change should only take a few days—a bold statement considering we didn’t even have a grasp on how containers worked yet.
After reading the official docs and Googling around, I began to feel overwhelmed. There were too many new concepts to learn: there were the pods, the containers, and the replicas. To me, it seemed Kubernetes was reserved for a clique of sophisticated developers.
I then did what I always do in these cases: I learned by doing. Going through a simple example goes a long way in understanding intricate subjects. So, I walked through the deployment process on my own.
In the end, we did it, albeit nowhere near the prescribed week—it took us almost a month to create three clusters, including their development, testing and production). This is not that bad when you consider the upgrade team I was part of consisted of three complete neophytes in Kubernetes. It was hard but well worth the effort.
This post is what I would have liked to read at that time: a detailed, step-by-step account of how to deploy an app to Kubernetes. By the end of this article, you’ll have a working Kubernetes deployment and continuous delivery workflow.
Continuous Integration and Delivery
Continuous Integration (CI) is the practice of building and testing the application on each update. By working in small increments, errors are detected earlier and promptly resolved.
Once integration is complete and all tests have passed, we can add Continuous Delivery (CD) to automate the release and deployment process. A project that uses CI/CD can make more frequent and reliable releases.
We’ll use Semaphore, a fast, powerful and easy-to-use Continuous Integration and Delivery (CI/CD) platform to automate the whole process:
- Install project dependencies.
- Run unit tests.
- Build a Docker image.
- Push the image to Docker Hub.
- Provide a one-click Kubernetes deployment.
For the application, we have a Ruby Sinatra microservice that exposes a few HTTP endpoints. The project already includes everything needed for the deployment, but some assembly is required.
Getting Ready
Before doing anything, you’ll need to sign up for a GitHub and a Semaphore account. Additionally, create a Docker Hub login for your Docker images.
Next, you should install some tools on your machine as well:
- Git: to handle the code.
- curl: the Swiss Army knife of networking.
- kubectl: to control your cluster remotely.
Of course, let’s not forget Kubernetes. Most cloud providers offer this service in one form or another, so shop around and see what fits your needs. The lowest-end machine and cluster size is enough to run our example app. I like starting from a three-node cluster, but you can get away with just one node.
After the cluster ready, download the kubeconfig file from your provider. Some let you download it directly from their web console, while others require a helper program. We’ll need this file to connect to the cluster.
With that out of the way, we’re ready to get started. The first thing to do is to fork the repository.
Fork the Repository
Fork the demo app we’ll be using throughout this post.
- Go the semaphore-demo-ruby-kubernetes repository and click the Fork button on the top right side.
- Click the Clone or download button and copy the address.
- Clone the repository:
$ git clone https://github.com/...your-repository-url...To connect your new repository with Semaphore:
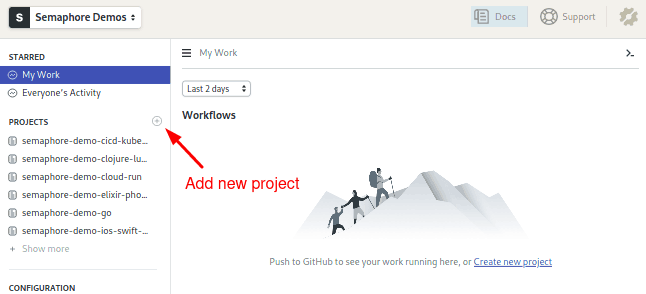
- Log in to your Semaphore using your GitHub account.
- Follow the link in the sidebar to create a new project:
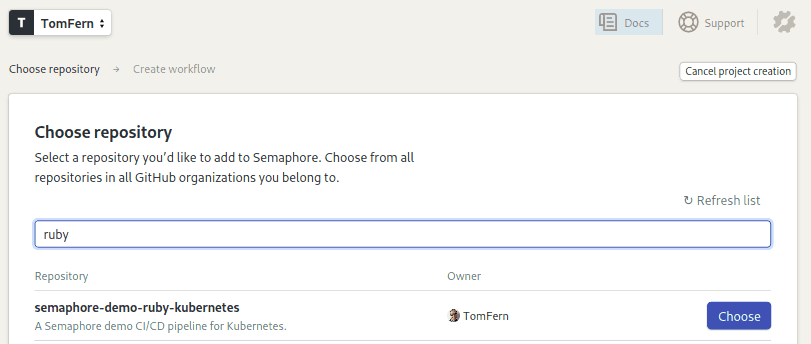
- Click on the Choose button next to your repository:
- Choose the option: I will use the existing configuration to keep the supplied CI/CD pipelines.
Semaphore will detect the existing configuration once you make an initial push to the repository. A single empty file is enough to trigger the process:
- Go back to the repository on GitHub.
- Use the Create new file button:
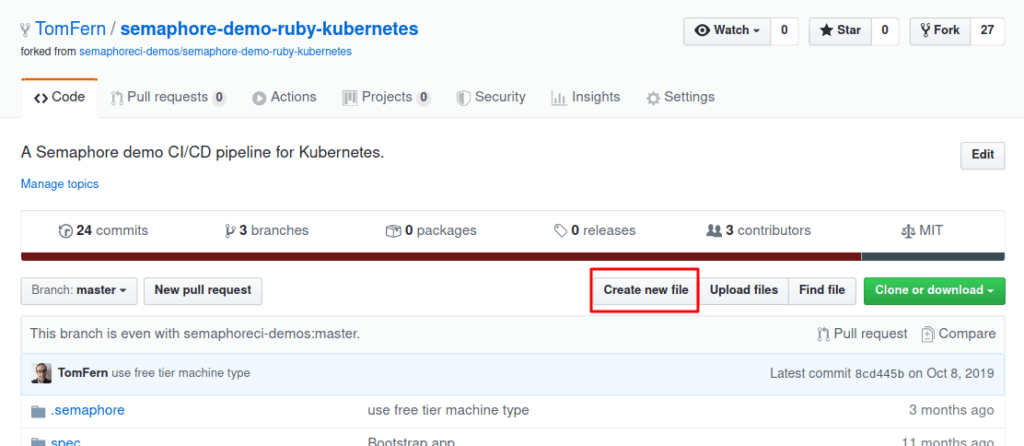
- Create a file with any name and commit the change.
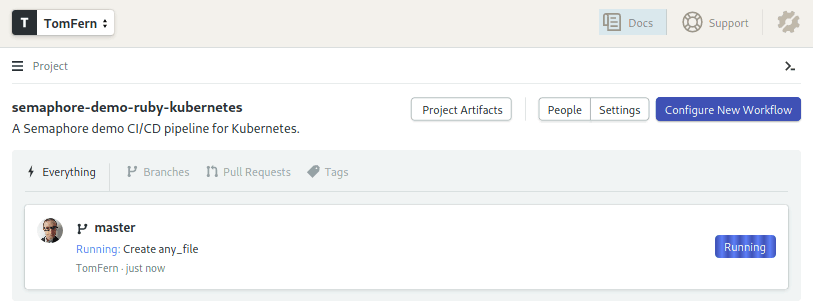
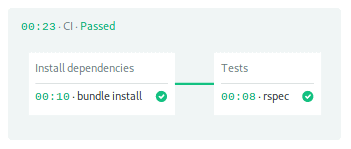
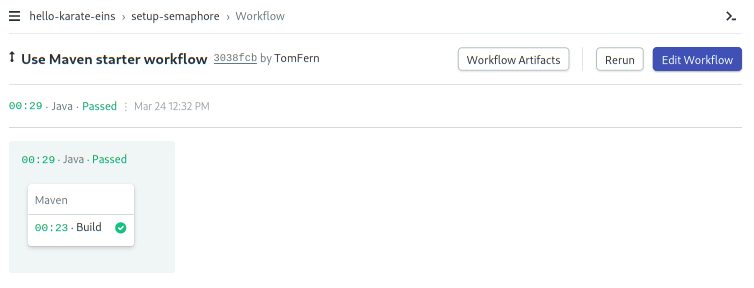
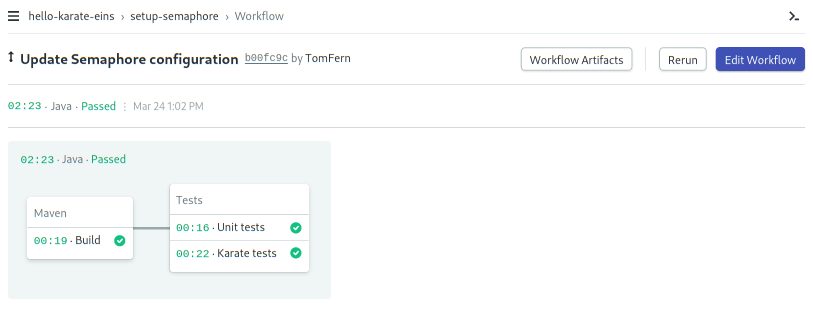
- Semaphore will start running immediately:
Testing With Semaphore
Continuous Integration turns testing fun and effective again. A well-thought-out CI pipeline creates a short feedback loop to catch errors early before they can do any harm. Our project comes with some ready-made tests:
- Click on Edit Workflow. This will open the Workflow Builder:

- This pipeline describes all the steps that Semaphore must follow to build and test the application:
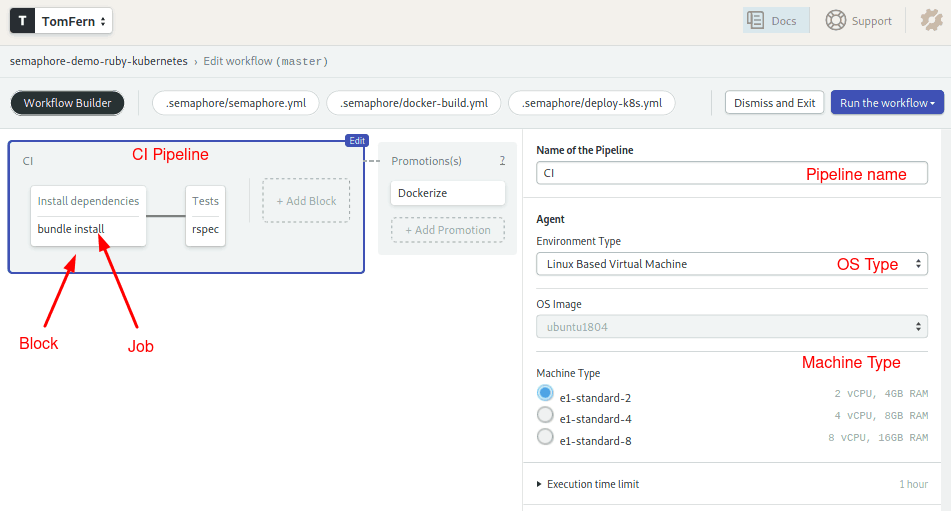
The agent is the virtual machine that powers the jobs. We have three machine types to choose from. The machine runs an optimized Ubuntu 18.04 image with build tools for many languages.
Blocks and jobs define what to do at each step of the pipeline. On Semaphore, blocks run sequentially, while jobs within a block run in parallel. The pipeline contains two blocks—one for the libraries installation and the other for running tests.
The first block downloads and installs the Ruby gems:
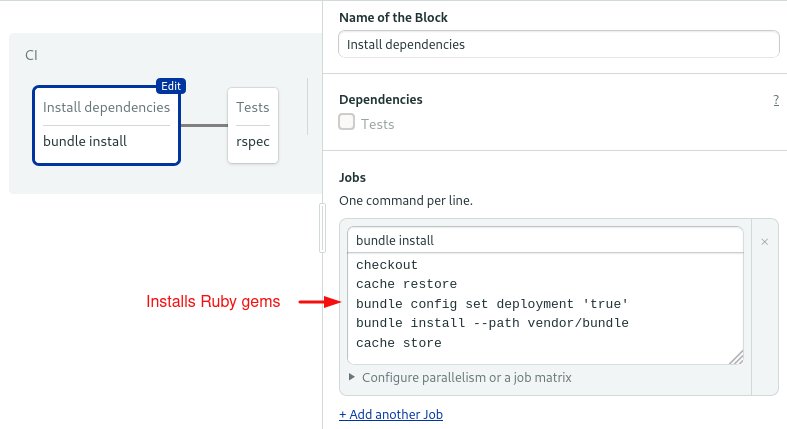
We’re using some Semaphore built-in commands:
- Checkout clones the code from GitHub.
- Since each job runs in a fully isolated machine, we must rely on the cache to store and retrieve files between job runs.
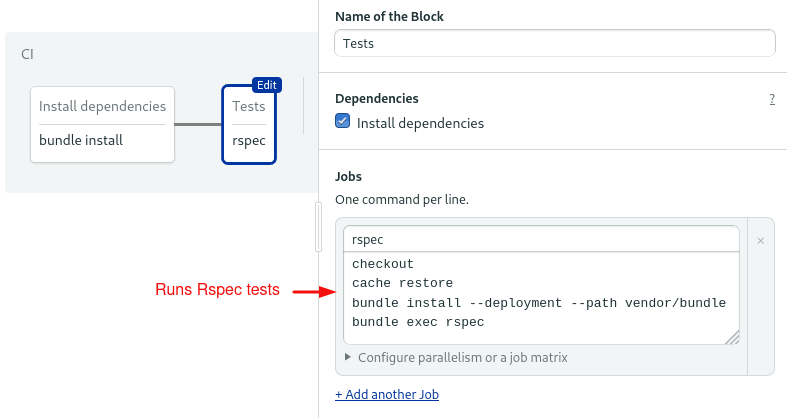
The second block is for testing. Notice that we repeat checkout and cache to get the initial files into the job. The final command starts the RSpec test suite:
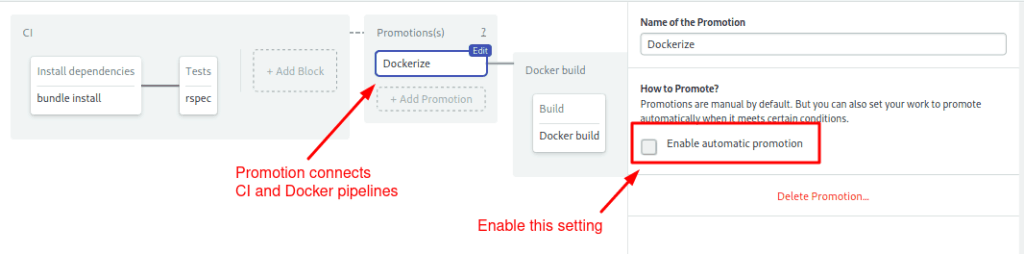
The last part declares a promotion. Promotions can conditionally connect pipelines to create complex workflows.
- Click on the Dockerize button in the Promotions box.
- Check the Enable automatic promotion option. This will cause the next pipeline to automatically start when all tests pass:
The workflow continues with the next pipeline.
Building Docker Images
We can run anything in Kubernetes—as long as it has been packaged in a Docker image. In this section, we’ll learn how to build it.
Our Docker image will include Ruby, the app code, and all its libraries. Take a look a the Dockerfile:
FROM ruby:2.5

RUN apt-get update -qq && apt-get install -y build-essential

ENV APP_HOME /app
RUN mkdir $APP_HOME
WORKDIR $APP_HOME

ADD Gemfile* $APP_HOME/
RUN bundle install --without development test

ADD . $APP_HOME

EXPOSE 4567

CMD ["bundle", "exec", "rackup", "--host", "0.0.0.0", "-p", "4567"]
The Dockerfile, like a recipe, has all the steps and commands needed to build the container image:
- Start from a pre-built ruby image.
- Install the build tools with
apt-get. - Copy Gemfile since it has all the dependencies.
- Install them with
bundle. - Copy the app source code.
- Define the listening port and the start command.
We’ll bake our production image in the Semaphore environment. However, if you wish to do a quick test on your machine, type:
$ docker build . -t test-imageTo start the server locally, use docker run and expose the internal port 4567:
$ docker run -p 4567:4567 test-imageYou can now test one of the available HTTP endpoints:
$ curl -w "\n" localhost:4567
hello world 🙂
Add Docker Hub Account to Semaphore
Semaphore provides a secure mechanism to store sensitive information such as passwords, tokens, or keys.
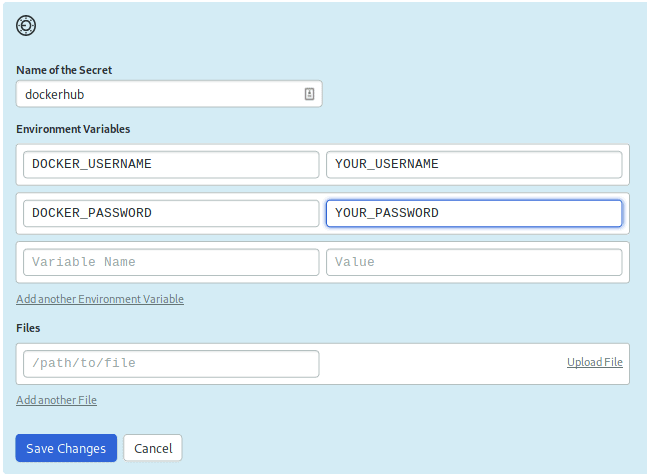
In order to push the image to your Docker Hub registry, create a Secret with your username and password:
- Open your Semaphore.
- On the left navigation bar, under Configuration, click on Secrets.
- Click on the Create New Secret.
- The name of the secret should be
dockerhub. Type in your login details as shown and Save:
The Docker Pipeline Build
This pipeline builds and pushed the image to Docker Hub. It only has one block and one job:
Let’s use the Workflow Builder again to examine the Docker Build Continuous Delivery Pipeline:
- Click on Edit Workflow
- Scroll right and click on the Dockerize promotion. This will open the pipeline:
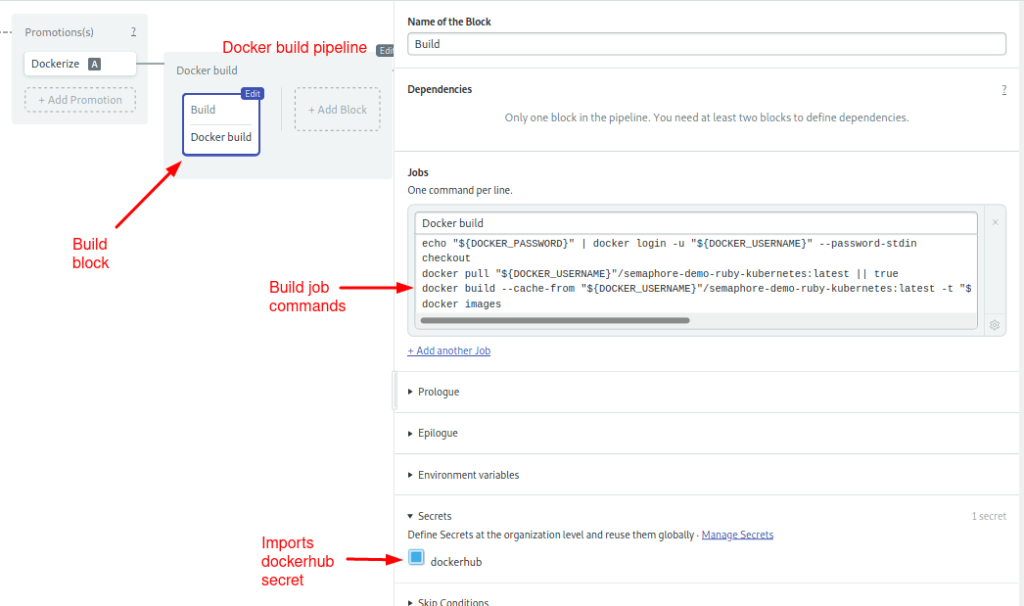
The build block starts by signing in to Docker Hub. The username and password are imported from the secret you just created.
Once logged in, Docker can directly access the registry:
echo "${DOCKER_PASSWORD}" | docker login -u "${DOCKER_USERNAME}" --password-stdin
checkout
docker pull "${DOCKER_USERNAME}"/semaphore-demo-ruby-kubernetes:latest || true
docker build --cache-from "${DOCKER_USERNAME}"/semaphore-demo-ruby-kubernetes:latest -t "${DOCKER_USERNAME}"/semaphore-demo-ruby-kubernetes:$SEMAPHORE_WORKFLOW_ID -t Dockerfile.ci .
docker images
docker push "${DOCKER_USERNAME}"/semaphore-demo-ruby-kubernetes:$SEMAPHORE_WORKFLOW_ID
The next command is docker pull which attempts to pull the image latest image. If the image is found, Docker may be able to reuse some of its layers and speed up the build. If there isn’t any latest image, that’s fine. It just takes a little bit longer to build.
The docker build command builds the image. You may have noticed that we use a different Dockerfile here: -f Dockerfile.ci. This version of the Dockerfile pulls the Ruby base image from Semaphore Container Registry, which is faster than Docker Hub and isn’t subjected to any kind of rate limits.
Finally, we push the new image. Notice here we’re using the SEMAPHORE_WORKFLOW_ID variable to uniquely tag the image.
To make your first automated build, run the pipeline:
- Click on Run the Workflow on the top-right corner.
- Click Start:
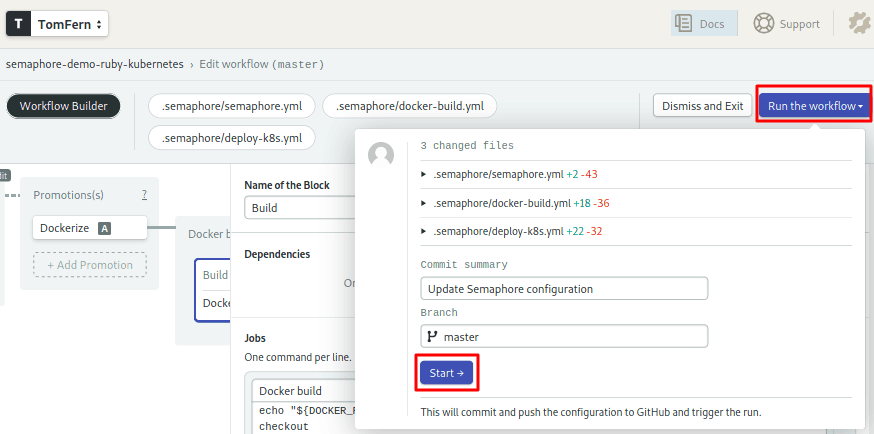
With the image ready, we can jump to the deployment phase:
Deploying to Kubernetes
Automatic deployment is Kubernetes’ strong suit. All we need is to tell the cluster our final desired state and it will take care of the rest.
Before doing the deployment, however, you have to upload the kubeconfig file to Semaphore.
Add Kubeconfig to Semaphore
We’ll need a second secret: the kubeconfig for the cluster. The file grants administrative access to it. As such, we don’t want it checked into the repository.
Create a secret called do-k8s and upload the kubeconfig file to /home/semaphore/.kube/dok8s.yaml:

Next, we’ll have to tell the Kubernetes cluster how to authenticate with the docker registry. Run the following command to store your Docker Hub username and password.
$ kubectl create secret docker-registry dockerhub \
--docker-server=docker.io \
--docker-username=YOUR_DOCKER_HUB_USERNAME \
--docker-password=YOUR_DOCKER_HUB_PASSWORD

secret/dockerhub created
Deployment Manifest
In spite of Kubernetes being a container orchestration platform, we don’t manage containers directly. In truth, the deployment unit is the pod. A pod is like a group of merry friends that always go together to the same places. Containers in a pod are guaranteed to run on the same node and have the same IP. They always start and stop in unison and, since they run on the same machine, they can share its resources.
The problem with pods is that they can start and stop at any time, and we can’t know for sure what IPs they’ll get assigned. To route HTTP traffic from our users we’ll also need a load-balancing service; it will be responsible for keeping track of the pods and forwarding incoming connections so, from the client’s point of view, there is always a single public IP.
Open the file located at deployment.yml. This is the manifest for deploying our app. It has two resources separated by three dashes.
First, the deployment:
apiVersion: apps/v1
kind: Deployment
metadata:
  name: semaphore-demo-ruby-kubernetes
spec:
  replicas: 1
  selector:
    matchLabels:
      app: semaphore-demo-ruby-kubernetes
  template:
    metadata:
      labels:
        app: semaphore-demo-ruby-kubernetes
    spec:
      imagePullSecrets:
      - name: dockerhub
      containers:
      - name: semaphore-demo-ruby-kubernetes
        image: $DOCKER_USERNAME/semaphore-demo-ruby-kubernetes:$SEMAPHORE_WORKFLOW_ID
There are several concepts to unpack here:
- Labels: resources can have a name and several labels, which are convenient to organize things.
- Spec: defines the desired final state and the template used to create the pods.
- Replicas: defines how many copies of the pod to create. We usually set this to the number of nodes in the cluster. Since I’m using three nodes, I’ll change this line to
replicas: 3.
The second resource is the service. It binds to port 80 and forwards the HTTP traffic to the pods in the deployment:
---

apiVersion: v1
kind: Service
metadata:
  name: semaphore-demo-ruby-kubernetes-lb
spec:
  selector:
    app: semaphore-demo-ruby-kubernetes
  type: LoadBalancer
  ports:
    - port: 80
      targetPort: 4567
Kubernetes matches up the selector with the labels to connect services with pods. Thus, we can have many services and deployments in the same cluster and wire them as required.
Deployment Pipeline
We’re entering the last stage of CI/CD configuration. At this point, we have a CI pipeline and the Docker pipeline.
In this one, we deploy to Kubernetes.
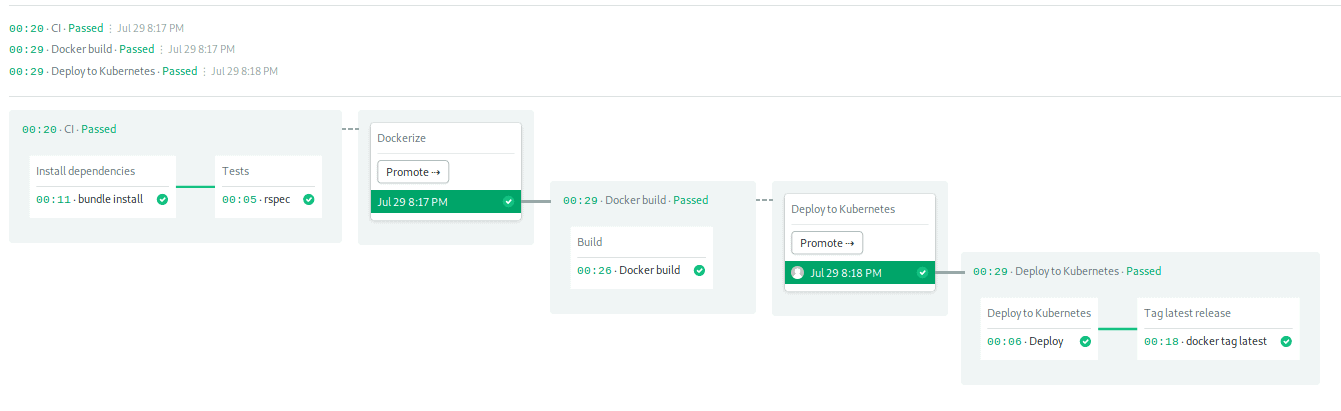
Two jobs make up the last pipeline:
Use the Workflow Builder to examine how it works:
- Open the Dockerize promotion.
- Scroll to the far right and open the Deploy to Kubernetes promotion:

The first block starts the deployment. After importing the kubeconfig file, envsubst replaces the placeholder variables in deployment.yml with their actual values. Then, kubectl apply sends the manifest to the cluster:
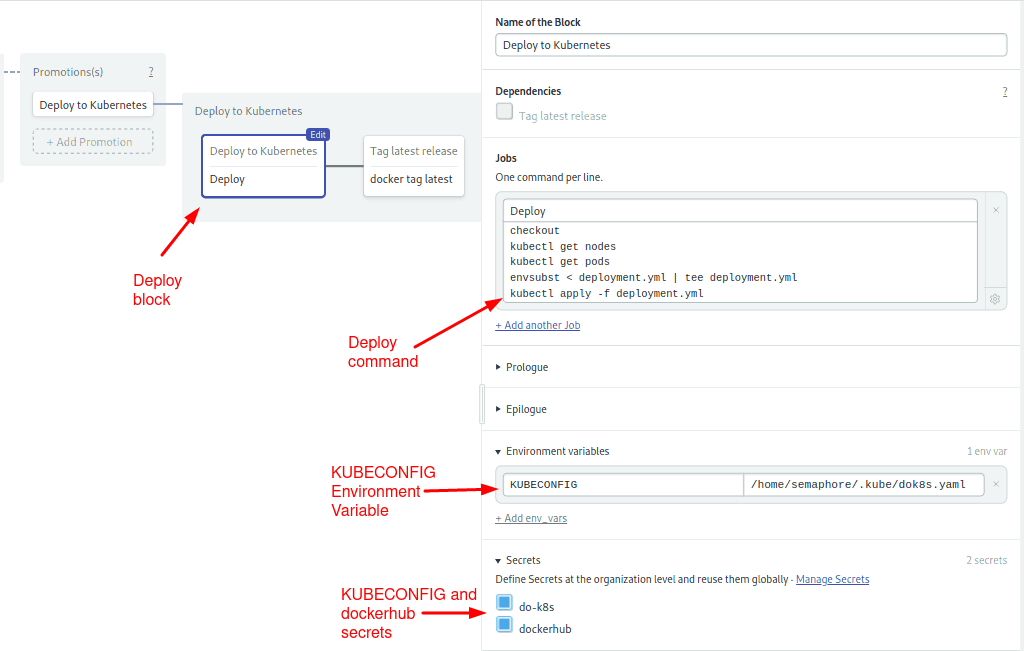
The second block pushes the image as latest so we can use it as a cache on the next run:
We use docker pull, tag and push to update the tags on DockerHub:
echo "${DOCKER_PASSWORD}" | docker login -u "${DOCKER_USERNAME}" --password-stdin
docker pull "${DOCKER_USERNAME}"/semaphore-demo-ruby-kubernetes:$SEMAPHORE_WORKFLOW_ID
docker tag "${DOCKER_USERNAME}"/semaphore-demo-ruby-kubernetes:$SEMAPHORE_WORKFLOW_ID "${DOCKER_USERNAME}"/semaphore-demo-ruby-kubernetes:latest
docker push "${DOCKER_USERNAME}"/semaphore-demo-ruby-kubernetes:latest
This is the end of the workflow. We’re ready to try it out. Save the changes:
- Click on Run the Workflow.
- Click on Start.
Deploy the App
Let’s teach our Sinatra app to sing. Add the following code inside the App class in app.rb:
get "/sing" do
  "And now, the end is near
   And so I face the final curtain..."
end
Push the modified files to GitHub:
$ git add deployment.yml
$ git add app.rb
$ git commit -m "test deployment”
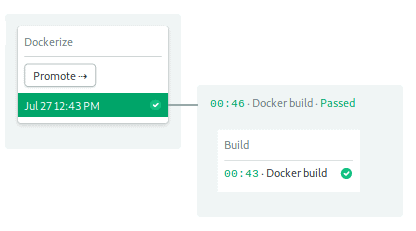
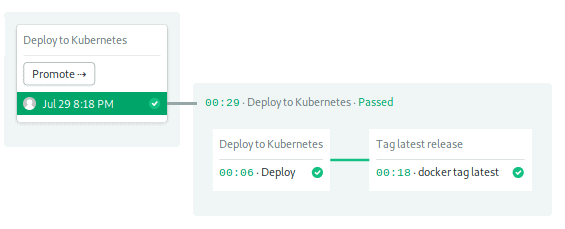
$ git push origin masterWait until the docker build pipeline completes; you can check the progress on Semaphore. Once ready, hit the Promote button:
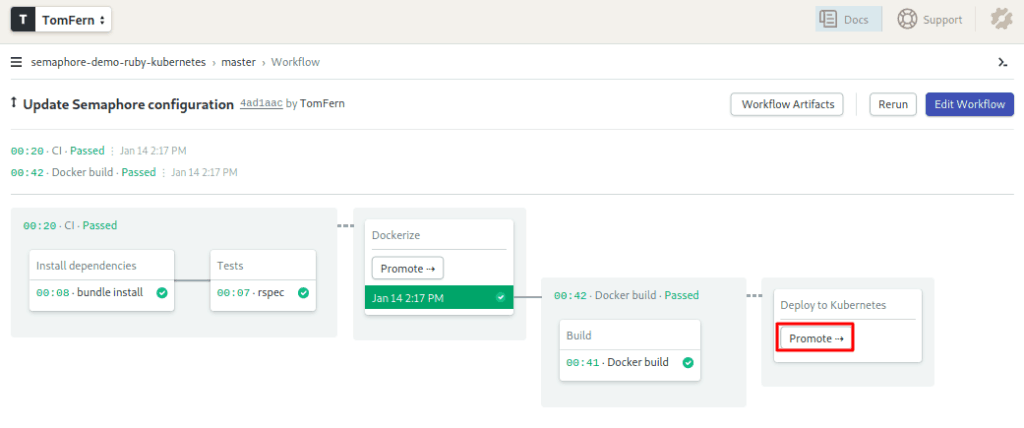
Did it work?
We’re off to a good start. Now it’s up to Kubernetes. We can check the deployment status using kubectl. The initial status is three pods desired and zero available:
$ kubectl get deployments
NAME                             DESIRED   CURRENT   UP-TO-DATE   AVAILABLE   AGE
semaphore-demo-ruby-kubernetes   3         0         0            0           15m
A few seconds after, the pods have started and reconciliation is complete:
$ kubectl get deployments
NAME                             DESIRED   CURRENT   UP-TO-DATE   AVAILABLE   AGE
semaphore-demo-ruby-kubernetes   3         3         3            3           15m
To get a general status of the cluster use get all. It shows pods, services, deployments and replicas:
$ kubectl get all
NAME                                                  READY   STATUS    RESTARTS   AGE
pod/semaphore-demo-ruby-kubernetes-7d985f8b7c-454dh   1/1     Running   0          2m
pod/semaphore-demo-ruby-kubernetes-7d985f8b7c-4pdqp   1/1     Running   0          119s
pod/semaphore-demo-ruby-kubernetes-7d985f8b7c-9wsgk   1/1     Running   0          2m34s


NAME                                        TYPE           CLUSTER-IP    EXTERNAL-IP    PORT(S)        AGE
service/kubernetes                          ClusterIP      10.12.0.1              443/TCP        24m
service/semaphore-demo-ruby-kubernetes-lb   LoadBalancer   10.12.15.50   35.232.70.45   80:31354/TCP   17m


NAME                                             DESIRED   CURRENT   UP-TO-DATE   AVAILABLE   AGE
deployment.apps/semaphore-demo-ruby-kubernetes   3         3         3            3           17m

NAME                                                        DESIRED   CURRENT   READY   AGE
replicaset.apps/semaphore-demo-ruby-kubernetes-7d985f8b7c   3         3         3       2m36s
The service IP is shown after the pods. For me, the load-balancer was assigned the external IP 35.232.70.45. Replace it with the one your provider has assigned to you. Let’s try the new server.
Would you sing for us?
$ curl -w "\n" http://YOUR_EXTERNAL_IP/sing
And now, the end is near
     And so I face the final curtain...
The End Is Near
Deploying to Kubernetes doesn’t have to be hard or painful, less so when backed with the right CI/CD solution. You now have a fully automated continuous delivery pipeline to Kubernetes.
Feel free to fork and play with semaphore-demo-ruby-kubernetes on your Kubernetes instance. Here are some ideas:
- Create a staging cluster.
- Build a development container and run tests inside it.
- Extend the project with more microservices.
Interested in Kubernetes? Don’t miss the rest of our tutorials:
- CI/CD for Microservices on DigitalOcean Kubernetes
- Continuous Integration and Delivery to AWS Kubernetes
- How to Release Faster with Continuous Delivery for Google Kubernetes
- CI/CD for Microservices on DigitalOcean Kubernetes