Do you know what airplanes, rockets, submarines, and blue-green deployments have in common? They all go to great lengths to prevent failures. And they do that using redundancy.
We’ve talked before about the generalities of blue-green deployments in another post. Today, I’d like to get into the gory details and see how we can create a CI/CD pipeline that deploys a Kubernetes application using the blue-green methodology.
The gist of blue-green deployments is to have two identical environments, conventionally called blue and green, to do continuous, risk-free updates. This way, users access one while the other receives updates.
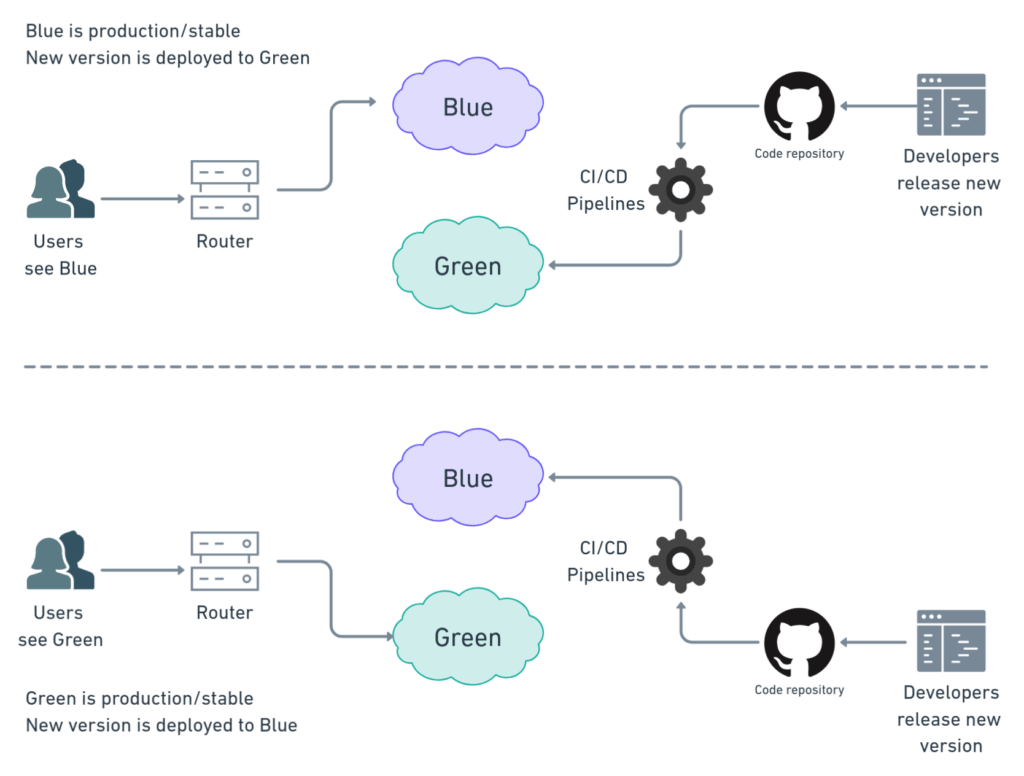
Blue and green take turns. On each cycle, we deploy new versions into the idle environment, test them, and finally switch routes so all users can start using it. With this method, we get three benefits:
- We test in a real production environment.
- Users don’t experience any downtime.
- We can rollback in an instant in case there is trouble.
Why Kubernetes?
The way we manage the infrastructure around blue-green deployments depends on the technology we’re running. If we’re using bare metal servers, one system will be idle most of the time. In practice, however, it’s a lot more common and cost-effective to provision resources on-demand in the cloud using infrastructure as code (IaC). For instance, we can start virtual machines and spin up containers, configure networks and services before we start the deployment. Once users have been switched to the new version, the old environment can be torn down.
Here is where Kubernetes enters the picture. Kubernetes is an orchestration platform that’s perfect for blue-green deployments. We can, for instance, use the platform to dynamically create the green environment, deploy the application, switch over the user’s traffic, and finally delete the blue environment. Kubernetes lets us manage the whole blue-green process using one tool.
If you are an absolute beginner in Kubernetes or if you’d like a refresher, grab a copy of our free eBook CI/CD with Docker and Kubernetes. It is a great way to get started with Docker and Kubernetes.
Blue-green Deployments with Kubernetes
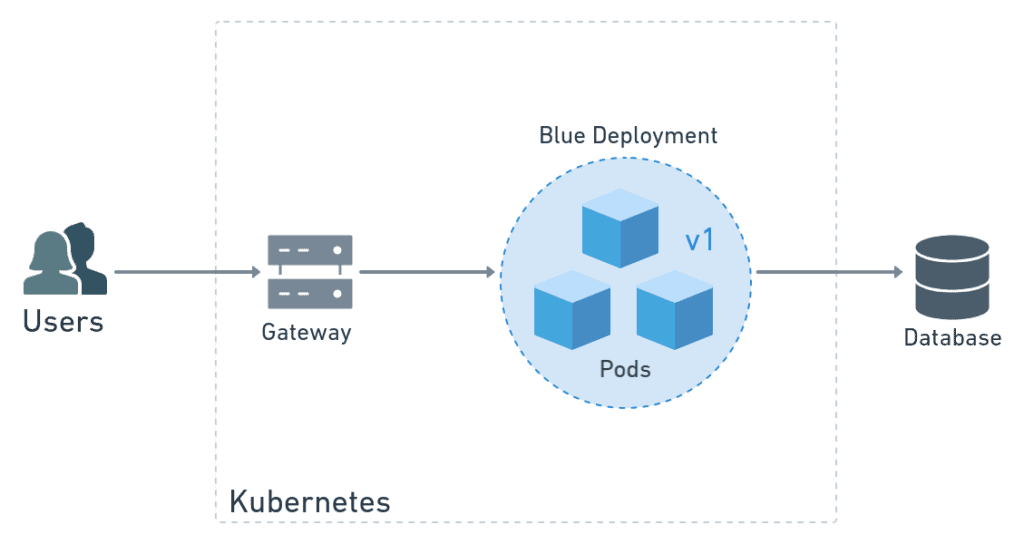
Let’s see Kubernetes blue-green deployments in action. Imagine we have version v1 of awesome application called myapp, and that is currently running in blue. In Kubernetes, we run applications with deployments and pods.
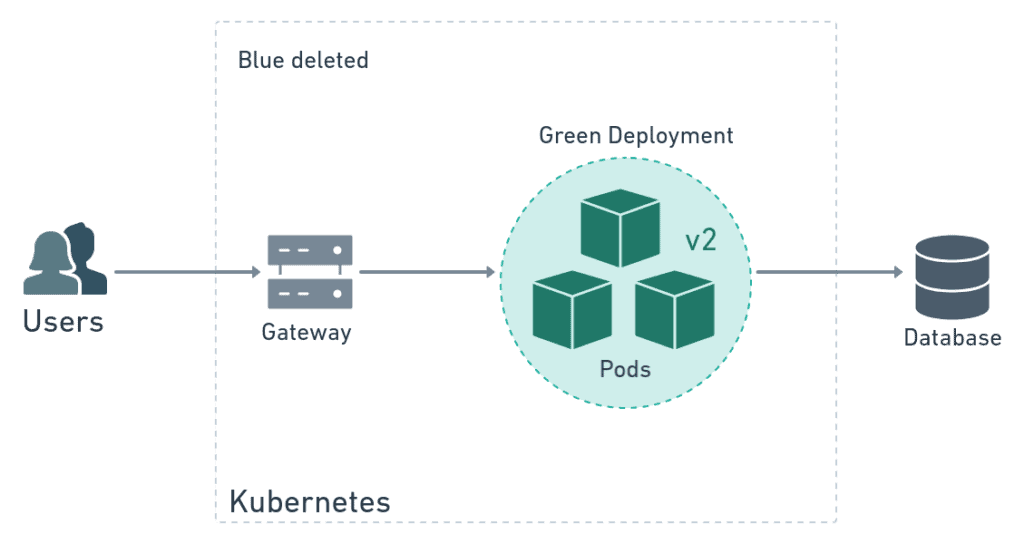
Sometime later, we have the next version (v2) ready to go. So we create a brand-new production environment called green. As it turns out, in Kubernetes we only have to declare a new deployment, and the platform takes care of the rest. Users are not yet aware of the change as the blue environment keeps on working unaffected. They won’t see any change until we switch traffic over from blue to green.
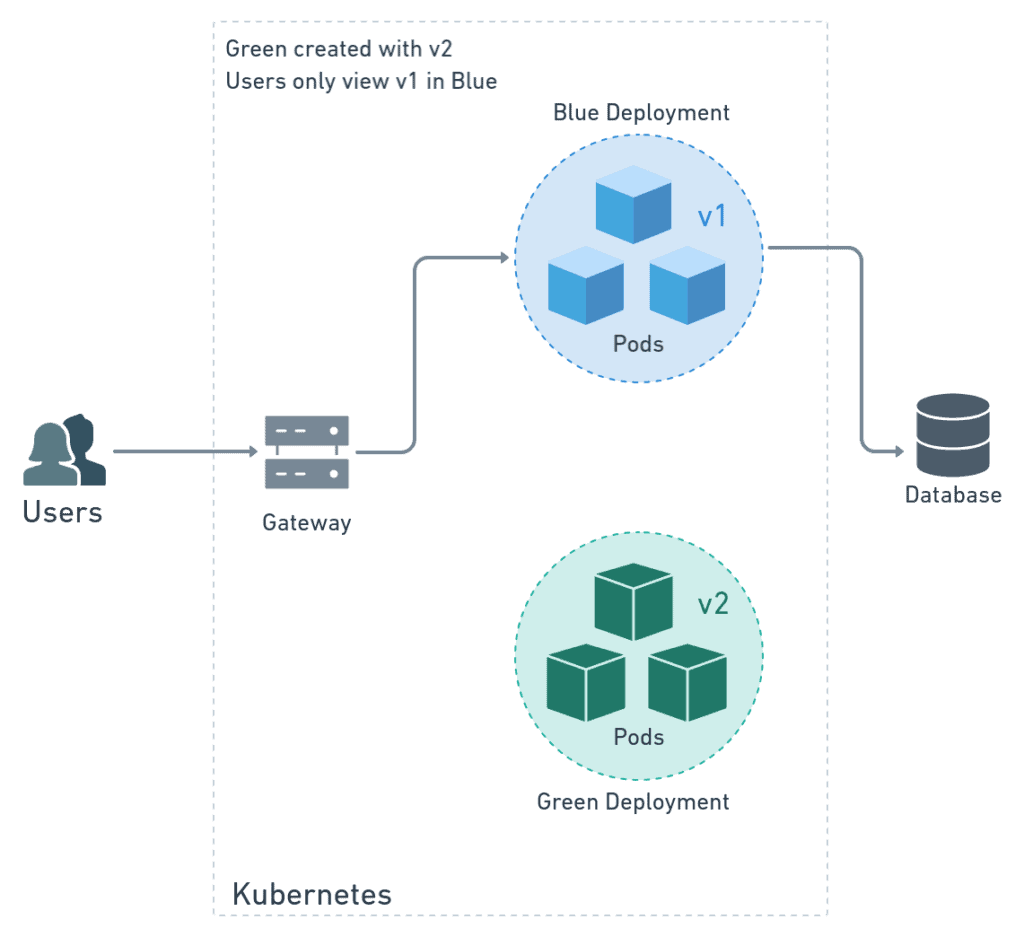
It’s said that only developers that like to live dangerously test in production. But here we all have the chance to do that without risks. We can test green at leisure on the same Kubernetes cluster where blue is running.
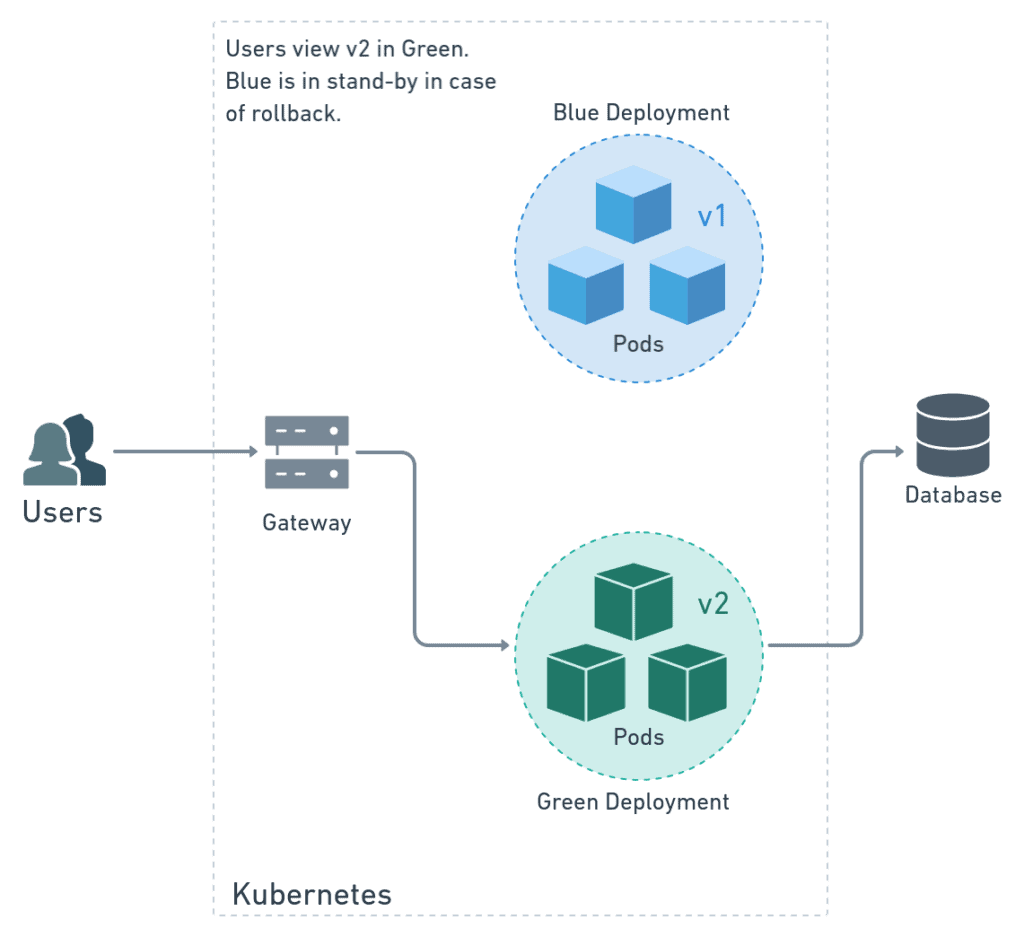
Once we have moved the users from blue to green and happy with the result, we can delete blue to free up resources.
As you can imagine, blue-green deployments are complex. We have to grapple with two deployments at once and manage the network. Fortunately, Kubernetes makes things a lot easier. Even so, we should strive to automate the release cycle as much as possible. In this tutorial, I’m going to show you how to use Semaphore Continuous Integration (CI) and Continuous Delivery (CD) to test and release any project.
Getting Ready
I’ll try to avoid going into cloud vendor-specific details. Technically, Kubernetes’ behavior itself doesn’t depend on the provider, so this guide should work the same for any application on Google Cloud, AWS, Azure, or any other cloud. However, the commands used to connect to the Kubernetes cluster will change.
That being said, we’ll need to define some common ground. You’ll need:
- A Kubernetes cluster running with Istio. Istio is a service mesh that adds many features to Kubernetes.
- A Docker registry to store the container images. We’ll use Docker Hub because it’s the default. Most cloud providers also offer private registries that may be more convenient for you.
- An application and its associated Dockerfile. We’ll use the semaphore-demo-cicd-kubernetes demo project. You’re welcome to fork it and play with it.
- The kubectl CLI and your cluster’s kubeconfig (plus any other tools needed to manage it).
Preparing the Manifests
In Kubernetes, we use manifests to describe what we want and let the platform figure out the rest.
I’ve split manifests into three parts:
- Gateway: the entry point for the application. Accepts HTTP requests.
- Routing: describes the routes that send requests to blue and green.
- Deployments: describes the pods that run the application. We’ll have a deployment for each color.
To get started, create a directory called manifests in the root of your project. Place the files as shown in the next section. These manifests were designed to work with our demo project, so you may need to adjust them for your use case.
manifests/
├── deployment.yml
├── gateway.yml
├── route-test.yml
├── route.yml
└── service.yml
Once you are done editing the manifests, push them to the repo:
$ git add manifests/*
$ git commit -m "add Kubernetes manifests"
$ git push origin master
Istio Manifests
Istio is an open-source service-mesh platform designed to run on top of products such as Kubernetes and Consul. This service is a popular choice for running microservice applications because it facilitates communication and provides security. Compared with native Kubernetes controllers, Istio’s service mesh gives us more control and flexibility. We’ll rely on Istio for handling all network traffic.
Gateway
An Istio Ingress gateway is a resource that processes traffic entering the cluster. Istio gateways describe a load balancer at the edge of the service mesh. We can use them to encrypt connections and expose ports to the Internet.
The following gateway accepts HTTP (port 80) connections from all hosts.
# manifests/gateway.yml

apiVersion: networking.istio.io/v1alpha3
kind: Gateway
metadata:
  name: myapp-gateway
spec:
  selector:
    istio: ingressgateway
  servers:
  - port:
      number: 80
      name: http
      protocol: HTTP
    hosts:
    - "*"
Routing
Before going into the routing let me tell you the variable convention we’ll use from now on:
$COLOR_ACTIVEis the live, in-production deployment. We’ll route all user connections into it by default. This environment runs the old/stable version.$COLOR_TESTis where we deploy the new version and where we run the tests. It temporarily exists while we’re making a deployment.
When one variable is green, the other is blue and vice-versa.
We’ll need two Istio resources to route inbound traffic:
- VirtualService: binds to the Istio gateway and uses rules to decide where to route the requests.
- DestinationRule: maps VirtualService rules with deployments using labels.
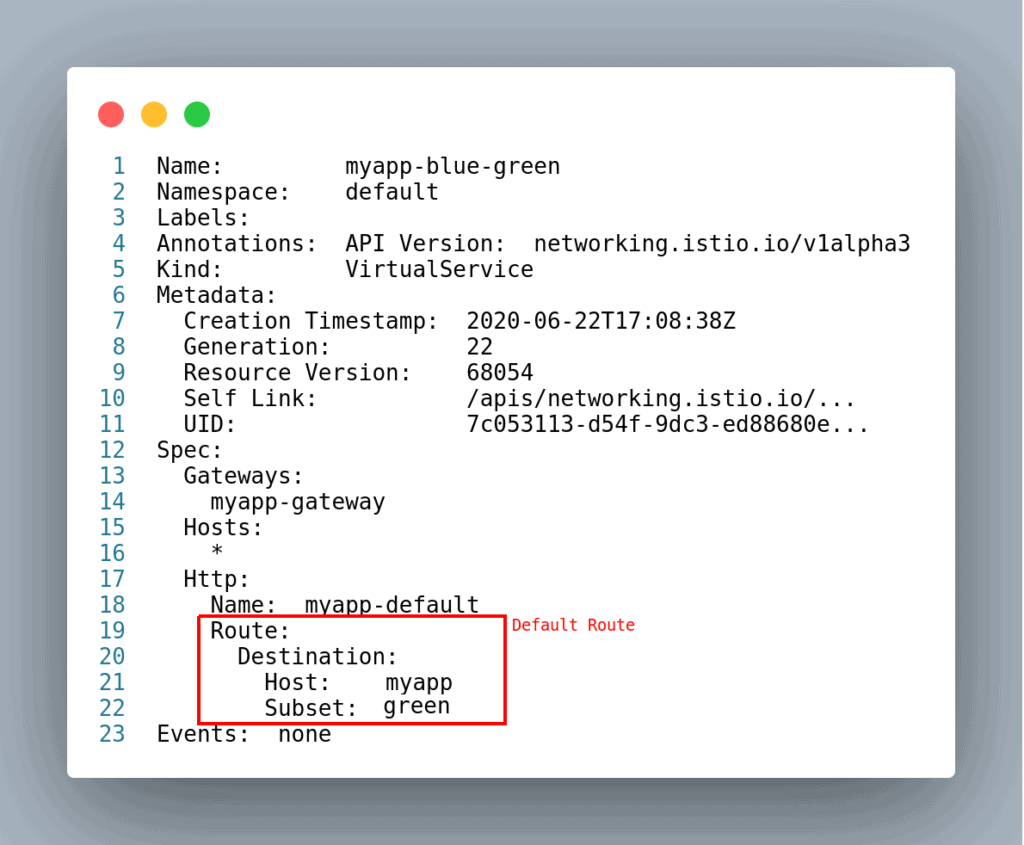
Steady State Routes
The following manifest describes the controllers that send all traffic from the gateway to the $COLOR_ACTIVE deployment:
# manifests/route.yml

apiVersion: networking.istio.io/v1alpha3
kind: VirtualService
metadata:
  name: myapp-blue-green
spec:
  hosts:
  - "*"
  gateways:
  - myapp-gateway
  http:
  - name: myapp-default
    route:
    - destination:
        host: myapp
        subset: $COLOR_ACTIVE


---

apiVersion: networking.istio.io/v1alpha3
kind: DestinationRule
metadata:
  name: myapp-blue-green
spec:
  host: myapp
  subsets:
  - name: $COLOR_ACTIVE
    labels:
      color: $COLOR_ACTIVE
Test Routes
During deployment things are different. We’ll need to split traffic in two. We want regular users to maintain their access to the old version, running in $COLOR_ACTIVE. At the same time, we’d like to have a special route for us to run some tests on the new version, running in $COLOR_TEST, before making the switch. Istio has several routing options to achieve this. For HTTP traffic, I find that the easiest one is to use a cookie.
The next manifest describes a VirtualService and DestinationRule that routes requests with a cookie having test=true to $COLOR_TEST. The rest of the traffic, that is, requests without the cookie, goes to $COLOR_ACTIVE. We’ll call this manifest manifests/route-test.yml.
# manifests/route-test.yml

apiVersion: networking.istio.io/v1alpha3
kind: VirtualService
metadata:
  name: myapp-blue-green
spec:
  hosts:
  - "*"
  gateways:
  - myapp-gateway
  http:
  - name: myapp-test
    match:
    - headers:
        cookie:
          regex: "^(.*?;)?(test=true)(;.*)?$"
    route:
    - destination:
        host: myapp
        subset: $COLOR_TEST

  - name: myapp-default
    route:
    - destination:
        host: myapp
        subset: $COLOR_ACTIVE


---

apiVersion: networking.istio.io/v1alpha3
kind: DestinationRule
metadata:
  name: myapp-blue-green
spec:
  host: myapp
  subsets:
  - name: blue
    labels:
      color: blue
  - name: green
    labels:
      color: green
Kubernetes Manifests
The remaining manifests describe native Kubernetes resources. They do not depend on Istio. These are the last manifests that complete the Kubernetes setup.
Deployments & Service
First, we’ll define a deployment, which creates the application’s pods. It includes a readiness probe and some database connection variables.
# manifests/deployment.yml

apiVersion: apps/v1
kind: Deployment
metadata:
  name: myapp-$COLOR_TEST
  labels:
    app: myapp
    color: $COLOR_TEST
spec:
  replicas: 1
  selector:
    matchLabels:
      app: myapp
      color: $COLOR_TEST
  strategy:
    type: Recreate
  template:
    metadata:
      labels:
        app: myapp
        color: $COLOR_TEST
    spec:
      imagePullSecrets:
      - name: dockerhub
      containers:
      - name: myapp
        image: $DOCKER_USERNAME/myapp:$SEMAPHORE_WORKFLOW_ID
        ports:
        - containerPort: 3000
        readinessProbe:
          httpGet:
            path: /ready
            port: 3000
        env:
        - name: NODE_ENV
          value: "production"
        - name: DB_HOST
          value: "$DB_HOST"
        - name: DB_PORT
          value: "$DB_PORT"
        - name: DB_SCHEMA
          value: "$DB_SCHEMA"
        - name: DB_USER
          value: "$DB_USER"
        - name: DB_PASSWORD
          value: "$DB_PASSWORD"
Second, you’ll need to store your docker registry credentials in the Kubernetes cluster. To do this run the following command. You only have to do this once:
$ kubectl create secret docker-registry dockerhub \
--docker-server=docker.io \
--docker-username=YOUR_DOCKER_HUB_USERNAME \
--docker-password=YOUR_DOCKER_HUB_PASSWORD

secret/dockerhub created
Finally, we’ll use a service to get a stable IP and hostname for the application. This service targets the application pods labeled as app = myapp.
# manifests/service.yml

apiVersion: v1
kind: Service
metadata:
  name: myapp
  labels:
    app: myapp
spec:
  selector:
    app: myapp
  ports:
  - port: 3000
    name: http
Setting Up Your Continuous Integration Pipelines
I will assume that you already have working continuous integration and delivery pipelines configured in Semaphore, which should build and test your Docker images. The only requirement is that, at some point, it pushes the image into the registry of your choice.
If you need help setting up your pipelines, you can find detailed step-by-step instructions in our free eBook CI/CD with Docker and Kubernetes. We also have detailed tutorials on dockerizing applications:
- Dockerizing a Ruby on Rails Application
- Dockerizing a Node.js Web Application
- Dockerizing a Python Django Web Application
- Dockerizing a PHP Application
- Continuous Integration with Deno
How to Organize Releases
There are probably as many ways of making releases as there are developers, after all, that’s our thing. But I think it’s a pretty safe bet that Git tags will be somehow involved. So, let’s mark releases using color-coded Git tags.
Step 1: Decide Which Pipeline Should Start
Suppose we want to deploy a new version of the application into green. The old version is currently running on blue. The deployment starts once the continuous integration pipeline is done building the docker image.
The first step is to decide which deployment pipeline to start: the green or the blue. As I said, we’ll make the decision based on how the release was tagged. We’ll use a regular expression to find if the tag contains either blue or green, and activate the appropriate pipeline. If there are no tags, or they don’t match a color, nothing happens.
Imagine that we tagged our release as v2.0-green. Since it matches “green”, the green deployment pipeline is activated.
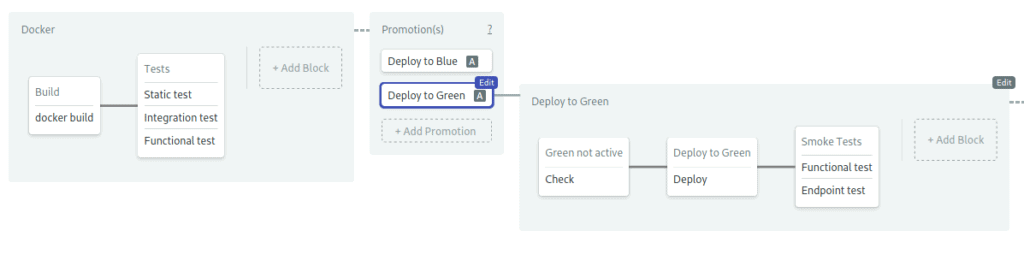
Step 2: Deploy
The second step is to make the deployment. Here, we create the green pods with the new version of the Docker image. Additionally, we create a test route in the VirtualService.
Step 3: Test the Deployment
The main benefit of blue-green deployments is that we can test the application in a real production setting. The third step is to run tests on the new deployment.
To run the tests, we make HTTP requests using a cookie. The test route sends them to the green deployment.
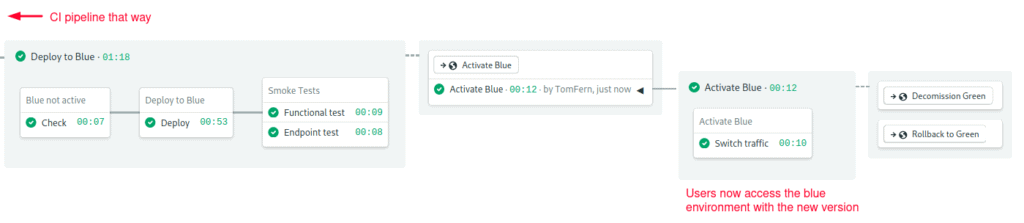
Step 4: Go Live
If all tests pass, the fourth step is to change the default route, so all users access the new version. We do this by updating the VirtualService default route.
Once we changed the default route to green, all users access the new deployment. Meanwhile, the old version is still running, nothing has changed on blue, other than it is no longer receiving any traffic.
Step 5: Cleanup or Rollback
At this point, the deployment is mostly complete. The only thing left is to do a cleanup. We can either delete the old environment or rollback. This will be the only manual step in the workflow. If for any reason, we are not satisfied with the new version, doing a rollback is easy, we just need to change the VirtualService route back to the blue.
On the other hand, if the new version works perfectly, we can start the cleanup pipeline that deletes the blue deployment. This step releases the computing resources back to the cluster.
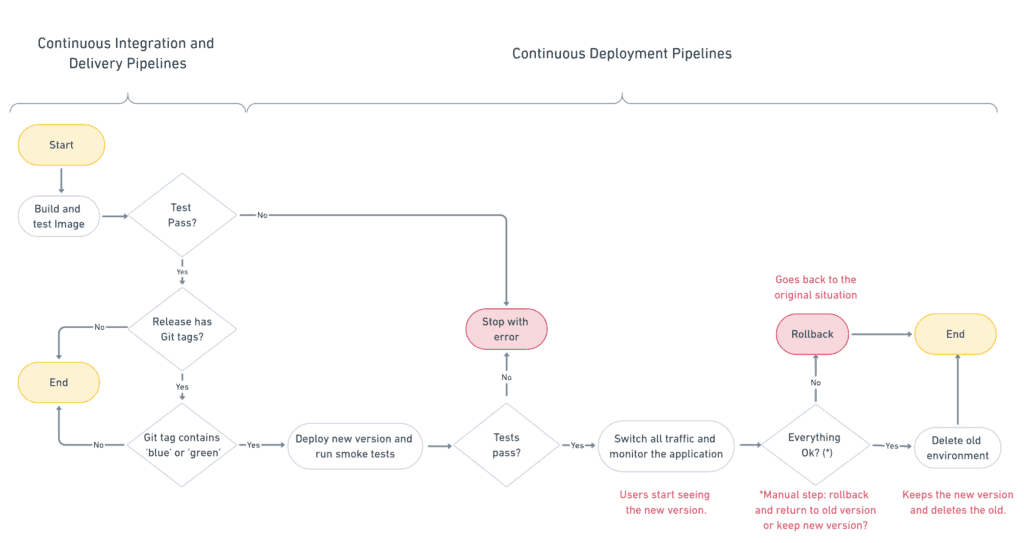
Deployment Flowchart
We can represent the sequence more visually using a flowchart.
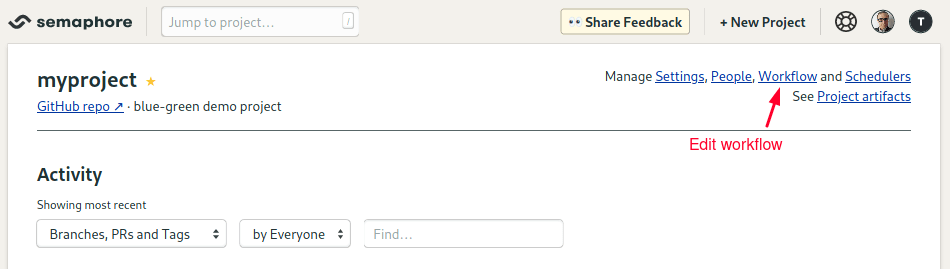
Connecting Semaphore with Kubernetes
Semaphore needs access to the Kubernetes cluster to make the deployment. To do this, follow these steps to create a secret:
- Click on the account badge on the top-right corner and enter the Settings section.

- Click on Secrets, then New Secret.
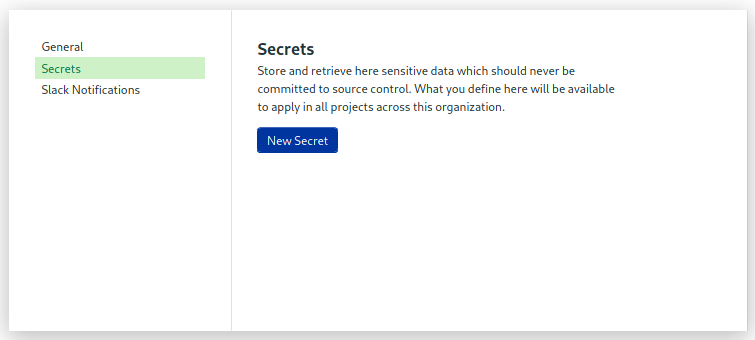
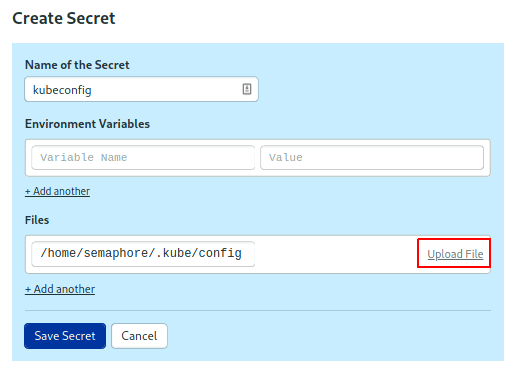
- Create a secret called “kubeconfig”.
- Upload your kubeconfig or any other files needed to connect.
The details depend on where the cluster is hosted; some cloud providers let you download the kubeconfig directly. Others require additional steps like installing and running dedicated CLIs. If you have any trouble setting this up, check out the links at the end of this post, you’ll find examples with various providers.
Next, create two sets of environment variables for your application:
- Create a new secret called “env-blue”.
- Add all the environment variables the application needs, for instance, the database connection parameters.
- Click on Save Changes.
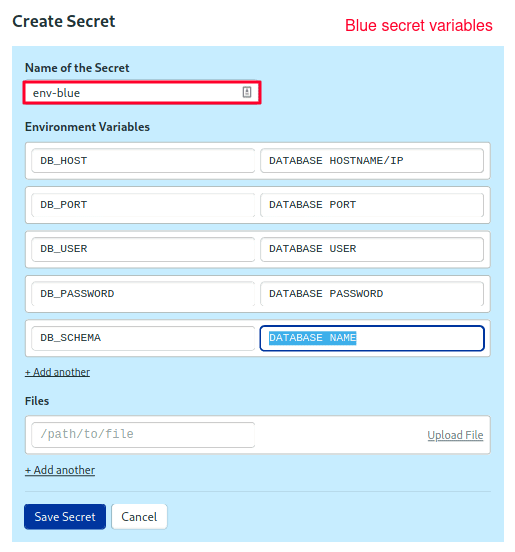
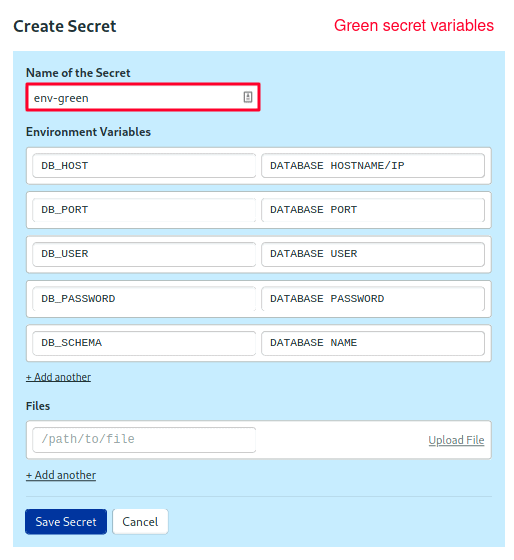
Repeat the steps to create the green secret.
Blue Pipelines
It looks like we’re finally ready to start a deployment. We’ll do blue first.
To begin, open the Workflow Editor.
- Select the branch.
- Press Add First Promotion.
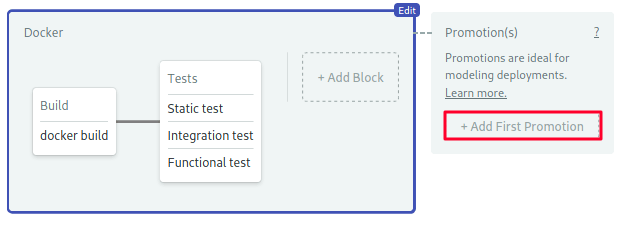
- Change the name to “Deploy to Blue”.
- Check the Enable automatic promotion option.
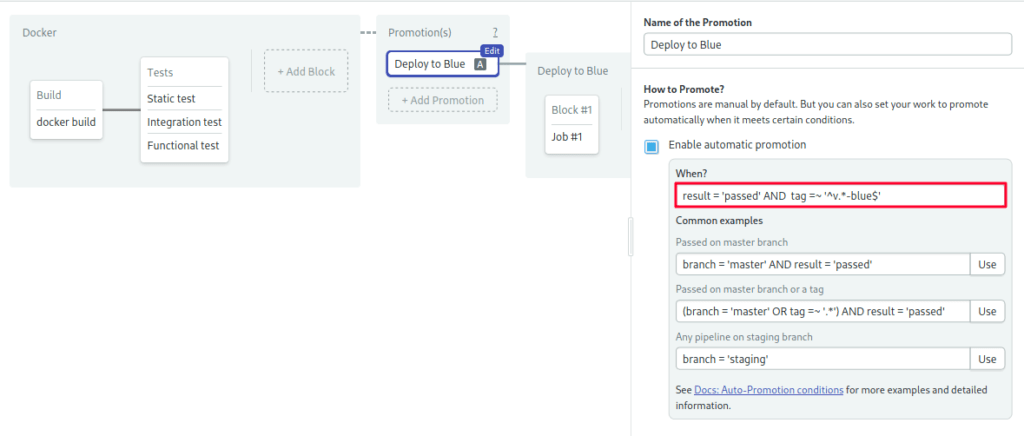
- Type the following conditions to follow releases tagged like
v1.2.3-blue:
result = 'passed' AND tag =~ '^v.*-blue$'Adding a Sanity Check
We’ll use the first block to do a sanity check. We have to make sure that we’re not deploying the new version into a live environment, which would be disastrous. This could happen if we Git-tagged the wrong color by mistake. The sanity check consists of retrieving the VirtualService default route and verifying that IS NOT blue.
- Open the prologue section. Place here any commands that you need to connect with your cluster.
- Open the environment variables section and create a variable named
COLOR_TEST = blue. - Import the
kubeconfigsecret. - Type the following command (sorry, it’s rather long):
if kubectl get virtualservice myapp-blue-green; then VSERVICE_DEFAULT=$(kubectl get virtualservice myapp-blue-green -o json | jq -r '.spec.http[-1].route[0].destination.subset'); echo "Default route goes to $VSERVICE_DEFAULT"; test "$VSERVICE_DEFAULT" != "$COLOR_TEST"; fi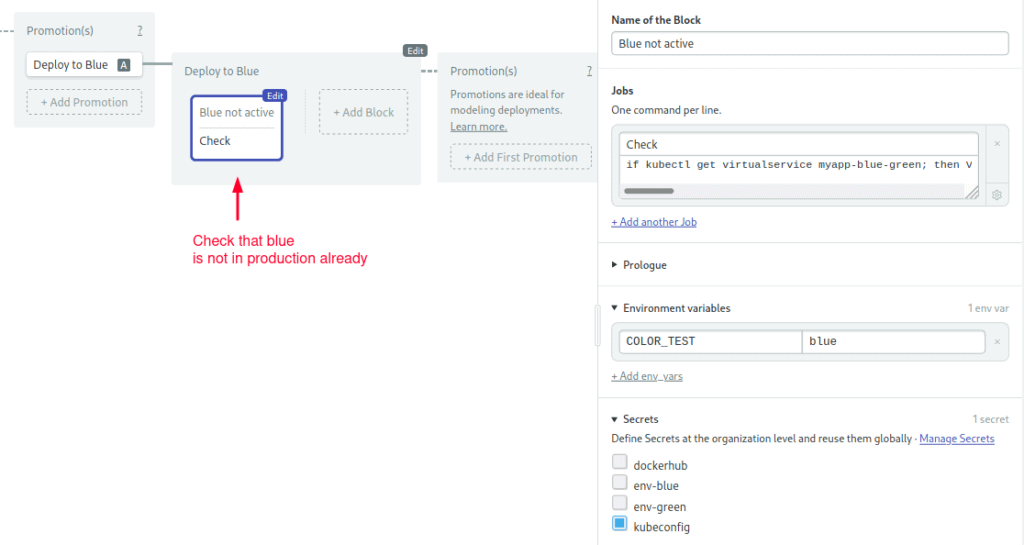
Adding a Deployment Block
Beyond this point, we can assume blue is not active and that it’s safe to deploy.
- Create a second block called “Deploy”.
- Import the
kubeconfig,dockerhubandenv-bluesecrets. - Configure the same prologue and environment variables as before.
- Type the following commands in the job, which creates the gateway, routes, service, deployment:
checkout

# service & deployment
kubectl apply -f manifests/service.yml
envsubst < manifests/deployment.yml | tee _deployment.yml
kubectl apply -f _deployment.yml
kubectl rollout status -f _deployment.yml --timeout=120s

# routes & gateway
kubectl apply -f manifests/gateway.yml
envsubst < manifests/route-test.yml | tee _route.yml
kubectl apply -f _route.yml

# place any other setup/initialization commands, for instance...
kubectl exec -it -c myapp $(kubectl get pod -l app=myapp,color=$COLOR_TEST -o name | head -n 1) -- npm run migrate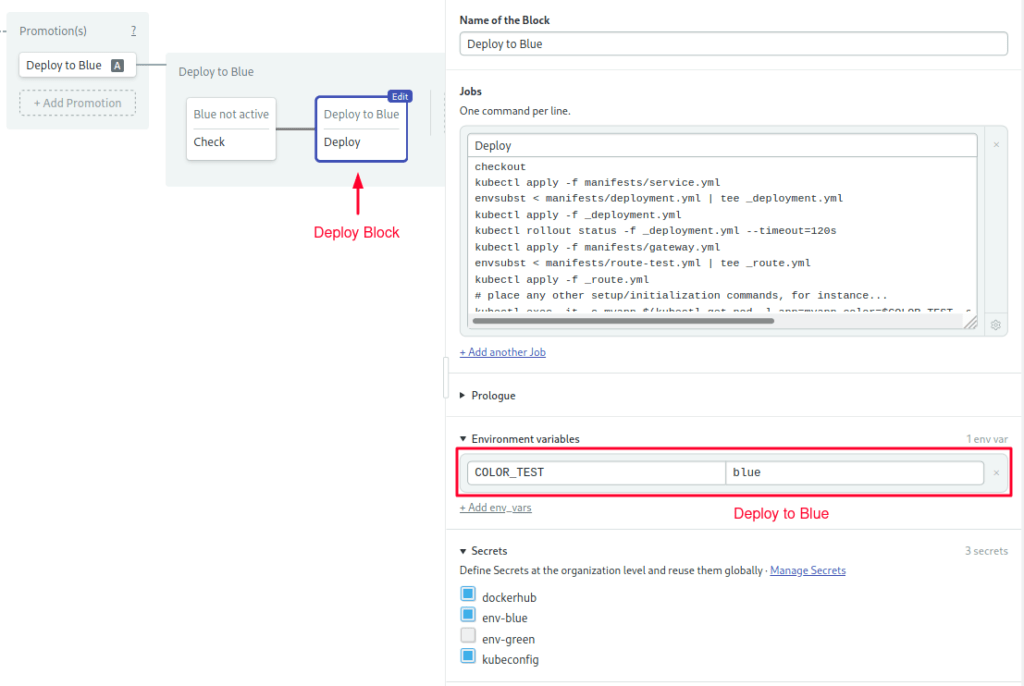
Adding Smoke Tests
- Create a third block called “Smoke Tests”.
- Repeat the prologue and environment variables from the last block.
- Import the kubeconfig secret.
- Add your test scripts. You can run them inside a running pod with
kubectl exec:
kubectl exec -it -c myapp $(kubectl get pod -l app=myapp,color=$COLOR_TEST -o name | head -n 1) -- npm run ping- You may add more test jobs. As an example, the following command uses curl and a cookie to access blue directly:
export INGRESS_HOST=$(kubectl -n istio-system get service istio-ingressgateway -o jsonpath='{.status.loadBalancer.ingress[0].ip}')
export INGRESS_PORT=$(kubectl -n istio-system get service istio-ingressgateway -o jsonpath='{.spec.ports[?(@.name=="http2")].port}')
export URL="http://${INGRESS_HOST}:${INGRESS_PORT}"
echo "Ingress gateway is $URL"
export TEST_VALUE=$(curl --cookie 'test=true' $URL/ready | jq -r '.ready')
test "$TEST_VALUE" = "true"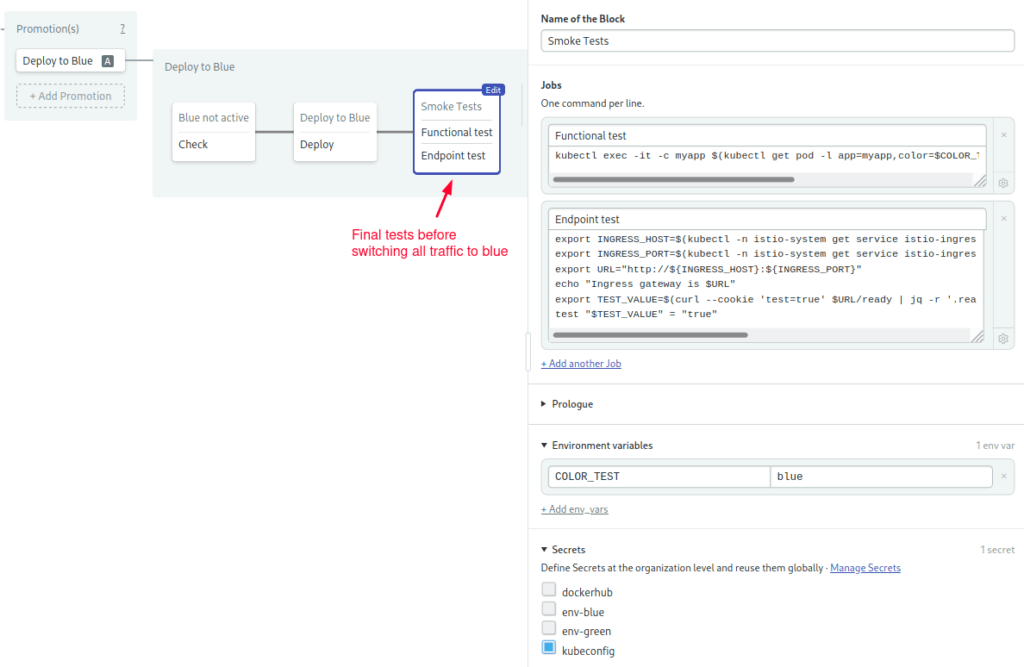
Activating the Blue Route
The only thing left is to change the route.
- Create a new promotion called “Activate Blue”
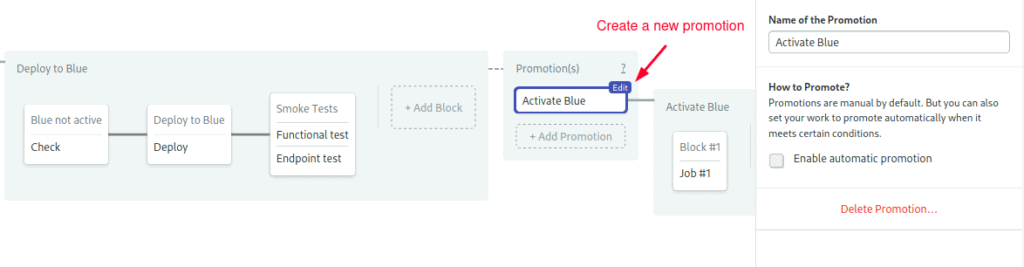
- Set the
COLOR_ACTIVEvariable toblue. - Configure the prologue commands exactly as you did earlier.
- Import the kubeconfig secret.
- Type the following commands in the job:
checkout
envsubst < manifests/route.yml | tee _route.yml
kubectl apply -f _route.yml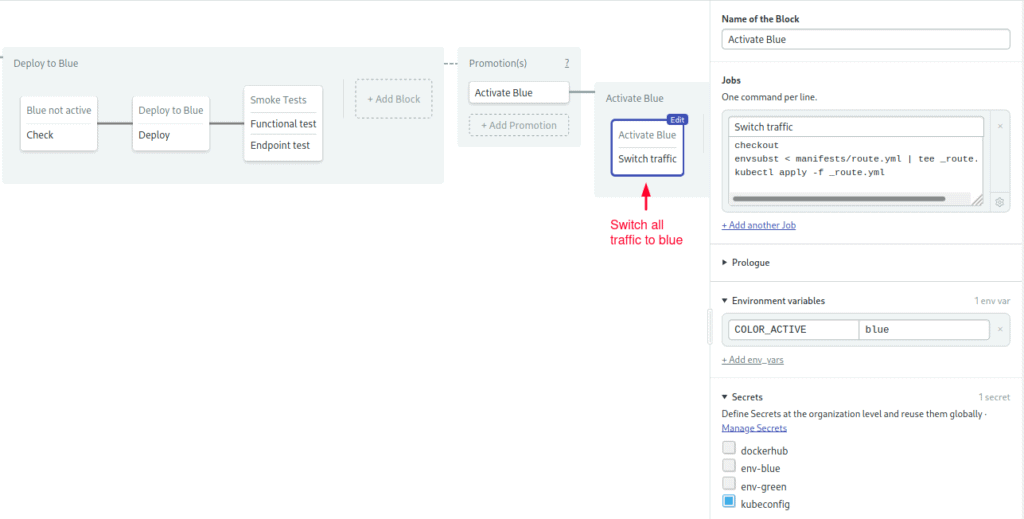
Cleanup Pipelines
At this point in the workflow, either the upgrade was a success and everything went smoothly, or we’re not satisfied and wish to go back.
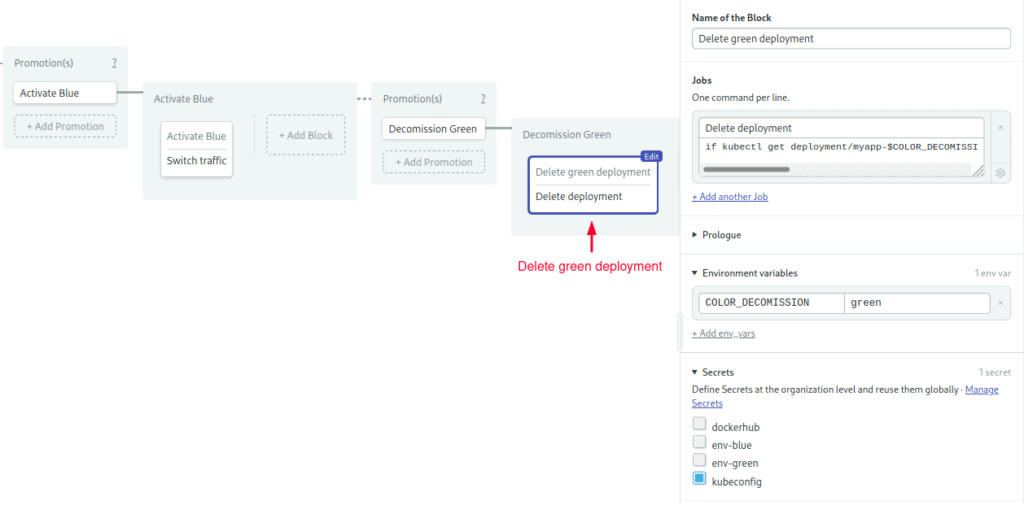
Decommission Pipeline
The decommission pipeline deletes the green deployment to free cluster resources:
- Create a new promotion: “Decommission Green”
- Add the prologue and kubectl secret.
- Set the environment variable
COLOR_DECOMISSION = green. - Type the following commands in the job:
if kubectl get deployment/myapp-$COLOR_DECOMISSION 2>/dev/null; then kubectl delete deployment/myapp-$COLOR_DECOMISSION; fi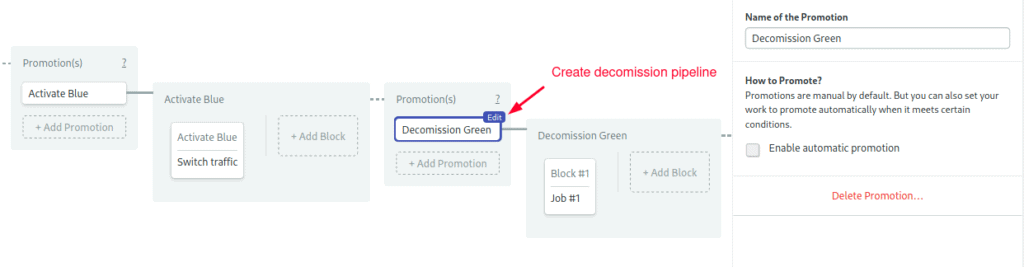
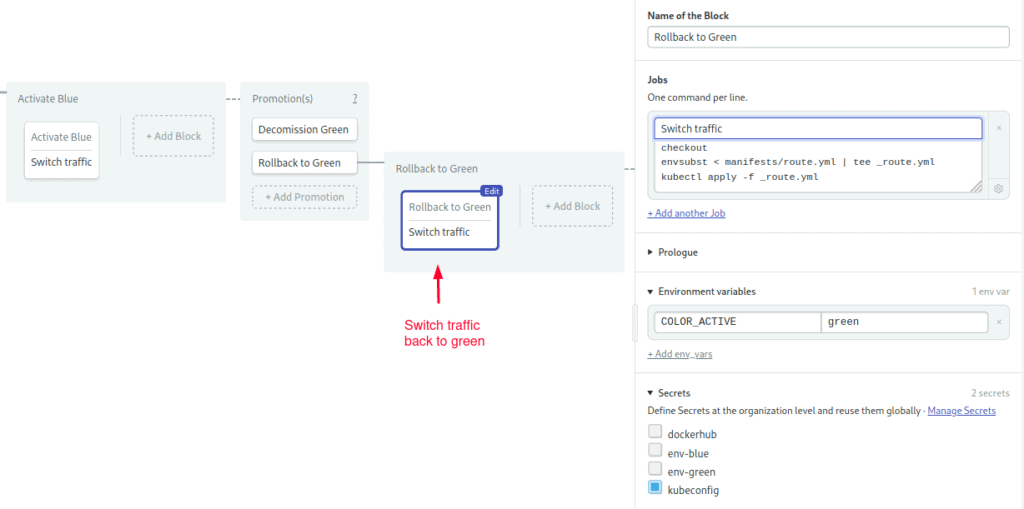
Rollback Pipeline
Activating the rollback pipeline is like pressing CTRL+Z; it routes all traffic back to green, effectively undoing the upgrade.
- Create a new promotion: “Rollback to Green”
- Add the prologue and kubectl secret.
- Set the environment variable
COLOR_ACTIVE = green. - Type the following commands in the job:
checkout
envsubst < manifests/route.yml | tee _route.yml
kubectl apply -f _route.yml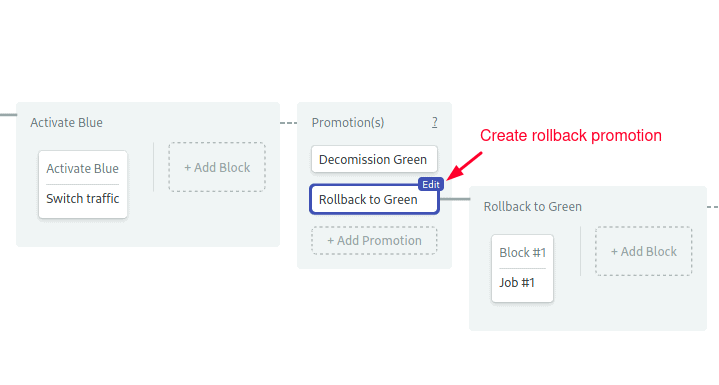
Congratulations! Your blue pipelines are ready.
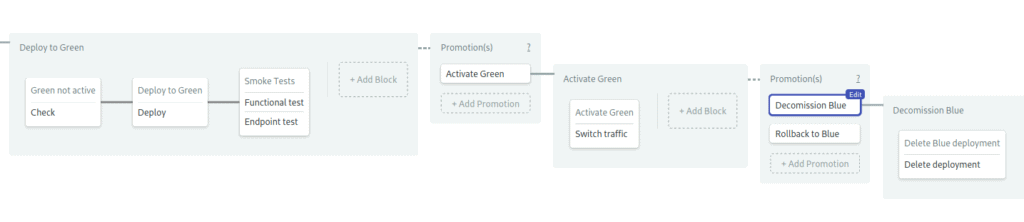
Green Pipelines
We’re halfway done. Now we have to do everything again for green, but in reverse–that’s “Deploy to Green”, “Activate Green”, “Decommission Blue” and “Rollback to Blue”.
Go back to the first pipeline in the workflow and create a second promotion for the green branch. Keep in mind the following:
- Green pipelines are the mirror image of blue.
- The automatic promotion condition is:
result = 'passed' AND tag =~ '^v.*-green$'- Import
env-greeninstead ofenv-bluein secrets. - Reverse the values of
$COLOR_TEST,$COLOR_ACTIVE, and$COLOR_DECOMISSION: replace blue with green, and green with blue.
When you’re done, save your work with Run the Workflow > Start.
Deploying to Green
Let’s do this. Imagine we want to release v1.0 of our awesome application. It’s green’s turn to be in production. Run these commands to start the green release:
- Get the latest revision from GitHub.
$ git pull origin setup-semaphore
$ git checkout setup-semaphore- Create a release according to the naming convention.
$ git tag -a v1.0-green -m "release v1.0 to green"
$ git commit -m "releasing v1.0"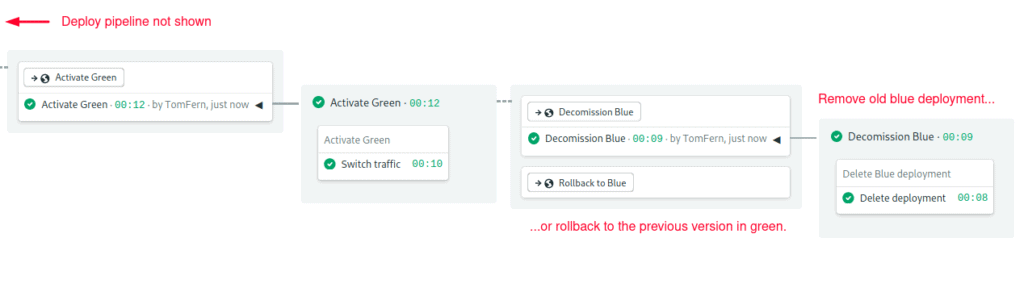
$ git push origin v1.0-green- Semaphore picks up the commit and begins working. When the deploy pipeline stops, click on promote to switch traffic to green:
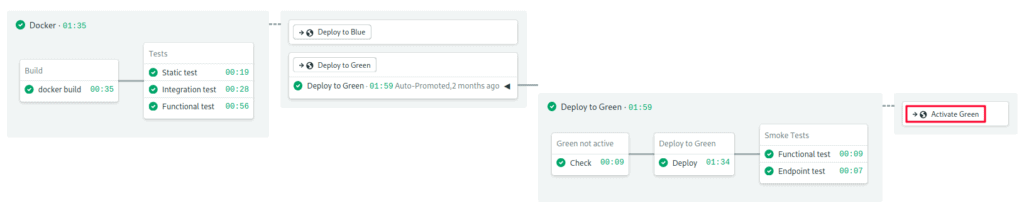

- If everything goes as planned, the happy path is to decommission blue:
You can check the status of your deployment with the following commands:
$ kubectl get deployments
NAME          READY   UP-TO-DATE   AVAILABLE   AGE
myapp-green   1/1     1            1           72m


$ kubectl get pods
NAME                           READY   STATUS    RESTARTS   AGE
myapp-green-664d56548d-5rm24   1/1     Running   0          72m

$ kubectl get virtualservice,destinationrules
NAME                                                  GATEWAYS          HOSTS   AGE
virtualservice.networking.istio.io/myapp-blue-green   [myapp-gateway]   [*]     70m

NAME                                                   HOST    AGE
destinationrule.networking.istio.io/myapp-blue-green   myapp   70m

$ kubectl get gateway
NAME            AGE
myapp-gateway   75m
To view the active route run: kubectl describe virtualservice/myapp-blue-green
Handling Simultaneous Deployments
There is a possible edge case in our process: if we make two simultaneous releases, we could find ourselves deploying a different version than the one we intended.
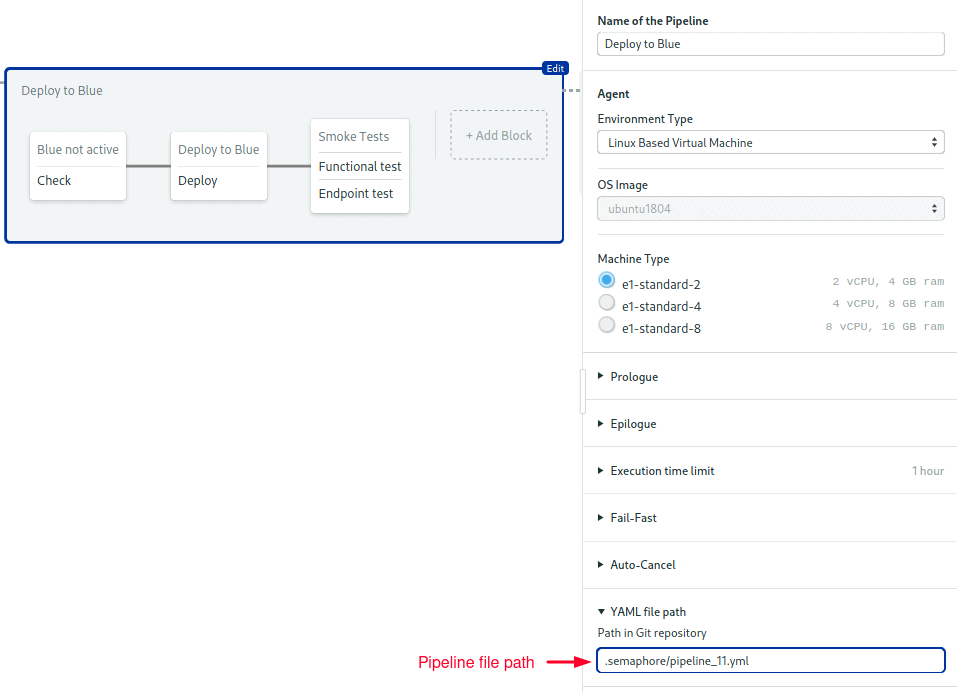
To prevent concurrency side-effects, we can set up pipeline queues. Pipeline queues let us force pipelines to run sequentially.
You’ll have to edit the pipeline YAML directly to change this setting as the workflow editor doesn’t yet have the option. The pipeline files are located on the .semaphore folder, at the root of the project.
First, do a git pull to ensure you’re working on the latest revision:
$ git pull origin setup-semaphoreNext, add the following lines to the deployment pipeline files. You should change eight files in total: “Deploy to Blue/Green”, “Activate Blue/Green”, and the decommission and the rollback pipelines.
queue:
  name: shared kubernetes deployment
  scope: organization
This option puts the pipelines an organization-wide queue called “shared kubernetes deployment”, ensuring that pipelines belonging to that queue always run sequentially. You can also set up conditions for placing pipelines in different queues. For further details, read about the queue property.
Push the changes to update the pipelines:
$ git add .semaphore/*
$ git commit -m "setup shared deployment queue"
$ git push origin setup-semaphore
Adding More Sanity Checks
Can you imagine what would happen if someone presses the promote button in a stale workflow by mistake? It’s difficult to say for sure, but the consequences aren’t likely to be good.
To minimize the impact of human errors, you can add checks before every command that affects the cluster. We’ve already done some of that when we created the “Blue/Green not active” block in the deployment pipeline.
The trick is to add labels to the Kubernetes resources and use kubectl get to validate their value before changing things. For example, you may add the Semaphore workflow id into the deployment manifest:
apiVersion: apps/v1
kind: Deployment
metadata:
  name: myapp-$COLOR_TEST
  labels:
    app: myapp
    color: $COLOR_TEST
    workflow: $SEMAPHORE_WORKFLOW_ID

# ... rest of the manifest ...
And test that the workflow label on the cluster is valid before changing the route:
test "$(kubectl get deployments -l app=myapp,color=$COLOR_DEPLOY,workflow=$SEMAPHORE_WORKFLOW_ID -o=jsonpath={.items..metadata.name})" = "myapp-${COLOR_DEPLOY}"Because any command that exits non-zero status stops the pipeline, this effectively prevents anyone from activating an invalid route. You may also add failsafe checks to verify that the pods are on the correct version and to validate the deployment. The more sanity tests you add, the more robust the process becomes.
Trying the Blue Pipeline
Let’s be thorough and try blue by simulating a second release.
- Start the process by tagging as blue.
$ git tag -a v2.0-blue -m "release v2.0 to blue"
$ git commit -m "releasing v2.0"
$ git push origin v2.0-blue- This time, the blue pipelines are activated.
- Wait for it to stop, press promote.

- You can now remove green or try a rollback.
![]() You just finished your first blue-green cycle, way to go!
You just finished your first blue-green cycle, way to go! ![]()
Conclusion
Upgrading is always a risky business. No matter how much testing we do, there’s still a chance for something to go wrong. But with a few carefully placed tests and a robust CI/CD workflow, we can avoid a lot of headaches.
With a few modifications, you can adapt these pipelines to any application and cloud. By all means, play with them, swap parts as required, or experiment with different routing strategies. You can even use a setup like this to do canary releases.
We have a lot of great resources to help you with your Docker and Kubernetes learning:
- What is Blue-Green Deployment?
- CI/CD with Docker and Kubernetes: Learn Docker, Kubernetes, and CI/CD principles with this free eBook.
- How to Release Faster with Continuous Delivery for Google Kubernetes: Shows deployment for Google Kubernetes Engine.
- CI/CD for Microservices on DigitalOcean Kubernetes: Deploy to DigitalOcean Kubernetes.
- Continuous Integration and Delivery to AWS Kubernetes: Learn how to use AWS Elastic Kubernetes Service.
Thanks for reading!