It is imperative for teams building customer-facing products to consistently churn out product updates. This is especially true since businesses now transact in competitive markets. Quickly releasing new features/fixes in response to customer feedback should intensify brand loyalty.
This new expectation for teams to be nimble has called for more innovative ways of building, testing, and deploying features. And this, in turn, birthed the era of continuous integration and continuous delivery/deployment (CI/CD). But hold on–what is CI/CD?
CI/CD is grounded in the philosophy that we can deliver quality features faster if we automate manual builds, testing, and deployments to staging or production environments. But how can we do this, you might ask? By implementing CI/CD!
This article will walk you through:
- Running automated tests in a FastAPI project when new changes are pushed to the main branch of your repository.
- Setting up automatic deployment of new changes pushed to main if they pass all test cases. The changes will be deployed to a staging server running in AWS Elastic Beanstalk.
But first, just so that you don’t get lost in a bunch of jargon, let’s cover some key concepts.
Key concepts
Let’s make sense of the concepts and tools worth noting.
Continuous Integration / Continuous Delivery or Deployment
Before CI/CD, engineering teams utilized manual techniques to build, test, and deploy changes. As you’d imagine, this approach was time-consuming and prone to human errors.
CI/CD was conceived to solve this problem. It is a development practice where we let some machine/entity execute builds, tests, and deployments on our behalf– think automation. Automating these phases of the development life cycle offers some benefits:
- Reduced build, testing, and deployment time.
- Lower presence and sometimes the total absence of human errors.
- The creation of a repeatable process for delivering quality features with velocity and reliability.
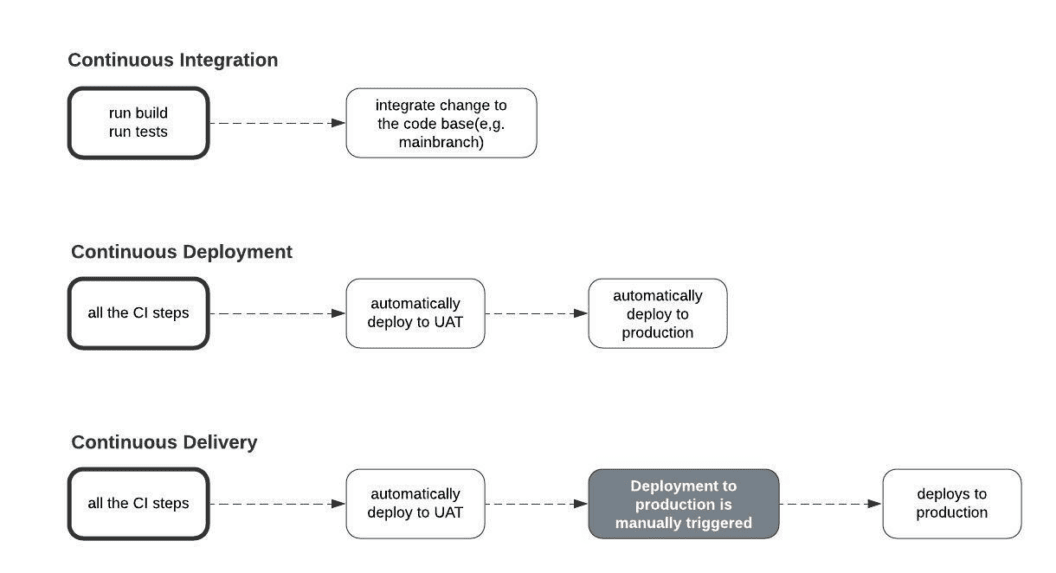
Note: The CI in CI/CD stands for Continuous Integration–and this happens when builds and tests are triggered on new changes to a codebase with little or no human intervention.
CD, on the other hand, stands for Continuous Delivery or Deployment. Continuous Delivery happens when a third-party automates deployments from version control (e.g. GitHub) to a staging environment (below ‘UAT’ – User Acceptance Testing).
Continuous Deployment happens when that third-party also automates the promotion of changes from the staging environment to the production environment.
Throughout this section, we’ve repeatedly mentioned how some machine or entity is introduced into the development life cycle to automate builds, tests, and deployments in CI/CD. But this begs the question–what is this entity?
Enter Semaphore
Semaphore is a service that automates the build, testing, and deployment phases of your application code. Essentially, it functions as that “entity”.
Usually, you integrate Semaphore or other services like it (think Jenkins, Circle CI GitHub Actions, etc) into your project by adding a YAML file. The YAML file contains the instructions to execute some task or set of tasks when certain conditions are met.
Whatever instructions you add to the YAML file usually translate to something like this in plain English: Hey Semaphore, execute action X each time activity Y is completed on this repository. In our case, the instructions we add to our YAML file translate to these:
- Run all the test cases defined each time new changes are pushed to the main branch.
- If all the test cases pass, deploy the new changes to our server on AWS.
It is important to note the following: Semaphore can automate the boring stuff in your project via workflows, pipelines, blocks, and promotions.
- Workflows and Pipelines: A workflow is made up of one or more pipelines. A pipeline is essentially some major task that needs to be done.
For example, in our Semaphore workflow, we are going to have a pipeline for running tests. Let’s call that pipeline semaphore-ci. We are also going to have a separate pipeline for deployment to AWS. Let’s call that pipeline semaphore-cd.
A pipeline is usually represented by a YAML file. Thus, we are going to have two semaphore YAML config files.
- Blocks: A pipeline can have one or more blocks. In other words, a major task(the pipeline, e.g. running tests) is broken down into sub-tasks (blocks). Let’s take the case of our semaphore-ci pipeline. In that pipeline, we could have a block for installing dependencies and a separate block for running the actual tests.
- Jobs: A block can have one or more jobs. For example, in the block where we are running our actual tests, we could have a job for running unit tests and a separate job for running security tests.
Each job specifies the instructions to execute at each step of the pipeline.
- Promotions: We can connect pipelines with promotions. For example, in our case, to trigger the semaphore-cd pipeline that deploys changes to AWS after all test cases have passed, we could add a promotion to the semaphore pipeline.
Pre-requisites
To smoothly follow the steps in the subsequent sections, you need to satisfy the following requirements:
- Knowledge of Python and FastAPI.
- Git and GitHub basics.
- Familiarity with AWS Elastic Beanstalk and S3.
- A GitHub Account.
- A Semaphore Account.
- AWS Account, If you are lost at any point, follow this guide to complete the signup process.
Setting up the Continuous Integration pipeline: automated testing on GitHub with Semaphore
Let’s demonstrate how to run automated unit tests in a FastAPI project using Semaphore. Even though we are limiting our CI step to just running test cases, it could also include builds and integration tests.
To proceed, we need a FastAPI project to work with.
Cloning the Project
I have prepared a rudimentary to-do REST API with sample test cases to use in this piece. Take the following steps to run the project on your machine.
- Fork the project on GitHub with your account.
- Clone the forked repo to your machine.
Your cloned project should have the structure shown in the image below:
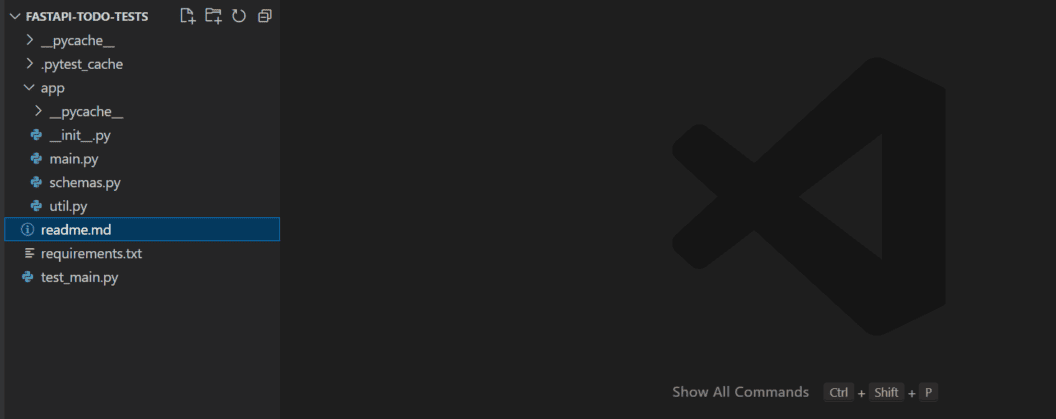
The following files in the image above are worth noting:
fastapi-todo-tests/requirements.txthas a list of the dependencies in our project.fastapi-todo-tests/app/main.pydefines three routes: creating a task, deleting a task, and getting a list of all the created tasks.fastapi-todo-tests/test_main.pydefines three test cases.
Setting up the Project
- In your terminal, run
python3 -m venv test-envon Unix and macOS orpython -m venv test-envon Windows to create a virtual environment namedtest-env. - Run
source test-env/bin/activateon Unix and macOS or.\test-env\Scripts\activateon Windows to activate the virtual environment. In your project’s root, runpip install -r requirements.txtto install project dependencies.
Running Tests
- Run
pytestto run the test cases.
Running the Development Server
- Run
uvicorn app.main:app --reloadto fire up your development server. - Point your browser to
localhost:8000/docsto test things out in your browser.
Creating a Semaphore Project
Next, we need to connect our repo with Semaphore. Take the following steps to do this:
- Login to your Semaphore account. On the navigation bar, click on + Create new.
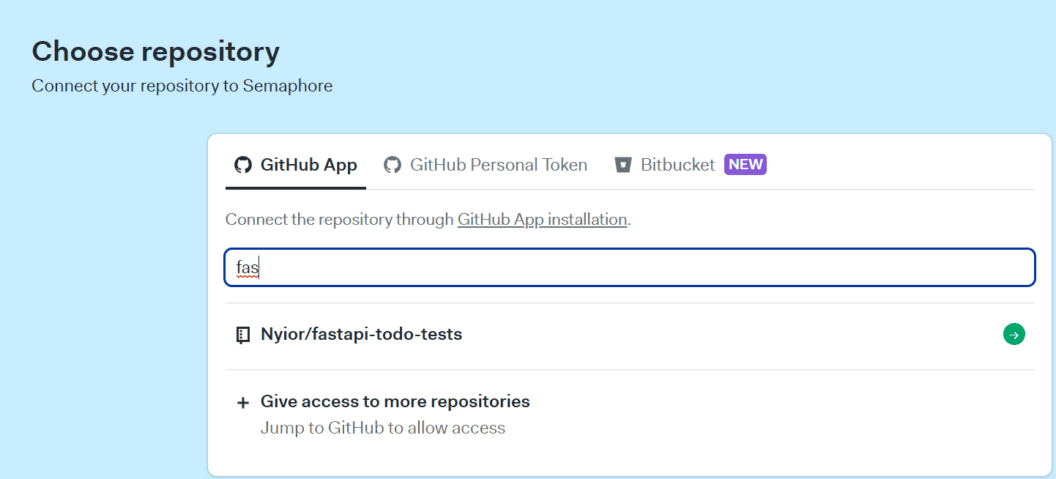
- Click on Choose repository on the next screen.

Find your repo by name and click Choose. Give Semaphore access to your repos for this to work; consult the detailed guide to connecting your GitHub account with Semaphore if you need help.
- Wait a few seconds for Semaphore to initialize the project.
- We don’t need to invite other people for this tutorial. On the next screen, click Continue to workflow setup to proceed.

Remember, we create a Semaphore pipeline by adding a YAML file to our repo. On the next screen, click on customize to modify the default YAML file created by Semaphore.
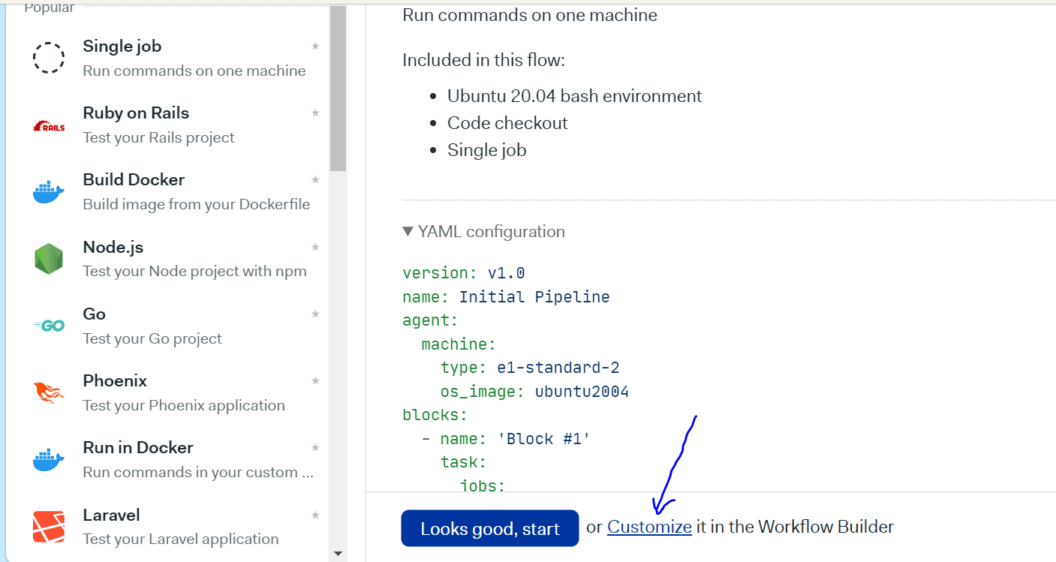
On Semaphore, we can customize our work using the UI or by editing the YAML file directly. We are going to do the latter. On the next screen click the semaphore.yaml link.
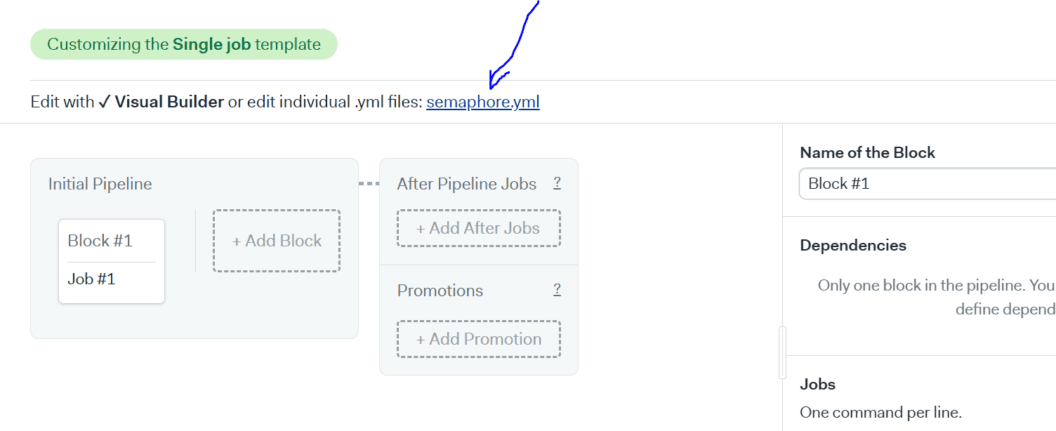
On the next screen, copy the snippet below and paste it into the semaphore.yaml file.
# Use the latest stable version of Semaphore 2.0 YML syntax:
version: v1.0

# Name your pipeline. In case you connect multiple pipelines with promotions,
# the name will help you differentiate between, for example, a CI build phase
# and delivery phases.
name: Semaphore FastAPI CI Example Pipeline

# An agent defines the environment in which your code runs.
# It is a combination of one of the available machine types and operating
# system images.
# See https://docs.semaphoreci.com/article/20-machine-types
# and https://docs.semaphoreci.com/article/32-ubuntu-1804-image
agent:
  machine:
    type: e1-standard-2
    os_image: ubuntu1804

global_job_config:
  prologue:
    commands:
      - sem-version python 3.8

# Blocks are the heart of a pipeline and are executed sequentially.
# Each block has a task that defines one or more jobs. Jobs define the
# commands to execute.
# See https://docs.semaphoreci.com/article/62-concepts
blocks:
  - name: "Install Dependencies"
    task:
      # This block installs all the python dependencies,
      # as well as all the required Linux packages.
      # The prologue section is always executed before each job on
      # the block.
      # See https://docs.semaphoreci.com/article/50-pipeline-yaml#prologue
      prologue:
        commands:
          # Set the python version.
          # See https://docs.semaphoreci.com/article/132-sem-service-managing-databases-and-services-on-linux
          # Install Linux dependencies.
          - sudo apt-get update && sudo apt-get install -y python3-dev && sudo apt-get install default-libmysqlclient-dev
      jobs:
        - name: pip
          commands:
            # Get the latest version of our source code from GitHub:
            # See https://docs.semaphoreci.com/article/54-toolbox-reference#checkout
            - checkout
            # Restore dependencies from cache. This command will not fail in
            # case of a cache miss. In case of a cache hit, pip can use it
            # to speed up the installation.
            # For more info on caching, see https://docs.semaphoreci.com/article/149-caching
            - cache restore
            # Install python dependencies.
            # If not found in the cache, pip will download them.
            - pip download --cache-dir .pip_cache -r requirements.txt
            # Persist downloaded packages for future jobs.
            - cache store

  - name: "Run Unit Tests"
    task:
      # This block runs the unit tests.

      prologue:
        commands:
          - checkout
          - cache restore
          - pip install -r requirements.txt --cache-dir .pip_cache
      # Two parallel test jobs are executed.
      jobs:
        - name: Test routes
          commands:
            # Test the application's routes.
- pytest - Let’s unpack couple of things in the snippet above:
- We first specified an agent. An agent is just some remote virtual machine. Our pipeline will run on that agent. In our case, we’re using an e1-standard-2 machine with an Ubuntu 18.04 LTS image.
- We defined two blocks:
Install DependenciesandRun Unit Tests. Each block has one job defined:pipandTest routesrespectively. What each block and their respective jobs do is pretty self-explanatory. - Notice how each block has a
prologuesection? The prologue is executed before each job in the block. This is where setup commands are usually specified.
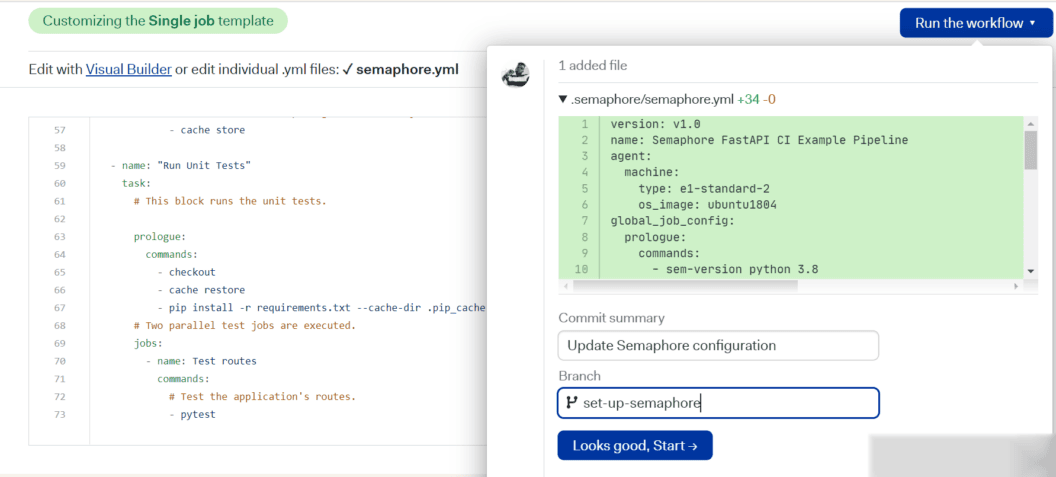
- Now that we’ve updated the autogenerated YAML file with custom instructions, click Run the workflow, then click Looks good, and Start.
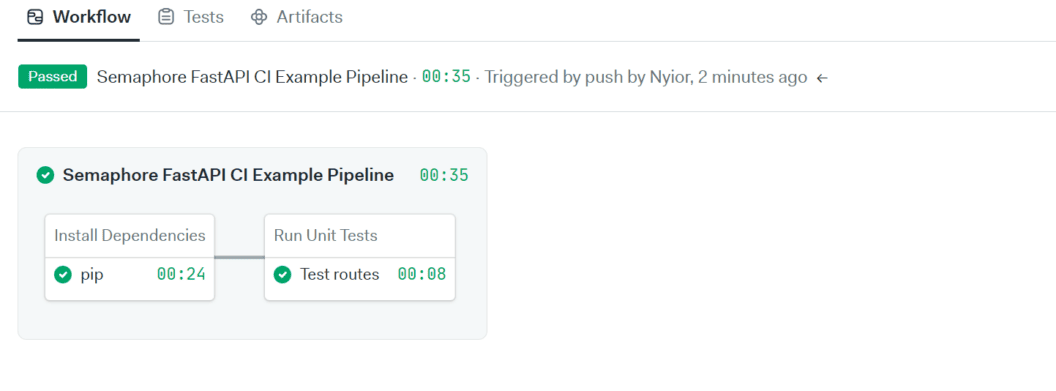
You will see your first workflow running and within seconds it should finish successfully.
Testing our Semaphore CI Pipeline on GitHub
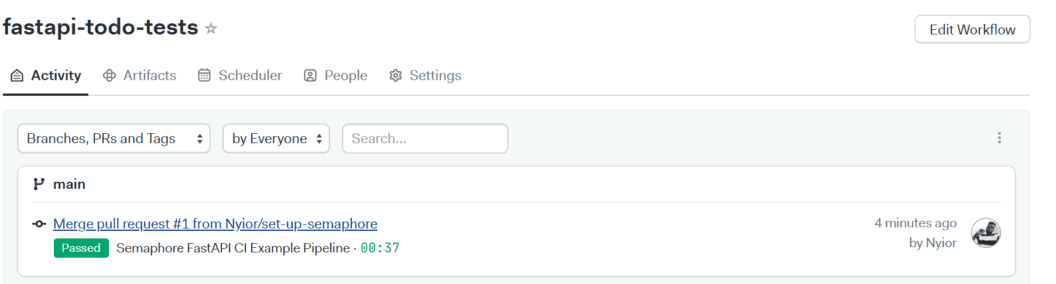
If you open your repository on GitHub, you will notice that there is a new branch: set-up-semaphore. Opening this branch will reveal that Semaphore has pushed a semaphore.yml configuration file into the .semaphore directory.
Since our goal is to trigger the pipeline on new changes pushed to the main branch, merge the set-up-semaphore branch into main. Once you merge that branch into main, the pipeline will be triggered on Semaphore. You can check your Semaphore dashboard to verify.
To do some further testing, you can create a new file locally, commit, and then push to main on remote. But first pull the changes from the remote.
In my case, I added a file testing_ci_pipeline.txt and pushed the commit, Adding dummy file to test CI pipeline to main. The new change triggered the workflow shown below:
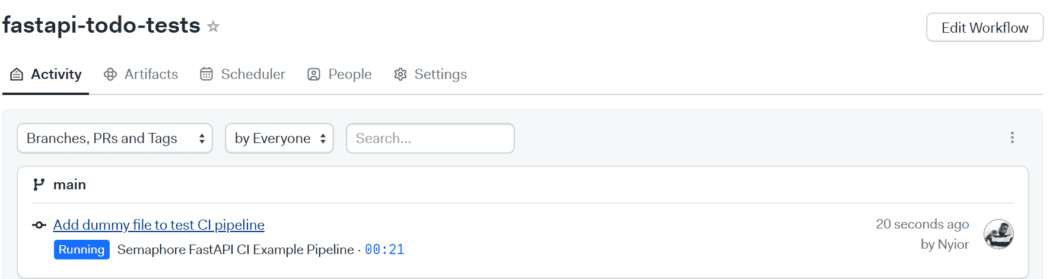
And that’s it 🙂 Next, let’s see how to set up our continuous delivery pipeline.
Setting up the Continuous Delivery pipeline: automated deployment to AWS
Let’s set up a pipeline that deploys our code to AWS when new changes are pushed to main. But first, the changes must pass the test cases in the CI pipeline.
For this, we will be using AWS’s Elastic Beanstalk compute service.
Even though we are deploying our code to Beanstalk, we’ll eventually do some Amazon S3 configuration too. This is because, under the hood, Semaphore will first upload our code to S3 before pulling the changes from S3 Beanstalk. So keep that in mind.
Also note this: every AWS resource you create (user, S3 bucket Beanstalk app, etc.) is tied to a region. The region is the location from which your resource will be served, so it is advisable to pick the location that’s closest to you or the potential users of the resource. It is also advisable to put resources that frequently communicate with each other in the same region. I’m working with the us-east-1 region in my case.
Creating AWS IAM user
Since AWS recommends creating additional users to access its services, let’s start by doing that:
- Go to the AWS IAM Console.
- On the left menu go to Users.
- Click the Add users button.
- Type ‘testUser’ on the user name.
- Select Access key – Programmatic access. Click Next: Permissions.
- Click on Attach existing policies directly.
- Open the Filter policies menu: check AWS managed – job function.
- Select AdministratorAccess policy. Go to Next: Tags.
- You may add any optional tags to describe the user. Go to Next: Review.
- Click Next and then Create user.
- Copy and save information displayed: Access Key ID and Secret access key
Creating an Elastic Beanstalk application
Log into your AWS account and take the following steps to create an application on AWS–this is pretty much the placeholder application for our main project.
- Set the default region for your application in the navigation bar. Mine is
eu-central-1. Take note of yours, we will be needing it later. - Type “ebs” in the search field and click Elastic Beanstalk.
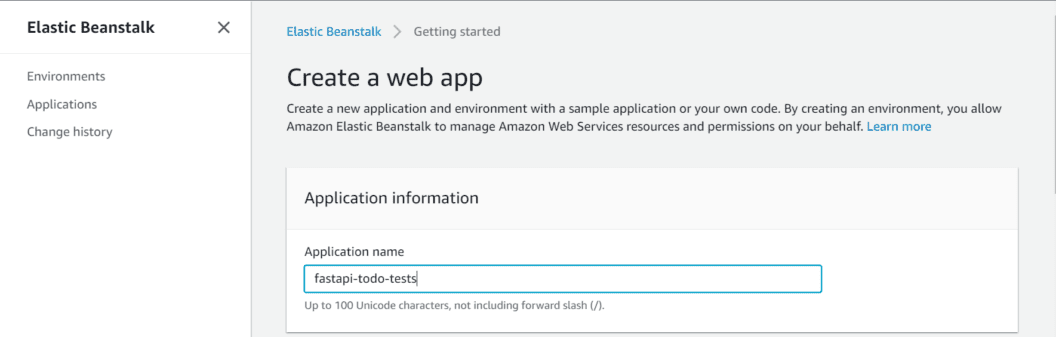
- Click Create Application.
- Type ‘fastapi-todo-tests’ in the Application Name field.
- You can add as many tags as you want.
- For Platform, select Python from the dropdown.
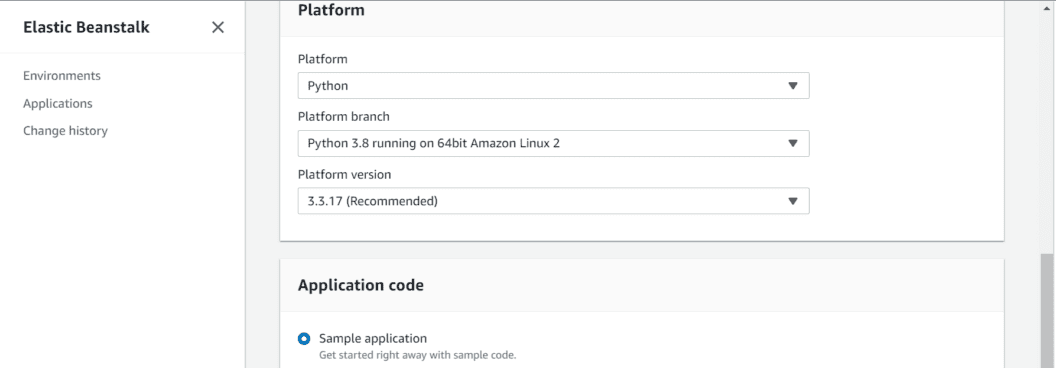
- Click Create application.
- After a while, AWS will spin up your application and its associated environment. You should see the names you submitted displayed on the left sidebar: the application’s name is first, then the environment name below it.
- Grab the application name and the environment name. We will be needing them in the subsequent steps.
- Under the app’s environment name drop-down, click Go to environment. You should be greeted by the screen below:

- Last, while creating our application, AWS also created an S3 bucket that’s associated with it. Type S3 in the search field, and also grab the name of the most recent bucket.
Configuring the project for Elastic Beanstalk
By default, Elastic Beanstalk expects to find an application.py file in our project. It uses the file to run our project. Because we don’t have that file, we need to tell Beanstalk to use our main.py file instead.
- Create a folder named .
ebextensionsin your project root. - Create
eb.configfile in that folder. - Copy and paste the snippet below into your newly-created config file.
option_settings:
  aws:elasticbeanstalk:container:python:
    WSGIPath: app.main:app
AWS will try to run our application with Gunicorn. But since FastAPI doesn’t support Gunicorn by itself, let’s modify our web process command to use a Uvicorn worker class.
- Create a Procfile in the project root. Copy and paste the snippet below:
web: gunicorn app.main:app --workers=4 --worker-class=uvicorn.workers.UvicornWorkerAt this point, your project’s structure should look like this:
fastapi-todo-tests
|-- .ebextensions
|   └-- eb.config
|-- .semaphore
|   └-- semaphore.yml
|-- app
|   └-- main.py
|   └-- schemas.py
|   └-- utils.py
|-- Procfile
|-- readme.md
|-- test_main.py
|-- requirements.txt
Adding Secrets on Semaphore
To deploy to EBS, Semaphore would need our AWS_DEFAULT_REGION, AWS_ACCESS_KEY_ID and AWS_SECRET_ACCESS_KEY. Semaphore allows configuring sensitive data like these via secrets. Let’s add our AWS credentials on Semaphore.
- Click your organization’s icon on the navigation bar and click Settings.
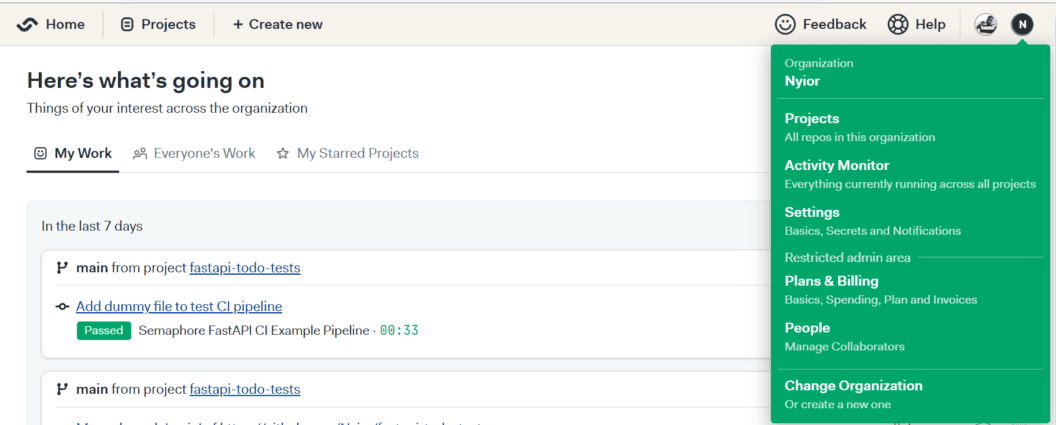
- Select Secrets then click New Secret.
- Type “aws-credentials” in the Name of the Secret field.
- Create environment variables for
AWS_DEFAULT_REGION, AWS_ACCESS_KEY_IDandAWS_SECRET_ACCESS_KEY. Use the correct values you copied in the previous steps.
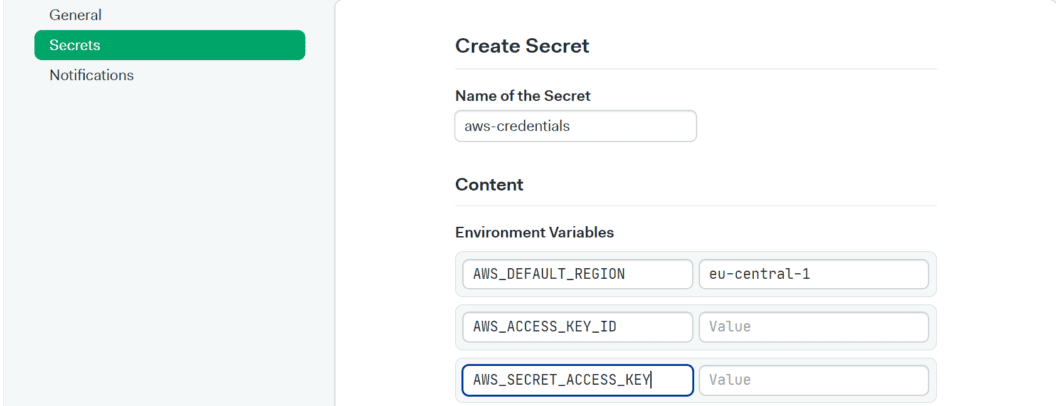
- Click Save Secret.
Updating our Semaphore workflow
Next, let’s add the pipeline that will deploy our code to AWS.
- Create
.semaphore/semaphore_cd.ymland add the snippet below:
version: v1.0
name: Elastic Beanstalk Deployment
agent:
  machine:
    type: e1-standard-2
    os_image: ubuntu1804

blocks:
  - name: "Deploy to ElasticBeanstalk"
    task:
      secrets:
        # contains AWS_DEFAULT_REGION, AWS_ACCESS_KEY_ID and AWS_SECRET_ACCESS_KEY
        - name: aws-credentials
      env_vars:
        - name: S3_BUCKET_NAME
          value: bucket-name
        - name: EB_APP_NAME
          value: app-name
        - name: EB_ENV_NAME
          value: env-name

      jobs:
        - name: "Deployment"
          commands:
            - checkout
            - echo "Zipping your newest code from git"; git archive -o "$EB_APP_NAME".zip HEAD
            - export EB_VERSION=`git rev-parse --short HEAD`-`date +%s`
            - aws s3 cp "$EB_APP_NAME".zip s3://$S3_BUCKET_NAME/"$EB_APP_NAME"/"$EB_VERSION".zip
            - aws elasticbeanstalk create-application-version --application-name "$EB_APP_NAME" --version-label "$EB_VERSION" --source-bundle S3Bucket=$S3_BUCKET_NAME,S3Key="$EB_APP_NAME/$EB_VERSION.zip" --description "`git show -s --format=%s HEAD | cut -c -200`"
            - aws elasticbeanstalk update-environment --environment-name "$EB_ENV_NAME" --version-label "$EB_VERSION"
            - echo "Environment status':' `aws elasticbeanstalk describe-environments --environment-names "$EB_ENV_NAME" | grep '"Status"' | cut -d':' -f2  | sed -e 's/^[^"]*"//' -e 's/".*$//'`"
            - echo "Your environment is currently updating"; while [[ `aws elasticbeanstalk describe-environments --environment-names "$EB_ENV_NAME" | grep '"Status"' | cut -d':' -f2  | sed -e 's/^[^"]*"//' -e 's/".*$//'` = "Updating" ]]; do sleep 2; printf "."; done
            - if [[ `aws elasticbeanstalk describe-environments --environment-names "$EB_ENV_NAME" | grep VersionLabel | cut -d':' -f2 | sed -e 's/^[^"]*"//' -e 's/".*$//'` = "$EB_VERSION" ]]; then echo "The version of application code on Elastic Beanstalk matches the version that Semaphore sent in this deployment."; echo "Your environment info':'"; aws elasticbeanstalk describe-environments --environment-names "$EB_ENV_NAME"; else echo "The version of application code on Elastic Beanstalk does not match the version that Semaphore sent in this deployment. Please check your AWS Elastic Beanstalk Console for more information."; echo "Your environment info':'"; aws elasticbeanstalk describe-environments --environment-names "$EB_ENV_NAME"; false; fi
            - sleep 5; a="0"; echo "Waiting for environment health to turn Green"; while [[ `aws elasticbeanstalk describe-environments --environment-names "$EB_ENV_NAME" | grep '"Health"' | cut -d':' -f2  | sed -e 's/^[^"]*"//' -e 's/".*$//'` != "Green" && $a -le 30 ]]; do sleep 5; a=$[$a+1]; printf "."; done; if [[ `aws elasticbeanstalk describe-environments --environment-names "$EB_ENV_NAME" | grep '"Health"' | cut -d':' -f2 | sed -e 's/^[^"]*"//' -e 's/".*$//'` = "Green" ]]; then echo "Your environment status is Green, congrats!"; else echo "Your environment status is not Green, sorry."; false; fi;
- echo "Your environment info':'"; aws elasticbeanstalk describe-environments --environment-names "$EB_ENV_NAME"- Things to note in the snippet above:
- We created a new pipeline named “Elastic Beanstalk Deployment”.
- The pipeline has just one block: “Deploy to ElasticBeanstalk”.
- This block also has just one job defined: “Deployment”.
- The secrets section basically tells Semaphore to use the
aws-credentialswe defined earlier for the deployment. - Last, with the
env_varssection, we declared three environment variables that will be read in the “Deployment” job: S3_BUCKET_NAME, EB_APP_NAME, and EB_ENV_NAME.
Make sure to replace their current values with your correct values. For example, replace bucket-name in the snippet below with your correct bucket name.
 - name: S3_BUCKET_NAME
   value: bucket-name
Next, copy and paste the snippet below at the end of the first pipeline file we created:
.semaphore/semaphore.yml promotions:
- name: Elastic Beanstalk Deployment
pipeline_file: semaphore_cd.yml
auto_promote:
when: "result = 'passed' and branch = 'main'"Essentially, we just added a promotion to our continuous integration pipeline. This promotion will trigger the deployment pipeline when new changes pushed to the main branch (and this branch only) pass all the test cases.
Testing our CD pipeline
To test the CD Pipeline, commit the changes and push to main. If everything goes well, you should see the two pipelines completed in your Semaphore dashboard.
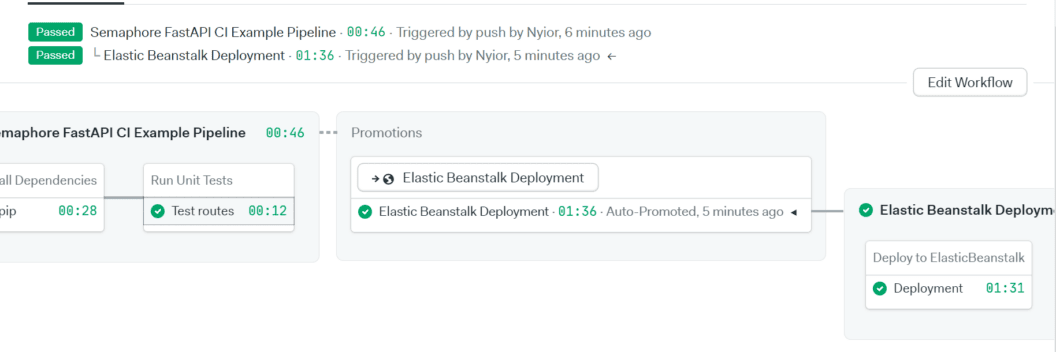
Notice the progression of our workflow:
- The Semaphore FastAPI CI Example Pipeline was first triggered. This pipeline executed the Install Dependencies and Run Unit Tests jobs.
- When all tests passed the promotion that we added to the first pipeline it triggered the second pipeline, called Elastic Beanstalk Deployment. This pipeline executed the Deployment job.
Note: on AWS, again click on Go to environment to test your new shiny FastAPI application.
One last thing: If you run into problems while trying to configure stuff, you can find the complete version of this project here. Comparing the code with yours might help.
Conclusion
In this piece, we’ve seen the incredible power of setting up a continuous integration and delivery pipeline firsthand. CI/CD pipelines generally eliminate manual feature delivery processes. This results in swift, dependable, and repeatable feature deliveries.
Even though we only implemented a continuous delivery pipeline to our staging environment in this article, in reality, you’ll most likely be working with multiple deployment environments. In such situations, you could implement a workflow that promotes code from one environment to the next.
For the next steps, you can learn more from Semaphore docs.
If you want to use Flask or Django instead of FastAPI, check the CI/CD Python Flask tutorial or CI/CD Python Django tutorial.