Semaphore gives you the power to easily create CI/CD pipelines that build, run and deploy Docker containers. DigitalOcean recently introduced a managed Kubernetes service which simplifies running cloud-native applications. Together, they’re a great match for productive software development. In this article, we’ll show you how to connect these two services together in a fast continuous delivery pipeline.
What we’re building
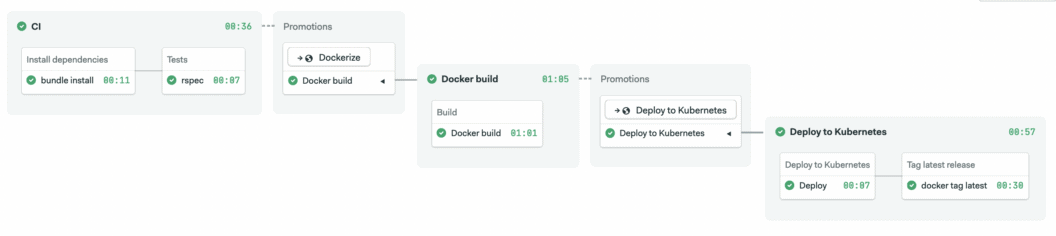
We’ll use a Ruby Sinatra microservice which exposes a few HTTP endpoints and includes a test suite. We’ll package it with Docker and deploy it to DigitalOcean Kubernetes. The CI/CD pipeline will fully automate the following tasks:
- Install project dependencies, reusing them from cache most of the time;
- Run unit tests;
- Build and tag a Docker image;
- Push the Docker image to Docker Hub container registry;
- Provide a one-click deployment to DigitalOcean Kubernetes.
We’ll go step by step, but if you’d like to jump straight into the final version of source code, check out the demo repository on GitHub.
Let’s begin!
Launch a Kubernetes cluster in 5 minutes on DigitalOcean
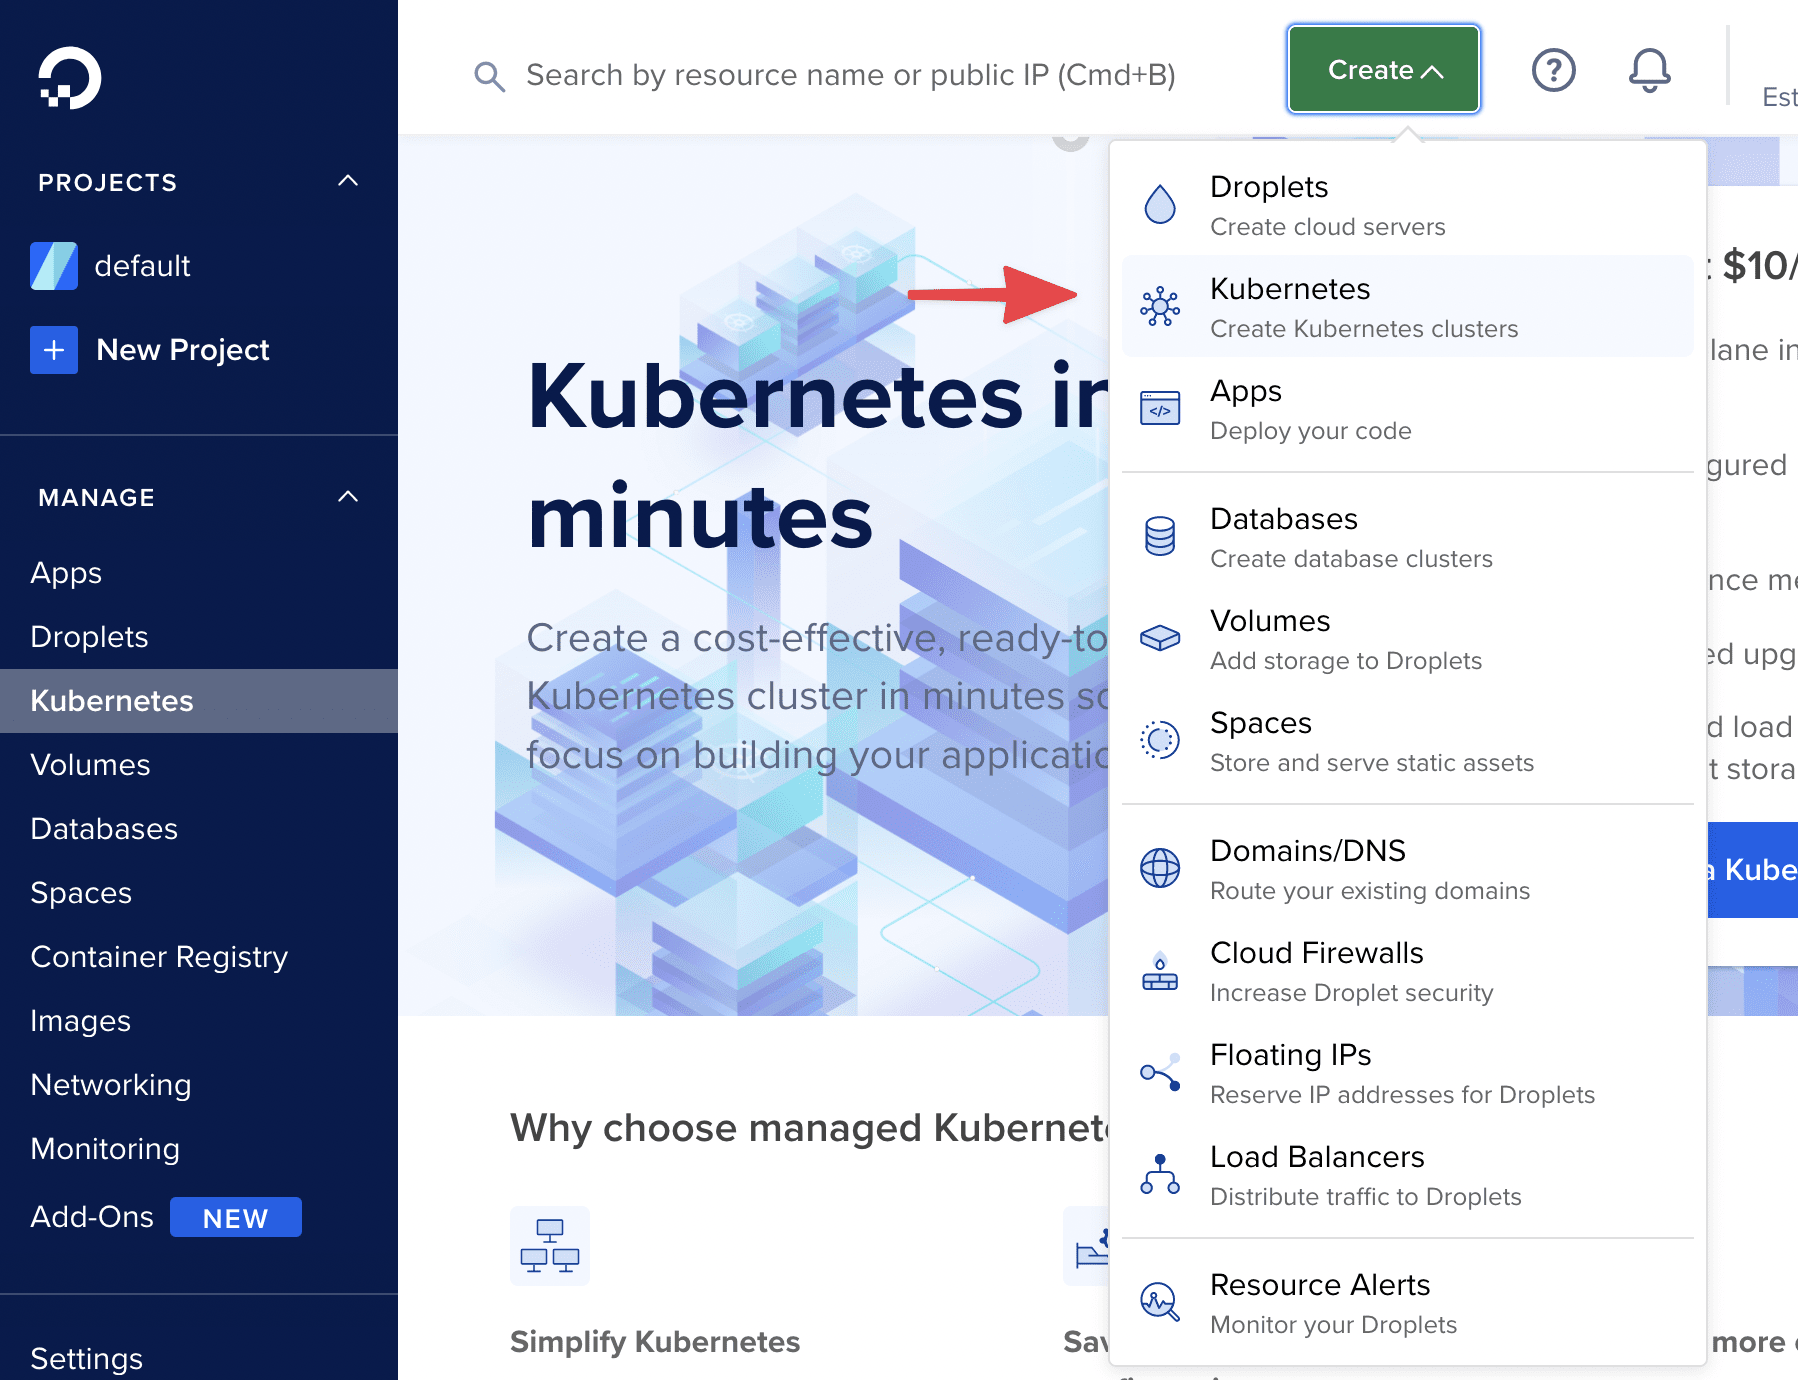
Launching a Kubernetes cluster on DigitalOcean is straightforward. From your dashboard, use the Create button on top to create it. The cluster will become available in 4-5 minutes.
The cluster page includes a number of tips and resources that you can use. If you haven’t done that yet, now is the time to install kubectl, the Kubernetes command-line tool.
Connect to your DigitalOcean Kubernetes cluster
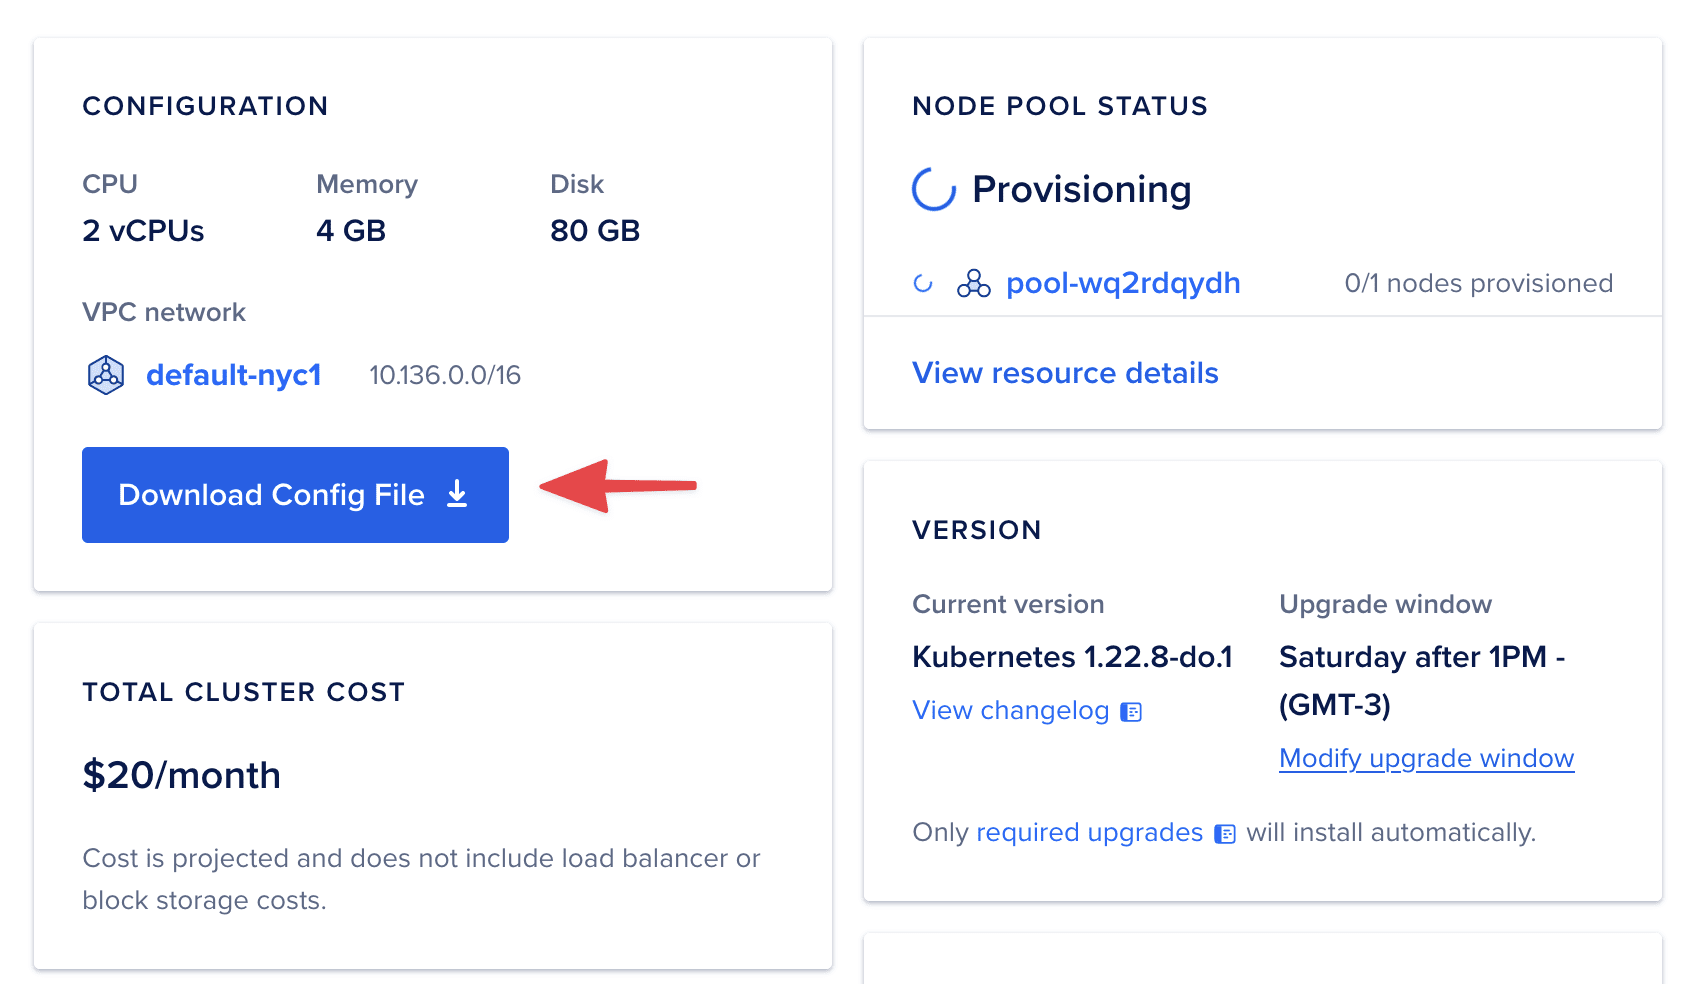
Provide a name for the cluster and select how many and what type of nodes to run. Then, scroll to the bottom of your cluster page to download the configuration file that you will use to authenticate and connect to the cluster.
On your local machine, create a directory to contain the Kubernetes configuration file:
$ mkdir ~/.kubeMove the downloaded file to ~/.kube and instruct kubectl to use it. You can run the following command in your terminal session, or add it to your shell profile like .bashrc or .zshrc:
$ export KUBECONFIG=$HOME/.kube/kubeconfig.yamlMake sure to change kubeconfig.yaml to match the name of your file.
Verify that you can communicate with your DigitalOcean Kubernetes cluster by running kubectl get nodes. When the command is successful, it returns information similar to the following:
$ kubectl get nodes
NAME                        STATUS    ROLES     AGE       VERSION
nostalgic-heisenberg-8vi3   Ready     <none>    92s       v1.22.8
nostalgic-heisenberg-8vi8   Ready     <none>    95s       v1.22.8
The number of nodes will match the number you selected during the cluster creation process. Note that if you run get nodes while your cluster is still being provisioned, the number of nodes will be zero.
Connect Semaphore to your DigitalOcean Kubernetes cluster
At this point, you have a Kubernetes cluster that you can control from your local machine. Let’s configure a basic CI/CD project in which Semaphore can also successfully execute kubectl get nodes.
If you’re new to Semaphore, start by taking the getting started tour and signing up with a free account.
Create a project on Semaphore
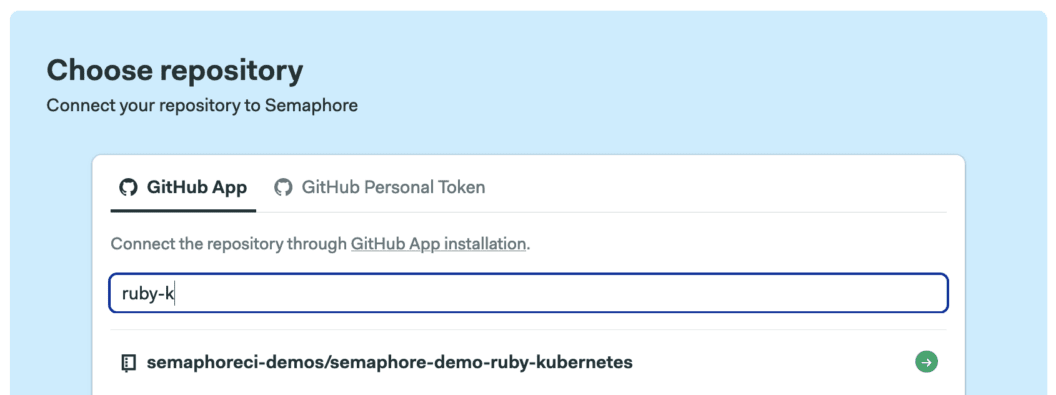
Once you’re in Semaphore, click on the + (plus sign) next to Projects and select your repository from the list:
When prompted, choose:
- If you want to start with a minimal configuration and build it up while you follow this tutorial, select “I want to configure this project from scratch“.
- If you want to jump forward to the end and view the final configuration, select the “I will use the existing configuration” option.
For both cases, Semaphore creates a deploy key and webhook on GitHub so that it can access your code as it changes. It also creates a pipeline definition file .semaphore/semaphore.yml.
Authenticating with Kubernetes using a Semaphore secret
Let’s edit the pipeline and instruct Semaphore on how to talk to Kubernetes.
Semaphore already provides kubectl preinstalled. So what’s left is to securely upload the Kubernetes configuration file inside the Semaphore environment. We generally solve this by creating a secret. A secret can be a collection of environment variables and files. Once created, it’s available to all projects within an organization.
In our case, we need a secret based on a single file:
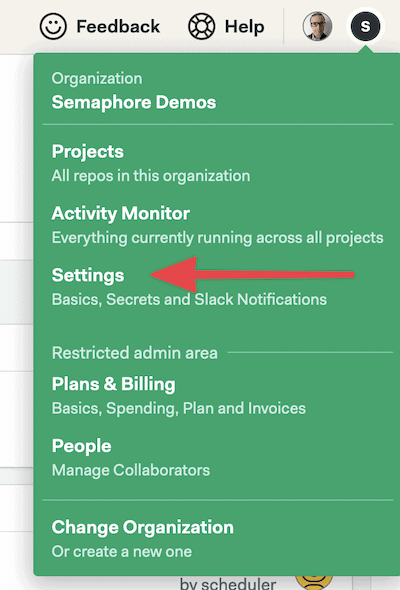
- Go to your Semaphore account and click on Settings.
- Press the Create New Secret button.
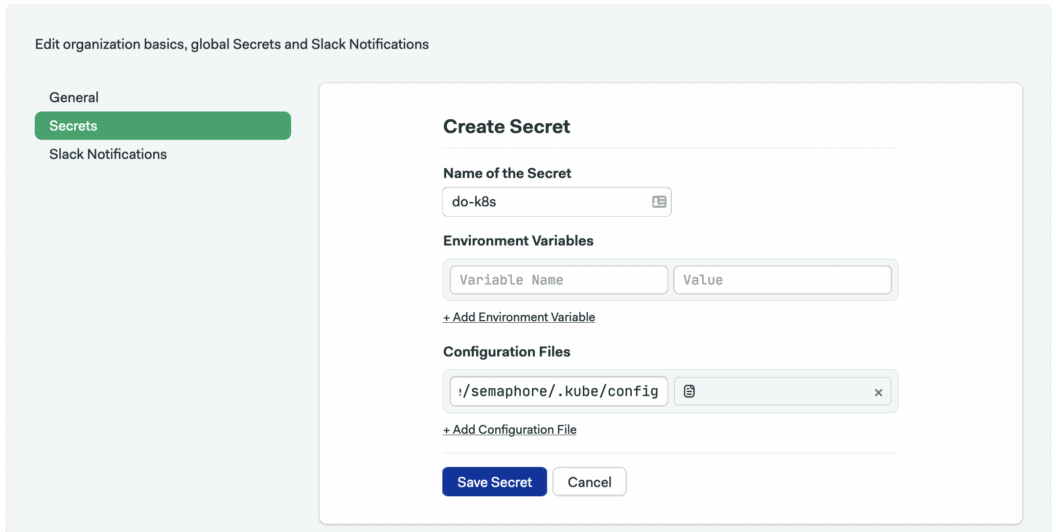
- Create the secret for your Kubernetes configuration:
- Set the name of the secret to
do-k8s. - Under files, type the path
/home/semaphore/.kube/config, where/home/semaphore/is the default directory from which all CI/CD jobs run. - Upload the DigitalOcean Kubernetes Config file.
- Set the name of the secret to
- Click on Save Changes.
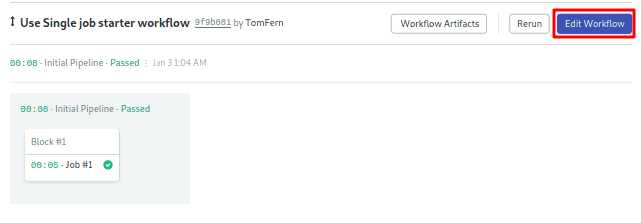
To modify the pipeline configuration, click on the Edit Workflow button on the top right corner:
Let’s try connecting to Kubernetes. Modify the initial block so it looks like this:
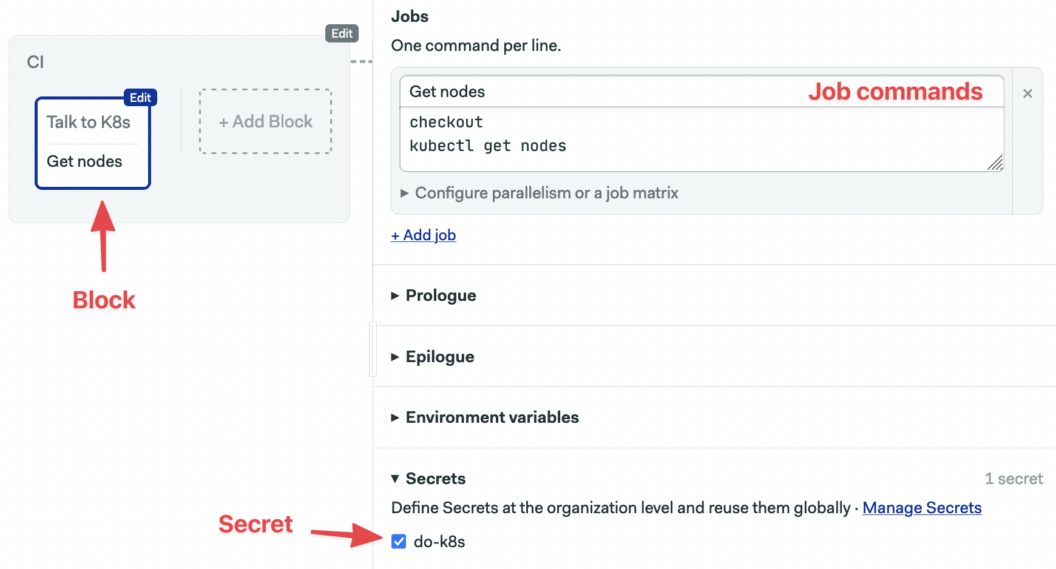
If this is the first time you see a Semaphore pipeline, a quick tour of concepts will help you understand it. Here’s the gist of how they apply in this example:
- Jobs have a name and a list of commands to execute.
- Jobs are grouped in blocks.
- We initialize environment variables for the jobs. In this case, we are setting
KUBECONFIG = /home/semaphore/.kube/dok8s.yml - We mount the Kubernetes config file with the
do-k8ssecret we’ve just created. - Our pipeline has one block and one job, in which we download our code from GitHub and run
kubectl get nodes
The Run Workflow button on the top right corner to push the changes to GitHub:
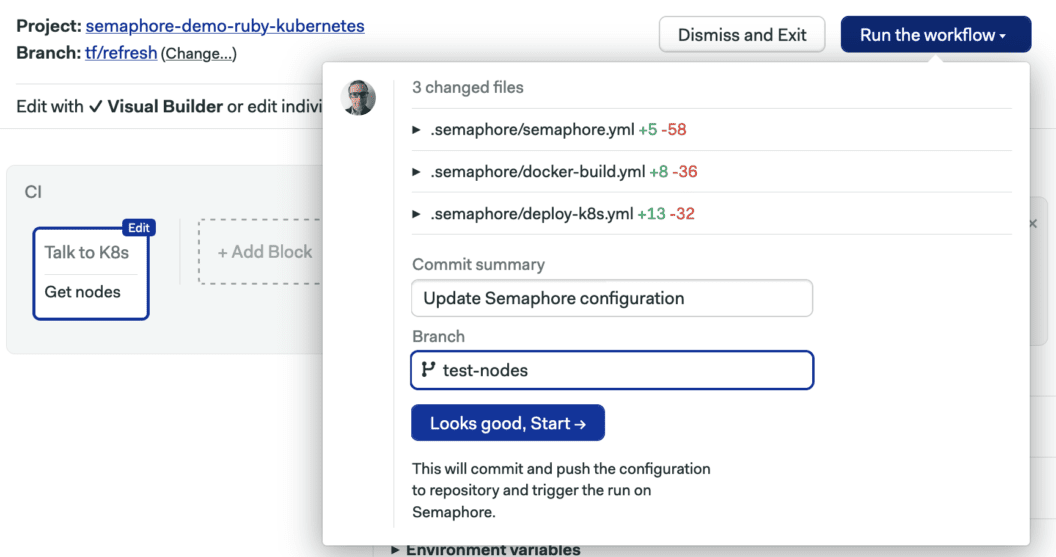
This will start the pipeline immediately:
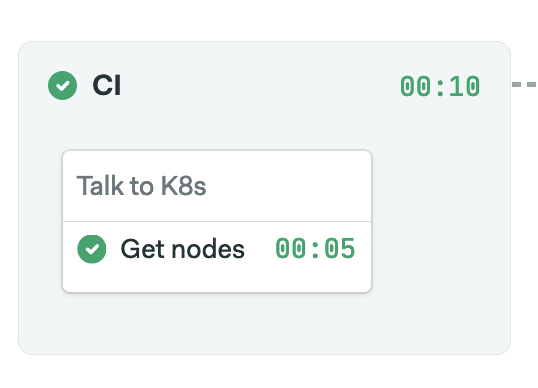
Clicking on the job will bring up its logs:
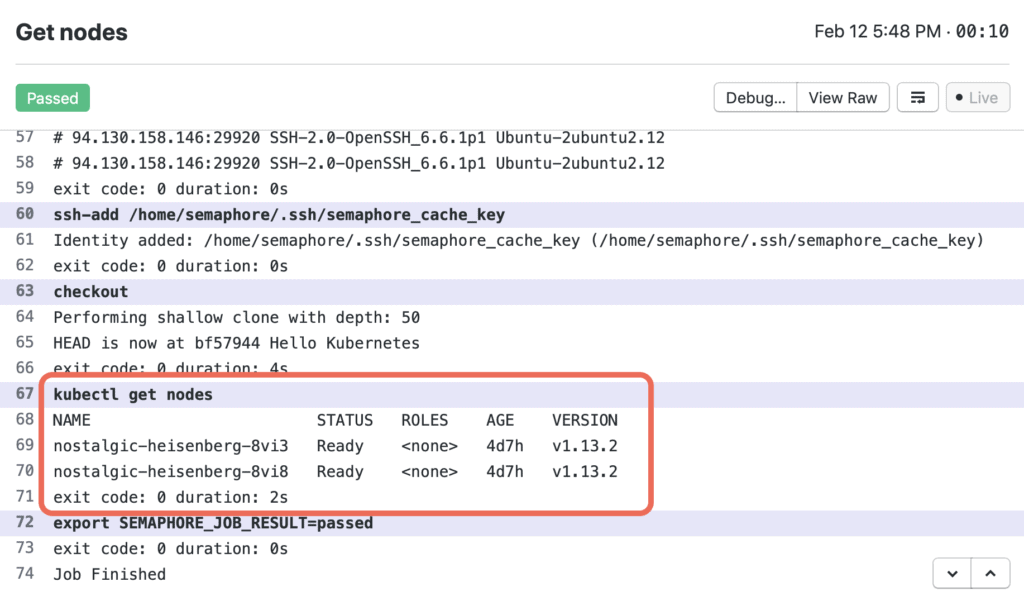
OK, we’re in business! Let’s proceed by setting up an actual project.
Set up continuous integration for a Sinatra microservice
Our Sinatra app is a microservice with minimal configuration and an RSpec test suite:
.
├── Gemfile
├── Gemfile.lock
├── README.md
├── app.rb
├── config.ru
└── spec
    ├── app_spec.rb
    └── spec_helper.rb
Let’s go back to setting up the Continuous Integration pipeline:
Edit the workflow and delete the block we created above. We’ll set up a pipeline that looks like this:
On Semaphore, blocks run sequentially, while jobs within a block run in parallel. The CI pipeline contains two blocks, one for installing dependencies and another for running tests. This is an example if it makes sense you could, of course, merge the blocks in one.
Click on the first block to edit the job. We’ll store our Ruby gems in Semaphore cache to avoid running bundle install from scratch on every commit:
- Block name: Install dependencies
- Job name: bundle install
- Job commands:
checkout
cache restore
bundle config set deployment 'true'
bundle install --path vendor/bundle
cache store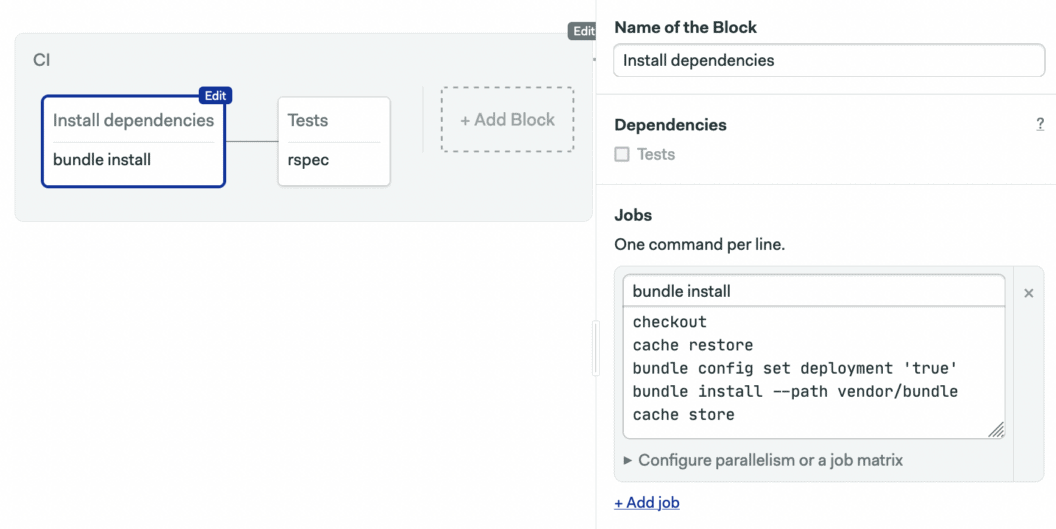
It’s necessary to run bundle install in the second block, even though cache restore will at that point always restore the gem bundle. It’s a limitation on Bundler’s side, but the good part is that the command will exit very quickly. The commands of the second block are:
checkout
cache restore
bundle install --path vendor/bundle
bundle exec rspec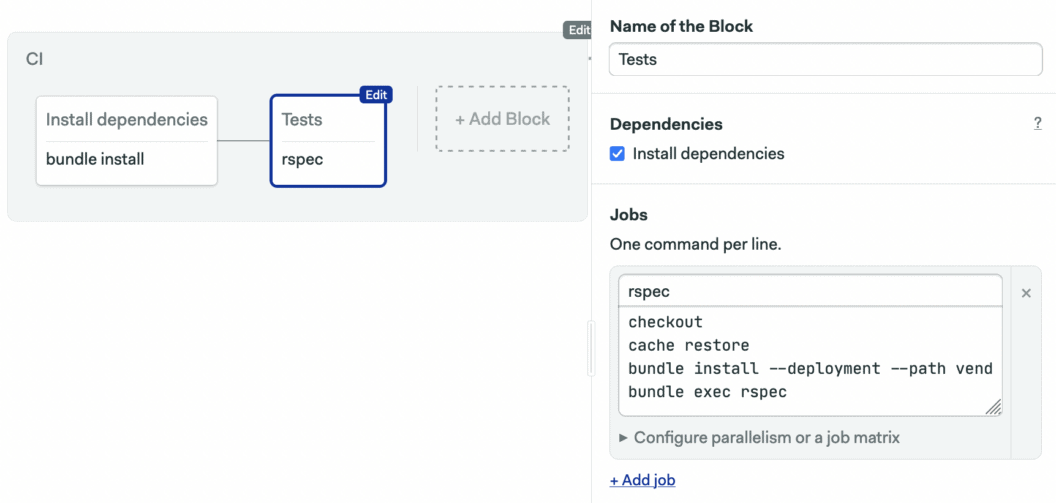
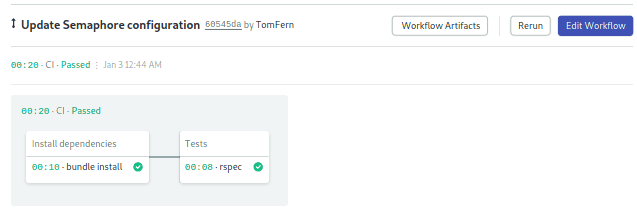
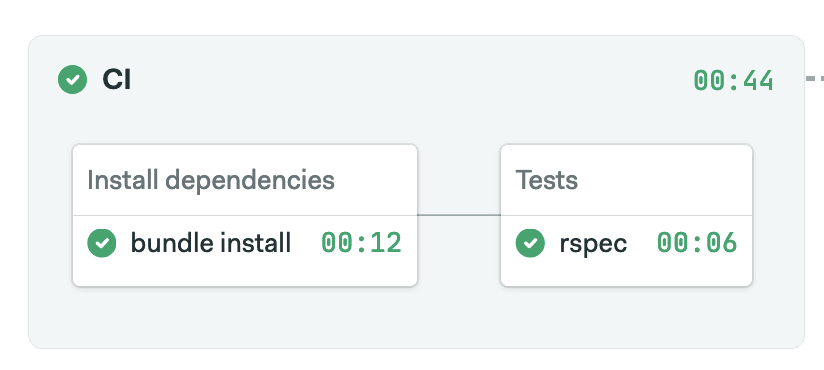
When you click on Run the Workflow > Start, you’ll see a real CI pipeline shaping up on Semaphore:
Dockerize Sinatra app
The next step is to package our Sinatra app in a Docker container. The following Dockerfile will do:
# Dockerfile
FROM ruby:3.1

RUN apt-get update -qq && apt-get install -y build-essential

ENV APP_HOME /app
RUN mkdir $APP_HOME
WORKDIR $APP_HOME

ADD Gemfile* $APP_HOME/
RUN bundle config set deployment 'true'
RUN bundle install --path vendor/bundle

ADD . $APP_HOME

EXPOSE 4567

CMD ["bundle", "exec", "rackup", "--host", "0.0.0.0", "-p", "4567"]
To verify, you can build and run the container locally:
$ docker build -t demo .
$ docker run -p 80:4567 demo
$ curl localhost
> hello world
Add the Dockerfile to GitHub:
$ git add Dockerfile
$ git commit -m "add Dockerfile"
$ git push origin master
Push Docker image to Docker Hub container registry
Deploying to Kubernetes requires us to push a Docker image to a container registry. In this example, we’ll use Docker Hub. The procedure is very similar to other registry providers.
Pushing to a container registry, public or private, requires authentication. For example, when you’re using Docker Desktop on Mac, you’re automatically authenticated and communication with Docker Hub just works. In the CI/CD environment, we need to make credentials available and authenticate before doing docker push.
Authenticating with Docker Hub using a Semaphore secret
Following the Docker Hub instructions available in Semaphore documentation, we need to create a secret.
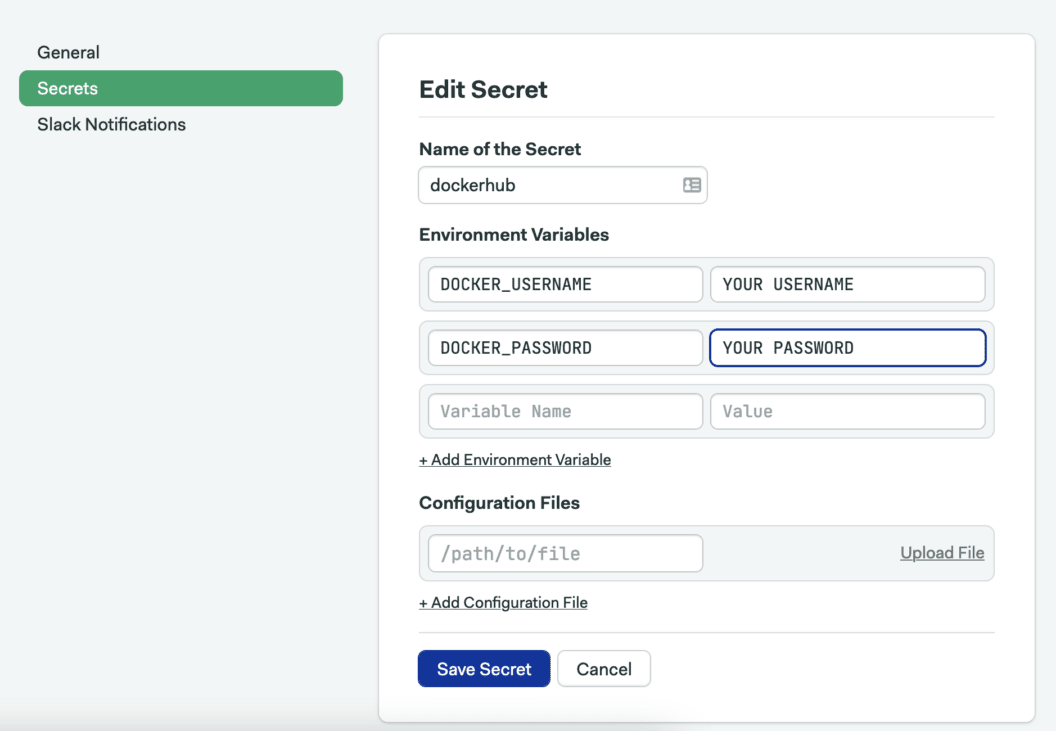
On the left menu, go to Configuration > Secrets and click on Create New Secret:
- Name of the Secret: “dockerhub”
- Variables:
DOCKER_USERNAME: type your DockerHub usernameDOCKER_PASSWORD: type your DockerHub password.
- Click on Save Changes.
We now have what it takes to push to Docker Hub from a Semaphore job.
Configure a promotion to run docker build
With Docker build and push operations we are entering the delivery phase of our project. We’ll extend our Semaphore pipeline with a promotion and use it to trigger the next stage.
To create a new promotion:
- Edit the Workflow
- Scroll right to the last block in the pipeline and press the Add First Promotion button.
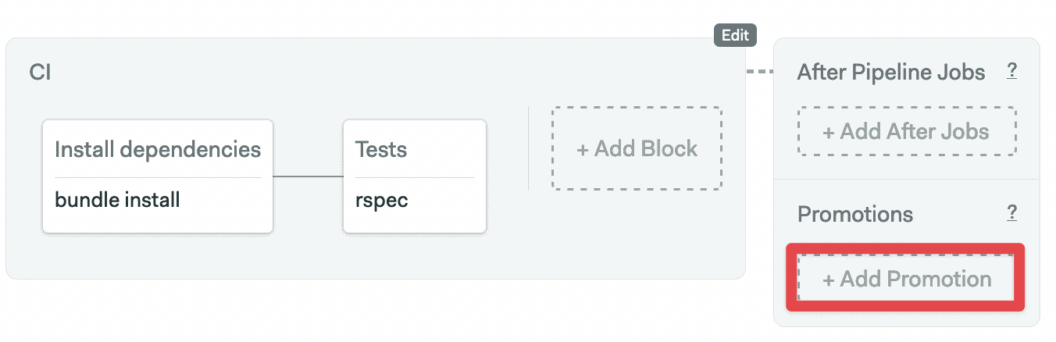
- Configure the new promotion:
- Check the Enable automatic promotion option
- Call the promotion: “Dockerize”
- Set up the new pipeline to build a Docker image:
- Click on the new pipeline. Set its name to “Docker build”. Here we can change the machine type that runs this pipeline, there is no need to change the default e1-standard-2.
- Edit the first block on the new pipeline. Let’s name it “Build”.
- Open the Secrets section and check the dockerhub entry.
- Type the following commands in the Job command box:
echo "${DOCKER_PASSWORD}" | docker login -u "${DOCKER_USERNAME}" --password-stdin
checkout
docker pull "${DOCKER_USERNAME}"/semaphore-demo-ruby-kubernetes:latest || true
docker build --cache-from "${DOCKER_USERNAME}"/semaphore-demo-ruby-kubernetes:latest -t "${DOCKER_USERNAME}"/semaphore-demo-ruby-kubernetes:$SEMAPHORE_WORKFLOW_ID .
docker images
docker push "${DOCKER_USERNAME}"/semaphore-demo-ruby-kubernetes:$SEMAPHORE_WORKFLOW_ID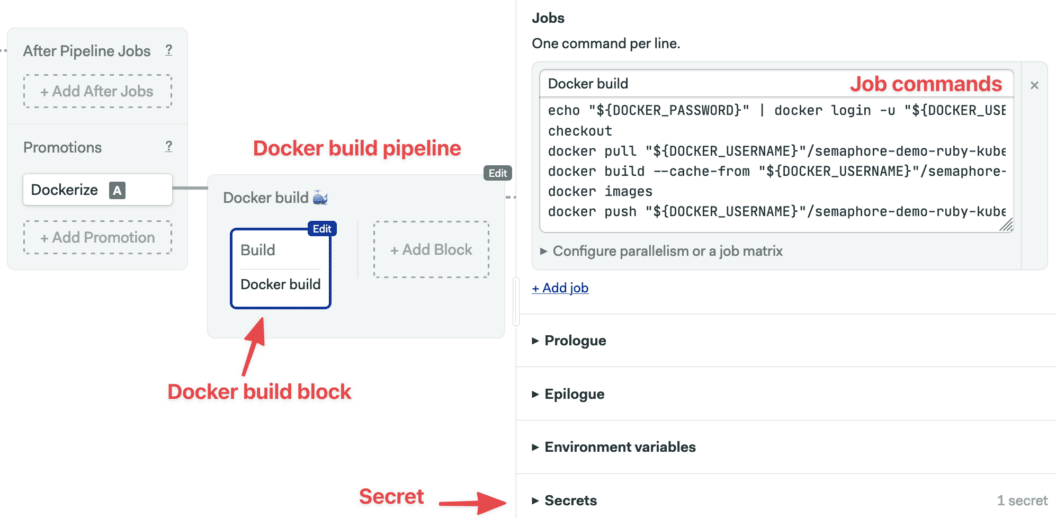
In the first command in the job we authenticate with Docker Hub using the environment variables defined in the dockerhub secret.
We’re using Docker layer caching to speed up the container build process. First, the docker pull command retrieves a previously built image from the registry. If this is the first time we run this operation, this step will be skipped and not fail.
By using the --cache-from flag with docker build, we’re reusing the layers from the pulled image to build the new one faster.
For the docker build and docker push commands we are using the SEMAPHORE_WORKFLOW_ID environment variable to produce a unique artifact after every build. It’s one of the environment variables available in every Semaphore job; see documentation for a complete list.
Note that we’re not creating a new version of the latest tag. We’re going to do that only after a successful deploy.
Once you finished setting up the job, click on Run workflow > Start. You should have a pipeline in a state similar to this:
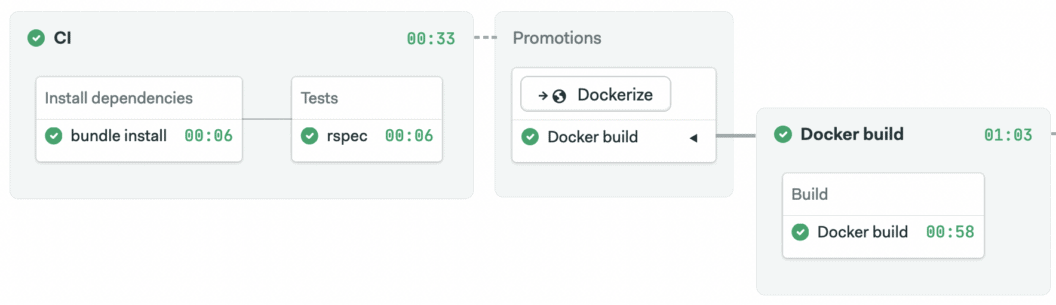
Depending on what branch you started the pipeline, the build pipeline may not start automatically. Automatic promotion is only triggered, by default, on the master branch. You may need to click Promote to start it.
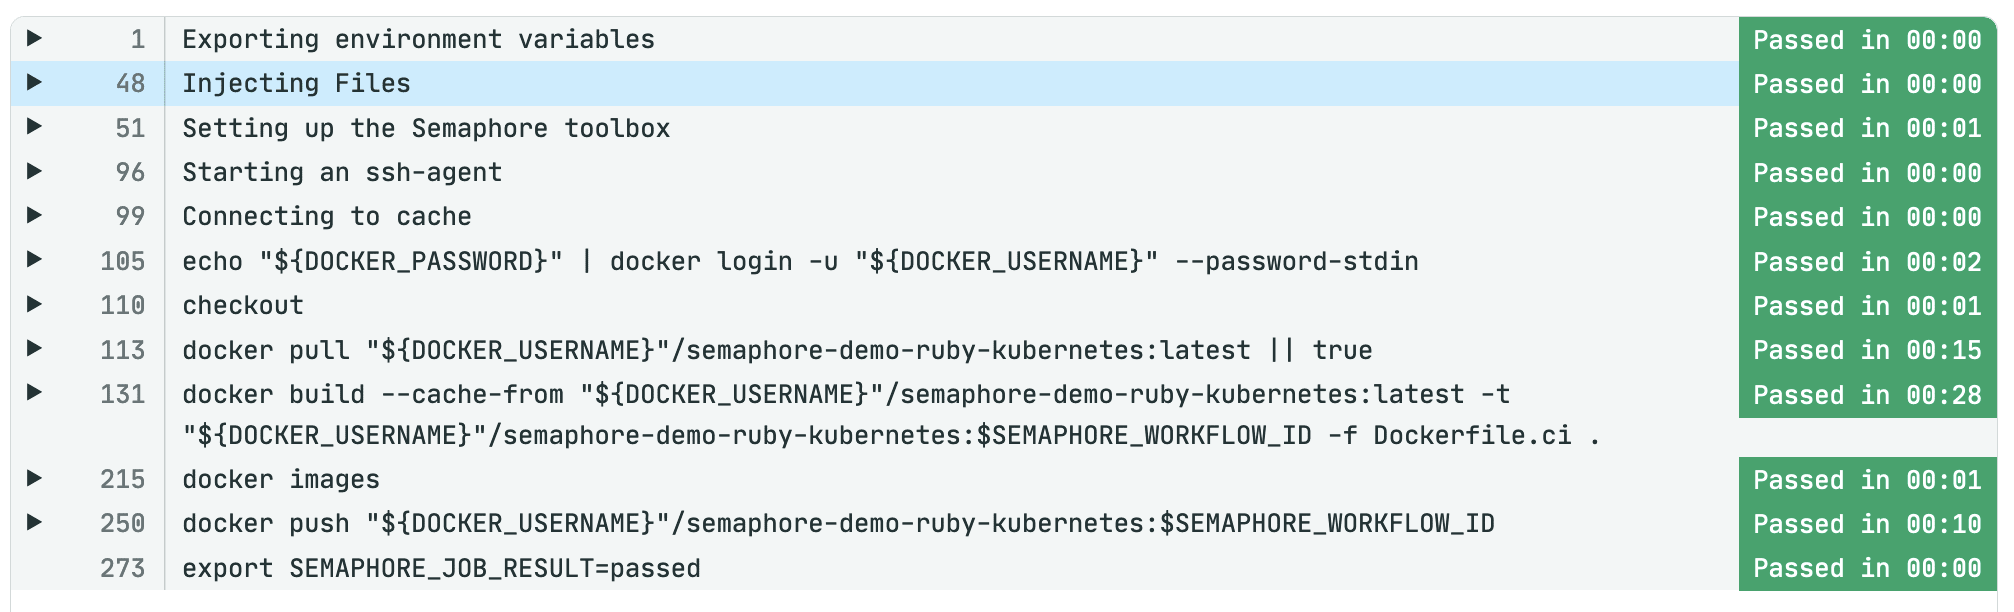
The job log shows that the container image has been created and pushed:
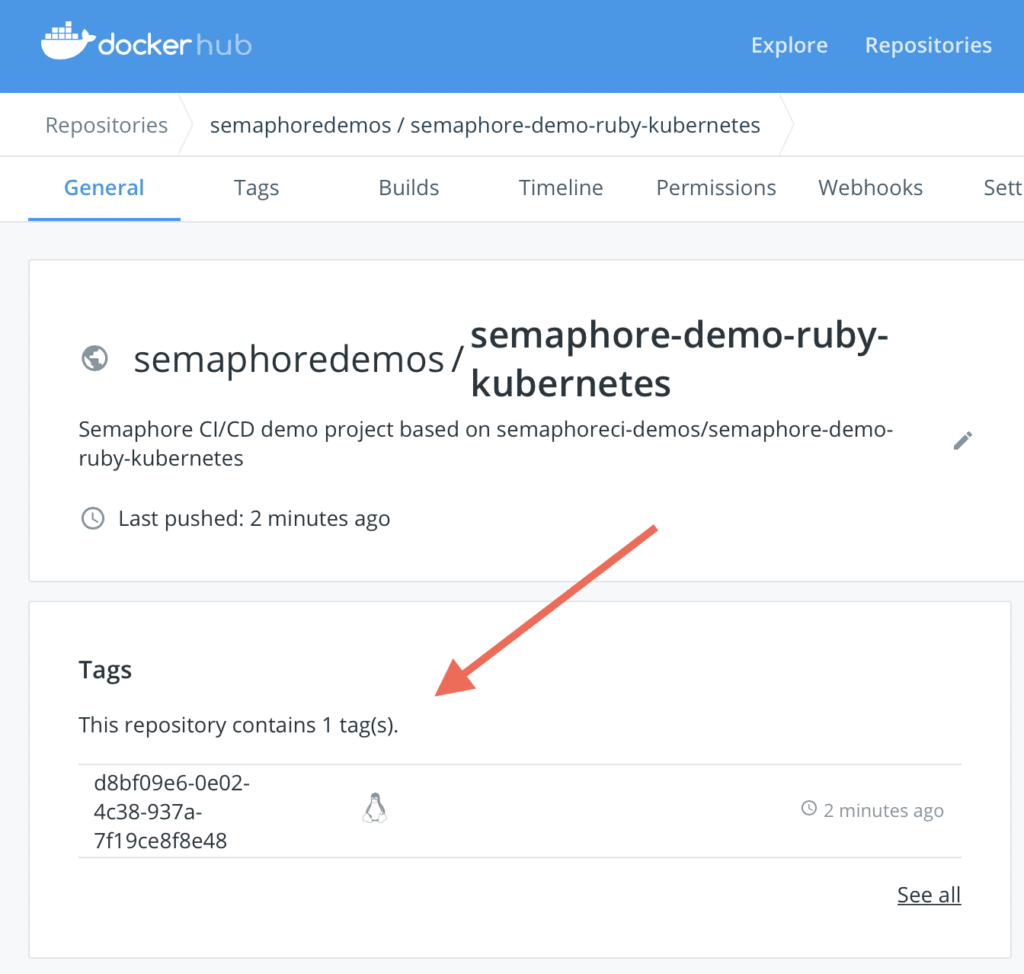
And your Docker registry should contain the latest images:
Deploy to DigitalOcean Kubernetes
If your Docker image is private, you’ll need to enable the Kubernetes cluster to authenticate with the Docker registry. The way to do that is, once again, by creating a secret, only this time on the Kubernetes cluster’s end. For demonstration purposes, I will show you how to do this, even though the image that we’re using in this tutorial is public.
Create a Kubernetes secret to pull a private Docker image from the registry
Run the following command on your local machine to create a docker-registry-type secret on your Kubernetes cluster:
$ kubectl create secret docker-registry dockerhub-user \
     --docker-server=https://index.docker.io/v1/ \
     --docker-username=YOUR_DOCKER_HUB_USERNAME \
     --docker-password=YOUR_DOCKER_HUB_PASSWORD \
     --docker-email=YOUR_EMAIL
You can verify the secret by running:
$ kubectl get secret dockerhub-user --output=yamlKubernetes secrets are base64-encoded and the output will look similar to:
apiVersion: v1
data:
  .dockerconfigjson: eyJhdXRocyI6eyJodHR...
kind: Secret
metadata:
  creationTimestamp: 2019-02-08T10:18:52Z
  name: dockerhub-user
  namespace: default
  resourceVersion: "7431"
  selfLink: /api/v1/namespaces/default/secrets/dockerhub-user
  uid: eec7c39e-2b8a-11e9-a804-1a46bc991881
type: kubernetes.io/dockerconfigjson
Write a deployment manifest
Create a new file in your repository, for example, called deployment.yml. This file describes what Kubernetes calls a deployment, which is a set of pods running your containerized application. In this example, we’ll run only one instance of the application, but we can scale it up as needed by changing the replicas value.
# deployment.yml
apiVersion: apps/v1
kind: Deployment
metadata:
  name: semaphore-demo-ruby-kubernetes
spec:
  replicas: 1
  selector:
    matchLabels:
      app: semaphore-demo-ruby-kubernetes
  template:
    metadata:
      labels:
        app: semaphore-demo-ruby-kubernetes
    spec:
      containers:
        - name: semaphore-demo-ruby-kubernetes
          image: semaphoredemos/semaphore-demo-ruby-kubernetes:$SEMAPHORE_WORKFLOW_ID
      imagePullSecrets: # if using a private image
        - name: dockerhub-user
The deployment configuration file as it appears now is not valid YML. The plan is to use a Linux utility called envsubst (also available on Mac via Homebrew) to replace $SEMAPHORE_WORKFLOW_ID with its value within a Semaphore CI/CD job.
Our deployment manifest, however, is not yet complete without a Kubernetes load balancer which will expose the deployed service on a public IP address. Append the following content to the same file:
# deployment.yml
# ...
---

apiVersion: v1
kind: Service
metadata:
  name: semaphore-demo-lb
spec:
  selector:
    app: semaphore-demo-ruby-kubernetes
  type: LoadBalancer
  ports:
    - port: 80
      targetPort: 4567
The complete deployment file is then:
apiVersion: apps/v1
kind: Deployment
metadata:
  name: semaphore-demo-ruby-kubernetes
spec:
  replicas: 1
  selector:
    matchLabels:
      app: semaphore-demo-ruby-kubernetes
  template:
    metadata:
      labels:
        app: semaphore-demo-ruby-kubernetes
    spec:
      imagePullSecrets:
      - name: dockerhub
      containers:
      - name: semaphore-demo-ruby-kubernetes
        image: $DOCKER_USERNAME/semaphore-demo-ruby-kubernetes:$SEMAPHORE_WORKFLOW_ID

---

apiVersion: v1
kind: Service
metadata:
  name: semaphore-demo-ruby-kubernetes-lb
spec:
  selector:
    app: semaphore-demo-ruby-kubernetes
  type: LoadBalancer
  ports:
    - port: 80
      targetPort: 4567
You can verify that the Kubernetes configuration works as intended from your local machine by replacing $SEMAPHORE_WORKFLOW_ID with latest and running:
$ kubectl apply -f deployment.yml
$ kubectl get services
NAME         TYPE           CLUSTER-IP       EXTERNAL-IP      PORT(S)        AGE
semaphore-demo-ruby-kubernetes     LoadBalancer   10.245.117.152   68.183.249.106   80:30569/TCP   10s
...
Add the deployment manifest to GitHub:
$ git add deployment.yml
$ git commit -m "add Kubernetes manifest"
$ git push origin master
Define a Semaphore deployment pipeline
We’re entering the last stage of CI/CD configuration. At this point, we have a CI pipeline and a Docker build pipeline. We’re going to define a third pipeline to trigger manually from Docker build which will deploy to Kubernetes.
- Edit the Workflow
- Scroll right to the last block in the workflow and click on the Add Promotion button.
- Call the promotion “Deploy to Kubernetes”
- Click on the new pipeline. Set its name to “Deploy to Kubernetes”.
- Click on the first block on the new pipeline. Let’s call it “Deploy”.
- Under the Secrets section: check the dockerhub and do-k8s entries.
- Set the job name to “Deploy” and type the following commands:
checkout
kubectl get nodes
kubectl get pods
envsubst < deployment.yml | tee deployment.yml
kubectl apply -f deployment.yml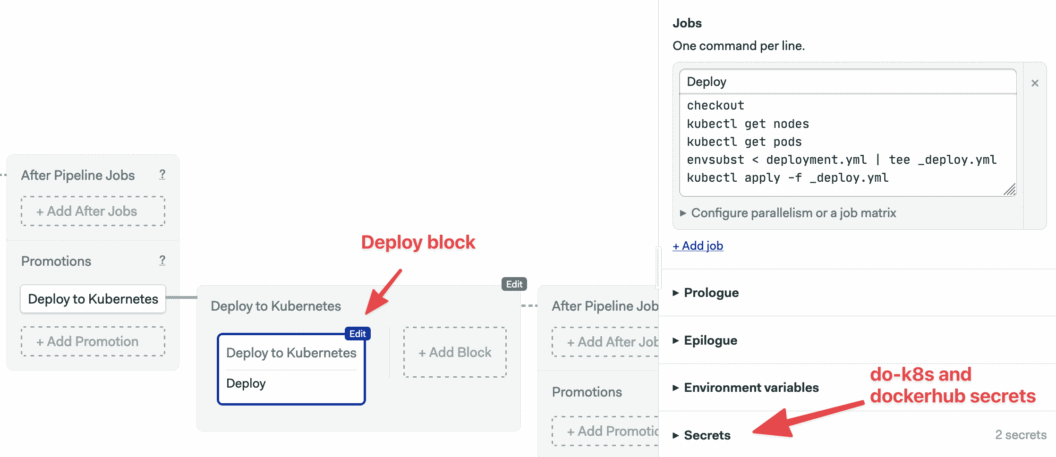
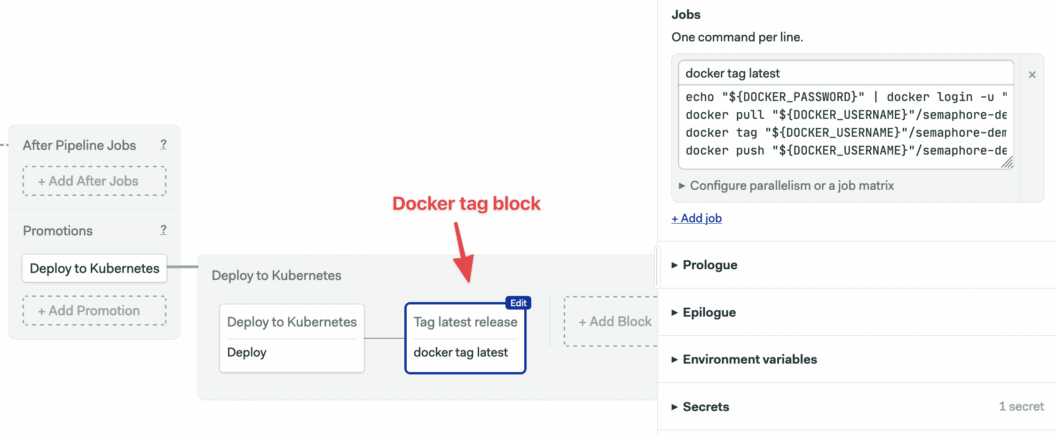
Add a second block to push the latest Docker image to the Docker Hub:
- Click on Add Block. Set its name to “Tag latest release”.
- Set the job name to “docker tag latest”.
- Under Secrets, check the dockerhub and do-k8s entries.
- Type the following commands in the job box:
echo "${DOCKER_PASSWORD}" | docker login -u "${DOCKER_USERNAME}" --password-stdin
docker pull "${DOCKER_USERNAME}"/semaphore-demo-ruby-kubernetes:$SEMAPHORE_WORKFLOW_ID
docker tag "${DOCKER_USERNAME}"/semaphore-demo-ruby-kubernetes:$SEMAPHORE_WORKFLOW_ID "${DOCKER_USERNAME}"/semaphore-demo-ruby-kubernetes:latest
docker push "${DOCKER_USERNAME}"/semaphore-demo-ruby-kubernetes:latest
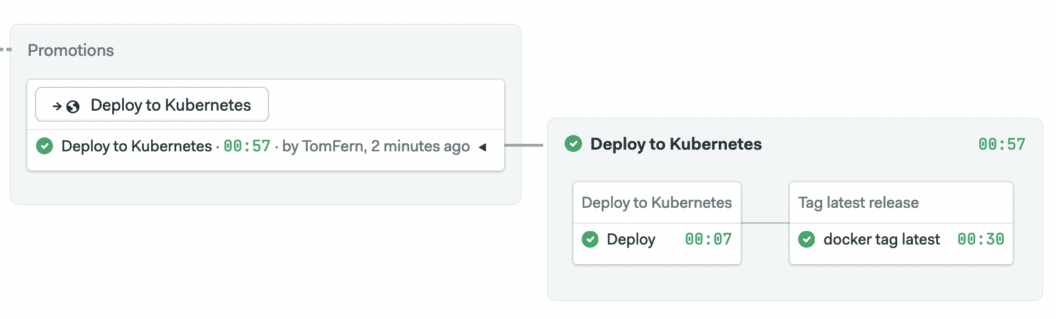
The deployment pipeline has two blocks: to apply a new Kubernetes configuration and to create a new version of our latest container image, which we’re treating like the master branch in Git (your practice may vary).
Once you click on Run workflow > Start, Semaphore runs the pipeline. Once the Docker build pipeline is completed successfully, click on the “Promote” button to trigger the deployment:
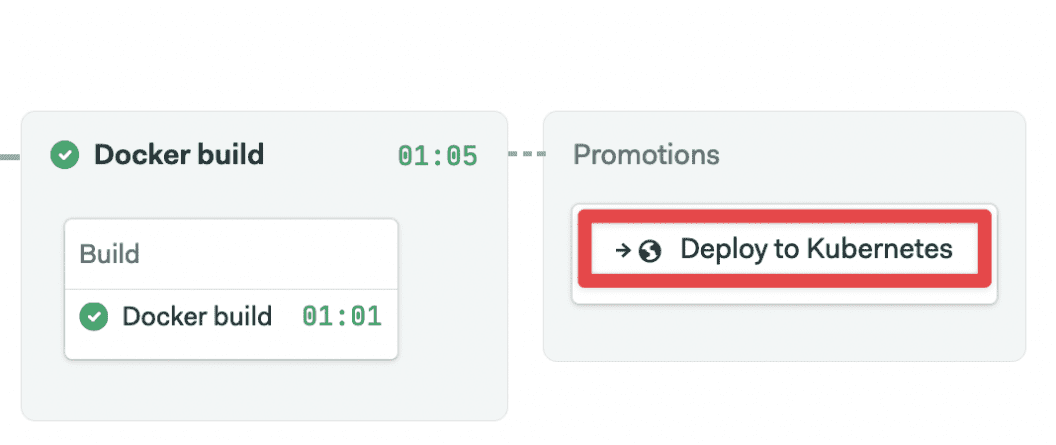
This should trigger the deployment pipeline:
You can now run kubectl get services to get see the load balancer service details. Alternatively, you can open the Load Balancers list on DigitalOcean > Networking tab section to find the public IP address of your microservice:
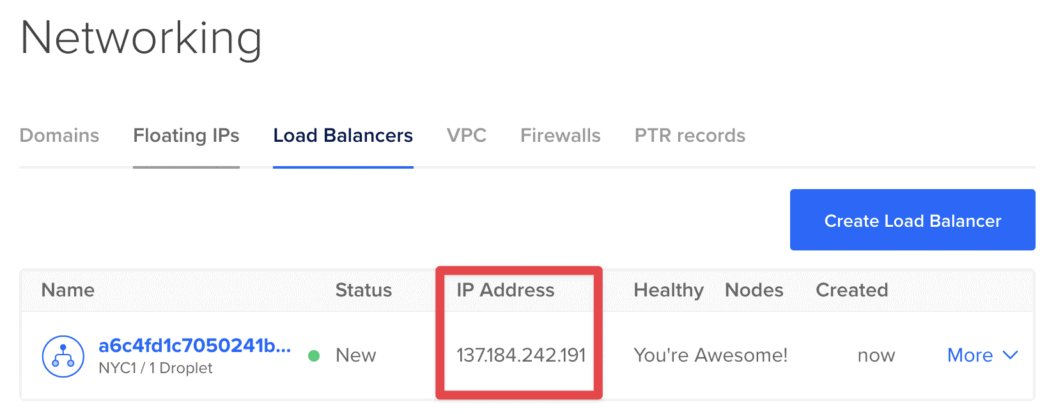
And test it out:
$ curl 137.184.242.191
hello world :))
Congratulations! You now have a fully automated continuous delivery pipeline to Kubernetes.
Deploy a demo app yourself
Feel free to fork the semaphore-demo-ruby-kubernetes repository and create a Semaphore project to deploy it on your Kubernetes instance.
Here are some ideas for potential changes you can make:
- Introduce a staging environment
- Build a Docker image first, and run tests inside it (requires a development version of Dockerfile since it’s best to avoid installing development and test dependencies when producing an image for production).
- Extend the project with more microservices.
- Try modifying the deployment pipeline to conduct canary deployments or blue-green deployments.
Happy building 🚀
This looks like just what I am looking for