I have learned during my career that productivity comes when you automate bulky and repetitive everyday tasks. For mobile developers, creating a new build and shipping it to the desired users is one of the most tedious items. CI/CD has been around for a long time now, but it is relatively new to the front-end world. Nevertheless, we have great tools available to help us automate tedious and time-consuming build & distribution processes. One of our previous posts focused on testing react-native apps, but now we take a more in-depth look at apps built with react native. So, we have set up a detailed tutorial for React Native (RN) developers to automate Build, Testing, and Distribution using Fastlane and Semaphore CI.
No time to read more? You can check out our sample app that has everything that we will cover!
TLDR; Intro to Fastlane
Fastlane is an open-source platform backed by Google developers, aimed at simplifying Android and iOS deployments. It lets you automate screenshot captures, beta distributions, code singing, and app stores releases. The vast range of community actions and plugins help you automate your processes faster.
Build iOS Apps Using Fastlane
Let us dive into the setup of Fastlane for iOS apps. The recommended way to install Fastlane is via Ruby Bundler for any OS. You also want to ensure you have the Xcode command-line tool installed. Here is a small bash script to help you install everything that is required on MacOS:
xcode-select --install
sudo gem install fastlane # Make sure ruby is already installed
Setting Up Fastlane
Now that you have Fastlane installed on your machine, it’s time to add it to your React Native app. Since Fastlane uses the XCode project for setup, you will execute the initialization command ios/ directory:
cd ios
fastlane init
Fastlane then asks you the purpose of the setup. To begin with, you can select “Automate beta distribution to TestFlight” – don’t worry as you will add additional lanes later on in this post.
Next it will ask you to enter the Apple developer account credential upon successful authentication. It will ask you to select the app store to connect the team for your app.
Once this is done, the iOS directory will have Fastlane & AppFile files in the Fastlane/ directory. AppFile here will have credentials of the app while the Fastlane file is where the magic happens. You can customize this file to brew more goodness.
Since you opted for the best distribution option at start, your Fastlane file will look as follows⬇️ :
platform :ios do
  desc "Push a new beta build to TestFlight" # Description to define following lane
  lane :beta do # `:<laneId>` this will be used via CLI to init lane
    # 🪄 this will increment build number of project to ensure smooth deliver
    increment_build_number(xcodeproj: "ReactNativeSemaphoreNew.xcodeproj")
    # 🏗️ Build app, this method has other options few we will explore in next section
    build_app(
      workspace: "ReactNativeSemaphoreNew.xcworkspace",
      scheme: "ReactNativeSemaphoreNew"
    )
    # ⏫ Its time to upload.
    upload_to_testflight
  end
end
Bingo, 🎉 you have added Fastlane to your app; Cheers 🥂 to writing exciting lanes.
Creating a Simple Build Task
You don’t want to upload every build to the app store, however. Let’s add a simple build task like this instead:
desc "Build"
desc "Build without code sign. Just to see if the build is working"
lane :build do |options|
  build_app(
    workspace: "./ios/ReactNativeSemaphoreNew.xcworkspace",
    scheme: "ReactNativeSemaphoreNew",
    skip_package_ipa: true,
    skip_archive: true,
    skip_codesigning: true,
    xcargs: "ONLY_ACTIVE_ARCH=YES", # since for this demo we skip_codesigning, the build will be done for a simulator, and since XCode 12, this means arm64, thus build failing. Semaphore is running on x86 chips.
    silent: true, # less logs
    clean: true # clean before build making sure no caching issues
  )
end
Now you can trigger the Fastlane build using:
bundle exec fastlane buildManaging app signing and secrets can be a little tough in the CI environment. Fortunately, we have the Semaphore Fastlane plugin to assist here. The Semaphore plugin creates a temporary keychain, sets match to read-only mode, and (optionally) redirects log output from scan and gym.
Now you can install the plugin from your app’s project directory:
fastlane add_plugin semaphoreThen from your Fastfile:
before_all do
  setup_semaphore
end
Uploading Your App
The above sample shows that app distribution is just a matter of a single line with Fastlane. For App Store and Google Play store distribution, Fastlane has actions readily available. Also, you can install several plugins available for the distribution of the app via different channels.
Using it with React Native
You now have Fastlane setup inside your ios/ directory, but as a React Native developer, this looks a little awkward to execute the task from the platform directory. Instead, you can have it at the root of your project and run it via NPM tasks.
Simple? Yes, it is. Just move the ios/Fastlane directory to the root of your project and add build tasks in scripts in package.json.
{
  ...
  "scripts": {
    ...
    "fastlane-build-ios": "bundle exec fastlane ios build",
  },
  ...
}
✅ Done!
The Fastlane build setup on your machine is complete. You can now add some really cool and useful plugins and actions to enhance your workflows.
Automating Build Using Semaphore CI
For every $1 invested in Semaphore, engineers gain $41 in reclaimed productivity. This might sound a little exaggerated, but as you try out different CI/CD platforms available, you will find it more and more realistic.
With robust infrastructure and a wide range of configured images that are tailor-made for most use cases. Semaphore can get your CI/CD implemented quickly and executed at blazing fast speed.
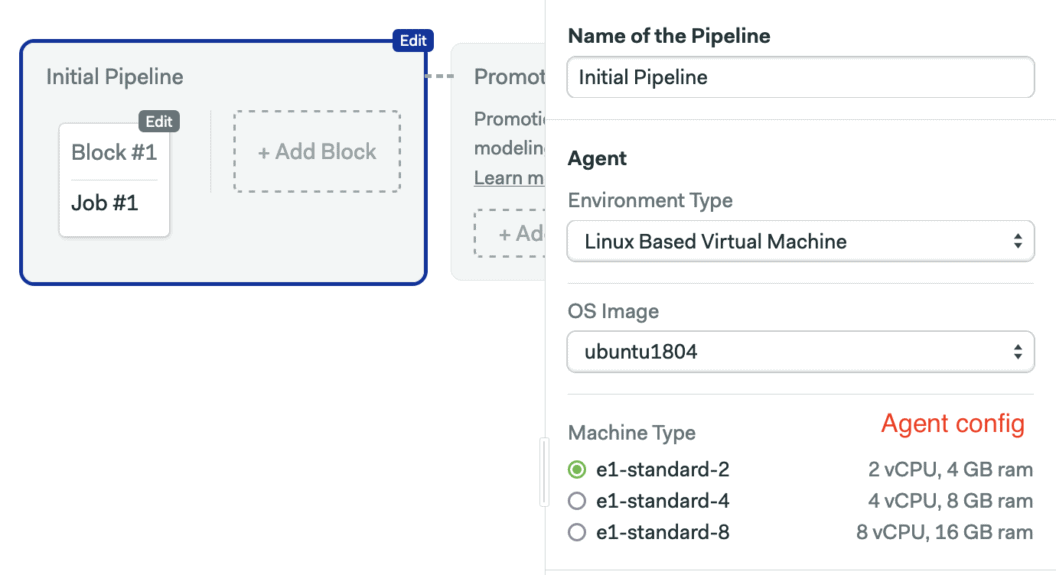
Setup the Semaphore App
Now that you have a Semaphore account, you can import our Github repository as a project in our organization.
If you never used Semaphore before, follow the Getting Started Guide that will walk you through all the initial steps and basic concepts.
Once the repository is imported into Semaphore, it’s time to set up your workflows. Semaphore CI offers out-of-the-box templates for several applications – including iOS with Fastlane. This can get you an excellent baseline to start with so you can edit this according to your needs. You can also opt for a custom file from the start.
Selecting a VM 🎰
Let’s define a VM to execute your CI/CD flow. Semaphore offers Apple VM with XCode 11 & XCode 12. We will use the macos-Xcode12 image that has several tools & utilities commonly used for CI/CD workflows. The macos-xcode12 is a customized image based on MacOS 11.5.1 optimized for CI/CD.
Defining Job Configs ⚙️
It’s time to add your blocks. In our last blog post, we looked into the top 4 parts of testing React Native apps:
- Linting
- Unit Tests
- Integration Tests
- E2E Tests
To get it all to happen In CI, you can break these into 3 blocks:
- Installing Dependencies
- Running Lint
- Executing Tests (including integration and unit tests)
NB: Semaphore has a neat feature that shows which test are running slow or failing, and which tests were skipped. Read more about Test Reports.
In this block, you will install dependencies for your app. Just a note: tools & utilities to run your app are already available in Semaphore images.
The Install Dependencies block code looks like this:
checkout
cache restore
npm install
cache store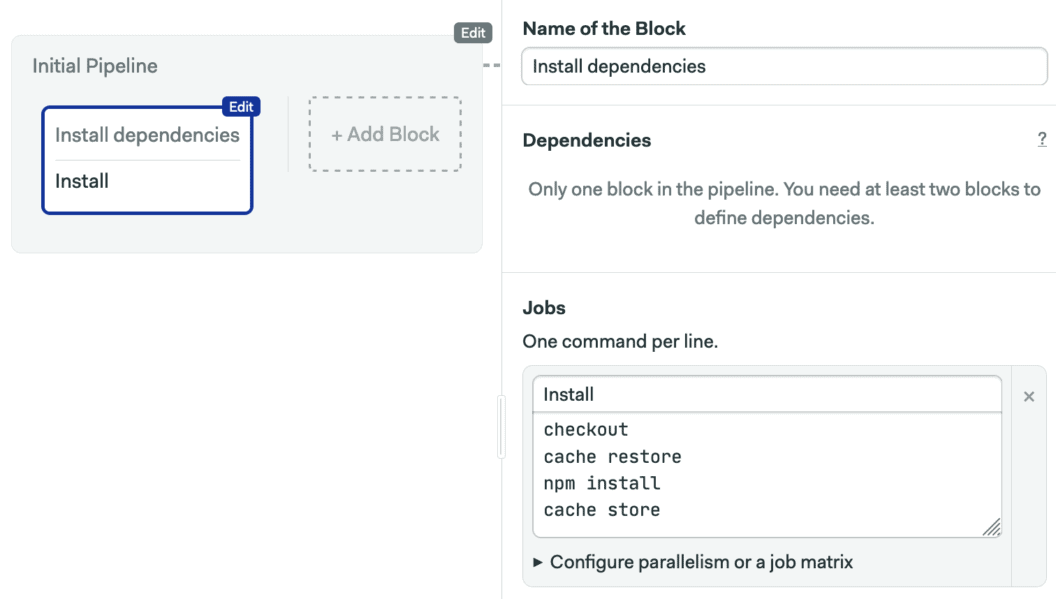
Linting the code
In general for all applications, especially for large-scale apps, the execution of tests gets more costly over time. Thus, it is best to plan so you can save time and ensure there aren’t any fundamental issues such as typos in your code.
For React Native apps, ESLint can be handy for such checkups. In this CI process, here is how the linting block looks:
checkout
cache restore
npm run lint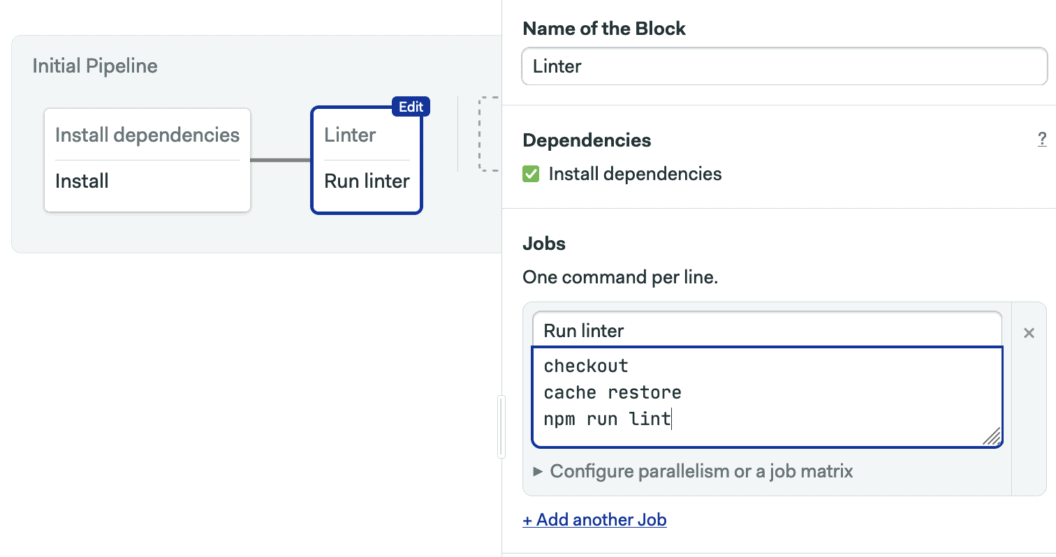
Executing Tests
It’s now time for some real buzz. We added two kinds of tests to our sample app.
First, unit & integration tests – written with Jest & RNTL – which require the JS environment to execute. Second, E2E tests using Detox requires a simulator to perform. Both of these suites can run independently, so you can execute them in parallel. This can save a reasonable amount of time.
Let’s define a block with multiple jobs and both will be executed in parallel.
The first job runs the unit tests:
checkout
cache restore
npm test
The second job in the block, the end to end tests:
cache
brew tap wix/brew
brew install applesimutils
cache restore
cd ios
pod install
cd ..
npm run detox-clean-and-build-cache
npm run detox-ios-build-release
npm run detox-ios-test-release
artifact push workflow ios/build/Build/Products/Release-iphonesimulator/ReactNativeSemaphoreNew.app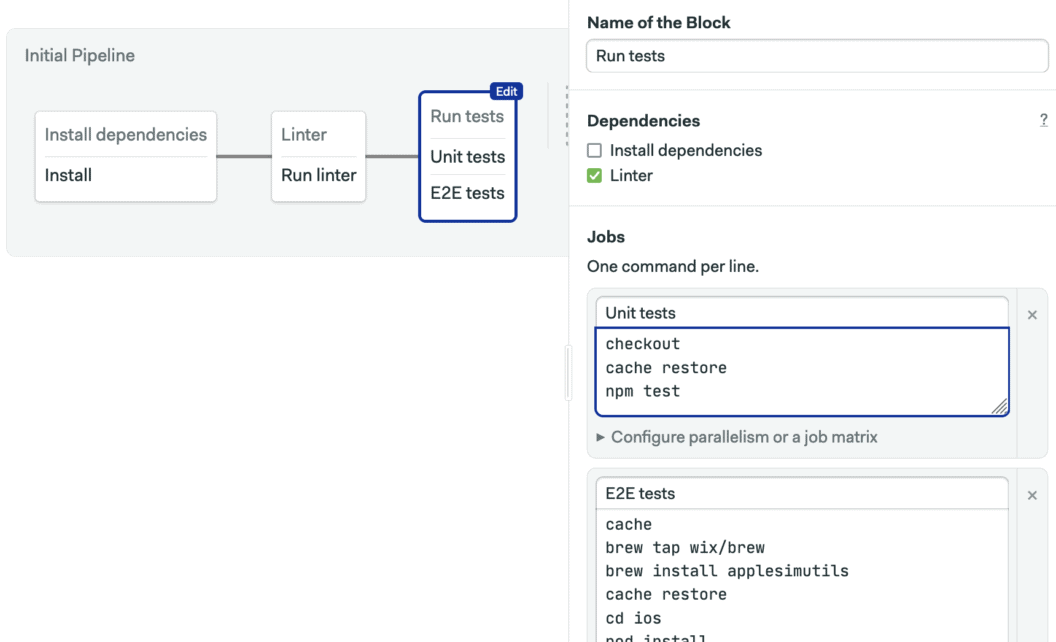
All set! If these blocks pass successfully, you can assure that your app doesn’t have bugs known to us. And, it is available for the next step in your release cycle.
Promotion – Continuous Deployment 🚀
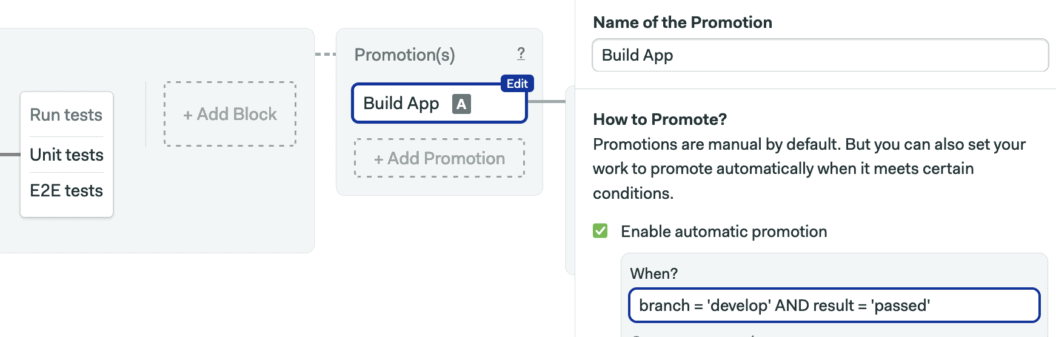
Naturally, we also hate tedious build upload tasks when done manually with Fastlane and Semaphore. Fortunately, it is easy to automate this process. With Semaphore, the distribution can be done via the promotion section to branch out your pipeline when certain conditions are met.
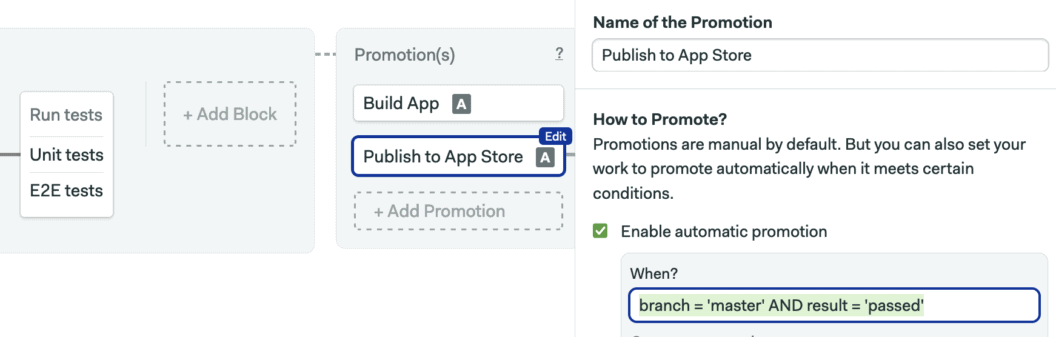
We have divided our distribution into two parts. For the develop branch, the build is made available via Semaphore. For the master, it is uploaded on App Store Test Flight.
Click on Add Promotion to create a new pipeline.
Create a second promotion for the production pipeline.
The first promotion simply builds the application on Semaphore. These are the commands:
checkout
cache restore
bundle exec fastlane build
Here is your sample promotion block:
checkout
cache restore
bundle exec fastlane beta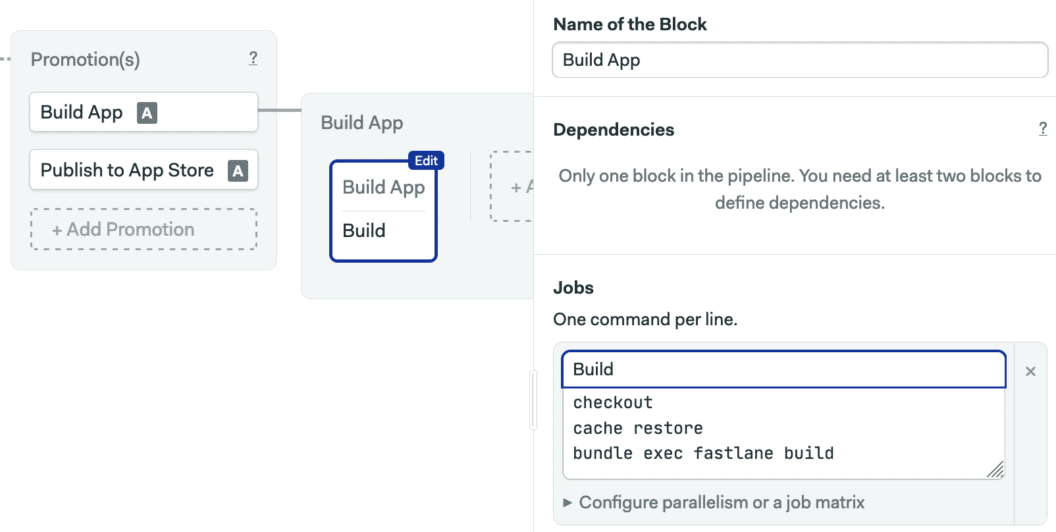
For App Store Test Flight distribution, if you have configured all your secrets via Fastlane, this will be very straightforward. If you haven’t, the CD section in this post describes it for you.
What’s Next?
If you wish to go beyond learning how to get apps built with react native, feel free to explore our rich library of CI/CD content and more. You can add more to make your workflows smooth and powerful like adding Slack notifications, using webhooks, updating a CHANGELOG file, or even creating GitHub releases. What’s more, you can use many other distribution channels like firebase for staging releases.
I hope this CI/CD integration will save you tons of time to allow you to do what matters most: focus on the next big thing you’re developing… or listen to our Podcasts – Semaphore Uncut.