In this article, we’ll learn about 7 tools that you can use to set up a rock-solid continuous integration (CI) process for your PHP project. Together, these tools increase code quality, reduce development time, easily reveal errors and will generally make your life easier.
We will learn how we can set up a Semaphore CI continuous integration pipeline for a PHP Laravel application.
The game plan is to set up various tests for our code, without having to provision or maintain any servers. Having a quick feedback cycle, we’ll be able to catch errors early and fix them before they grow.
Sounds good? Let’s get started.
Code analysis tests
Code analysis consists of scanning the source for certain structures that may point to deeper problems, such as design flaws and bad coding practices, usually called code smells.
Some code analysis tools focus on finding out bad patterns: functions with too many parameters, fat classes or too deeply nested structures. While others check for style: indentation rules, name conventions, etc.
Every analysis must start with some standard to follow. These rules are, at the end of the day, subjective but informed by previous experience. The rules can be generally configured and customized.
PHP Mess Detector
PHP Mess Detector (phpmd) checks for code smells: awkward, overcomplicated or unused code. It is inspired by the PMD project.
Phpmd ships with several rulesets than can be enabled or disabled independently.
Basic usage:
$ phpmd SOURCE_FILE_OR_DIR REPORT_FORMAT RULESETSBuilt-in rules are:
- cleancode: enforce clean code base rules.
- codesize: complexity rules, excessively long classes, etc.
- controversial: camelcase rules, globals, etc.
- design: forbid eval, goto, exit. Also coupling and depth rules.
- naming: long and short identifier names, method name rules.
- unusedcode: dead code and unused variables rules.
What does it look like?
$ phpmd src text cleancode,codesize,controversial,design,naming,unusedcode

ProvisionerCommand.php:38       The variable $myvar_id is not named in camelCase.
ProvisionerCommand.php:38       Avoid variables with short names like $io. Configured minimum length is 3.
PermissionsComponent.php:53     Avoid unused private methods such as 'checkAccount'.
PagesController.php:349         Avoid excessively long variable names like $view_registration_count. Keep variable name length under 20.
ProvisionersController.php:106  The method delete uses an else expression. Else is never necessary and you can simplify the code to work without else.
If you’ve never done any code analysis on your project before, it is likely to make you want to pull your hairs out. Don’t worry and be patient, once the code is in order your life will be easier.
Instead of setting the rules by command line, we can create an XML file that can be checked in source control:
$ phpmd src text myrules.xml<?xml version="1.0"?>
<ruleset name="Basic"
xmlns="http://pmd.sf.net/ruleset/1.0.0"
xmlns:xsi="http://www.w3.org/2001/XMLSchema-instance"
xsi:schemaLocation="http://pmd.sf.net/ruleset/1.0.0
http://pmd.sf.net/ruleset_xml_schema.xsd"
xsi:noNamespaceSchemaLocation="
http://pmd.sf.net/ruleset_xml_schema.xsd">
<description>
First basic ruleset for code analysis...
</description>
<!-- Import all rule sets -->
<rule ref="rulesets/cleancode.xml" />
<rule ref="rulesets/codesize.xml" />
<rule ref="rulesets/controversial.xml" />
<rule ref="rulesets/design.xml" />
<rule ref="rulesets/naming.xml">
<exclude name="ShortVariable" />
<exclude name="LongVariable" />
</rule>
</ruleset>PHP Code Sniffer
PHP Code sniffer (phpcs) is a style checker. If you’ve ever used a linter (jshint, pylint, checkstyle, etc) you already know what it does. Phpcs can check for indentation, missing comments, naming conventions, etc.
PHP Code sniffer ships with various popular PHP styles such as PEAR, PSR2, and Zend among others. We can also make our own rules or mix and match checks from existing ones.
The typical invocation goes:
$ phpcs FILE_OR_DIR --standard=STANDARD_NAME$ phpcs FILE_OR_DIR --report-full --standard=PEAR
FILE: app/Providers/RouteServiceProvider.php
-----------------------------------------------------------------------------------------------------
FOUND 7 ERRORS AFFECTING 7 LINES
-----------------------------------------------------------------------------------------------------
2 | ERROR | [ ] Missing file doc comment
8 | ERROR | [ ] Missing doc comment for class RouteServiceProvider
55 | ERROR | [x] Object operator not indented correctly; expected 12 spaces but found 13
56 | ERROR | [x] Object operator not indented correctly; expected 12 spaces but found 13
69 | ERROR | [x] Object operator not indented correctly; expected 12 spaces but found 13
70 | ERROR | [x] Object operator not indented correctly; expected 12 spaces but found 13
71 | ERROR | [x] Object operator not indented correctly; expected 12 spaces but found 13
-----------------------------------------------------------------------------------------------------
PHPCBF CAN FIX THE 5 MARKED SNIFF VIOLATIONS AUTOMATICALLY
-----------------------------------------------------------------------------------------------------PHP Code Sniffer also includes phpcbf, a program then can automatically fix some problems.
$ phpcbf FILE_OR_DIR --report-full --standard=PEAR

PHPCBF RESULT SUMMARY
-------------------------------------------------------------------
FILE                                               FIXED  REMAINING
-------------------------------------------------------------------
app/Providers/RouteServiceProvider.php               5      2
app/Providers/BroadcastServiceProvider.php           3      5
app/Http/Middleware/Authenticate.php                 1      4
app/Http/Middleware/RedirectIfAuthenticated.php      3      6
app/Http/Controllers/UserController.php              10     20
app/Http/Controllers/Auth/RegisterController.php     8      9
app/Services/UserService.php                         9      22
app/Exceptions/Handler.php                           3      7
app/Console/Kernel.php                               2      4
-------------------------------------------------------------------
A TOTAL OF 44 ERRORS WERE FIXED IN 9 FILES
-------------------------------------------------------------------

Time: 201ms; Memory: 8MB
PHP Copy Paste Detector
PHP Copy Paste Detector (phpcpd) does what it says on the tin: finds duplicate code inside your project.
Having duplicate code usually signals the need for refactoring, the repeated parts should find a new home in a shared library or component. Duplicates also force developers to make shotgun surgery: a single change must be repeated multiple times.
Basic usage:
$ phpcpd FILE_OR_DIRWe can tell phpcpd how many lines must be repeated to be considered an error:
$ phpcpd src --min-lines=40

phpcpd 4.1.0 by Sebastian Bergmann.

Found 1 clones with 45 duplicated lines in 2 files:

  - src/Controller/PagesController.php:32-77 (45 lines)
    src/Controller/Component/PermissionsComponent.php:9-54

1.14% duplicated lines out of 3950 total lines of code.
Average size of duplication is 45 lines, largest clone has 45 of lines

Time: 39 ms, Memory: 6.00MB
Unit testing: PHPUnit
Unit testing ensures that our implementation does what it has been designed to do. Units are the smallest testable pieces of code, for instance: a class method, a function, or an API call.
Unit tests also act as a form of living documentation, by reading what they do we can infer how the tested parts should work, what inputs do they take and what outputs should them provide. And validate that code still valid after refactoring.
As new code is being written, we should also be creating tests to validate its behavior.
We’ll be using phpunit, the most popular testing framework for PHP, to drive our test cases. Fortunately, Semaphore has a great resource to get you started:
After our tests are in place, we call phpunit to get an error report:
$ phpunit

PHPUnit 7.5.2 by Sebastian Bergmann and contributors.

..F.                                                                4 / 4 (100%)

Time: 1.04 seconds, Memory: 18.00MB

There was 1 failure:

1) Tests\Unit\UserServiceTest::testItCanUpdateUser
Failed asserting that two strings are equal.
--- Expected
+++ Actual
@@ @@
-'updated name'
+'updatedx name'

tests/Unit/UserServiceTest.php:45

FAILURES!
Tests: 4, Assertions: 8, Failures: 1.
Browser tests: Laravel Dusk
PHPUnit’s biggest problem is its inability to test javascript on the frontend. Dusk is a browser automation tool that overcomes this limitation by testing the application on an actual browser.
Dusk interfaces with a real Chrome browser to programmatically browse sites, perform actions, select elements and do assertions.
In order to test with Dusk, we need to start our application with Laravel’s artisan tool:
$ php artisan serve &
$ php artisan dusk

PHPUnit 7.5.2 by Sebastian Bergmann and contributors.

F..                                                                 3 / 3 (100%)

Time: 11.34 seconds, Memory: 20.00MB

There was 1 failure:

1) Tests\Browser\LoginTest::testUserCanLogIn
Did not see expected text [Welcome, Test Account] within element [body].
Failed asserting that false is true.

vendor/laravel/dusk/src/Concerns/MakesAssertions.php:173
vendor/laravel/dusk/src/Concerns/MakesAssertions.php:144
tests/Browser/LoginTest.php:33
vendor/laravel/dusk/src/Concerns/ProvidesBrowser.php:67
tests/Browser/LoginTest.php:34

FAILURES!
Tests: 3, Assertions: 4, Failures: 1.
Security tests: Sensiolabs
With SensioLabs security checker, we can scan our project dependencies for known vulnerabilities. It scans our composer file for dependencies and runs them down through a vulnerabilities database:
$ php security-checker security:check ../composer.lock

Symfony Security Check Report
=============================

No packages have known vulnerabilities.
Running Continuous Integration with Semaphore
Continuous Integration (CI) is all about testing early and often.
We can set up a CI pipeline to build the application on every push. The pipeline can drive the tests and optionally deploy the application.
Semaphore is a cloud-hosted continuous integration and delivery service. It’s easy to use, really fast and there is no need to install any software, manage any servers or maintain any systems. Semaphore fully supports Linux and macOS applications. The best thing is we can set up the whole process from a single config file.
Getting started with Semaphore is a breeze: first, create an account on semaphoreci.com We can log in with our GitHub account and Semaphore will have access to the repositories. If you don’t have any repositories you may fork Semaphore’s PHP Laravel Demo.
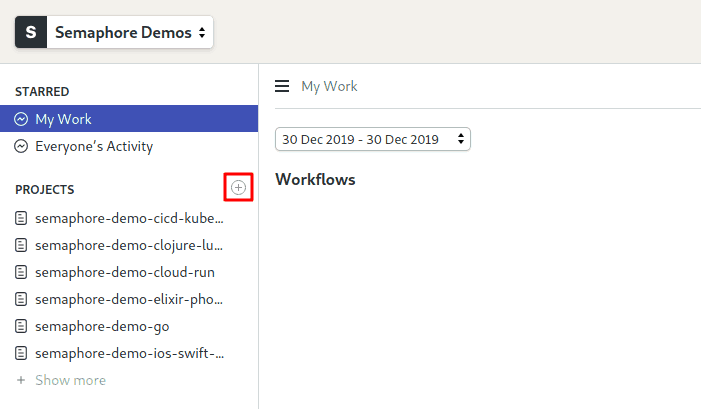
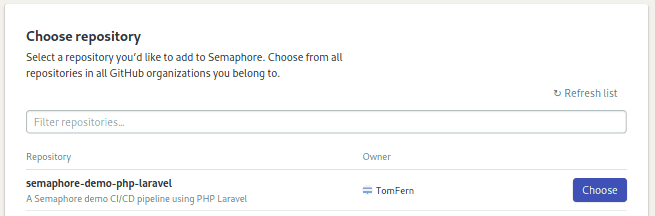
To create a project click on the + (plus sign) next to Projects. Semaphore will show a list of our GitHub repos.
Click on the Choose button next to the repository to get started.
Alternatively, we create our project with the command-line tool. To install it, click on the little cursor icon on the upper right side. Open the Install sem CLI & Connect section and copy/paste the commands on your machine:
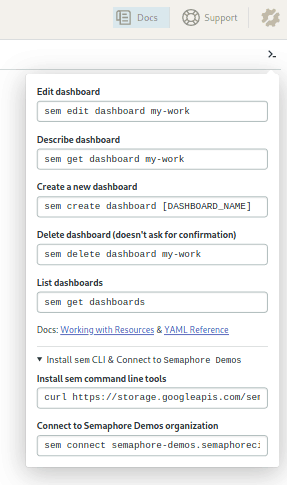
$ curl https://storage.googleapis.com/sem-cli-releases/get.sh | bash
$ sem connect YOUR_ACCOUNT_NAME.semaphoreci.com SECRET
Once connected, cd into the local copy of your project and:
$ sem initThe demo has a ready-to-use CI/CD pipeline to get you started. After making a push we should see the pipeline running in our dashboard.
$ touch any_file
$ git add any_file
$ git commit -m "add Semaphore CI/CD"
$ git push origin master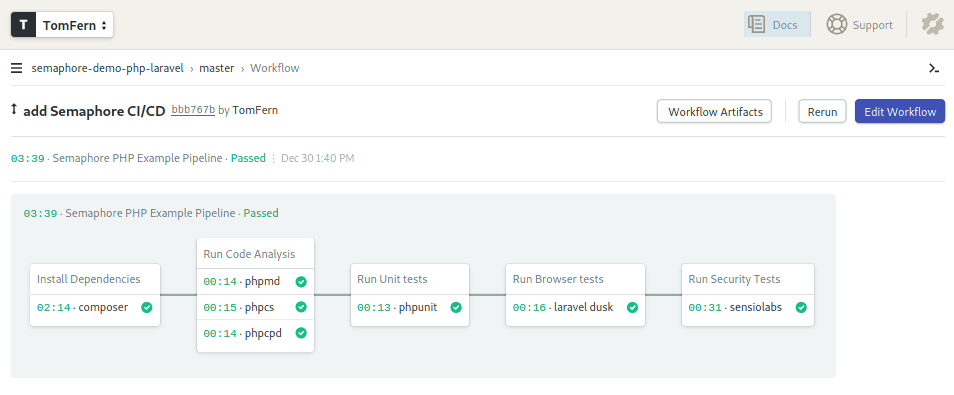
The Semaphore Pipeline
Click on the Edit Workflow button on the top right corner of the pipeline view.
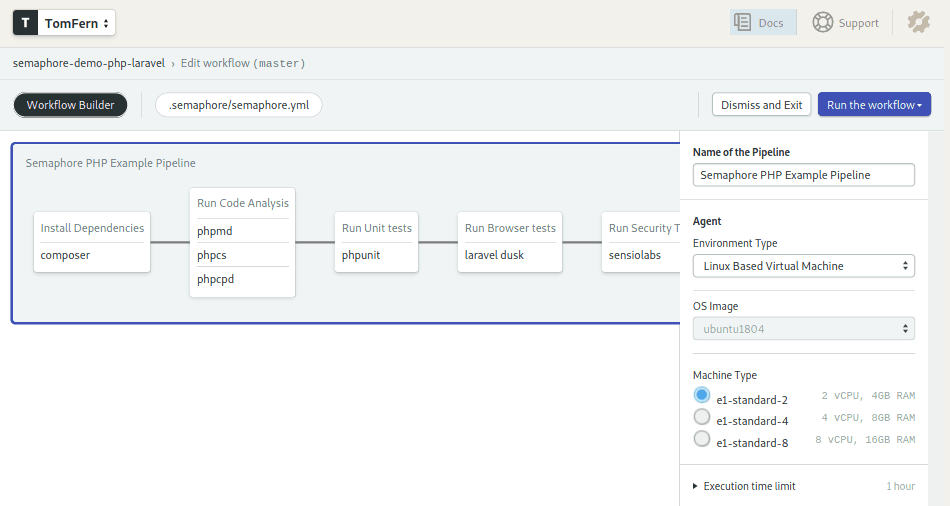
Let us walk through the CI pipeline which includes all the tools we have discussed so far.
Name of the Pipeline: The optional pipeline name.
Agent: The agent is the environment in which our code will run, which consists of a virtual machine and an operating system. The Machine Type sets the virtual machine type to be provisioned and OS Image its operating system. Semaphore automatically provisions machines on demand.
Here we’re using e1-standard-2 machine (2 vCPUs, 4GB, 25GB disk) paired with an Ubuntu 18.04 LTS image.
Blocks and Jobs: Are the heart of the pipeline. A pipeline is made of a series of blocks. Blocks can have one or more jobs. Jobs are a list of commands to execute.
Blocks are started sequentially, one after the other. Within a block, jobs are executed in parallel. Each block only starts after all the jobs on the previous blocks have finished.
Block 1: Install Dependencies
First things first, we need to install all our dependencies or we won’t get anywhere.
Semaphore’s Ubuntu image includes php, composer and npm to manage packages.
Let’s see how the first block looks:
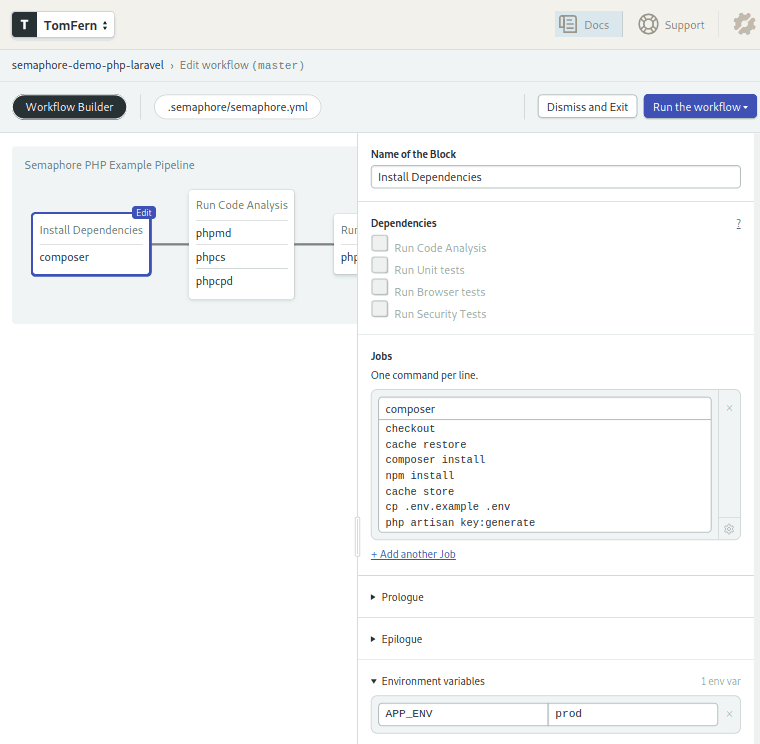
Lots of things are happening here:
- The env variable
APP_ENVis set to “prod”, this is applied to all jobs on the task. - The code is cloned from our GitHub repo with checkout.
composer installandnpm installmanages the PHP and Javascript dependencies installs.- Cache stores intermediary files in a project-level cache. We need the cache to store and retrieve files between job executions. The cache tool automatically determines which files to save.
Block 2: Code analysis
The second block runs all our code analysis.
Since the tools don’t actually execute our application, we can run all of them in parallel and save us some precious time.
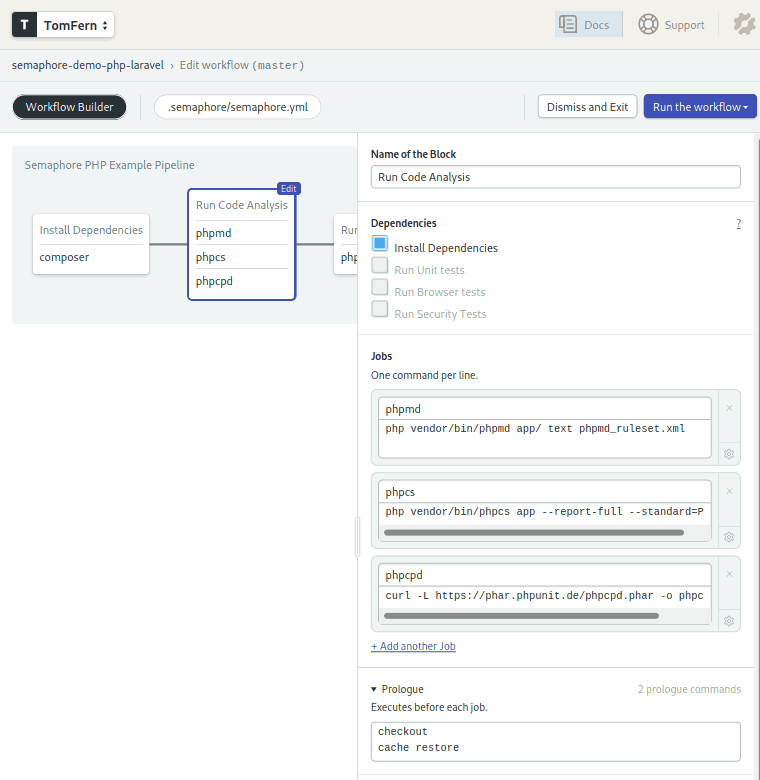
We’re taking advantage of the prologue feature. Commands in the prologue and epilogue are executed before and after each job, respectively.
We have a job for each tool: phpmd, phpcs and phpcpd. The first two were installed by composer in the first block, whereas phpcd is downloaded from the website directly.
Unit tests
The fourth block executes the unit tests:
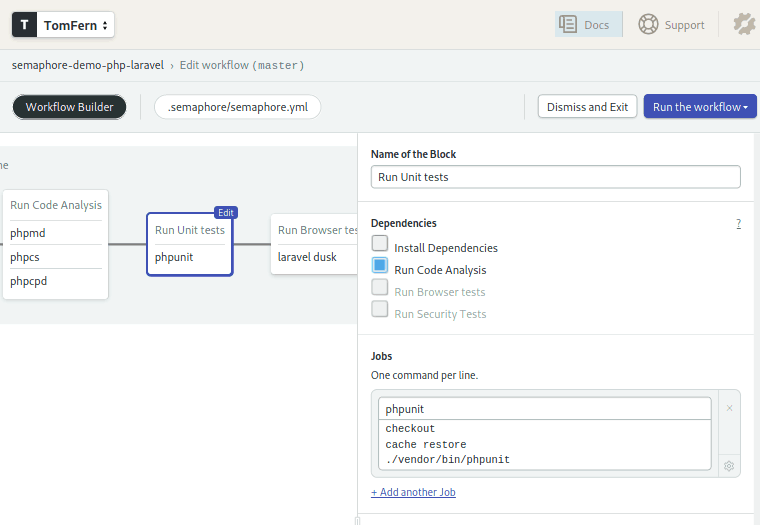
Nothing new here. Do you see the pattern? checkout to get the code and cache restore to get the dependencies. Then, execute the tests.
Browser tests
We’ll continue our round of tests with Laravel dusk:
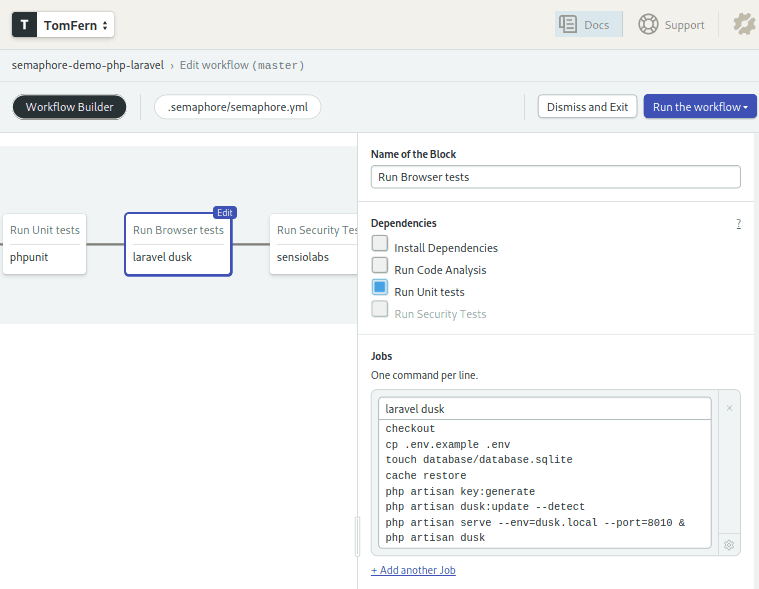
This job is a bit longer because we need to set up a few things beforehand.
Our application uses a database, Semaphore supports many database services out of the box, so we could choose to use one of them. However, to keep things simple, we can get away with an sqlite DB, so lets do that.
We use php artisan serve to start the application and the browser testing is done with php artisan dusk
Did you notice that we didn’t install any browsers? That’s because Semaphore’s OS images already include several browsers, Google Chrome among them.
Security Tests
And for the final round of tests we’ll do a quick security checkup using sensiolabs:
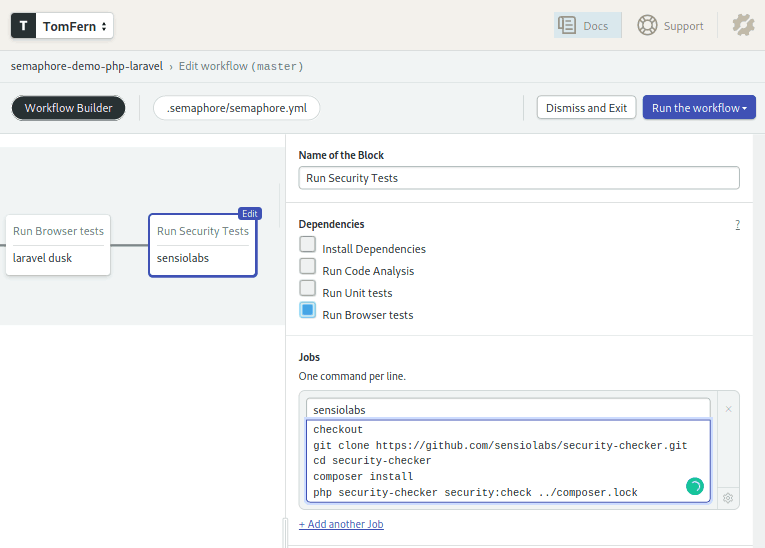
You know the drill by now, checkout then cache restore. Then we clone the security checker code, install additional dependencies, and run the security test.
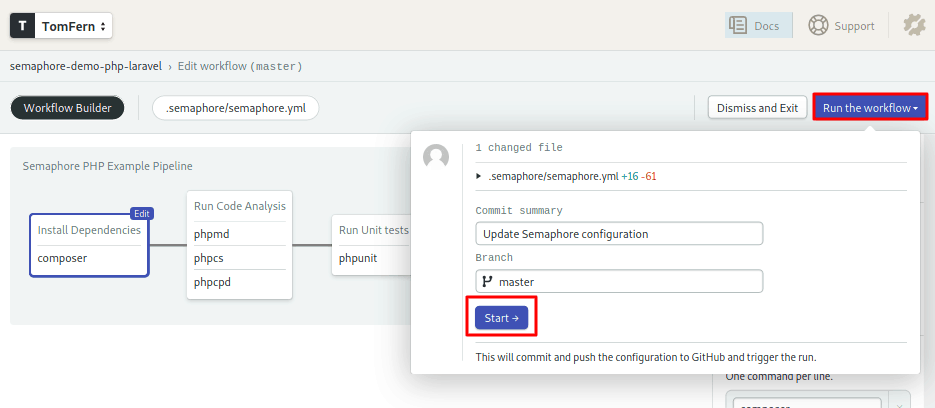
Let the code flow
Click on the Run the workflow and the Start buttons to run the CI pipeline.
Semaphore will run the workflow on every push to the GitHub repository.
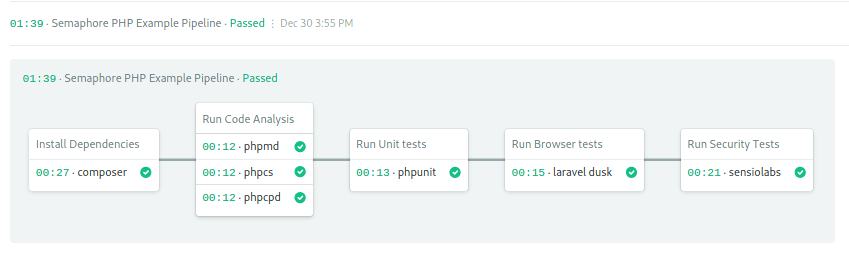
We can click on any individual job to read its log.
If any job fails to run, we can easily hop into its session to snoop around. Click on the debug button on the upper right side of the job’s log.

Semaphore gives us a command to SSH into a job session:
$ sem debug job UUIDSemaphore also has Test Reports that allow you to see which tests are skipped or failing, and which tests are the slowest ones in your test suite. Read more about Test Reports.
Wrap up
With great continuous integration tools for PHP working well together, we can focus on our code with a peace of mind that code quality is ensured.
With a few clicks and lines of code, we’ve come a long way. And we’re just scratching the surface on what Semaphore can do.
Additional resources: