Mocking and stubbing are the cornerstones of having quick and simple unit tests. Mocks are useful if you have a dependency on an external system, file reading takes too long, the database connection is unreliable, or if you don’t want to send an email after every test.
Unlike with integration or functional tests, where the real system is being tested as a whole, unit tests should focus on a single class. Everything else should be either a simple class or a mock. Mockito now seems to be the dominant Mocking framework in Java, and is now in its second version. Spock is also a great solution that we will explore in a future article.
We will cover:
- Downloading and setting up of Mockito — the most popular Java framework for mocking/stubbing,
- Some brief theory on when and why you want to use Mockito,
- Stubbing return data from methods,
- Verifying interactions,
- Using argument captors, and
- Returning custom mocked responses.
Despite the version number, Mockito is mostly the same as Mockito 1, as far as the external API is concerned. If you have any existing Mockito tests, you may need to change some imports. However, other than that, upgrading to Mockito should be easy regardless of your code size.
Prerequisites
It is assumed that you already have a Java project and you want to write unit tests for it. We will need:
- A sample Java project constructed in a well-disciplined manner, i.e. using Dependency Injection,
- A valid
pom.xmlfile that builds the project, - Maven installed—the command
mvnshould be available in your command line, and - Internet access to download Maven dependencies.
Mockito is commonly used with JUnit. Therefore, familiarity with JUnit is essential. It is also assumed that we already know our way around basic Maven builds. If not, then feel free to consult its official documentation first.
Setting Up Mockito
Mockito is already distributed via Maven central, so using it in a Java forward is a painless process. We need to modify the pom.xml:
    <dependencies>
		<dependency>
			<groupId>junit</groupId>
			<artifactId>junit</artifactId>
			<version>4.12</version>
			<scope>test</scope>
		</dependency>
		<dependency>
			<groupId>org.mockito</groupId>
			<artifactId>mockito-core</artifactId>
			<version>3.2.4</version>
			<scope>test</scope>
		</dependency>
   </dependencies>
Mockito offers two equivalent ways of mocking:
- Using static methods and
- Using @Mock annotations.
All the examples in this article use static methods. Feel free to use annotations instead, but make sure that you agree on a single solution with the rest of your team, so that unit tests are written in a common format.
Quick Crash Course on Mocking and Stubbing
The theory behind mocking and stubbing is so vast that it would need an entire book on its own. This tutorial will summarize the basics of it.
Semaphore also provides tutorials for mocking in other languages if your interests go beyond Java:
The Position of Unit Tests in the Testing Pyramid
Even after all these years, we still don’t have common terminology for unit tests. Just to make things clear, we’ll define unit tests as the tests that sit at the bottom of the testing pyramid.
These tests:
- examine a single class,
- require just the source code of the application, instead of a running instance,
- are fast,
- are not affected by external systems, e.g. web services or databases, and
- perform little or no I/O, e.g. no real database connections.
These tests are the mainstay of your whole test suite and should comprise the bulk number of all your tests. In this article, we talk about these tests exclusively. Some developers confuse unit tests with the second layer of the testing pyramid which is called integration tests, or service tests, or system tests, or functional tests.
This distinction is important. A test that writes to a database or reads JSON from a web service is NOT a unit test. It can become a unit test if you mock that external web service. Unit tests and integration tests should also be handled differently, as we have already seen in the previous tutorial.
The Need for Mocks and Stubs
Mocking is the act of removing external dependencies from a unit test in order to create a controlled environment around it. Typically, we mock all other classes that interact with the class that we want to test. Common targets for mocking are:
- Database connections,
- Web services,
- Classes that are slow,
- Classes with side effects, and
- Classes with non-deterministic behavior.
For example, think of a Java class that communicates with an external payment provider, e.g. Paypal. There is no need to actually connect to the payment provider each time the unit test runs. It would be dangerous to test code that charges credit cards using a live payment environment. It would also make the unit test non-deterministic, e.g. if the payment provider is down for some reason.
Mocks and stubs are fake Java classes that replace these external dependencies. These fake classes are then instructed before the test starts to behave as you expect. More specifically:
- A stub is a fake class that comes with preprogrammed return values. It’s injected into the class under test to give you absolute control over what’s being tested as input. A typical stub is a database connection that allows you to mimic any scenario without having a real database.
- A mock is a fake class that can be examined after the test is finished for its interactions with the class under test. For example, you can ask it whether a method was called or how many times it was called. Typical mocks are classes with side effects that need to be examined, e.g. a class that sends emails or sends data to another external service.
Notice that, even though stubbing and mocking are two different things, Mockito uses “mocks” for everything so we will follow the same terminology in the sample source code.
Basic Stubbing with Mockito
In our example application, we have a class that reads a customer from the database and forms their full name.
Here is the code for the customer:
    @Entity
	public class Customer {

		@Id
		@GeneratedValue(strategy = GenerationType.AUTO)
		private long id;

		private String firstName;

		private String lastName;

		//...getters and setters redacted for brevity...

	}
and here is our business class:
	public class CustomerReader {

		@PersistenceContext
		private EntityManager entityManager;

		public String findFullName(Long customerID){
			Customer customer = entityManager.find(Customer.class, customerID);
			return customer.getFirstName() +" "+customer.getLastName();
		}

	}
This class reads customers from the database via the EntityManager. So, how do we test this class?
A naive solution would be to pre-fill a real database with customers and run this test against it. This is problematic for a lot of reasons. It creates a hard dependency on a running database, and also requires an extra step to create the test data. For this example, you could make it work, but in a real-world application, this would not be practical at all.
A better solution would be to use an in-memory database. This would solve the speed problem, but it would suffer from the extra step of pre-filling the database with custom test data. Again, in a real-world application, this can get quickly out of hand, especially when multiple tests also change the initial state of the database.
The best solution for a true unit test is to completely remove the database dependency. We will stub the database connection instead, and “fool” our class to think that it is talking to a real EntityManager, while in reality, the EntityManager is a Mockito stub. This way, we have complete control over what is returned by the database connection without having to deal with an actual database.
Here is the respective unit test:
	public class CustomerReaderTest {

		@Test
		public void happyPathScenario(){
			Customer sampleCustomer = new Customer();
			sampleCustomer.setFirstName("Susan");
			sampleCustomer.setLastName("Ivanova");

			EntityManager entityManager = mock(EntityManager.class);
			when(entityManager.find(Customer.class,1L)).thenReturn(sampleCustomer);

			CustomerReader customerReader = new CustomerReader();
			customerReader.setEntityManager(entityManager);

			String fullName = customerReader.findFullName(1L);
			assertEquals("Susan Ivanova",fullName);
		}
	}
First, we create a sample customer. We use the real class as this is very simple and fast, a POJO actually, so no need to mock it.
Then, we mock the Entity Manager. This happens with the mock() static call. Using an annotation would also work.
The most important line of the whole test is the next one. This defines what will happen when somebody calls the find() method of the entityManager. We set it up so that our sample customer is returned, i.e. if 1 is passed as a database ID.
Finally, we create our class under test CustomerReader and pass it our own mocked Entity Manager as a dependency. For this particular example, we have added a new setter method to follow setter injection, but this would work with constructor injection as well.
From that point on, our class under test does not really know that the Entity Manager is fake. It will just call its method and get the sample Customer unaware that Mockito is behind everything.
This test satisfies all requirements outlined in the previous section. It has no external dependencies, it only needs the Java source code, it is very fast and it is completely deterministic. We did not need a database at all.
The When-Then Mantra
Using simple stubbing directives when(something).thenReturn(somethingElse) will get you a long way in your unit tests. Depending on your application, this might be the only Mockito feature you will ever need.
If you have multiple test methods, it makes sense to move the mock creation process to a single place and only differentiate its behavior for each individual test.
You might have already noticed that our CustomerReader class is not correct, as it does not handle the null case, i.e. the given database ID does not exist as an object in the DB. While we could copy-paste the existing unit test, it is best if we organize the code with a common test method.
	public class CustomerReaderTest {

		//Class to be tested
		private CustomerReader customerReader;

		//Dependencies
		private EntityManager entityManager;


		@Before
		public void setup(){
			customerReader = new CustomerReader();

			entityManager = mock(EntityManager.class);
			customerReader.setEntityManager(entityManager);
		}

		@Test
		public void happyPathScenario(){
			Customer sampleCustomer = new Customer();
			sampleCustomer.setFirstName("Susan");
			sampleCustomer.setLastName("Ivanova");

			when(entityManager.find(Customer.class,1L)).thenReturn(sampleCustomer);

			String fullName = customerReader.findFullName(1L);
			assertEquals("Susan Ivanova",fullName);
		}

		@Test
		public void customerNotPresentInDb(){
			when(entityManager.find(Customer.class,1L)).thenReturn(null);

			String fullName = customerReader.findFullName(1L);
			assertEquals("",fullName);
		}
	}
Here, we have extracted the common code of creating our test class and its mocked dependencies into the setup method. The Before annotation will make this initialization code run for each test method.
The only thing that differs between each test method is the when directive. In the second case, we make the fake database return null to emulate a customer that does not exist in the Database.
In true TDD, fashion we have created the unit tests before the actual implementation. If you run our unit test, the second test method will fail.
As an exercise, feel free to correct the CustomerReader implementation and also add extra unit tests when the first and/or last name are null themselves.
As you are adding more tests, it will be obvious that not having to deal with a real database allows you to iterate faster on each subsequent implementation feature.
Basic Mocking with Mockito
Let’s see a case where a mock is needed instead of a stub, assuming that we want to test the following class in the same application:
	public class LateInvoiceNotifier {

		private final EmailSender emailSender;
		private final InvoiceStorage invoiceStorage;

		public LateInvoiceNotifier(final EmailSender emailSender, final InvoiceStorage invoiceStorage){
			this.emailSender = emailSender;
			this.invoiceStorage = invoiceStorage;
		}

		public void notifyIfLate(Customer customer)
		{
			if(invoiceStorage.hasOutstandingInvoice(customer)){
				emailSender.sendEmail(customer);
			}
		}
	}
This class has two external dependencies, and we use constructor injection this time around. It checks for late invoices of customers and sends them an email if an invoice is late.
In a real system, the InvoiceStorage class is actually a web service that connects with an external legacy CRM system which is slow. A unit test could never make use of such a web service.
The EmailSender class is also an external system from a third-party mass email provider. So, we will mock it as well.
However, as soon as you try to write a unit test for this class, you will notice that nothing can really be asserted. The method that we want to test – notifyIfLate – is a void method that cannot return anything. So how do we test it?
In this case, we need to focus on the side effects of the code. The side effect here is sending an email. This email is sent only if an outstanding invoice is present. Mockito provides the verify family of directives for testing side-effects. Here is the whole unit test:
	public class LateInvoiceNotifierTest {

		//Class to be tested
		private LateInvoiceNotifier lateInvoiceNotifier;

		//Dependencies (will be mocked)
		private EmailSender emailSender;
		private InvoiceStorage invoiceStorage;

		//Test data
		private Customer sampleCustomer;


		@Before
		public void setup(){
			invoiceStorage = mock(InvoiceStorage.class);
			emailSender = mock(EmailSender.class);

			lateInvoiceNotifier = new LateInvoiceNotifier(emailSender,invoiceStorage);

			sampleCustomer = new Customer();
			sampleCustomer.setFirstName("Susan");
			sampleCustomer.setLastName("Ivanova");
		}

		@Test
		public void lateInvoice(){
			when(invoiceStorage.hasOutstandingInvoice(sampleCustomer)).thenReturn(true);

			lateInvoiceNotifier.notifyIfLate(sampleCustomer);

			verify(emailSender).sendEmail(sampleCustomer);
		}

		@Test
		public void noLateInvoicePresent(){
			when(invoiceStorage.hasOutstandingInvoice(sampleCustomer)).thenReturn(false);

			lateInvoiceNotifier.notifyIfLate(sampleCustomer);

			verify(emailSender, times(0)).sendEmail(sampleCustomer);
		}

	}
As before, we stub the InvoiceStorage class using the when/then syntax. For the first test, we assume the customer has an outstanding invoice. For the second test, no late invoice is present.
Both tests do not contain the normal JUnit assert statements. Instead, we use the verify directive which examines the mocks after each run and passes the test if a method was called with the specified argument. For the second test, we want to make sure that the email method is NOT called. Therefore, we also add the times argument to restrict the number of times this method was (not) called. If times is omitted it is assumed to be 1, which is what we do in the first test.
Notice that mocks can still be stubbed if needed. You can think of mocks as a superset of stubs and this is why Mockito calls both of them “mocks”.
Verifying Arguments with Argument Captors
The previous example was relatively simple, we just verified whether a single method was called or not. Sometimes we need more detail, and instead of looking only at the method call itself, we are also interested in the arguments.
As an example, let’s assume that the analytics department wants more extensive metrics and asked you to implement an extra mechanism, where several important events for a customer are recorded and later analyzed.
Here is the source code of the Event that the metrics solution supports:
	public class Event {

		public enum Type  {REMINDER_SENT, REGISTRATION, INVOICE_ISSUED,PAYMENT, SETTLEMENT};

		private Type type;
		private String customerName;
		private LocalDate timestamp;

		//..getters and setters redacted for brevity...

	}
The LateInvoiceNotifier class is then augmented with an EventRecorder dependency, and you want to write a unit tests that verify that the event recorded:
- is of type
REMINDER_SENT, - has the correct customer name, and
- contains a timestamp.
Mockito supports the examination of method arguments via the ArgumentCaptor construct. Here is the source code of the unit test:
	public class LateInvoiceNotifierTest {

		//Class to be tested
		private LateInvoiceNotifier lateInvoiceNotifier;

		//Dependencies (will be mocked)
		private EmailSender emailSender;
		private InvoiceStorage invoiceStorage;
		private EventRecorder eventRecorder;

		//Test data
		private Customer sampleCustomer;


		@Before
		public void setup(){
			invoiceStorage = mock(InvoiceStorage.class);
			emailSender = mock(EmailSender.class);

			eventRecorder = mock(EventRecorder.class);

			lateInvoiceNotifier = new LateInvoiceNotifier(emailSender,invoiceStorage,eventRecorder);

			sampleCustomer = new Customer();
			sampleCustomer.setFirstName("Susan");
			sampleCustomer.setLastName("Ivanova");
		}

		@Test
		public void lateInvoiceEvent(){
			when(invoiceStorage.hasOutstandingInvoice(sampleCustomer)).thenReturn(true);

			lateInvoiceNotifier.notifyIfLate(sampleCustomer);

			verify(emailSender).sendEmail(sampleCustomer);

			ArgumentCaptor<Event> myCaptor = ArgumentCaptor.forClass(Event.class);
			verify(eventRecorder).recordEvent(myCaptor.capture());

			Event eventThatWasSent = myCaptor.getValue();
			assertNotNull(eventThatWasSent.getTimestamp());
			assertEquals(Event.Type.REMINDER_SENT, eventThatWasSent.getType());
			assertEquals("Susan Ivanova",eventThatWasSent.getCustomerName());

		}
	}
The unit test here examines two related actions. First of all, it verifies that the email was indeed sent as in the previous section. For the event, we could also use a second verify directive to check it as well, but instead, we use an ArgumentCaptor to examine the event in more detail. First, we construct an ArgumentCaptor and define it as a holder for an Event class. Then, in the verify directive we use our captor by calling its capture() method.
At this point, when the unit test is complete, the captor contains the exact argument that was sent to the mocked EventRecorder class when the notifyIfLate method was called.
We can extract the actual argument instance by calling the getValue() method of the captor. The result is a normal Java object that can be used for further assertions using the usual JUnit statements. In the example above, we check the event type, the fact that the full name is formed correctly, and whether there is a timestamp.
Note that the argument can be any complex Java object. In our example, it is a class with scalar values, but you could have nested classes or a whole data structure/list. Mockito could capture it without any problem, and you could run any number of assert statements in the final result, or any fields of the argument class.
Forming Dynamic Responses for Mocks
As a final example of the power of Mockito we will see how you can create custom responses from mocks that depend on the arguments of the call. This is an advanced technique that will be needed only for some very specific corner cases in your unit tests. If you have a choice, it is best to return predefined results in your mocks/stubs so that the test is more readable. Use dynamic responses only as a last resort in your unit tests.
Dynamic Manipulation of Arguments
Let’s see an example where we just want to modify the argument itself. Let’s assume that you want to test the following class:
	public class CustomerDao {

		@PersistenceContext
		private EntityManager entityManager;

		private Logger logger;

		public void saveCustomer(String firstName, String lastName) {
			if(firstName == null || lastName==null)
			{
				logger.error("Missing customer information");
				throw new IllegalArgumentException();
			}
			Customer customer = new Customer(firstName,lastName);
			entityManager.persist(customer);
			entityManager.flush();
			logger.info("Saved customer with id {}", customer.getId());
		}

	}
You should instantly see why writing a unit test for this class is a bit tricky. Even though the DAO logic itself is very basic, the big problem is the fact that once the customer is saved using the persist method, its database ID is sent to the logger. For this contrived example, the code will work just fine in the real system, as the database will indeed assign an ID to the object as soon as it is saved.
But how can we replicate this processing in our unit test? The persist method does not return an argument so we cannot mock it with the usual when/then directives. However, even for this corner case, Mockito still has a solution:
	public class CustomerDaoTest {

		// Class to be tested
		private CustomerDao customerDao;

		// Dependencies (will be mocked)
		private EntityManager entityManager;
		private Logger logger;

		@Before
		public void setup() {
			customerDao = new CustomerDao();

			entityManager = mock(EntityManager.class);
			customerDao.setEntityManager(entityManager);

			logger = mock(Logger.class);
			customerDao.setLogger(logger);
		}

		@Test
		public void happyPath() {
			doAnswer(new Answer<Void>() {
				public Void answer(InvocationOnMock invocation) {
					Customer customer = invocation.getArgument(0);
					customer.setId(123L);
					return null;
				}
			}).when(entityManager).persist(any(Customer.class));

			customerDao.saveCustomer("Suzan", "Ivanova");

			verify(logger).info("Saved customer with id {}", 123L);
		}

		@Test(expected = IllegalArgumentException.class)
		public void missingInformation() {
			customerDao.saveCustomer("Suzan", null);
		}

	}
This unit test is based on the doAnswer/when directives. Mockito allows us to override the answer to any method by implementing the Answer interface. This interface has a single method that gives us access to the arguments passed by our unit test.
In this particular case, we know that the argument is a customer. We fetch the customer and set its database ID to 123L, or any other value you like. We also instruct Mockito to bind this answer to any argument of type customer. The any keyword is part of the huge list of matchers offered in Mockito. You can think of them as wildcards. Normally, you do not need to use them, because in your unit tests you should know all the arguments beforehand.
In this particular example, the argument to the persist method is not created by us, but by the class under test, so we cannot create an instance as test data that will match it. However, with Mockito doAnswer directive we don’t need to know anything beforehand, as we modify the argument during runtime.
The test is completed with the verify directive that checks whether our database ID is indeed sent to the logger. The problematic scenario, e.g. throwing an exception, is so trivial that we don’t even need Mockito for the respective test method. JUnit has built-in support for checking the presence of an exception. You can see the implementation in the missingInformation test method above.
Dynamic Responses Based on Arguments
For a more realistic example, where the answer of a mock depends on the argument, let’s assume that you want to test the following class:
	public class MassUserRegistration {

		private final EventRecorder eventRecorder;
		private final UserRepository userRepository;

		public MassUserRegistration(final EventRecorder eventRecorder,
				final UserRepository userRepository) {
			this.eventRecorder = eventRecorder;
			this.userRepository = userRepository;
		}

		private void register(String firstName, String lastName) {
			Customer newCustomer = userRepository.saveCustomer(firstName, lastName);

			Event event = new Event();
			event.setTimestamp(newCustomer.getSince());
			event.setCustomerName(newCustomer.getFullName());
			event.setType(Type.REGISTRATION);
			eventRecorder.recordEvent(event);
		}

		public void massRegister(List<Customer> rawCustomerNames) {
			for (Customer customer:rawCustomerNames) {
				register(customer.getFirstName(),customer.getLastName());
			}
		}
	}
This is a class that takes a list of customers and saves them on the UserRepository. For each customer an event of type REGISTRATION is also emitted.
We want to test the method called massRegister, as the register one is private. In theory, we could pass a list of just one customer in our unit test, but in practice, it is best to try with a big list of customers. The code here is very simple and does no error checking at all, but in a production system, there might be several consistency checks before a customer is registered. A realistic unit test would pass a huge list of customers with various problems so that all checks can be evaluated during unit testing.
Let’s say we want to test using a list of 20 customers. This time the saveRepository method does return an argument, so in theory, we could use the when/then directive 20 times to instruct it exactly what output it should send.
A more concise way is the following:
public class MassUserRegistrationTest {

		//Class to be tested
		private MassUserRegistration massUserRegistration;

		//Dependencies (will be mocked)
		private UserRepository userRepository;
		private EventRecorder eventRecorder;

		//Test data
		private List<Customer> sampleCustomers;


		@Before
		public void setup(){
			sampleCustomers = new ArrayList<>();

			eventRecorder = mock(EventRecorder.class);
			userRepository = mock(UserRepository.class);

			when(userRepository.saveCustomer(anyString(),
							anyString())).thenAnswer(new Answer<Customer>() {
				public Customer answer(InvocationOnMock invocation) throws Throwable {
            		String firstName = invocation.getArgument(0);
            		String lastName = invocation.getArgument(1);
            		Customer newCustomer = new Customer(firstName, lastName);
            		newCustomer.setFullName(firstName+" "+lastName);
            		newCustomer.setSince(LocalDate.now());
					return newCustomer;
            	}
        	});

			massUserRegistration = new MassUserRegistration(eventRecorder,userRepository);
		}

		@Test
		public void registerTwentyAccounts(){
			sampleCustomers.add(new Customer("Susan", "Ivanova"));
			sampleCustomers.add(new Customer("Lyta", "Alexander"));
			sampleCustomers.add(new Customer("Vir", "Cotto"));
			sampleCustomers.add(new Customer("Stephen", "Frankling"));
			//[...20 customers redacted for brevity...]

			massUserRegistration.massRegister(sampleCustomers);

			ArgumentCaptor<Event> myCaptor = ArgumentCaptor.forClass(Event.class);
			verify(eventRecorder, times(sampleCustomers.size())).recordEvent(myCaptor.capture());

			List<Event> eventsThatWereSent = myCaptor.getAllValues();
			assertEquals(sampleCustomers.size(),eventsThatWereSent.size());
			for(int i=0;i< eventsThatWereSent.size();i++){
				Event event= eventsThatWereSent.get(i);
				assertNotNull(event.getTimestamp());
				assertEquals(Event.Type.REGISTRATION, event.getType());
				assertEquals(sampleCustomers.get(i).getFirstName()
				+" "
				+sampleCustomers.get(i).getLastName(),event.getCustomerName());
			}

		}
	}
As before, we override the saveCustomer method in our UserRepository class by implementing our custom Answer. We fetch the two arguments using the anyString matchers, create a Customer instance on the fly and fill the required information.
Now, regardless of the size of our testing data, the UserRepository mock will always return the correct response to the class under test.
Notice that the unit test is written in such a way that the size of the input data is actually irrelevant. We can expand the test data from 20 customers to 100 customers, to 1000 customers, and the mocking and verification code will remain unchanged. This would not be the case if we had manually stubbed a different response for each specific customer.
Testing with Semaphore CI/CD
Once you’ve mastered writing unit tests with JUnit and Mockito, the next step is to set up Continuous Integration (CI) to automate testing.
With CI, we get immediate feedback on every code change. So, when things get broken, we know the exact time and place where the failure was introduced. We can track the last good revision and fix the problem.
In this section, we’ll learn how to use Semaphore CI/CD to test our Java App.
Create a Github Repository
If you already have a Java project on GitHub, you can skip this section and jump right to the next one.
You can create a brand new “Hello, World” project in 10 minutes:
- Install the Java SDK and Apache Maven.
- Create a new project using Maven:
$ mvn -B archetype:generate \
      -DarchetypeGroupId=org.apache.maven.archetypes \
      -DarchetypeVersion=1.4 \
      -DgroupId=com.mycompany.app \
-DartifactId=my-app- Create a new repository on GitHub. In the gitignore selection at the end, pick Java.
- Make an initial push of the code:
$ git init
$ git remote add origin YOUR_GITHUB_REPOSITORY_ADDRESS
$ git pull origin master
$ git add -A
$ git commit -m "initial commit"
$ git push -u origin master
Write the Unit Tests
It’s time all to put in practice all that you’ve learned:
- Edit the
pom.xmlfile to add the JUnit and Mockito dependencies:
    <dependencies>
		<dependency>
			<groupId>junit</groupId>
			<artifactId>junit</artifactId>
			<version>4.12</version>
			<scope>test</scope>
		</dependency>
		<dependency>
			<groupId>org.mockito</groupId>
			<artifactId>mockito-core</artifactId>
			<version>3.2.4</version>
			<scope>test</scope>
		</dependency>
</dependencies>-
Write your tests in the
src/tests/java/...directory. JUnit will scan it recursively and run all the test cases. - Check that your tests are running:
$ mvn testSemaphore CI/CD for Your Project
Sign up with Semaphore using your GitHub account. The free account will give you 1300 free minutes each month, that’s $10/month worth of service for free.
In this section, we’ll create an initial pipeline for the project.
- Go to your Semaphore account. Click on Add Project to add your repository.
- Choose your repository from the list:

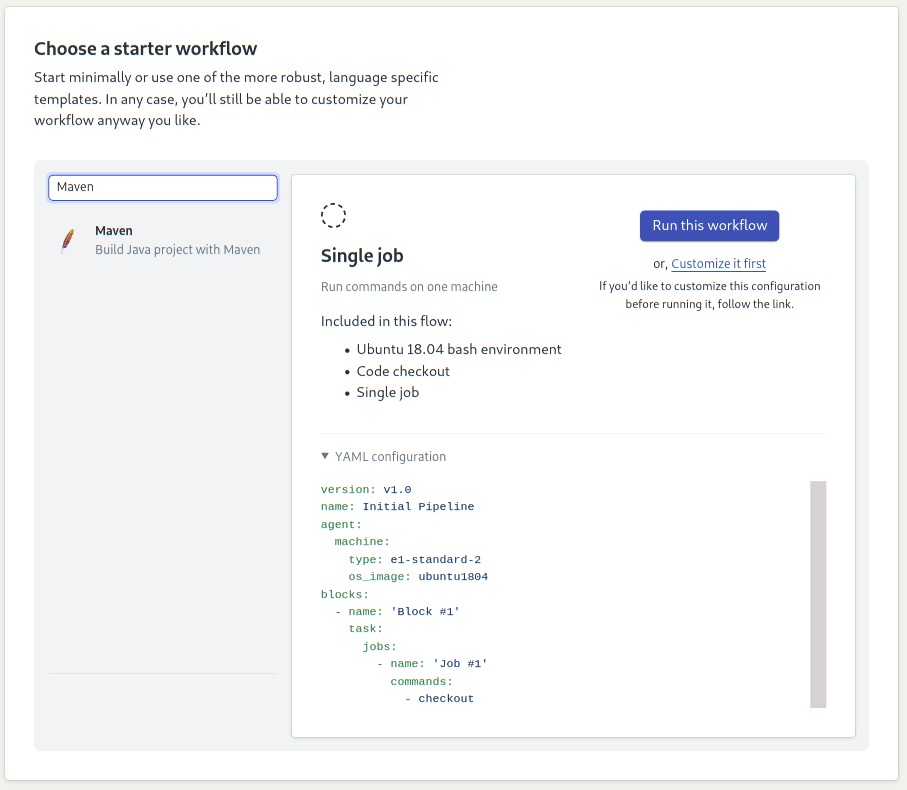
- As a Starter Workflow, select Maven and click on the Run this Workflow button:
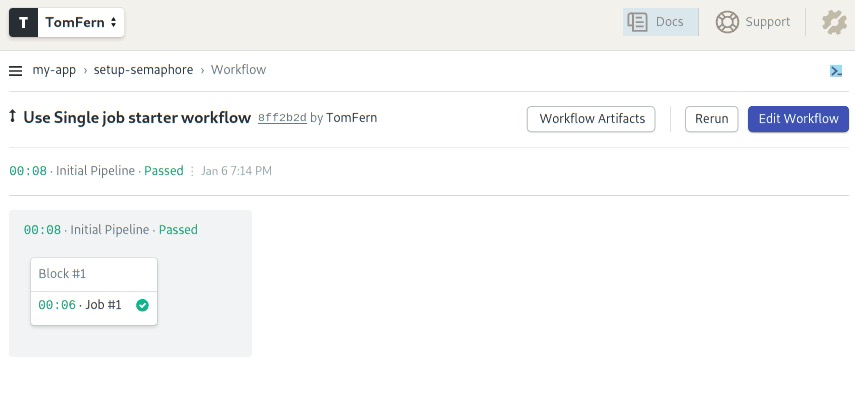
- The initial pipeline starts immediately:
Build Job
We need to customize the starter workflow to build the application in the CI environment.
- Click on the Edit Workflow button on the top-right corner toopen the Workflow Editor:
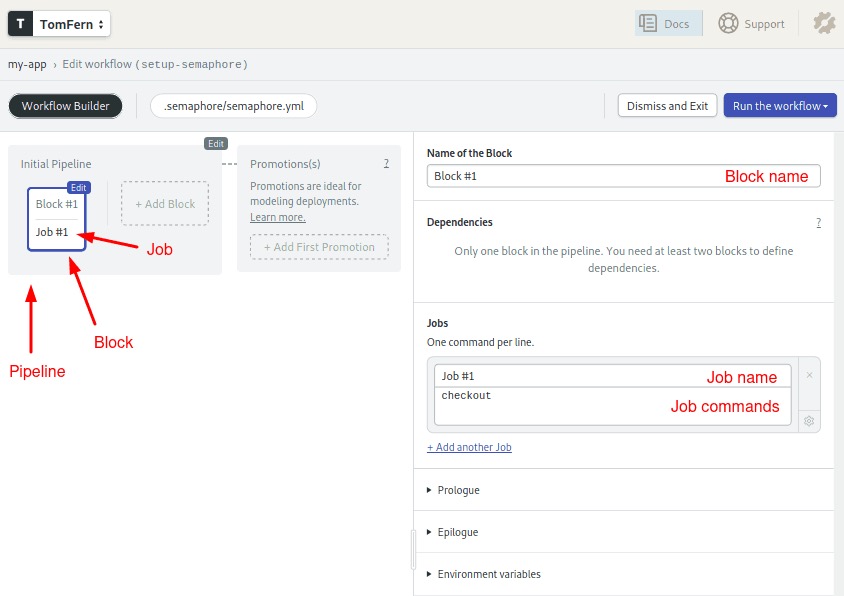
Semaphore CI/CD combines the following elements:
- Job: a job is a list of commands to execute.
- Block: a block group jobs with the same purpose and configuration. Jobs in a block run concurrently.
- Pipeline: a pipeline is a series of blocks. The execution flow goes from left to right; each one begins when all the jobs in the previous block are done. Pipelines usually fulfill a specific objective, such as testing, deployment, etc.
- Workflow: a workflow is a series of pipelines working together.
To customize the initial pipeline:
- Click on the block called “Block #1” and rename it to “Build”.
- Below, you’ll find one job called “Job #1”. Change its name to “Build” and type the following commands:
checkout
sem-version java 1.8
mvn package
Checkout is a built-in command that clones the code from GitHub.
The sem-version built-in script activates a particular version of a programming language. In this case, we’re choosing Java 1.8.
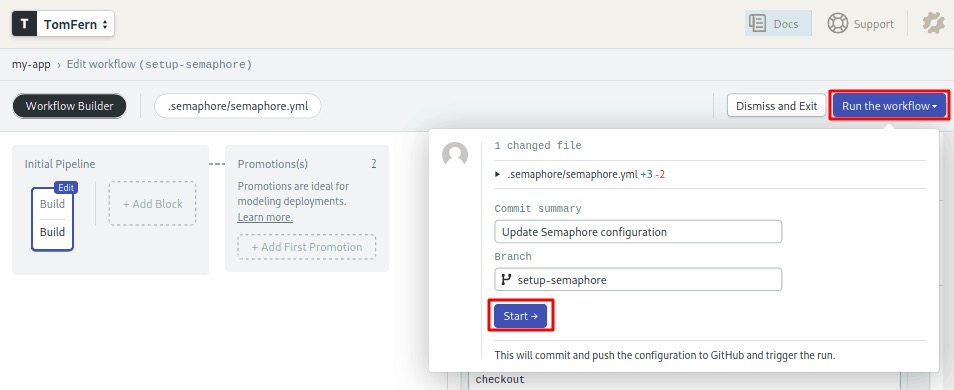
- To run the modified pipeline, click on Run the Workflow and the Start button:
- Semaphore begins building the application:

Speeding up the build
The build job works, but we can make it better. Right now, the job re-downloads all the dependencies each time it runs. This happens because each job runs in a brand-new, clean environment.
To make the job more efficient, we can store the dependencies in the cache:
- Click on Edit the Workflow.
- Click on the “Build” block.
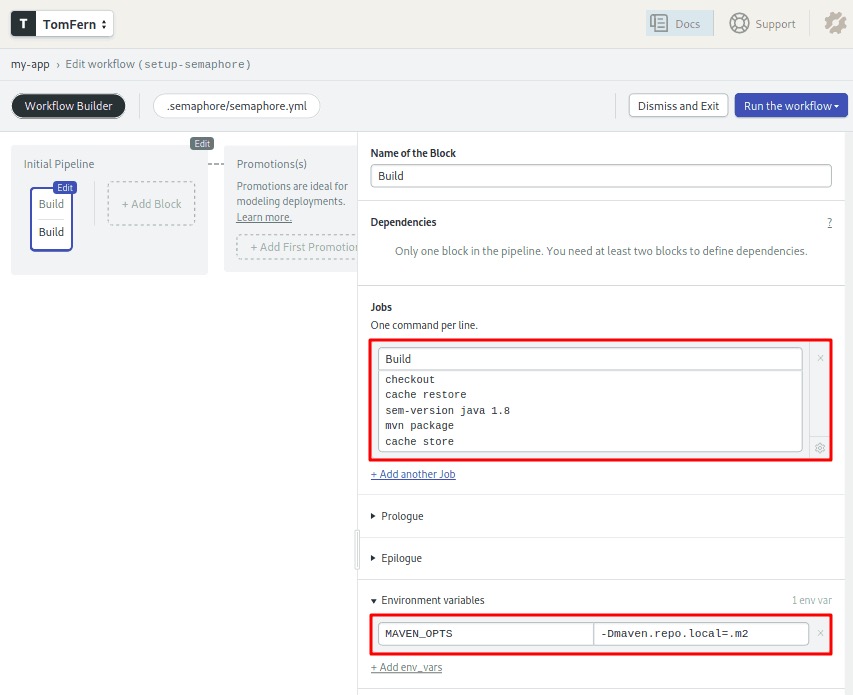
- Modify the commands on the job, so they look like this:
checkout
cache restore
sem-version java 1.8
mvn package
cache store
Cache is a built-in command that stores and retrieves files from a project-wide cache. Cache is smart and can figure out what files and directories it needs to store.
- Open the Environment Variables section and add the following variable using +Add env_vars:
MAVEN_OPTS:-Dmaven.repo.local=.m2
Environment Variables can be defined at the block level and are active for all its jobs. The value maven.repo.local=.m2 tells Maven to download dependencies in the local directory instead of in the user’s $HOME, so they can be cached more easily.
- Click on Run the Workflow and Start:
Now, the downloaded packages are preserved in the cache. As a result, the build job a lot less time.
Automating Tests in Semaphore
Now that we are happy with the build job, let’s add a test block:
- Click on Edit the Workflow.
- Click the +Add Block dotted box:
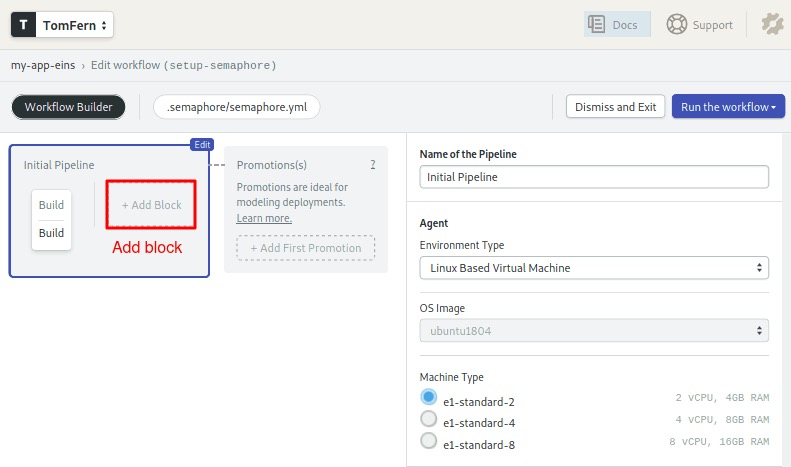
- Name the second block “Tests” and the job “Unit tests”.
- Type the Maven test in the command box:
mvn test - Open the Prologue section and type the following commands:
checkout
cache restore
sem-version java 1.8
Commands in the prologue are executed before each job in the block.
- Once more, open the Environment Variables section and add the same
MAVEN_OPTSvariable as last time.

- Run the Workflow to test the pipeline:
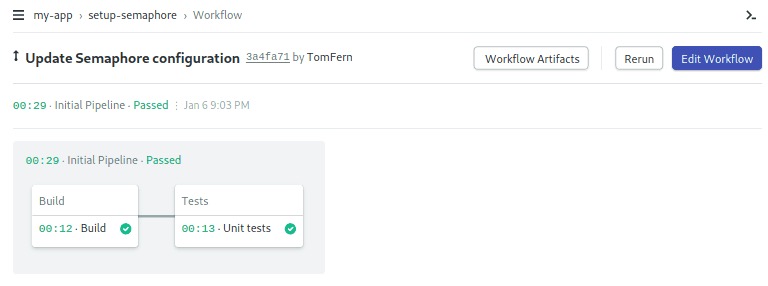
With this simple CI pipeline, from now on, your code is tested on each push.
You can add many more jobs to the test block, for example integration tests, code analysis, and benchmarks. Semaphore also has Test Reports where you can see which tests are skipped, find the slowest and failing tests in your test suite.
Summary
In this tutorial, we have written several unit tests using Mockito for both stubbing and mocking.
We have seen:
- How to download and set up Mockito via Maven,
- The reasons that mocks and stubs are needed,
- Basic stubbing with the
when/thendirectives, - Basic verification with
verifyandtimes()directives, - Advanced verification of arguments using Mockito Argument Captors,
- Advanced dynamic manipulation of arguments, and
- Advanced dynamic responses based on arguments.
- You can continuously test your code by adding your project to Semaphore and setting up a CI pipeline.
Where To Go from Here
We have seen the most important features of Mockito, but there are several more to explore.
- There are more argument matchers than those we demonstrated
- Number of verifications can also be described in an atLeast/atMost manner
- Verifications support a timeout argument
- Stubs can be instructed to throw exceptions (for negative testing scenarios)
- You can also verify the order to events as they happen in a unit test
- You can stub multiple calls to the same method to return different results for each subsequent time
- Mockito also supports Spies which is another advanced type of fake objects
In our next tutorial, we will see how we can use Spock to do similar useful tricks. Until then, the official documentation is your best source regarding Mockito techniques.
Also, don’t miss these CI/CD tutorials and docs:
- CI/CD for Spring Boot Microservices
- Working with Java Guide
- Java Spring Continuous Integration
- Revving up Continuous Integration with Parallel Testing
If you have any questions and comments, feel free to leave them in the section below. Also, feel free to share this tutorial with anyone you think might benefit from it.